ESP VAUXHALL INSIGNIA 2018.5 Owner's Guide
[x] Cancel search | Manufacturer: VAUXHALL, Model Year: 2018.5, Model line: INSIGNIA, Model: VAUXHALL INSIGNIA 2018.5Pages: 327, PDF Size: 9.2 MB
Page 145 of 327
Lighting143Activate temporary flashing by
holding the lever just before the
resistance point. Turning lights will
flash until lever is being released.
To activate three flashes, tap the
lever briefly without passing the
resistance point. With a trailer
connected, the turn signal flashes
six times and tone frequency
changes.
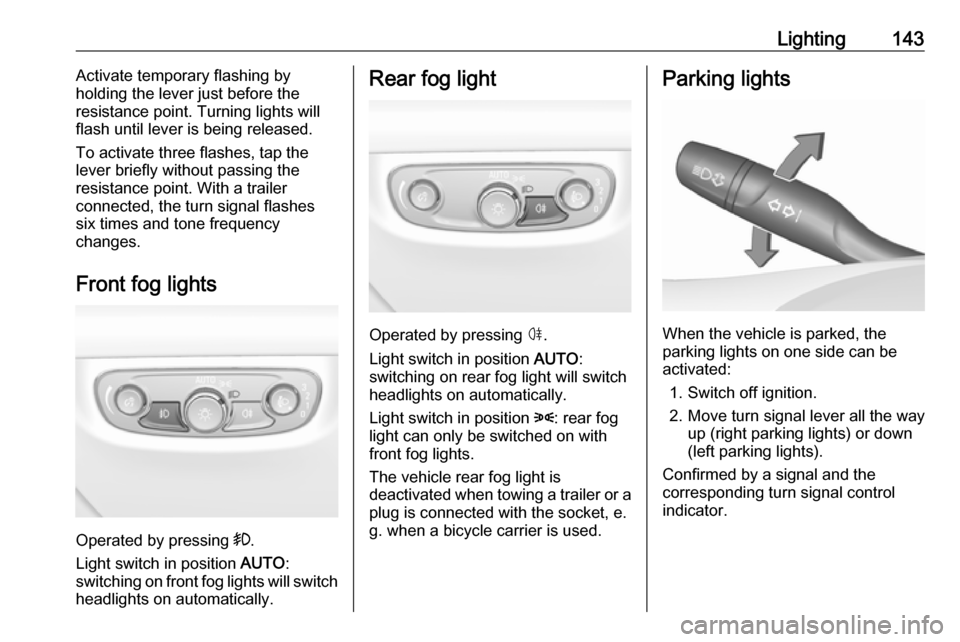
Front fog lights
Operated by pressing >.
Light switch in position AUTO:
switching on front fog lights will switch headlights on automatically.
Rear fog light
Operated by pressing ø.
Light switch in position AUTO:
switching on rear fog light will switch
headlights on automatically.
Light switch in position 8: rear fog
light can only be switched on with
front fog lights.
The vehicle rear fog light is
deactivated when towing a trailer or a
plug is connected with the socket, e.
g. when a bicycle carrier is used.
Parking lights
When the vehicle is parked, the
parking lights on one side can be
activated:
1. Switch off ignition.
2. Move turn signal lever all the way up (right parking lights) or down
(left parking lights).
Confirmed by a signal and the
corresponding turn signal control
indicator.
Page 147 of 327
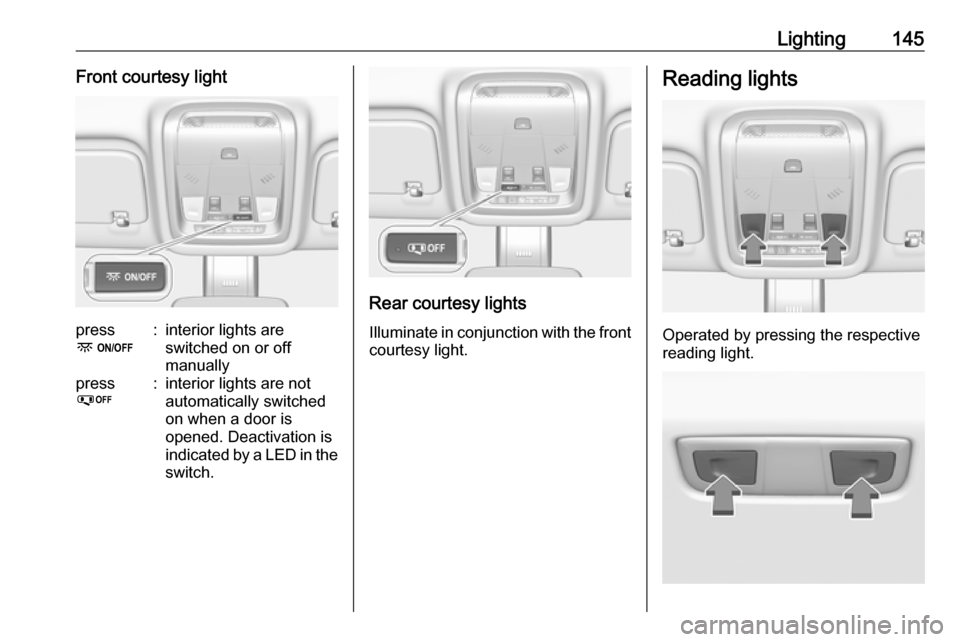
Lighting145Front courtesy lightpress
-:interior lights are
switched on or off
manuallypress
%:interior lights are not
automatically switched
on when a door is
opened. Deactivation is
indicated by a LED in the switch.
Rear courtesy lights
Illuminate in conjunction with the front courtesy light.
Reading lights
Operated by pressing the respective
reading light.
Page 151 of 327

Climate control149Climate controlClimate control systems.............149
Air conditioning system ...........149
Electronic climate control system .................................... 152
Auxiliary heater ........................158
Air vents ..................................... 158
Adjustable air vents .................158
Fixed air vents ......................... 159
Maintenance .............................. 159
Air intake ................................. 159
Air conditioning regular operation ................................ 160
Service .................................... 160Climate control systems
Air conditioning system
Illustration shows functions which
may not be available for your
particular vehicle.
Controls for: ● Fan speed E
● Temperature TEMP
● Air distribution w, x and y
● Air conditioning A/C
● Demisting and defrosting á
● Air recirculation n
● External air 5
● Heated rear window and exterior
mirrors b
● Heated windscreen ,
● Heated seats ß
Some changes of settings are
indicated briefly in the Info-Display.
Activated functions are indicated by
the LED in the respective button.
Fan speed E
Adjust the air flow by turning Z to the
desired speed.clockwise:increaseanti-clockwise:decrease
Temperature TEMP
Adjust the temperature by turningTEMP to the desired temperature.
red area:warmerblue area:colder
Heating will not be fully effective until
the engine has reached normal
operating temperature.
Page 155 of 327
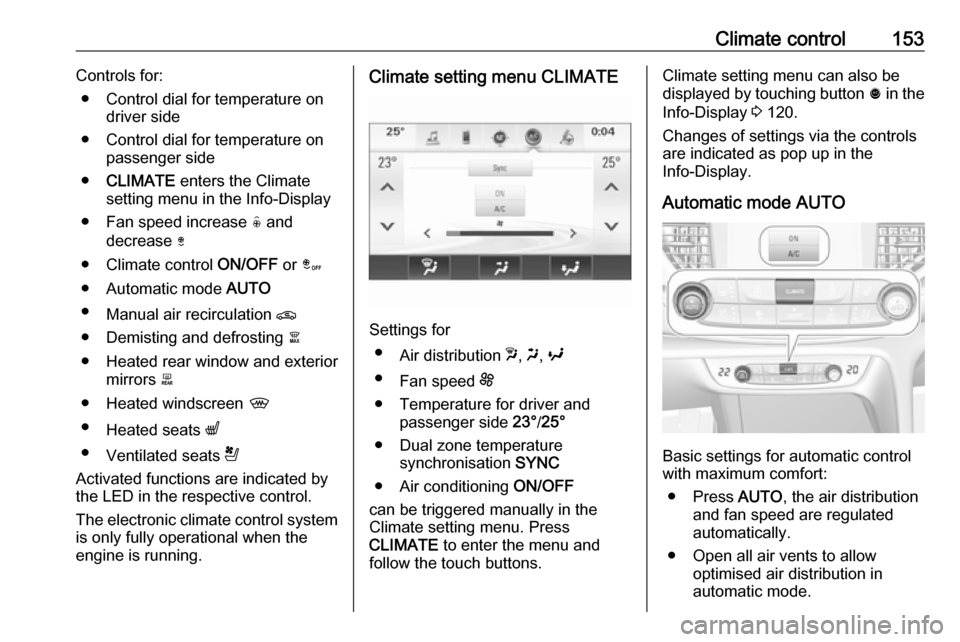
Climate control153Controls for:● Control dial for temperature on driver side
● Control dial for temperature on passenger side
● CLIMATE enters the Climate
setting menu in the Info-Display
● Fan speed increase ( and
decrease )
● Climate control ON/OFF or â
● Automatic mode AUTO
● Manual air recirculation n
● Demisting and defrosting à
● Heated rear window and exterior mirrors b
● Heated windscreen ,
● Heated seats q
● Ventilated seats r
Activated functions are indicated by the LED in the respective control.
The electronic climate control system
is only fully operational when the
engine is running.Climate setting menu CLIMATE
Settings for
● Air distribution w, x , y
● Fan speed E
● Temperature for driver and passenger side 23°/25°
● Dual zone temperature synchronisation SYNC
● Air conditioning ON/OFF
can be triggered manually in the
Climate setting menu. Press
CLIMATE to enter the menu and
follow the touch buttons.
Climate setting menu can also be
displayed by touching button ã in the
Info-Display 3 120.
Changes of settings via the controls
are indicated as pop up in the
Info-Display.
Automatic mode AUTO
Basic settings for automatic control
with maximum comfort:
● Press AUTO, the air distribution
and fan speed are regulated
automatically.
● Open all air vents to allow optimised air distribution in
automatic mode.
Page 162 of 327

160Climate controlAir conditioning regularoperation
In order to ensure continuously
efficient performance, cooling must
be operated for a few minutes once a
month, irrespective of the weather
and time of year. Operation with
cooling is not possible when the
outside temperature is too low.
Service For optimal cooling performance, it is recommended to annually check the
climate control system, starting
three years after initial vehicle
registration, including:
● functionality and pressure test
● heating functionality
● leakage check
● check of drive belts
● cleaning of condenser and evaporator drainage
● performance check
● cabin air filter check
Page 167 of 327
Driving and operating165Press Engine Start/Stop briefly: an
automatic procedure operates the
starter with a short delay until the engine is running.
To switch off the engine when vehicle
is stationary, press
Engine Start/Stop briefly. Automatic
transmission: apply the parking brake
and engage P.
To start the engine during an
Autostop:
Manual transmission: during an
Autostop, the engine can be started
by depressing the clutch pedal
3 166.
Automatic transmission: during an
Autostop, the engine can be started
by releasing the brake pedal 3 166.
Emergency engine shut off during driving
If the engine needs to be switched off during driving in case of emergency,
press Engine Start/Stop for more than
two seconds or press twice briefly
within five seconds.9 Danger
Switching off the engine during
driving may cause loss of power
support for brake and steering
systems. Assistance systems and
airbag systems are disabled.
Lighting and brake lights will
extinguish. Therefore power down the engine and ignition while
driving only when required in case of emergency.
Starting the vehicle at low
temperatures
Starting the engine without additional
heaters is possible down to -25 °С for diesel engines and -30 °C for petrol
engines. Required is an engine oil
with the correct viscosity, the correct fuel, performed services and a
sufficiently charged vehicle battery.
With temperatures below -30 °C the
automatic transmission requires a
warming phase of approx.
five minutes. The selector lever must
be in position P.
Automatic Starter Control
This function controls the engine
starting procedure. The driver does
not need to hold Engine Start/Stop
pressed. Once applied, the system
will go on starting automatically until
the engine is running. Because of the checking procedure, the engine startsrunning after a short delay.
Possible reasons for a non-starting
engine:
● Clutch pedal not operated (manual transmission).
● Brake pedal not operated or selector lever not in P or N
(automatic transmission).
● Timeout occurred.
Turbo engine warm-up
Upon start-up, engine available
torque may be limited for a short time, especially when the engine
temperature is cold. The limitation is
to allow the lubrication system to fully
protect the engine.
Page 181 of 327

Driving and operating179Drive systems
All-wheel drive
The All-wheel drive system enhances
driving characteristics and stability,
and helps to achieve the best
possible driveability regardless of
ground surface. The system is always
active and cannot be deactivated.
The torque is distributed steplessly
between the wheels of the front and rear axle up to a torque split of 50%to 50%. Depending on the driving
conditions, i.e. steady state driving,
All wheel drive system transfers a
minimum amount of torque for fuel
efficiency. Additionally the torque
vectoring between the rear wheels is
distributed depending on the vehicle
dynamic and surface.
This is possible because the All wheel drive system operates with two
clutches, one on each side.
For optimum system performance,
the vehicle's tyres should not have
varying degrees of wear.If a service message is displayed in
the Driver Information Centre, the
system may have limited functionality
(or be completely disabled in some
cases, i.e. the vehicle switches to
Front-wheel drive). Seek the
assistance of a workshop.
Towing the vehicle 3 278.Brakes
The brake system comprises two independent brake circuits.
If a brake circuit fails, the vehicle can
still be braked using the other brake
circuit. However, braking effect is
achieved only when the brake pedal
is depressed firmly. Considerably
more force is needed for this. The
braking distance is extended. Seek the assistance of a workshop before
continuing the journey.
When the engine is not running, the
support of the brake servo unit
disappears once the brake pedal has
been depressed once or twice.
Braking effect is not reduced, but
braking requires significantly greater
force. It is especially important to bear this in mind when being towed.
Control indicator R 3 108.
Active emergency braking 3 202.
Antilock brake system Antilock brake system (ABS)
prevents the wheels from locking.
Page 182 of 327
180Driving and operatingABS starts to regulate brake pressureas soon as a wheel shows a tendency to lock. The vehicle remains
steerable, even during hard braking.
ABS control is made apparent
through a pulse in the brake pedal
and the noise of the regulation
process.
For optimum braking, keep the brake
pedal fully depressed throughout the
braking process, despite the fact that
the pedal is pulsating. Do not reduce
the pressure on the pedal.
After starting off, the system performs
a self-test which may be audible.
Control indicator u 3 109.
Adaptive brake light During full braking, all three brake
lights flash for the duration of ABS
control.
Fault9 Warning
If there is a fault in the ABS, the
wheels may be liable to lock due
to braking that is heavier than
normal. The advantages of ABS are no longer available. During
hard braking, the vehicle can no longer be steered and may
swerve.
Have the cause of the fault remedied
by a workshop.
Parking brake
9 Warning
Before leaving the vehicle, check
parking brake status. Control
indicator m must illuminate
constantly.
Electric parking brake
Applying when vehicle is stationary
9 Warning
Pull switch m for a minimum of
one second until control indicator
m illuminates constantly and
electric parking brake is applied
3 108. The electric parking brake
operates automatically with
adequate force.
Before leaving the vehicle, check
the electric parking brake status.
Control indicator m 3 108.
Page 187 of 327
Driving and operating185
● To deactivate only Tractioncontrol system press button t
briefly: TC is inactive but ESC
remains active, k illuminates. A
status message appears in the
Driver Information Centre when
TC is deactivated.
ESC is reactivated by pressing the t
button again. If the TC system was
previously disabled, both TC and
ESC are reactivated. k and t
extinguishes when TC and ESC are reactivated.
ESC is also reactivated the next time
the ignition is switched on.
Fault
If there is a fault in the system the
control indicator b illuminates
continuously and a message appears in the Driver Information Centre. The
system is not operational.
Have the cause of the fault remedied by a workshop.
Interactive driving system Flex RideFlex Ride driving system allows the
driver to select between three driving
modes:
● SPORT mode: press SPORT,
LED illuminates.
● TOUR mode: press TOUR, LED
illuminates.
● AUTO or Standard / Normal mode: neither SPORT nor
TOUR is pressed, no LED
illuminates.
Deactivate SPORT mode or TOUR
mode by pressing corresponding
button once more.
In each driving mode Flex Ride adjusts the following electronic
systems:
● electronic damping control
● accelerator pedal control
● electronic power steering control
● automatic transmission● adaptive cruise control
● all-wheel drive
● engine sound enhancement
● instrument cluster theme
SPORT mode
The settings of the systems are
adjusted for a sportier driving style:
● Damping of shock absorbers is set up for increased handling andagility.
● The engine reacts more quickly to accelerator pedal changes.
● Steering support is sportier.
Page 189 of 327
Driving and operating187Flex Ride visualisation menu
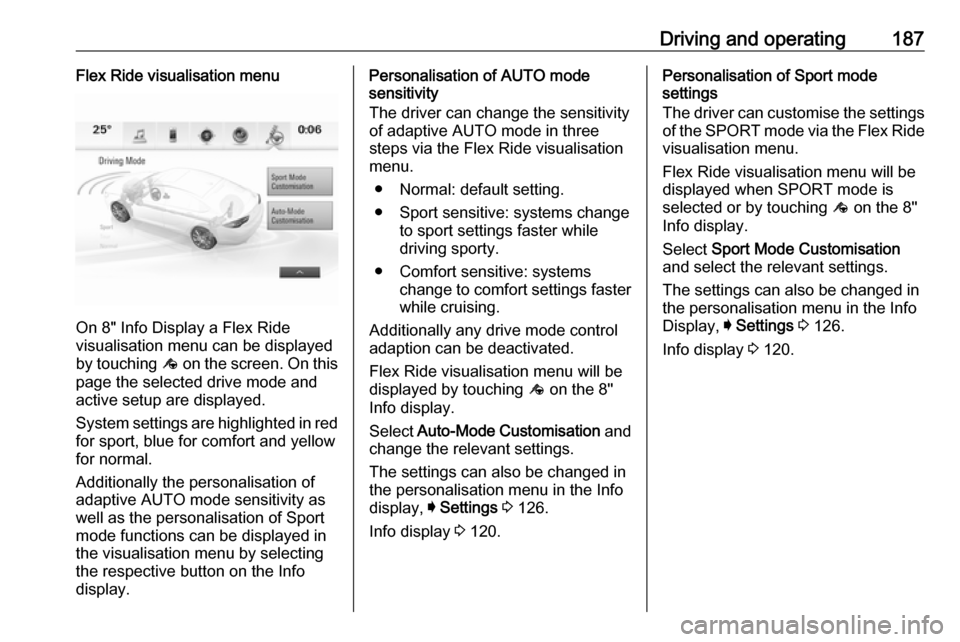
On 8" Info Display a Flex Ride
visualisation menu can be displayed
by touching ê on the screen. On this
page the selected drive mode and
active setup are displayed.
System settings are highlighted in red for sport, blue for comfort and yellowfor normal.
Additionally the personalisation of
adaptive AUTO mode sensitivity as
well as the personalisation of Sport
mode functions can be displayed in
the visualisation menu by selecting
the respective button on the Info
display.
Personalisation of AUTO mode
sensitivity
The driver can change the sensitivity
of adaptive AUTO mode in three
steps via the Flex Ride visualisation
menu.
● Normal: default setting.
● Sport sensitive: systems change to sport settings faster while
driving sporty.
● Comfort sensitive: systems change to comfort settings faster
while cruising.
Additionally any drive mode control adaption can be deactivated.
Flex Ride visualisation menu will be
displayed by touching ê on the 8"
Info display.
Select Auto-Mode Customisation and
change the relevant settings.
The settings can also be changed in
the personalisation menu in the Info
display, I Settings 3 126.
Info display 3 120.Personalisation of Sport mode
settings
The driver can customise the settings
of the SPORT mode via the Flex Ride visualisation menu.
Flex Ride visualisation menu will be
displayed when SPORT mode is
selected or by touching ê on the 8"
Info display.
Select Sport Mode Customisation
and select the relevant settings.
The settings can also be changed in
the personalisation menu in the Info
Display, I Settings 3 126.
Info display 3 120.