light VAUXHALL INSIGNIA 2018 Manual Online
[x] Cancel search | Manufacturer: VAUXHALL, Model Year: 2018, Model line: INSIGNIA, Model: VAUXHALL INSIGNIA 2018Pages: 323, PDF Size: 9.25 MB
Page 256 of 323
254Vehicle care
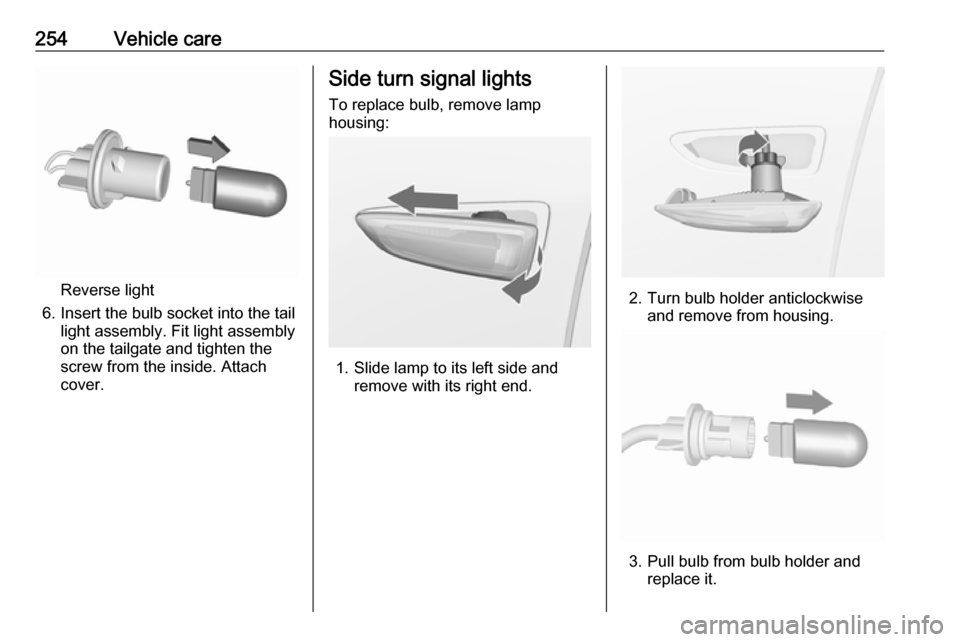
Reverse light
6. Insert the bulb socket into the tail light assembly. Fit light assembly
on the tailgate and tighten the
screw from the inside. Attach
cover.
Side turn signal lights
To replace bulb, remove lamp
housing:
1. Slide lamp to its left side and remove with its right end.
2. Turn bulb holder anticlockwiseand remove from housing.
3. Pull bulb from bulb holder and replace it.
Page 257 of 323
Vehicle care2554. Insert bulb holder and turnclockwise.
5. Insert left end of the lamp, slide to
the left and insert right end.
Number plate light
The number plate light is designed as LEDs and can not be changed. Incase of defective LEDs, have them
replaced by a workshop.
Interior lights
Courtesy light, reading lights Have bulbs replaced by a workshop.
Load compartment light
Have bulbs replaced by a workshop.
Instrument panelillumination
Have bulbs replaced by a workshop.Electrical system
Fuses Data on the replacement fuse mustmatch the data on the defective fuse.
There are three fuse boxes in the
vehicle:
● engine compartment
● instrument panel
Before replacing a fuse, turn off the
respective switch and the ignition.
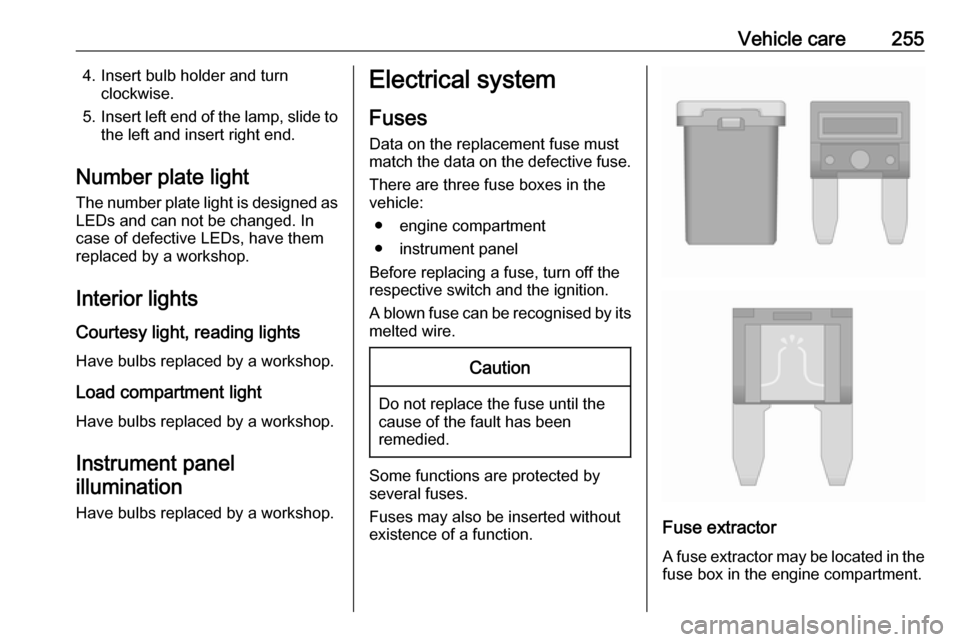
A blown fuse can be recognised by its melted wire.Caution
Do not replace the fuse until the
cause of the fault has been
remedied.
Some functions are protected by
several fuses.
Fuses may also be inserted without
existence of a function.
Fuse extractor
A fuse extractor may be located in the
fuse box in the engine compartment.
Page 259 of 323

Vehicle care257No.Circuit1–2–3ABS4–5–6Tailgate7Fog light8Memory module9Heated windscreen10Seat lumbar11DC/DC battery12Heated rear window13Heated mirror14–15–16Front wiper17Power seat, passengerNo.Circuit18Sunblind19Power seat, driver20–21Sunroof22Rear wiper/Airbag23Adaptive forward lighting24–25–26Transmission control module27Ignition/Instrument panel28–29Rear view camera/Air vent30Malfunction indicator light/
Trailer31–32Camera33Seat heat front34Seat heat rearNo.Circuit35Damping/All-wheel drive36Fuel system37–38–39–40Steering wheel lock41–42–43Heated steering wheel44Headlight range adjustment45–46Engine control module47–48DC/DC converter/Air vent/E-
Boost49Rear door control module50–51–
Page 260 of 323

258Vehicle careNo.Circuit52–53–54–55–56Starter57–58–59Left headlight (LED)60Cooling fan61–62–63–64–65Climate control66–67–68–No.Circuit69Right high beam (Halogen)/
Right headlight (LED)70Left high beam (Halogen)71–72Starter73–74Transmission control module75Engine control module76Exhaust reduction system77–78Horn79Washer system80–81Engine control module82–83Ignition coil84Ignition coil85PowertrainNo.Circuit86–87Diesel fuel heating88Air shutter89–90–91–92After boil pump93Electronic key system94–95Coolant pump96Diesel fuel heating97–98–99Coolant pump
After having changed defective fuses,
close the fuse box cover and press
until it engages.
If the fuse box cover is not closed
correctly, malfunction may occur.
Page 267 of 323
Vehicle care265Vehicle loading statusAdjust tyre pressure to load condition
according tyre information label or
tyre pressure chart 3 300, and select
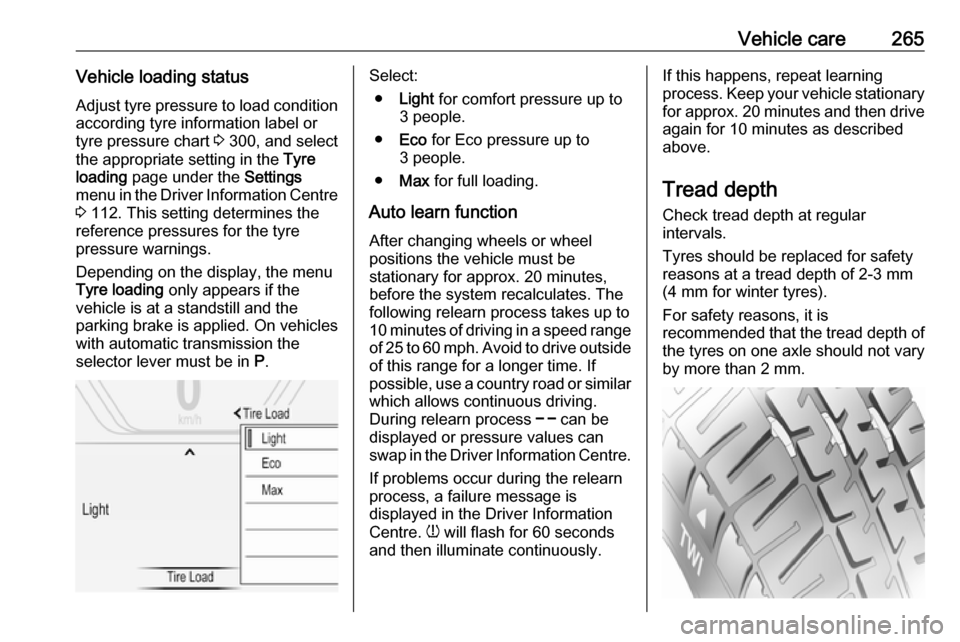
the appropriate setting in the Tyre
loading page under the Settings
menu in the Driver Information Centre 3 112. This setting determines the
reference pressures for the tyre
pressure warnings.
Depending on the display, the menu
Tyre loading only appears if the
vehicle is at a standstill and the
parking brake is applied. On vehicles
with automatic transmission the
selector lever must be in P.Select:
● Light for comfort pressure up to
3 people.
● Eco for Eco pressure up to
3 people.
● Max for full loading.
Auto learn function After changing wheels or wheel
positions the vehicle must be
stationary for approx. 20 minutes,
before the system recalculates. The
following relearn process takes up to
10 minutes of driving in a speed range
of 25 to 60 mph. Avoid to drive outside
of this range for a longer time. If
possible, use a country road or similar which allows continuous driving.
During relearn process $ can be
displayed or pressure values can
swap in the Driver Information Centre.
If problems occur during the relearn
process, a failure message is
displayed in the Driver Information
Centre. w will flash for 60 seconds
and then illuminate continuously.If this happens, repeat learning
process. Keep your vehicle stationary for approx. 20 minutes and then drive
again for 10 minutes as described
above.
Tread depth
Check tread depth at regular
intervals.
Tyres should be replaced for safety
reasons at a tread depth of 2-3 mm
(4 mm for winter tyres).
For safety reasons, it is
recommended that the tread depth of
the tyres on one axle should not vary
by more than 2 mm.
Page 271 of 323

Vehicle care2692.Type 1: screw the compressor air
hose to the connection on the
sealant bottle and fit the sealant
bottle into the retainer on the
compressor.
Type 2: remove screw plug from
the compressor and from the
sealant bottle. Screw the bottle on the compressor without removing
the tinfoil from the bottle.
3. Set the compressor near the tyre in such a way that the sealant
bottle is upright.
4. Unscrew valve cap from defective
tyre.
5. Type 1: screw the filler hose to the
tyre valve.
Type 2: remove protection cap
from filler hose and screw the filler
hose to the tyre valve. The air
release valve must be closed (turn
clockwise).
6. The switch on the compressor must be set to J.
7. Connect the compressor plug to the power outlet or cigarette
lighter socket.
To avoid discharging the battery,
we recommend running the
engine.
8. Set the rocker switch on the compressor to I. The tyre is filled
with sealant.
Page 279 of 323
Vehicle care2773. Connect the black lead to thenegative terminal of the booster
battery.
4. Connect the other end of the black
lead to a vehicle grounding point
of your vehicle in the engine
compartment.
Route the leads so that they cannot
catch on rotating parts in the engine
compartment.
To start the engine: 1. Start the engine of the vehicle providing the jump.
2. After five minutes, start the other engine. Start attempts should be
made for no longer than
15 seconds at an interval of one
minute.
3. Allow both engines to idle for approx. three minutes with the
leads connected.
4. Switch on electrical consumers (e.g. headlights, heated rear
window) of the vehicle receiving
the jump start.
5. Reverse above sequence exactly when removing leads.Towing
Towing the vehicle
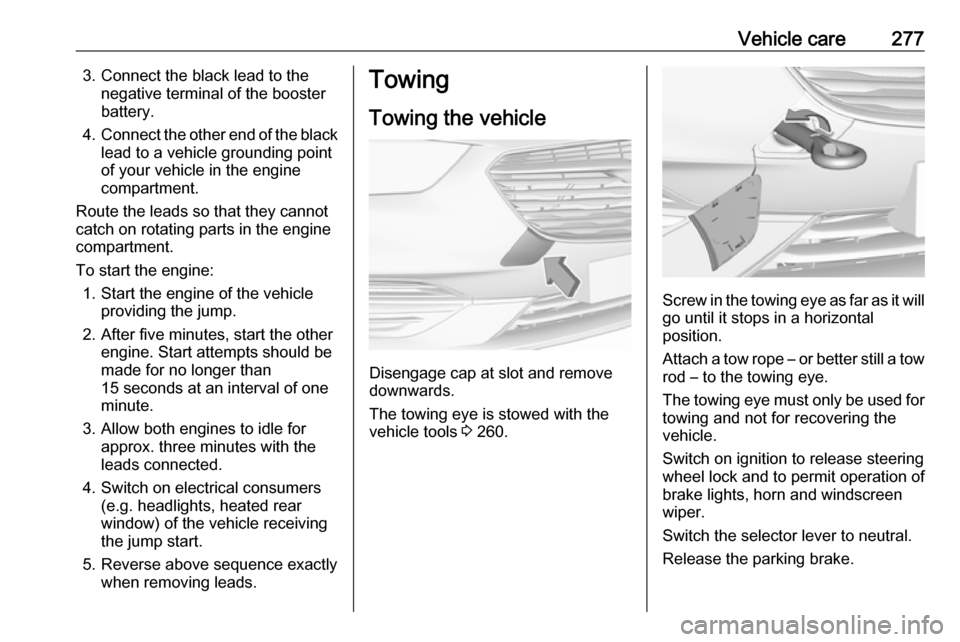
Disengage cap at slot and remove
downwards.
The towing eye is stowed with the
vehicle tools 3 260.
Screw in the towing eye as far as it will
go until it stops in a horizontal
position.
Attach a tow rope – or better still a tow
rod – to the towing eye.
The towing eye must only be used for towing and not for recovering the
vehicle.
Switch on ignition to release steering
wheel lock and to permit operation of
brake lights, horn and windscreen
wiper.
Switch the selector lever to neutral.
Release the parking brake.
Page 282 of 323

280Vehicle careDo not clean the engine compartmentwith a steam-jet or high-pressure jet
cleaner.
Thoroughly rinse and leather-off the
vehicle. Rinse leather frequently. Use
separate leathers for painted and
glass surfaces: remnants of wax on
the windows will impair vision.
Have the door hinges of all doors
greased by a workshop.
Exterior lights
Headlight and other light covers are
made of plastic. Do not use any
abrasive or caustic agents, do not use
an ice scraper, and do not clean them dry.
Polishing and waxing Wax the vehicle regularly (at the
latest when water no longer beads).
Otherwise, the paintwork will dry out.
Polishing is necessary only if the paint
has become dull or if solid deposits
have become attached to it.
Paintwork polish with silicone forms a
protective film, making waxing
unnecessary.Plastic body parts must not be treated with wax or polishing agents.
Windows and windscreen wiper
blades
Use a soft lint-free cloth or chamois
leather together with window cleaner
and insect remover.
When cleaning the rear window from
inside, always wipe in parallel to the
heating element to prevent damage.
For mechanical removal of ice, use a
sharp-edged ice scraper. Press the
scraper firmly against the glass so
that no dirt can get under it and
scratch the glass.
Clean smearing wiper blades with a
soft cloth and window cleaner.
Remove dirt residues from smearing
wiper blades by using a soft cloth and
window cleaner. Also make sure to
remove any residues such as wax,
insect residues and similar from the
window.
Ice residues, pollution and continuous wiping on dry windows will damage or
even destroy the wiper blades.Sunroof
Never clean with solvents or abrasive
agents, fuels, aggressive media
(e.g. paint cleaner, acetone-
containing solutions etc.), acidic or
highly alkaline media or abrasive
pads. Do not apply wax or polishing
agents to the sunroof.
Wheels and tyres Do not use high-pressure jet
cleaners.
Clean rims with a pH-neutral wheel
cleaner.
Rims are painted and can be treated
with the same agents as the body.
Paintwork damage
Rectify minor paintwork damage with
a touch-up pen before rust forms.
Have more extensive damage or rust areas repaired by a workshop.
Underbody Some areas of the vehicle underbody
have a PVC undercoating while other
critical areas have a durable
protective wax coating.
Page 283 of 323
Vehicle care281After the underbody is washed, check
the underbody and have it waxed if
necessary.
Bitumen/rubber materials could
damage the PVC coating. Have
underbody work carried out by a
workshop.
Before and after winter, wash the
underbody and have the protective
wax coating checked.
Liquid gas system9 Danger
Liquid gas is heavier than air and
can collect in sink points.
Take care when performing work
at the underbody in a pit.
For painting work and when using a
drying booth at a temperature above
60 °C, the liquid gas tank must be
removed.
Do not make any modifications to the
liquid gas system.
Towing equipment
Do not clean the coupling ball bar with a steam-jet or high-pressure jet
cleaner.
Interior care
Interior and upholstery
Only clean the vehicle interior,
including the instrument panel fascia
and panelling, with a dry cloth or
interior cleaner.
Clean the leather upholstery with
clear water and a soft cloth. In case of heavy soiling, use leather care.
The instrument cluster and the
displays should only be cleaned using
a soft damp cloth. If necessary use a
weak soap solution.
Clean fabric upholstery with a
vacuum cleaner and brush. Remove
stains with an upholstery cleaner.
Clothing fabrics may not be
colourfast. This could cause visible
discolourations, especially on light-coloured upholstery. Removable
stains and discolourations should be
cleaned as soon as possible.
Clean seat belts with lukewarm water or interior cleaner.Caution
Close Velcro fasteners as open
Velcro fasteners on clothing could
damage seat upholstery.
The same applies to clothing with
sharp-edged objects, like zips or
belts or studded jeans.
Plastic and rubber parts
Plastic and rubber parts can be
cleaned with the same cleaner as
used to clean the body. Use interior cleaner if necessary. Do not use any
other agent. Avoid solvents and petrol in particular. Do not use high-
pressure jet cleaners.
Page 318 of 323

316IndexAAccessories and vehicle modifications .......................... 237
Active bonnet ................................ 69
Active emergency braking ..........201
Adaptive cruise control .......111, 189
AdBlue ................................ 109, 170
Adjustable air vents ...................157
Airbag and belt tensioners .........106
Airbag deactivation ..............61, 106
Airbag label................................... 56
Airbag system .............................. 56
Air conditioning regular operation ................................ 159
Air conditioning system .............. 148
Air intake .................................... 158
Air vents...................................... 157
All-wheel drive ........................... 178
Antilock brake system ................ 178
Antilock brake system (ABS) .....108
Anti-theft alarm system ................32
Anti-theft locking system .............. 32
Appearance care ........................279
Armrest ................................... 51, 53
Armrest storage ........................... 72
Ashtrays ....................................... 95 Automatic anti-dazzle ..................38
Automatic dimming ......................37
Automatic light control ...............135
Automatic locking ........................25Automatic transmission .............173
Autostop ..................................... 165
Auxiliary heater ........................... 157
B Baselevel display ........................112
Battery discharge protection ......146
Battery voltage ........................... 124
Belts.............................................. 54 BlueInjection ............................... 170
Bonnet ....................................... 239
Brake and clutch fluid .................283
Brake and clutch system ...........107
Brake assist ............................... 180
Brake fluid .................................. 242
Brakes ............................... 178, 242
Breakdown.................................. 277
Bulb replacement ....................... 245
C Capacities .................................. 299
Cargo management system ........79
Catalytic converter .....................169
Central locking system ................21
Centre console lighting ..............145
Centre console storage ...............72
Changing tyre and wheel size ...266
Charging system ........................ 107
Child locks ................................... 26
Child restraint installation locations ................................... 65