charging VAUXHALL INSIGNIA 2019.5 Owner's Manual
[x] Cancel search | Manufacturer: VAUXHALL, Model Year: 2019.5, Model line: INSIGNIA, Model: VAUXHALL INSIGNIA 2019.5Pages: 321, PDF Size: 9.37 MB
Page 54 of 321

52Seats, restraintsEasy exit function
For a convenient exit out of the
vehicle, the power driver seat moves
rearwards when vehicle is stationary.
To activate the easy exit function: ● set selector lever to position P
(automatic transmission)
● apply parking brake (manual transmission)
● switch off ignition
● remove key from the ignition switch
● open the driver's door
If the door has already been opened,
switch off ignition to activate easy
exit.
To stop movement, press one of the
memory or power seat controls.
This function can be activated or
deactivated in the vehicle
personalisation.
Select the relevant setting in the Vehicle menu in the Info Display.
Info Display 3 117.
Vehicle personalisation 3 123.Safety function
If the driver's seat encounters
resistance during movement, the
recall may stop. After removing the
obstruction, press and hold the
appropriate memory position button
for two seconds. Try recalling the
memory position again. If the recall
does not operate, consult a
workshop.
Overload
If the seat setting is electrically overloaded, the power supply is
automatically cut-off for a short time.
Notice
After an accident in which airbags
have been deployed, the memory
function for each position button will
be deactivated.Armrest
Push button and fold armrest
upwards. Under the armrest there is
a storage compartment and an
inductive charger.
Inductive charging 3 93.
Page 88 of 321

86Instruments and controlsInstruments and
controlsControls ....................................... 87
Steering wheel adjustment ........87
Steering wheel controls .............87
Heated steering wheel ...............87
Horn ........................................... 88
Windscreen wiper and washer ..88
Rear window wiper and washer ...................................... 90
Outside temperature ..................91
Clock ......................................... 91
Power outlets ............................. 92
Inductive charging .....................93
Ashtrays .................................... 94
Warning lights, gauges and indi‐
cators ........................................... 95
Instrument cluster ......................95
Speedometer ........................... 100
Odometer ................................ 101
Trip odometer .......................... 101
Tachometer ............................. 102
Fuel gauge .............................. 102
Engine coolant temperature gauge ..................................... 103
Service display ........................ 103Control indicators ....................104
Turn lights ................................ 104
Seat belt reminder ...................104
Airbag and belt tensioners .......105
Airbag deactivation ..................105
Charging system .....................106
Malfunction indicator light ........106
Brake and clutch system .........106
Electric parking brake ..............106
Electric parking brake fault ......106
Antilock brake system (ABS) ...107
Gear shifting ............................ 107
Following distance ...................107
Lane keep assist .....................107
Electronic Stability Control off . 107
Electronic Stability Control and Traction Control system .........107
Traction Control system off .....108
Engine coolant temperature ....108
Preheating ............................... 108
AdBlue ..................................... 108
Tyre pressure monitoring system .................................... 108
Engine oil pressure ..................108
Low fuel ................................... 109
Immobiliser .............................. 109
Exterior light ............................ 109
High beam ............................... 109
High beam assist .....................109
LED headlights ........................ 109Front fog lights......................... 109
Rear fog light ........................... 110
Cruise control .......................... 110
Adaptive cruise control ............110
Vehicle detected ahead ...........110
Pedestrian detection ................110
Speed limiter ........................... 110
Traffic sign assistant ................110
Door open ................................ 110
Displays ..................................... 111
Driver Information Centre ........111
Info Display .............................. 117
Head-up display ......................119
Vehicle messages ......................122
Warning chimes .......................122
Vehicle personalisation ..............123
Telematics service .....................128
OnStar ..................................... 128
Page 95 of 321

Instruments and controls93Sports Tourer, Country Tourer: A
12 V power outlet is located at the left
sidewall in the load compartment.
With ignition off, this power outlet
remains active.
Do not exceed the maximum power
consumption of 120 W.
Electrical accessories that are
connected must comply with the
electromagnetic compatibility
requirements laid down in
DIN VDE 40 839.
Do not connect any current-delivering accessories, e.g. electrical charging
devices or batteries.
Do not damage the outlets by using
unsuitable plugs.
Stop-start system 3 161.USB port
Two USB ports for charging devices
are located below the foldable
armrest. These ports have also a data connection to the Infotainment
system.
USB charging port
Two USB ports for charging devices
only are located in the back of the
centre console.
Notice
The sockets must always be kept clean and dry.
Inductive charging
9 Warning
Inductive charging can affect the
operation of implanted
pacemakers or other medical
Page 96 of 321
94Instruments and controlsdevices. If applicable, seek
medical advice before using the
inductive charging device.9 Warning
Remove any metal objects from
the charging device before
charging a mobile device, as these objects could become very hot.
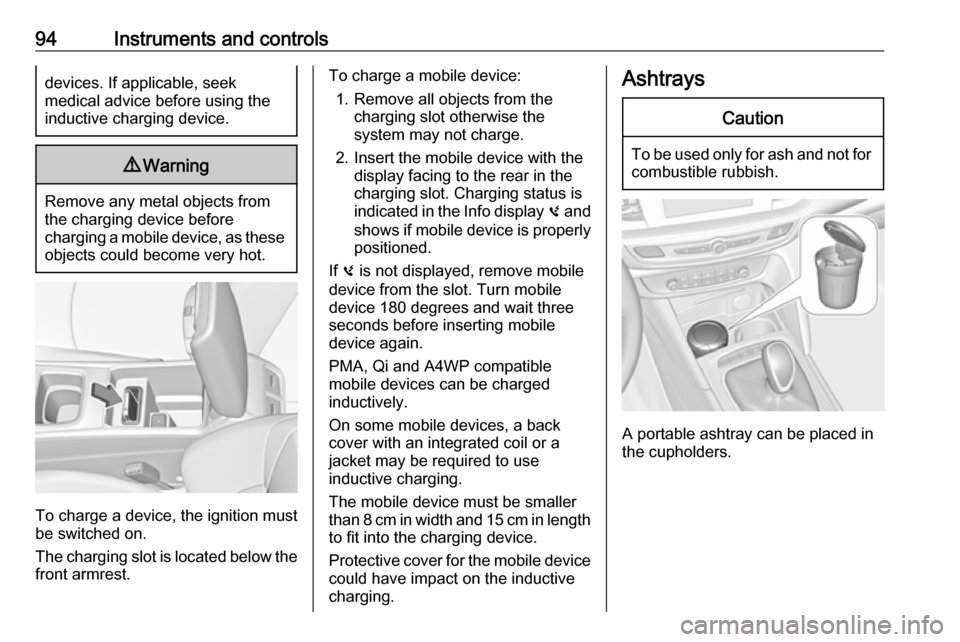
To charge a device, the ignition must
be switched on.
The charging slot is located below the
front armrest.
To charge a mobile device:
1. Remove all objects from the charging slot otherwise the
system may not charge.
2. Insert the mobile device with the display facing to the rear in the
charging slot. Charging status is
indicated in the Info display 0 and
shows if mobile device is properly positioned.
If 0 is not displayed, remove mobile
device from the slot. Turn mobile
device 180 degrees and wait three
seconds before inserting mobile
device again.
PMA, Qi and A4WP compatible
mobile devices can be charged
inductively.
On some mobile devices, a back
cover with an integrated coil or a
jacket may be required to use
inductive charging.
The mobile device must be smaller
than 8 cm in width and 15 cm in length to fit into the charging device.
Protective cover for the mobile device
could have impact on the inductive
charging.AshtraysCaution
To be used only for ash and not for combustible rubbish.
A portable ashtray can be placed in
the cupholders.
Page 102 of 321
100Instruments and controlsOverviewOTurn lights 3 104XSeat belt reminder 3 104vAirbag and belt tensioners
3 105VAirbag deactivation 3 105pCharging system 3 106ZMalfunction indicator light
3 106RBrake and clutch system 3 106mElectric parking brake 3 106jElectric parking brake fault
3 106uAntilock brake system (ABS)
3 107RGear shifting 3 107EFollowing distance 3 107aLane keep assist 3 107nElectronic Stability Control off
3 107bElectronic Stability Control and
Traction Control system 3 107kTraction Control system off
3 108WEngine coolant temperature
3 108!Preheating 3 108uAdBlue 3 108wTyre pressure monitoring
system 3 108IEngine oil pressure 3 108YLow fuel 3 109dImmobiliser 3 1098Exterior light 3 109CHigh beam 3 109fHigh beam assist 3 109fLED headlights 3 109>Front fog lights 3 109rRear fog light 3 110mCruise control 3 110CAdaptive cruise control 3 110AVehicle detected ahead 3 1107Pedestrian detected ahead
3 110LSpeed limiter 3 110LTraffic sign assistant 3 110hDoor open 3 110
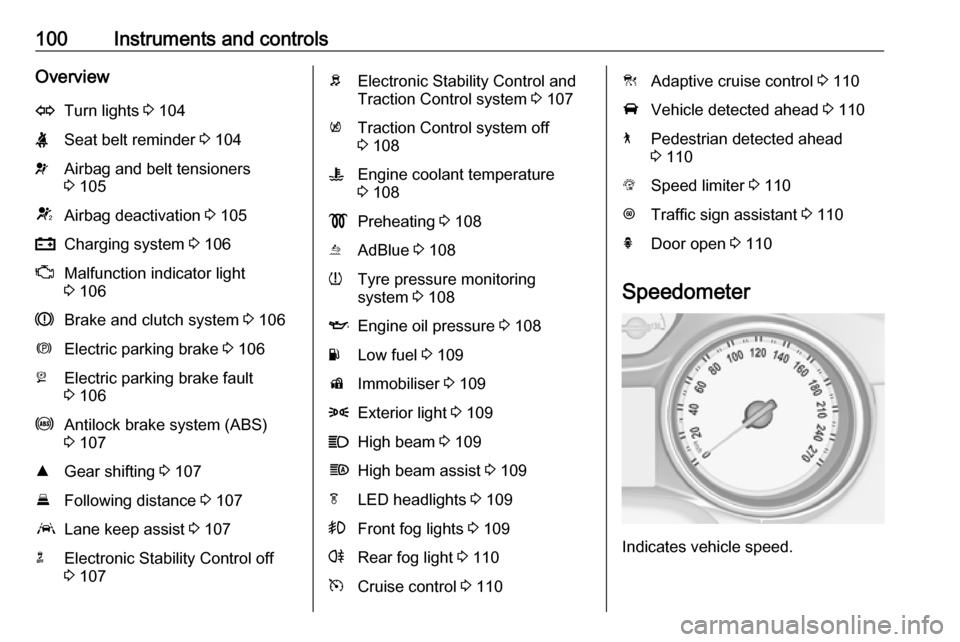
Speedometer
Indicates vehicle speed.
Page 108 of 321
106Instruments and controlsThe front passenger airbag is
activated.
* illuminates yellow.
The front passenger airbag is
deactivated.
Airbag deactivation 3 62.
Charging system
p illuminates red.
Illuminates when the ignition is
switched on and extinguishes shortly after the engine starts.
Illuminates when the engine is
running
Stop, switch off engine. Vehicle
battery is not charging. Engine
cooling may be interrupted. The
brake servo unit may cease to be effective. Seek the assistance of a
workshop.
Malfunction indicator light
Z illuminates or flashes yellow.Illuminates when the ignition is
switched on and extinguishes shortly
after the engine starts.
Illuminates when the engine is
running
Fault in the emission control system.
The permitted emission limits may be
exceeded.
The cleaning process of the exhaust
filter is potentially not possible.
Seek the assistance of a workshop
immediately.
Flashes when the engine is
running
Fault that could lead to catalytic
converter damage. Ease up on the accelerator until the flashing stops.
Seek the assistance of a workshop
immediately.
Brake and clutch system
R illuminates red.
The brake and clutch fluid level is too low.9 Warning
Stop. Do not continue your
journey. Consult a workshop.
Electric parking brake
m illuminates or flashes red.
Illuminates
Electric parking brake is applied
3 175.
Flashes
Electric parking brake is not fully applied or released. Depress the
brake pedal and attempt to reset the system by first releasing then
applying the electric parking brake. If
m remains flashing, do not drive and
seek the assistance of a workshop.
Electric parking brake fault
j illuminates or flashes yellow.
Illuminates
Electric parking brake is operating
with degraded performance 3 175.
Page 165 of 321
Driving and operating163Vehicles with automatic transmissionRelease the brake pedal or move
selector lever out of D into N or P to
restart the engine.
Restart of the engine by the stop-
start system
The selector lever must be in neutral
to enable an automatic restart.
If one of the following conditions
occurs during an Autostop, the
engine will be restarted automatically
by the stop-start system:
● The stop-start system is manually deactivated.
● The bonnet is opened.
● The driver's seat belt is unfastened and the driver's door
is opened.
● The engine temperature is too low.
● The charging level of the vehicle battery is below a defined level.
● The brake vacuum is not sufficient.
● The vehicle is driven at least at walking speed.● The climate control systemrequests an engine start.
● The air conditioning is manually switched on.
If the bonnet is not fully closed, a warning message is displayed in the
Driver Information Centre.
If an electrical accessory, e.g. a
portable CD player, is connected to
the power outlet, a brief power drop
during the restart might be noticeable.
Notice
If a trailer or a bike carrier is
attached, late restart is deactivated.
Parking9 Warning
● Do not park the vehicle on an
easily ignitable surface. The
high temperature of the
exhaust system could ignite the
surface.
● Always apply the parking brake. Pull switch m for
approx. 1 second and check if
the control indicator m
illuminates.
The electric parking brake is
applied when control indicator
m illuminates 3 106.
● Switch off the engine. ● If the vehicle is on a level surface or uphill slope, engage
first gear or set the selector
lever to position P before
switching off ignition. On an
uphill slope, turn the front
wheels away from the kerb.
If the vehicle is on a downhill
slope, engage reverse gear or
set the selector lever to position P before switching off ignition.
Turn the front wheels towards
the kerb.
● Close the windows and the sunroof.
● Switch off ignition with power button. Turn the steering wheel
until the steering wheel lock is
felt to engage.
Page 242 of 321
240Vehicle care
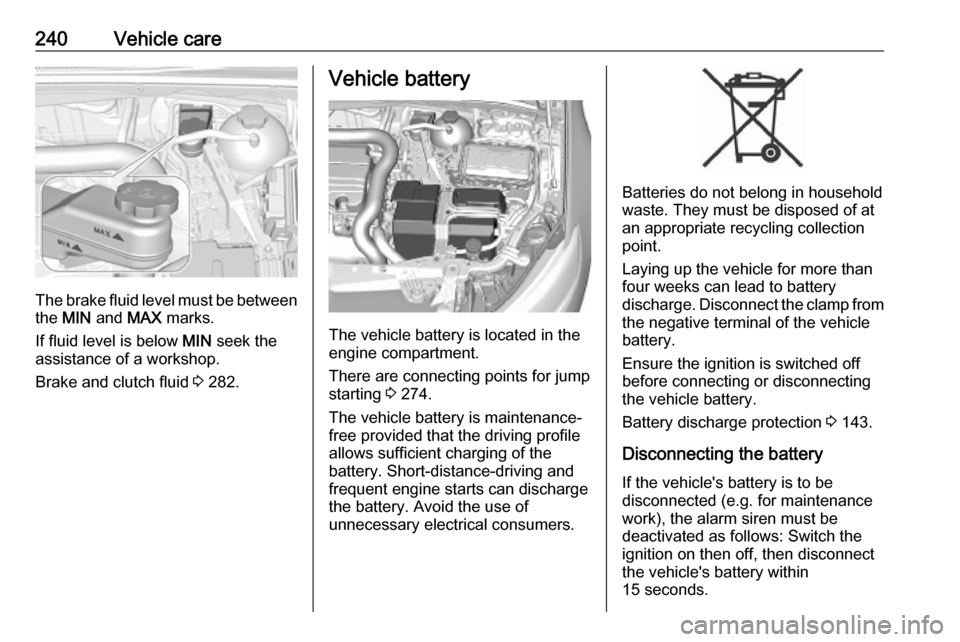
The brake fluid level must be betweenthe MIN and MAX marks.
If fluid level is below MIN seek the
assistance of a workshop.
Brake and clutch fluid 3 282.
Vehicle battery
The vehicle battery is located in the
engine compartment.
There are connecting points for jump starting 3 274.
The vehicle battery is maintenance-
free provided that the driving profile
allows sufficient charging of the
battery. Short-distance-driving and
frequent engine starts can discharge
the battery. Avoid the use of
unnecessary electrical consumers.
Batteries do not belong in household
waste. They must be disposed of at
an appropriate recycling collection
point.
Laying up the vehicle for more than
four weeks can lead to battery
discharge. Disconnect the clamp from the negative terminal of the vehicle
battery.
Ensure the ignition is switched off
before connecting or disconnecting
the vehicle battery.
Battery discharge protection 3 143.
Disconnecting the battery
If the vehicle's battery is to be
disconnected (e.g. for maintenance
work), the alarm siren must be
deactivated as follows: Switch the
ignition on then off, then disconnect
the vehicle's battery within
15 seconds.
Page 243 of 321

Vehicle care241Replacing the vehicle batteryNotice
Any deviation from the instructions
given in this section may lead to
temporary deactivation or
disturbance of the stop-start system.
When the vehicle battery is being
replaced, please ensure that there
are no open ventilation holes in the
vicinity of the positive terminal. If a
ventilation hole is open in this area, it
must be closed off with a dummy cap, and the ventilation in the vicinity of the
negative terminal must be opened.
Ensure that the battery is always replaced by the same type of battery.
We recommend that you have the
vehicle battery replaced by a
workshop.
Stop-start system 3 161.Charging the vehicle battery9 Warning
On vehicles with stop-start
system, ensure that the charging potential does not exceed 14.6 V
when using a battery charger.
Otherwise the vehicle battery may be damaged.
Jump starting 3 274.
Discharge protection Battery voltage
When the vehicle battery voltage is
running low, a warning message will
appear in the Driver Information
Centre.
1. Switch off any electrical consumers which are not requiredfor a safe ride, e.g. seat heating,
heated rear window or other main consumers.
2. Charge the vehicle battery by driving continuously for a while or
by using a charging device.
The warning message will disappear
after the engine has been started
twice without a voltage drop.
If the vehicle battery cannot be
recharged, have the cause of the fault
remedied by a workshop.
Vehicle battery state of charge
function
The function guarantees longest vehicle battery life via a generator
with controllable power output and
optimised power distribution.
To prevent discharge of the vehicle
battery when driving, the following
systems are reduced automatically in two stages and finally switched off:
● auxiliary heater
● heated rear and front window
● heated steering wheel
● heated mirrors
● heated seats
● fan
In the second stage, a message
which confirms the activation of the
vehicle battery discharge protection
will be displayed in the Driver
Information Centre.
Page 244 of 321
242Vehicle careIdle boost
If charging of the vehicle battery is
required due to battery condition, the
power output of the generator must be increased. This will be achieved by an idle boost which may be audible.
A message appears in the Driver
Information Centre.
Power outlet
The power outlets are deactivated in
the event of low vehicle battery
voltage.
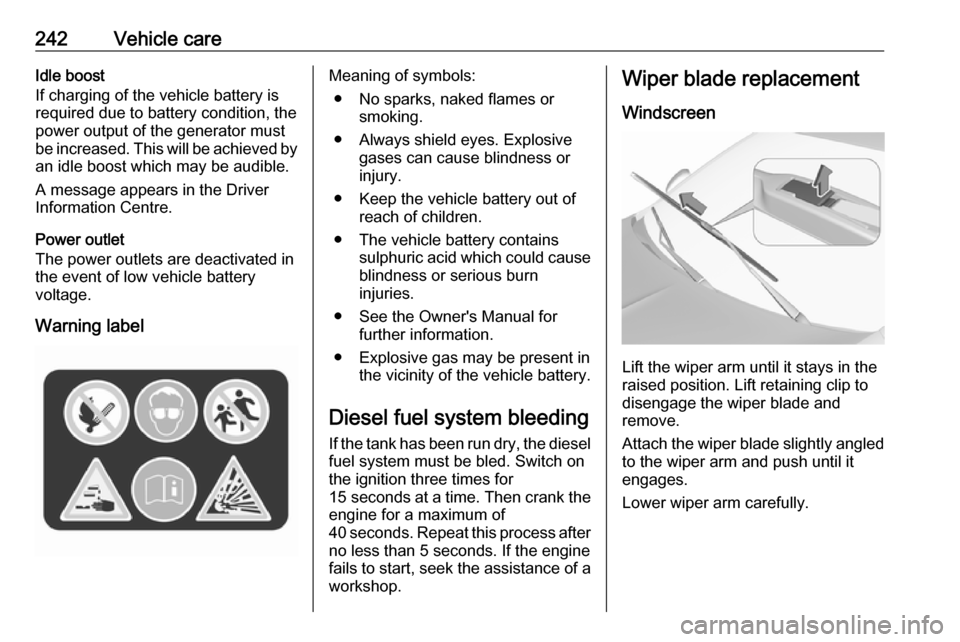
Warning labelMeaning of symbols: ● No sparks, naked flames or smoking.
● Always shield eyes. Explosive gases can cause blindness or
injury.
● Keep the vehicle battery out of reach of children.
● The vehicle battery contains sulphuric acid which could cause
blindness or serious burn
injuries.
● See the Owner's Manual for further information.
● Explosive gas may be present in the vicinity of the vehicle battery.
Diesel fuel system bleeding If the tank has been run dry, the diesel
fuel system must be bled. Switch on
the ignition three times for
15 seconds at a time. Then crank the
engine for a maximum of 40 seconds. Repeat this process after
no less than 5 seconds. If the engine fails to start, seek the assistance of a
workshop.Wiper blade replacement
Windscreen
Lift the wiper arm until it stays in the
raised position. Lift retaining clip to
disengage the wiper blade and
remove.
Attach the wiper blade slightly angled
to the wiper arm and push until it
engages.
Lower wiper arm carefully.