sensor VAUXHALL INSIGNIA 2020 Owner's Guide
[x] Cancel search | Manufacturer: VAUXHALL, Model Year: 2020, Model line: INSIGNIA, Model: VAUXHALL INSIGNIA 2020Pages: 313, PDF Size: 9.32 MB
Page 208 of 313

206Driving and operatingThe system may not operate properly
when:
● Ice, snow, mud, stickers, magnets, metal plates, or
anything else covers the sensors.
● Driving in heavy rainstorms.
● The vehicle had an accident or if the area surrounding the
detection sensor is damaged or
not properly repaired.
● There are extreme temperature changes.
● The vehicle is towing a trailer
In the event of a fault in the system or if the system does not work due to
temporary conditions, a message is
displayed in the Driver Information
Centre. Seek the assistance of a
workshop.
Notice
Each new vehicle requires a
calibration. For optimal
performance, drive as soon as
possible on a straight motorway
road with roadside objects, e.g.
guardrails and barriers for some
distance.Lane change alert
Additional to the side blind spot alert
3 205, lane change alert recognises
rapidly approaching vehicles from
behind on parallel lanes next to your
vehicle.
The system alerts visually in each
exterior mirror when detecting rapidly
approaching vehicles from behind.
The radar distance sensors are
located in the rear bumper.9 Warning
Lane change alert does not
replace driver vision.
Before changing a lane, always
check all mirrors, look over the
shoulder and use the turn light.
When the system detects an
approaching vehicle from behind
which drives considerably faster, the
yellow warning symbol F will
illuminate in the relevant exterior mirror. If the driver then activates the
turn lights, the warning symbol F
starts flashing yellow as a warning not to change lanes.
Lane change alert is active at all
speeds.
When the vehicle is started, both
exterior mirror displays will briefly come on to indicate that the system is operating.
Page 209 of 313

Driving and operating207Detection zones
The system sensors cover a zone of
approx. 3.5 m parallel on both vehicle
sides and approx. 3 m rearwards on
side blind zone alert (A) and approx.
50 m rearwards on lane change alert (B) on parallel lanes. The zones start
at each exterior mirror. The height of
the zone is approx. between 0.5 m
and 2 m off the ground.
Deactivation Activation or deactivation of the lane
change alert can be set in the vehicle personalisation menu in the Info
Display.
Vehicle personalisation 3 122.
Info Display 3 116.
Deactivation is indicated by a
message in the Driver Information
Centre.
System limitations
Occasional missed alerts can occur
under normal circumstances or in
sharp curves. The system can
temporarily alert of objects in the blind spot at specific weather conditions
(rain, hail etc). Driving on a wet road
or in the transitions from a dry area to a wet area can cause the control
indicator F to light up, as water
splash can be interpreted as an object. Otherwise the control indicator
F may illuminate due to guardrails,
signs, trees, shrubs or other immobile
objects. This is normal operation and
the system does not need to be
serviced.The system may not operate properly
when:
● ice, snow, mud, stickers, magnets, metal plates, or
anything else covers the sensors
● driving in heavy rainstorms
● the vehicle had an accident or if the area surrounding the
detection sensor is damaged or
not properly repaired
● there are extreme temperature changes
● the vehicle is towing a trailer
In the event of a fault in the system or if the system does not work due to
temporary conditions, a message is
displayed in the Driver Information
Centre. Seek the assistance of a
workshop.
Notice
Each new vehicle requires a
calibration. For optimal
performance, drive as soon as
possible on a straight motorway road with roadside objects, e.g.
guardrails and barriers for some
distance.
Page 210 of 313

208Driving and operatingPanoramic view system
This system allows views of the
vehicle's surroundings to be
displayed as a nearly 360° picture in
the Info Display, like a bird's eye view.
The system uses four cameras: ● rear camera, installed in the tailgate
● front camera, installed in the front
grill below the emblem
● side cameras, located at the bottom of both exterior mirrors
The screen in the Info Display is
divided into two parts: on the left there
is a view from above the vehicle, and
on the right there is the view from front
or the rear displayed, according to the gear engaged. The parking sensors
complete the information on the view.
Activation Panoramic view system can be
activated by touching d in the Info
Display. It may be neccessary to slide
to the next page on the home menu
to find.
Functionality
Rear view
Rear view displays an image of the
area behind the vehicle on the right
part of the screen when reverse gear
is engaged or by touching d first
and e second.
A warning triangle 9 may be
displayed on the screen when
obstacles are detected by the rear
sensors of the parking assist. This
triangle changes from yellow to red
and increases in size the closer the
object gets.The previous content of the Info
Display appears when the vehicle is
shifted out of reverse gear after a short delay. To return to the previous
display content sooner, press the
camera icon in the Info Display.
Driving faster than 7 mph in a forward gear will deactivate the panoramic
system also.
Surround view
Surround view displays an image of
the area surrounding the vehicle from
above, along with the front or rear
camera views in the Info Display.
Front view
Front view displays an image of the
area in front of the vehicle on the right
part of the screen. The view displays
after shifting from reverse gear to a
forward gear, or by touching d in the
Info Display. Front view also displays objects automatically detected within
30 cm. The front view is only
displayed up to a speed of 7 mph in a
forward gear.
Page 212 of 313

210Driving and operatingSystem limitationsCaution
For optimal operation of the
system, it is important to keep the
lenses of the cameras in the front
grille, the housings of outside
mirrors and in the tailgate between the number plate lights always
clean. Rinse the lenses with water and wipe with a soft cloth.
Do not clean the lenses with a
steam-jet or high-pressure jet
cleaner.
The panoramic view system may not
operate properly when:
● The surrounding is dark.
● The sun or the beam of headlights is shining directly into
the camera lenses.
● During nighttime driving.
● Weather limits visibility, such as fog, rain, or snow.
● The camera lenses are blocked by snow, ice, slush, mud, dirt.
● The vehicle is towing a trailer.
● The vehicle had an accident.
● There are extreme temperature changes.
Rear view camera The rear view camera assists the
driver when reversing by displaying a
view of the area behind the vehicle.
The view of the camera is displayed
in the Info Display.9 Warning
The rear view camera does not
replace driver vision. Note that
objects that are outside the
camera's field of view and the
parking assist sensors, e.g. below
the bumper or underneath the
vehicle, are not displayed.
Do not reverse or park the vehicle
using only the rear view camera.
Always check the surrounding of
the vehicle before driving.
Activation
Rear view camera is automatically
activated when reverse gear is
engaged.
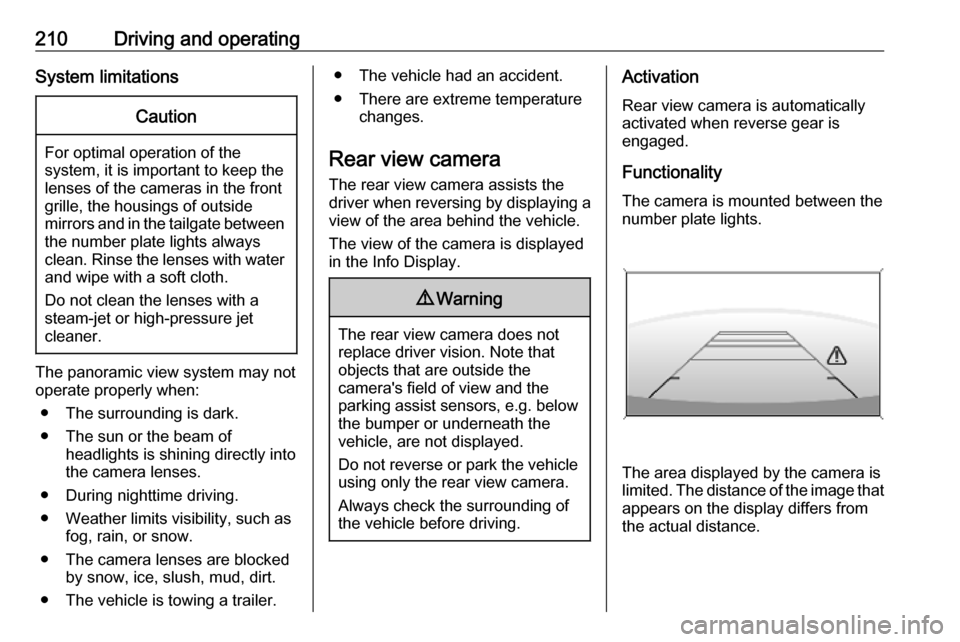
Functionality
The camera is mounted between the number plate lights.
The area displayed by the camera is
limited. The distance of the image that
appears on the display differs from
the actual distance.
Page 213 of 313

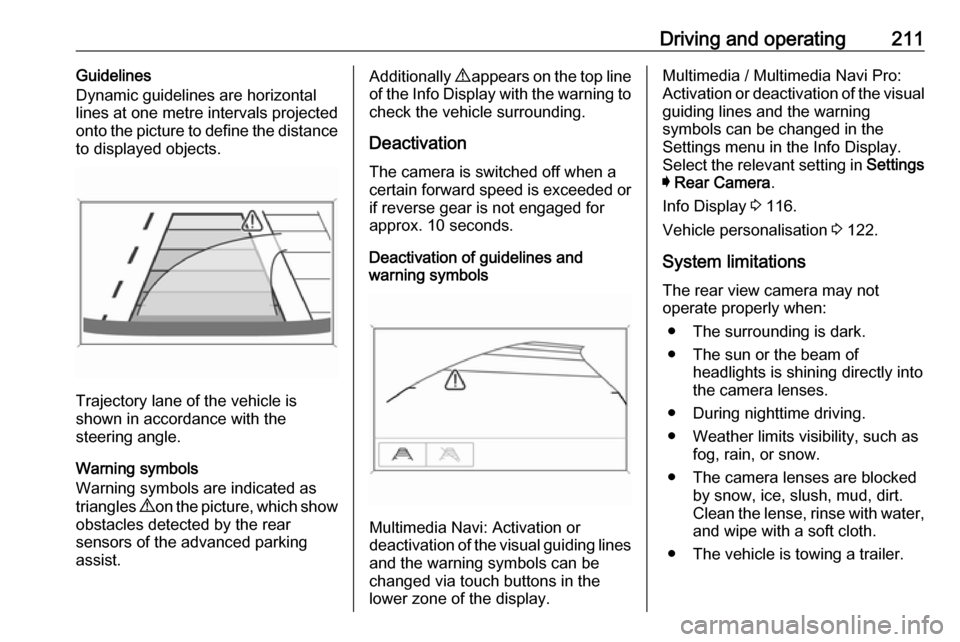
Driving and operating211Guidelines
Dynamic guidelines are horizontal
lines at one metre intervals projected
onto the picture to define the distance
to displayed objects.
Trajectory lane of the vehicle is
shown in accordance with the
steering angle.
Warning symbols
Warning symbols are indicated as
triangles 9 on the picture, which show
obstacles detected by the rear
sensors of the advanced parking
assist.
Additionally 9 appears on the top line
of the Info Display with the warning to
check the vehicle surrounding.
Deactivation
The camera is switched off when a
certain forward speed is exceeded or
if reverse gear is not engaged for
approx. 10 seconds.
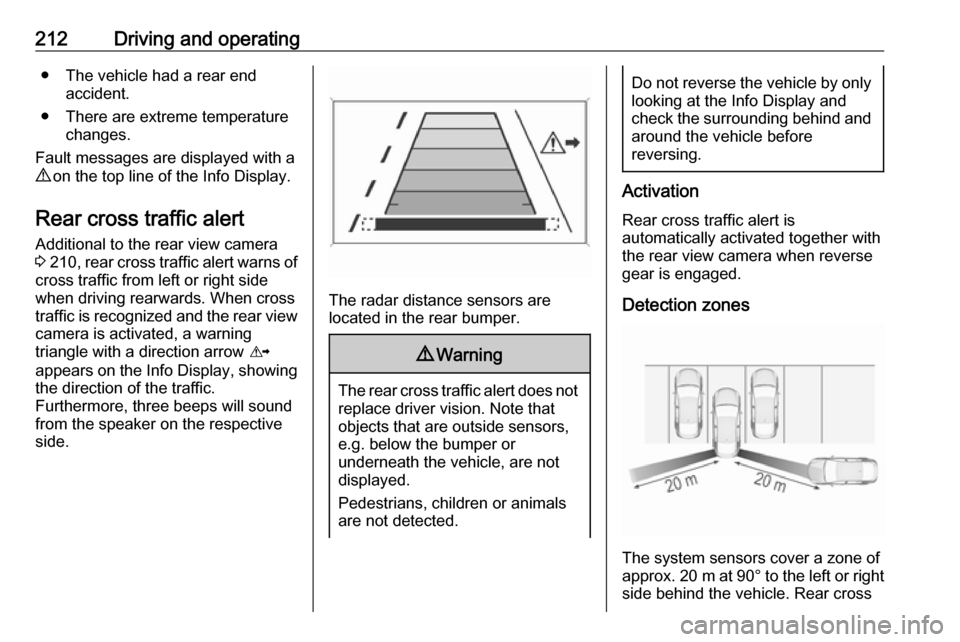
Deactivation of guidelines and
warning symbols
Multimedia Navi: Activation or
deactivation of the visual guiding lines and the warning symbols can be
changed via touch buttons in the
lower zone of the display.
Multimedia / Multimedia Navi Pro:
Activation or deactivation of the visual
guiding lines and the warning
symbols can be changed in the
Settings menu in the Info Display.
Select the relevant setting in Settings
I Rear Camera .
Info Display 3 116.
Vehicle personalisation 3 122.
System limitations The rear view camera may not
operate properly when:
● The surrounding is dark.
● The sun or the beam of headlights is shining directly into
the camera lenses.
● During nighttime driving.
● Weather limits visibility, such as fog, rain, or snow.
● The camera lenses are blocked by snow, ice, slush, mud, dirt.
Clean the lense, rinse with water, and wipe with a soft cloth.
● The vehicle is towing a trailer.
Page 214 of 313

212Driving and operating● The vehicle had a rear endaccident.
● There are extreme temperature changes.
Fault messages are displayed with a
9 on the top line of the Info Display.
Rear cross traffic alert
Additional to the rear view camera
3 210 , rear cross traffic alert warns of
cross traffic from left or right side
when driving rearwards. When cross
traffic is recognized and the rear view camera is activated, a warning
triangle with a direction arrow K
appears on the Info Display, showing
the direction of the traffic.
Furthermore, three beeps will sound
from the speaker on the respective
side.
The radar distance sensors are
located in the rear bumper.
9 Warning
The rear cross traffic alert does not
replace driver vision. Note that
objects that are outside sensors,
e.g. below the bumper or
underneath the vehicle, are not
displayed.
Pedestrians, children or animals
are not detected.
Do not reverse the vehicle by only
looking at the Info Display and
check the surrounding behind and
around the vehicle before
reversing.
Activation
Rear cross traffic alert is
automatically activated together with
the rear view camera when reverse
gear is engaged.
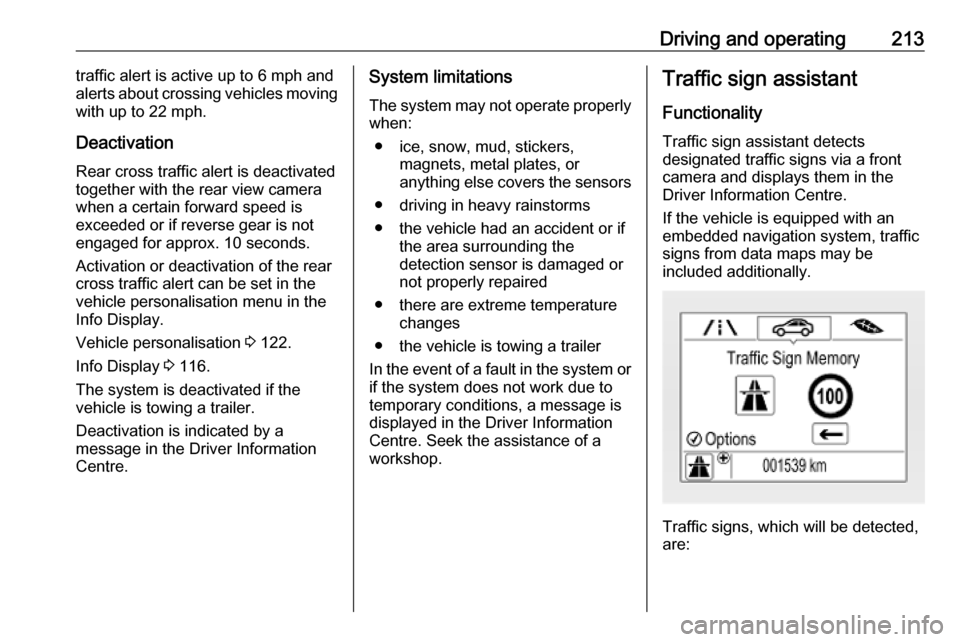
Detection zones
The system sensors cover a zone of
approx. 20 m at 90° to the left or right
side behind the vehicle. Rear cross
Page 215 of 313

Driving and operating213traffic alert is active up to 6 mph and
alerts about crossing vehicles moving
with up to 22 mph.
Deactivation Rear cross traffic alert is deactivated
together with the rear view camera
when a certain forward speed is
exceeded or if reverse gear is not
engaged for approx. 10 seconds.
Activation or deactivation of the rear
cross traffic alert can be set in the
vehicle personalisation menu in the
Info Display.
Vehicle personalisation 3 122.
Info Display 3 116.
The system is deactivated if the
vehicle is towing a trailer.
Deactivation is indicated by a
message in the Driver Information
Centre.System limitations
The system may not operate properly
when:
● ice, snow, mud, stickers, magnets, metal plates, or
anything else covers the sensors
● driving in heavy rainstorms
● the vehicle had an accident or if the area surrounding the
detection sensor is damaged or
not properly repaired
● there are extreme temperature changes
● the vehicle is towing a trailer
In the event of a fault in the system or if the system does not work due to
temporary conditions, a message is
displayed in the Driver Information Centre. Seek the assistance of a
workshop.Traffic sign assistant
Functionality
Traffic sign assistant detects
designated traffic signs via a front
camera and displays them in the
Driver Information Centre.
If the vehicle is equipped with an
embedded navigation system, traffic
signs from data maps may be
included additionally.
Traffic signs, which will be detected,
are:
Page 221 of 313

Driving and operating219If the system detects a lane, it
appears as a green dashed line, as
shown on the right side of the vehicle
in the graphic above. This dashed line becomes amber if the vehicle
approaches a detected lane marking
without the turn lights in that direction
has been used.
If the system intervenes by steering,
a short amber line appears, as shown on the left side of the vehicle in the
graphic above.
Deactivation
The system is deactivated by
pressing a; the LED in the button
extinguishes.
The system is deactivated
automatically when a trailer is
detected.
System limitations
The system performance may not
operate properly when:
● vehicle speed is out of range from
37 to 112 mph
● driving on winding or hilly roads ● during nighttime driving● weather limits visibility, such as fog, rain, or snow
● the sensor in the windscreen is blocked by snow, ice, slush, mud,dirt, windscreen damage or
affected by foreign items, e.g.
stickers
● the sun is shining directly into the
camera lens
● close vehicles ahead
● banked roads
● road edges
● roads with poor lane markings
● sudden lighting changes
● vehicle modifications, e.g. tyres
Switch off the system if the system is
disturbed by tar marks, shadows,
road cracks, temporary or
construction lane markings, or other
road imperfections.9 Warning
Always keep your attention on the
road and maintain proper vehicle
position within the lane, otherwise
vehicle damage, injury or death
could occur.
Lane keep assist does not
continuously steer the vehicle.
The system may not keep the
vehicle in the lane or give an alert,
even if a lane marking is detected.
The steering of the lane keep
assist may not be sufficient to
avoid a lane departure.
The system may not detect hands-
off driving due to external
influences (road condition and
surface, weather etc). The driver
has full responsibility to control the vehicle and is always required tokeep the hands on the steeringwheel while driving.
Using the system while towing a
trailer or on slippery roads could
cause loss of control of the vehicle
and a crash. Switch the system off.
Page 253 of 313

Vehicle care251Instrument panel fuse box
In left-hand drive vehicles, the fuse
box is behind a cover in the
instrument panel.
Disengage cover at the side and
remove.
In right-hand drive vehicles, the fuse
box is located behind a cover in the
glovebox. Open the glovebox and
remove the cover.
No.Circuit1Left power window2Right power window3Body control module4Climate control fan5Body control module6Trailer provisions7Rear seat power folding8Body control module9Engine control module10Head-up display11NO x reduction / Pipe heater12NO
x reduction / Soot sensor13AdBlue module14Heated steering wheel15Transmission control module16Amplifier17Alarm
Page 258 of 313

256Vehicle careAll wheels must be equipped with
pressure sensors and the tyres must
have the prescribed pressure.
Notice
In countries where the tyre pressure monitoring system is legally
required, the use of wheels without
pressure sensors will invalidate the
vehicle operating permit.
Select the Tyre pressure monitoring
page under the Info Menu in the
Driver Information Centre 3 110.
System status and pressure warnings
are displayed by a message
indicating the corresponding tyre in the Driver Information Centre.
The system considers the tyre
temperature and the tyre loading
setting for the warnings.
Tyre loading setting, see below in this chapter.
Temperature dependency 3 254.
Baselevel display: If the pressure of a
tyre decreases significantly, the
respective tyre pressure value is displayed inverted.
Uplevel display: Tyre pressure values in normal range are shown in greenletters. If the pressure of a tyre
decreases significantly, the
respective value will turn its colour to
amber.
A detected low tyre pressure
condition is indicated by the control
indicator w 3 108.
If
w illuminates, stop as soon as
possible and inflate the tyres as
recommended 3 291.
Ensure that vehicle loading status
matches selected tyre pressure.
Vehicle loading status, see below in
this chapter.
After inflating, some driving may be
required to update the tyre pressure
values in the Driver Information
Centre. During this time w may
continue to illuminate.
If w illuminates at lower temperatures
and extinguishes after some driving,
this could be an indicator for
approaching a low tyre pressure
condition. Check tyre pressure.
Vehicle messages 3 121.
Only mount wheels with pressure
sensors, otherwise the tyre pressure
will not be displayed and w
illuminates continuously.
A spare wheel or temporary spare
wheel is not equipped with pressure
sensors. The tyre pressure
monitoring system is not operational
for these wheels. Control indicator w