infotainment VAUXHALL MOKKA 2014.5 Infotainment system
[x] Cancel search | Manufacturer: VAUXHALL, Model Year: 2014.5, Model line: MOKKA, Model: VAUXHALL MOKKA 2014.5Pages: 135, PDF Size: 3.02 MB
Page 27 of 135

Radio27
Retrieving a stationIf required, briefly press the FAV
button to open a favourite list or to
switch to another favourite list. Press
one of the station buttons 1...6 to
activate the station stored in the
respective location.
Defining the number of favouritelists
Press the CONFIG button and then
select the Radio Settings menu item.
Select Number of Favourite Pages to
display the respective submenu.
Select the number of favourite pages
you wish to be displayed.
Radio data system (RDS) RDS is a service of FM stations that
considerably facilitates the finding of
the desired station and its fault-free
reception.Advantages of RDS
■ On the display the programme name of the set station appears
instead of its frequency.
■ During station search the Infotainment system tunes in to
RDS stations only.
■ The Infotainment system always tunes in to the best receivable
broadcasting frequency of the set
station by means of AF (Alternative Frequency).
■ Depending on the station that is received the Infotainment system
displays radio text that can contain,
for example, information on the
current programme.
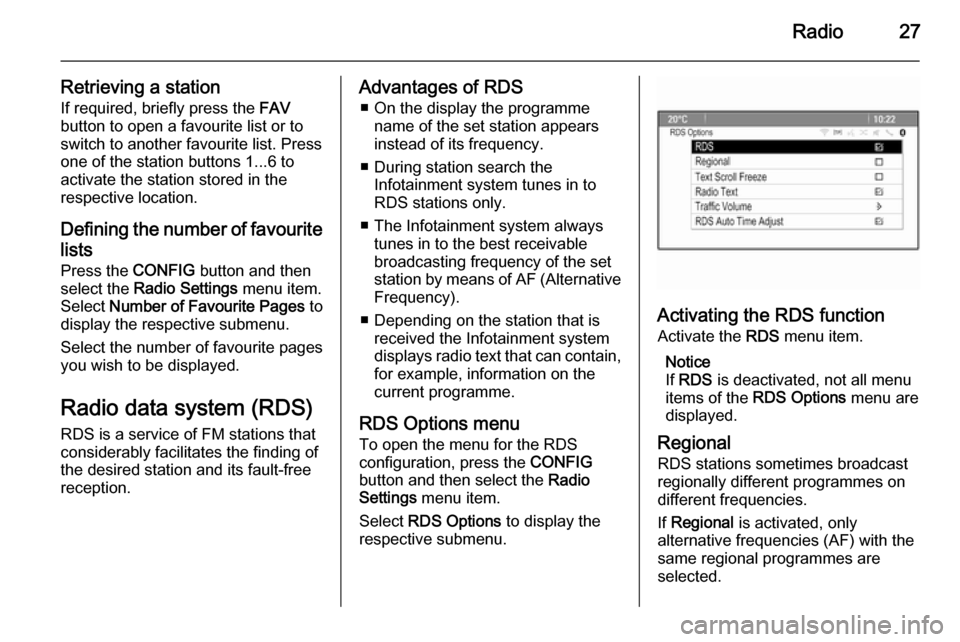
RDS Options menu To open the menu for the RDS
configuration, press the CONFIG
button and then select the Radio
Settings menu item.
Select RDS Options to display the
respective submenu.
Activating the RDS function
Activate the RDS menu item.
Notice
If RDS is deactivated, not all menu
items of the RDS Options menu are
displayed.
Regional
RDS stations sometimes broadcast regionally different programmes on
different frequencies.
If Regional is activated, only
alternative frequencies (AF) with the
same regional programmes are
selected.
Page 28 of 135

28Radio
If Regional is deactivated, alternative
frequencies of the stations are
selected without regard to regional
programmes.
Text Scroll Freeze Some RDS stations do not only show
the programme service name on the
display, but also additional
information on the current
programme. If additional information
is displayed, the programme name is
hidden.
To prevent additional information
from being displayed, activate the
Text Scroll Freeze menu item.
Radio Text
If RDS and the reception of an RDS
station are activated, information on
the radio programme currently active
or the music track currently playing
are displayed below the programme
name.
To show or hide the information,
activate or deactivate the Radio Text
menu item.Radio traffic service
(TP = Traffic Programme)
Radio traffic service stations are RDS
stations that broadcast traffic news.
If the radio traffic service is switched
on, radio or media playback is
interrupted for the duration of the
traffic announcement.
Switching the radio traffic service on
and off
To switch the traffic announcement
standby facility of the Infotainment
system on and off, press the TP
button.
■ If the radio traffic service is switched on, [ ] is indicated on the
display.
■ If the current station is not a radio traffic service station, a search is
started automatically for the next
radio traffic service station.
■ If a radio traffic service station has been found, [TP] is indicated on the
display.Traffic Volume
To adjust the volume of traffic
announcements, select the Traffic
Volume menu item. The respective
submenu is displayed. Adjust the
setting as desired.
Listening to traffic announcements
only
Switch on the radio traffic service and
completely turn down the volume of
the Infotainment system.
Blocking out traffic announcements
To block out a traffic announcement,
e.g. during CD/MP3 playback:
Press the TP button or select the
Cancel screen button in the TP
message.
The traffic announcement is
cancelled, but the radio traffic service remains switched on.
Auto Time Adjust
The system constantly receives
information on the current time and
date.
Page 29 of 135

Radio29
If you wish the time and date settingsto be updated automatically, activate
the RDS Auto Time Adjust menu item.
If you wish to set time and date
manually, deactivate the RDS Auto
Time Adjust menu item.
Digital audio broadcasting Digital audio broadcasting (DAB) is
an innovative and universal
broadcast system.
General information ■ DAB stations are indicated by the programme name instead of the
broadcasting frequency.
■ With DAB, several radio programmes (services) can be
broadcasted on a single frequency
(ensemble).
■ Besides high-quality digital audio services, DAB is also able to
transmit programme-associated
data and a multitude of other data
services including travel and traffic
information.■ As long as a given DAB receiver can pick up the signal sent out by a
broadcasting station (even if the signal is very weak), sound
reproduction is ensured.
■ There is no fading (weakening of the sound) that is typical of AM or
FM reception. The DAB signal is
reproduced at a constant volume.
■ Interference caused by stations that are on nearby frequencies (aphenomenon that is typical of AM
and FM reception) does not occur
with DAB.
If the DAB signal is too weak to be
picked up by the receiver, the
system switches over to the same
programme on another DAB or FM
station.
■ If the DAB signal is reflected by natural obstacles or buildings, the
reception quality of DAB is
improved, whereas AM or FM
reception is considerably impaired
in such cases.
■ When DAB reception is enabled, the FM tuner of the Infotainment
system remains active in thebackground and continually
searches for the best receivable FM stations. If TP 3 27 is activated,
traffic announcements of the FM
station which is currently best
received are issued. Deactivate TP,
if DAB reception should not be
interrupted by FM traffic
announcements.
DAB announcements
Besides their music programmes, lots of DAB stations also broadcast
announcements of various
categories.
While being in the DAB main menu,
press the multifunction knob to open
the DAB menu and then select
Announcements .
If you activate some or all categories, the currently received DAB service is
interrupted when an announcement
of these categories is made.
Activate the desired categories.
Page 30 of 135

30CD PlayerCD PlayerGeneral information.....................30
Usage .......................................... 31General information
Important information about
audio CDs and MP3/WMA CDs The Infotainment system's CD player
can play audio CDs and MP3/WMA
CDs.Caution
Under no circumstances place
DVDs, single-CDs with a diameter
of 8 cm or shaped CDs in the audio
player.
You must not put any stickers on
CDs. These discs can get jammed
in the CD drive and ruin the drive.
An expensive replacement of the
device will then be necessary.
File formats
Audio CDs
The following CD formats can be
used: CD-ROM Mode 1 and Mode 2;
CD-ROM XA Mode 2, Form 1 and
Form 2.
MP3 CDs
The following file formats can be
used: ISO9660 Level 1, Level 2,
(Romeo, Joliet).
MP3 and WMA files written in any
format other than listed above may
not play correctly, and their file names and folder names may not be
displayed correctly.
The following restrictions apply for the
data stored on an MP3/WMA CD:
Number of tracks: max. 999.
Number of folders: max. 255.
Folder structure depth:
max. 64 levels (recommended:
max. 8 levels).
Number of playlists: max. 15.
Number of songs per playlist:
max. 255.
Applicable playlist
extensions: .m3u, .pls, .asx, .wpl.
Page 32 of 135

32External devicesExternal devicesGeneral information.....................32
Playing audio ............................... 34
Displaying pictures ....................... 35
Using apps ................................... 36General information
Sockets for the connection of external
devices are located in the centre
console hidden behind a cover.
Notice
The sockets must always be kept
clean and dry.
AUX input It is possible to connect e.g. an iPod,
Smartphone or another auxiliary
device to the AUX input. The
Infotainment system can play music
files contained in auxiliary devices.
When connected to the AUX input,
the audio signal of the auxiliary device
is transmitted via the speakers of the
Infotainment system.
The volume can be adjusted via the Infotainment system. All other control functions must be operated via the
auxiliary device.
Connecting a device
To connect the auxiliary device to the
AUX input socket of the Infotainment
system, use the following cable:
3-pole for audio source.To disconnect the AUX device, select
another function and then remove the AUX device.
USB port An MP3 player, USB device, iPod or
Smartphone can be connected to the
USB port. The Infotainment system
can play music files or display
pictures contained in auxiliary
devices.
When connected to the USB port, the devices mentioned above can be
operated via the controls and menus
of the Infotainment system.
Notice
Not all MP3 player, USB drive, iPod
models or Smartphones are
supported by the Infotainment
system.
Connecting/disconnecting a device
Connect the device to the USB port.
For the iPod, use the appropriate
connection cable.
Notice
If a non-readable USB device or iPod is connected, a corresponding
error message will appear and the
Page 33 of 135

External devices33
Infotainment system will
automatically switch to the previous
function.
To disconnect the USB device or
iPod, select another function and then remove the USB storage device.Caution
Avoid disconnecting the device
during playback. This may
damage the device or the
Infotainment system.
Bluetooth
Bluetooth enabled audio sources
(e.g. music mobile phones, MP3
players featuring Bluetooth, etc.),
which support the Bluetooth music profiles A2DP and AVRCP can be
connected wirelessly to the
Infotainment system.
The Infotainment system can play
music files contained in Bluetooth
devices, e.g. iPod or Smartphone.
Connecting a device
For a detailed description of the
Bluetooth connection 3 61.
File formats
Audio files
Only devices formatted in the FAT32,
NTFS and HFS+ file systems are supported.
Notice
Some files may not be played
properly. This might be due to a
different recording format or the
condition of the file.
Files from online shops to which
Digital Rights Management (DRM)
has been applied cannot be played.
The playable audio file formats
are .mp3, .wma, .aac and .m4a.
When playing a file with ID3 tag
information, the Infotainment system
can display information, e.g. on the
track title and artist.
Picture files
The displayable picture file formats
are .jpg, .jpeg, .bmp, .png and .gif.The files must have a maximum size
of 2048 pixels in width and
2048 pixels in height (4MP).
Gracenote
The Gracenote database contains
information on media data currently available on the market.
When connecting external devices,
the tracks or files are recognised by
the Gracenote function.
If the Gracenote normalisation
function is activated, spelling
mistakes in MP3 tag data are
automatically corrected. Due to this,
media search results may be
improved.
Press the CONFIG button and then
select the Radio Settings menu item.
Select Gracenote Options to display
the respective submenu.
Activate the Gracenote normalisation function.
Page 36 of 135

36External devices
Picture menu
To display the picture menu, select
the Menu screen button at the bottom
of the screen.
Picture Viewer Main
Select the Picture Viewer Main menu
item to display a list of all picture folders, see above.
Slideshow Timer
To adjust the time sequence in which one picture is shown during a slide
show, select the Slideshow Timer
menu item. The respective submenu is displayed. Select the desired
option.
Shuffle Images
To display the pictures of a slide show in random order, activate the Shuffle
Images screen button.
Using apps The Infotainment system supports the
operation of apps via the controls on
the Infotainment system.Before an application can be
operated using the controls and
menus of the Infotainment system,
the respective application has to be
installed via a smartphone.
Activating the Tethering function
on the smartphone Activate the Tethering and the
Bluetooth functions on the
smartphone (see user guide of the smartphone).
Notice
Tethering has to be set up correctly
depending on the network provider.
Connect the smartphone to the
Infotainment system via Bluetooth
3 61.
Creating a new account Press the ; button and then select
the Apps icon to display a welcome
screen.
To setup a new account, select the
respective screen button at the
bottom of the screen. You are led through various setup screens.First, a list of all phones paired to the
system is displayed. Select the phone
with which you want to establish an
Internet connection to the app store.
Then a keyboard for the entry of an
email address is displayed. Enter
your email address.
In the menu displayed afterwards, a
PIN code needs to be set. Select the
New PIN entry field. A keyboard is
displayed. Select the desired digits.
To confirm the PIN code, select the
Confirm New PIN entry field. The
keyboard is redisplayed. Enter the
PIN code again. Confirm your input.
A menu for country selection is
displayed. Scroll through the list and
select the desired country.
Last, the privacy policy of the app
store is displayed. Select the Agree
screen button to create the account.
The apps main menu is displayed.
Installing new apps
Press the ; button and then select
the Apps icon to display the apps
main menu.
Page 37 of 135

External devices37
Select the Apps screen button at the
bottom of the screen to display the apps menu.
All
To display a list of all apps available,
select the All screen button at the
bottom of the screen.
Scroll through the list and select the
desired app. A submenu with detailed
information on the respective app is
displayed.
To install the app on the Infotainment
system, select the Install screen
button at the bottom of the screen.
The app is installed.
When the installation process is
finished, the Install screen button
changes to Launch.
Notice
Apps installed on the Infotainment
system are displayed as icons on the home pages.
o
To search for a specific app, select the o screen button. A keyboard is
displayed.Enter the search name. A list of all
apps found for the respective search
name is displayed.
Select the desired app. A submenu
with detailed information on the
respective app is displayed.
To install the app on the Infotainment
system, select the Install screen
button at the bottom of the screen.
The app is installed.
When the installation process is
finished, the Install screen button
changes to Launch.
Notice
Apps installed on the Infotainment
system are displayed as icons on the home pages.
My Apps Press the ; button and then select
the Apps icon to display the apps
main menu.
Select the Apps screen button at the
bottom of the screen to display the
apps menu.To display a list of all apps installed on the Infotainment system, select
the My Apps screen button at the
bottom of the screen.
Select the desired options for e.g.
starting or deleting an app.
Settings The settings menu provides options
for the management of the accounts.
Press the ; button and then select
the Apps icon to display the apps
main menu.
Select the Settings screen button at
the bottom of the screen to display the respective submenu.
Select the desired option.
Page 38 of 135

38NavigationNavigationGeneral information.....................38
Usage .......................................... 39
Destination input ..........................43
Guidance ..................................... 51General information
The navigation application will reliably guide you to your destination without
the need to read maps.
The current traffic situation is taken
into account in the route calculation.
For this reason, the Infotainment
system receives traffic
announcements in the current
reception area via RDS-TMC.
The navigation application cannot,
however, take into account traffic
incidents, traffic regulations changed at short notice and hazards or
problems that arise suddenly (e.g.
road works).Caution
The usage of the navigation
system does not release the driver
from the responsibility for a
correct, vigilant attitude in road
traffic. The relevant traffic
regulations must always be
followed. If a navigation instruction contradicts traffic regulations, the
traffic regulations always apply.
Functioning of the navigation
application
The position and movement of the
vehicle are detected by the navigation
application using sensors. The
travelled distance is determined by
the vehicle's speedometer signal and turning movements on bends by a
gyro sensor. The position is
determined by the GPS satellites
(Global Positioning System).
By comparing the sensor signals with the digital maps, it is possible to
determine the position with an
accuracy of approx. 10 metres.
The system will also work with poor
GPS reception, however, the
accuracy of the determination of the
position will be reduced.
After the entry of the destination
address or point of interest (nearest
petrol station, hotel, etc.) the route is
calculated from the current location to
the destination selected.
Page 42 of 135

42Navigation
Position informationCurrent position
Press the multifunction knob to
display the Navigation Menu . Select
the Current Position Info menu item.
On the right side of the screen, the
current position is displayed on the
map. On the left side, the GPS
coordinates of the current position are
shown.
Destination position
If route guidance is active, you may
display information on the destination entered.
Press the multifunction knob to
display the Navigation Menu . Select
the Destination Position Info menu
item.
On the right side of the screen, the
destination is displayed on the map.
On the left side, the address and the
GPS coordinates of the destination
are shown.Saving a position
The current position or a destination
position may be saved in the address
book.
Select the Save screen button. Find a
detailed description on saving
addresses in the address book
3 43.
Route simulation The Infotainment system features a
route simulation mode for test
purposes.
To start the simulation mode, press
the CONFIG button and then select
the Navigation Settings menu item.
Scroll through the list and select
Route Simulation to display the
respective submenu.
Starting position
Since the simulation mode does not
draw on the GPS signal providing the current position of the vehicle, a start
position must be set manually.Use Last Known Position
To set the last position provided by a GPS signal as starting point, select
the Use Last Known Position menu
item.Use Previous Destination
To use one of the last destinations
entered as starting point, select the
Use Previous Destination menu item.
The previous destinations list is
displayed.
Select the desired address.Use Specified Location
To use a specific location as starting
point, select the Use Specified
Location menu item.
Enter an address. Find a detailed description 3 43.
Simulation mode is started.
Cancelling simulation mode
To leave the simulation mode, press
the CONFIG button and then select
the Navigation Settings menu item.
Scroll through the list and select
Route Simulation to display the
respective submenu.