light VAUXHALL MOKKA 2014 Infotainment system
[x] Cancel search | Manufacturer: VAUXHALL, Model Year: 2014, Model line: MOKKA, Model: VAUXHALL MOKKA 2014Pages: 221, PDF Size: 4.66 MB
Page 26 of 221

26Radio
Each waveband has 2 autostore lists
( AS 1 , AS 2 ), in each of which
6 stations can be stored.
Notice
The currently received station is highlighted.
Automatic station storing
Keep the AS button pressed until an
autostore message is displayed. The
12 strongest stations in the current
waveband are stored in the two
autostore lists.
To cancel the autostore procedure,
select the Cancel screen button.
Storing stations manually
Stations can also be stored manually
in the autostore lists.
Set the station to be stored.
Press the AS button to open the
autostore list or to switch to another autostore list.
To store the station in a list position:
press the corresponding station
button 1...6 until a confirmation
message is displayed.
Notice
Manually stored stations are
overwritten in an automatic station
storing process.
Retrieving a station
If required, press the AS button to
open an autostore list or to switch to
another autostore list.
Press one of the station buttons 1...6
to activate the station at the
corresponding list position.
Favourite lists
Stations of all wavebands can be
stored manually in the favourite lists.
6 stations can be stored in each
favourite list. The number of available favourite lists can be set (see below).
Notice
The currently received station is
highlighted.
Storing a station Set the station to be stored.
Briefly press the FAV button to open
a favourite list or to switch to another favourite list.
To store the station in a list position:
press the corresponding station
button 1...6 until a confirmation
message is displayed.
Page 41 of 221

Navigation41
Map modes
Press the multifunction knob to
display the Navigation Menu . Select
the Map Modes menu item to display
the respective submenu.
The following options are available: ■ Full Map ("Normal" view described
above): Full screen map view, all
function and indication screen
buttons displayed.
■ Full Glory : Full screen map view,
most functions and indication
screen buttons hidden.
■ Split with Turn List : Divided screen
with map on the left and turn list on the right side.
■ Split with Turn Arrow : Divided
screen with map on the left side and
turn arrow for the next turning
manoeuvre on the right side.
■ Split with Media : Divided screen
with map on the left side and audio
source currently active on the right
side.
Select the desired option.Map display
Press the multifunction knob to
display the Navigation Menu . Select
the Map Settings menu item and then
Map Display to display the respective
submenu.
Depending on the external lighting
conditions, activate the Day or Night
menu item.
For an automatic adaption by the
system, activate Automatic.
Displaying POIs
Press the multifunction knob to
display the Navigation Menu .
Select the Show POIs menu item to
display the respective submenu.
If you wish all POIs available in the
system to be displayed on the map, activate Show all POIs .
If you do not wish POIs to be
displayed on the map, activate Hide
all POIs .
To only display specific POIs, activate
the User Defined menu item and then
activate the POI categories you wish
to be displayed.Changing screen information
The route information displayed on
the screen during active route
guidance may be customised.
Press the multifunction knob to
display the Navigation Menu . Scroll
through the list and select the Switch
Route Time/Destination menu item.Time information
If you wish to change the time
information displayed, select Switch
Arrival/Travel Time to display the
respective submenu.
Activate the information setting you
wish to be displayed.Destination information
If you are in a waypoint trip, you may
want to display the route information
for a waypoint instead of those for the final destination.
To change the setting, select Switch
Waypoint/Destination . A list of all
destinations in the waypoint trip
currently active is displayed.
Activate the information setting you
wish to be displayed.
Page 58 of 221

58Speech recognition
In such a case you need to select
another language for the display if you want to control the Infotainment
system via voice input. Changing
the display language, see
"Language" in chapter "System
settings" 3 21.
Address input for destinations in
foreign countries
In case you want to enter the address
of a destination located in a foreign
country via voice input, you need to
change the language of the
Infotainment display to the language
of the foreign country.
E.g. if the display is currently set to
English and you want to enter the
name of a city located in France, you
need to change the display language
to French.
Exceptions: If you want to enter
addresses in Belgium, you may
optionally change the display
language to French or Dutch. For
addresses in Switzerland you may
optionally change the display
language to French, German, or
Italian.For changing the display language,
see "Language" in chapter "System
settings" 3 21.
Input order for destination addresses The order in which the parts of an
address need to be entered using the speech recognition system is
dependent on the country where the
destination is located.
■ Austria, Germany:
■ Belgium, France, Great Britain:
■ Italy, Netherlands, Portugal, Russia, Spain, Switzerland:
Usage
Activating speech recognition Notice
Speech recognition is not available
during an active phone call.
Press the w button on the right side of
the steering wheel.The audio system mutes, the w
symbol on the display is highlighted, and a voice output message prompts
you to say a command.
As soon as the speech recognition is
ready for voice input, a beep is heard.
You can now say a voice command to
directly initiate a system function
(e.g. playing a radio station), or to
start a dialogue sequence with
several dialogue steps (e.g. entering
a destination address), see
"Operation via speech commands"
further below.
After a dialogue sequence is finished,
the speech recognition is deactivated
automatically. To initiate another dialogue sequence, you must activate
the speech recognition again.
Adjusting the volume of voice
prompts
Press the w or ─ buttons on the right
side of the steering wheel.
Page 88 of 221
88Radio
AM waveband
Turn the multifunction knob and set
the optimal reception frequency on
the pop-up frequency display.
DAB waveband
Press the multifunction knob to open
the DAB menu and select DAB
manual tuning .
Turn the multifunction knob and set
the required reception frequency on
the pop-up frequency display.
Autostore lists
The stations that can be received best
in a waveband can be searched for
and stored automatically via the
autostore function.
Notice
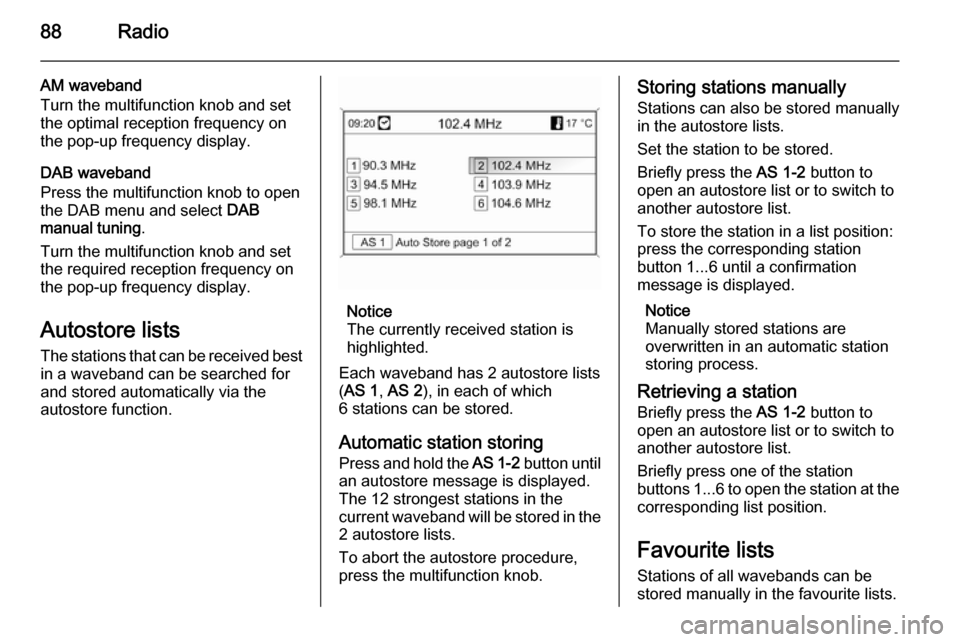
The currently received station is highlighted.
Each waveband has 2 autostore lists
( AS 1 , AS 2 ), in each of which
6 stations can be stored.
Automatic station storing
Press and hold the AS 1-2 button until
an autostore message is displayed.
The 12 strongest stations in the
current waveband will be stored in the 2 autostore lists.
To abort the autostore procedure,
press the multifunction knob.
Storing stations manually
Stations can also be stored manually
in the autostore lists.
Set the station to be stored.
Briefly press the AS 1-2 button to
open an autostore list or to switch to
another autostore list.
To store the station in a list position:
press the corresponding station
button 1...6 until a confirmation
message is displayed.
Notice
Manually stored stations are
overwritten in an automatic station storing process.
Retrieving a station
Briefly press the AS 1-2 button to
open an autostore list or to switch to
another autostore list.
Briefly press one of the station
buttons 1...6 to open the station at the
corresponding list position.
Favourite lists
Stations of all wavebands can be
stored manually in the favourite lists.
Page 89 of 221
Radio89
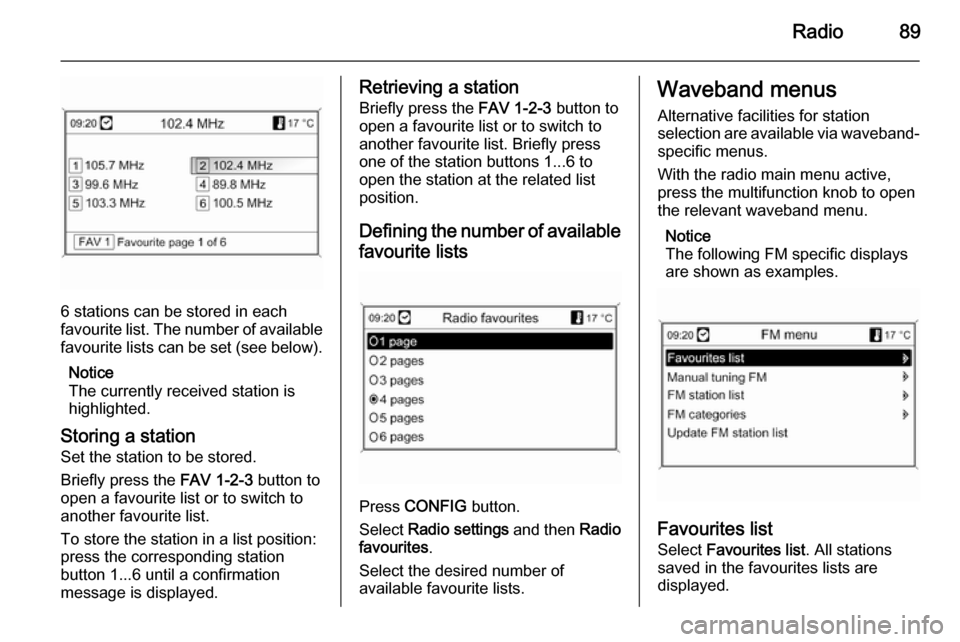
6 stations can be stored in each
favourite list. The number of available favourite lists can be set (see below).
Notice
The currently received station is
highlighted.
Storing a station Set the station to be stored.
Briefly press the FAV 1-2-3 button to
open a favourite list or to switch to
another favourite list.
To store the station in a list position:
press the corresponding station
button 1...6 until a confirmation
message is displayed.
Retrieving a station
Briefly press the FAV 1-2-3 button to
open a favourite list or to switch to
another favourite list. Briefly press
one of the station buttons 1...6 to
open the station at the related list
position.
Defining the number of available favourite lists
Press CONFIG button.
Select Radio settings and then Radio
favourites .
Select the desired number of
available favourite lists.
Waveband menus
Alternative facilities for station
selection are available via waveband-
specific menus.
With the radio main menu active,
press the multifunction knob to open
the relevant waveband menu.
Notice
The following FM specific displays
are shown as examples.
Favourites list
Select Favourites list . All stations
saved in the favourites lists are
displayed.
Page 96 of 221
96CD PlayerCD PlayerGeneral information.....................96
Usage .......................................... 97General information
The Infotainment system's CD player
can replay audio CDs and MP3/WMA CDs.
Important information about
audio CDs and MP3/WMA CDsCaution
Under no circumstances place
DVDs, single-CDs with a diameter
of 8 cm or shaped CDs in the audio
player.
You must not put any stickers on
CDs. These discs can get jammed
in the CD drive and ruin the drive.
An expensive replacement of the
device will then be necessary.
■ Audio CDs with copy protection, which are not in compliance with
the audio CD standard, may not
play correctly or not at all.
■ Self-recorded CD-Rs and CD-RWs
are more vulnerable to mishandling
than prerecorded CDs. Correct
handling, especially in the case of
self-recorded CD-Rs and CD-RWs, must be ensured; see below.
■ Self-recorded CD-Rs and CD-RWs
may not play correctly or not at all.
■ On mixed mode CDs (combinations
of audio and data, e.g. MP3), only
the audio tracks will be detected
and played.
■ Avoid leaving fingerprints when you
change CDs.
■ Put CDs back in their sleeves immediately after removing them
from the audio player in order to
protect them from damage and dirt.
■ Dirt and liquids on CDs can smear the lens of the audio player inside
the device and cause faults.
■ Protect CDs from heat and direct sunlight.
■ The following restrictions apply for the data stored on an MP3/WMA
CD:
Maximum folder structure depth:
11 levels.
Maximum number of MP3/WMA
files that can be saved: 1000.
Page 137 of 221
Navigation137
and roads may differ from those in
use at the time the map data was produced.
To order additional SD cards or an
update of the map data, contact your
Opel Service Partner.
Replacing a map SD card, see below .
Important information on SD card
handlingCaution
Never attempt to use an SD card
that has been cracked, deformed
or repaired using adhesive tape.
Doing so may damage the
equipment.
■ Handle the SD card with care. Never touch the metal contacts.
■ Do not use any conventional cleaner, benzine, thinner, or
antistatic spray.
■ If you need to clean the SD card, use a soft cloth.
■ Do not bend the SD card. Do notuse any SD card that is bent or
cracked.
■ Do not put any sticker or write anything on either surface.
■ Do not store the SD card in locations exposed to direct
sunlight, or in high temperatures or
humidity.
■ Always place the SD card in its storage case, when not in use.
Replacing a map SD card
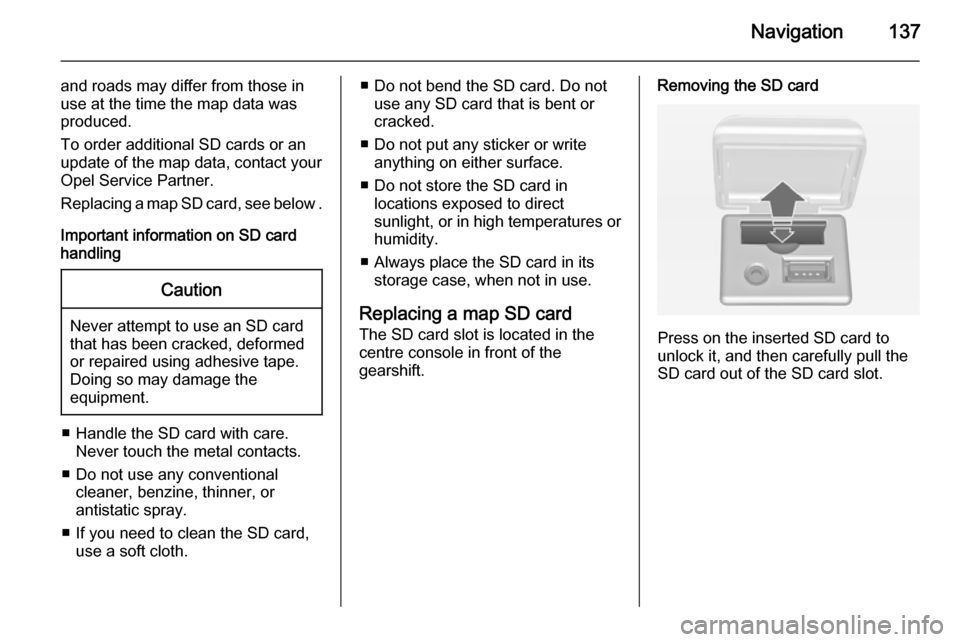
The SD card slot is located in the
centre console in front of the
gearshift.Removing the SD card
Press on the inserted SD card to
unlock it, and then carefully pull the
SD card out of the SD card slot.
Page 190 of 221
190Audio playersAudio playersCD player................................... 190
Auxiliary devices ........................198CD player
The CD/MP3 player of this system
can play audio CD and MP3 (WMA)
discs.
Before using the CD player Important information about audio CDand MP3 (WMA) discsCaution
In any case, do not insert any
DVDs, mini disks with a diameter
of 8 cm, or discs with abnormal
surfaces in this CD/MP3 (WMA)
player.
Do not put any stickers on the disk surface. Such disks may get stuck
in the CD player, and damage the
drive device. If this occurs, then
the device will need to be replaced
at high costs.
■ An audio CD disc with an anti- piracy function with no compatibilitywith the audio CD standard may not
work properly or not at all.
■ CD-R and CD-RW discs that are manually recorded are more often
handled with carelessness than the
original CD discs. Manually
recorded CD-R and CD-RW discs should be handled with special
care. Please refer to the following.
■ Manually recorded CD-R and CD- RW discs may not play properly or
not at all. In such cases, this is not a problem with the device.
■ When changing discs, take care to not smear any fingerprints on the
playing side.
■ After removing the disc from the CD/MP3 player, make sure to
immediately put the disc into a disc
sleeve to prevent it from being
damaged or smeared with dust.
■ If the disc is smeared with dust or liquid, then this may cause
problems by contaminating the lens of the CD/MP3 player inside the
device.
■ Protect the disc from heat and exposure to direct light.
Page 191 of 221

Audio players191
Usable disc type■ This product can play audio CD/ MP3 (WMA) discs.
◆ CD-DA: CD-R/CD-RW
◆ MP3 (WMA): CD-R/CD-RW/CD- ROM
■ The MP3 (WMA) files below cannot
be played.
◆ Files encoded in MP3i (MP3 interactive) or MP3 PRO
standards
◆ MP3 (WMA) files encoded in non-
standards
◆ MP3 files that are not in MPEG1 Layer3 format
Cautions for using discs ■ Do not use any of the discs described below. Excessive use of
these discs in the player may cause
problems.
◆ Discs with stickers, labels, or a protective cell attached
◆ Discs affixed with a label printed with an inkjet printer◆ Discs that are made by over- burning, thus holding data
exceeding the standard capacity
◆ Discs with cracks or scratches or
which are bent
◆ An 8 cm disc or a non-circular disc (quadrangle, pentagon,
oval)
■ Do not put anything other than discs in the disc slot since this maycause trouble or damage.
■ The disc player may not work properly if the heater is turned on incold weather due to moisture
created inside the device. If this is
a concern, keep the product off for
about one hour before use.
■ Play may be stopped due to the vehicle shaking while driving on
rugged roads.
■ Do not forcefully take out or insert the disc or block it with your hand
while it is being ejected.
■ Insert the disc with the printed side facing up. It cannot be played if it is
inserted upside down.■ Do not touch the recording side with
your hand while handling the disc
(the side without any print or
decoration).
■ Place discs that are not being used
in cases, and keep them in a place
not exposed to direct light or high temperature.
■ Do not smear any chemical substances on the disc. Clean
discs of dirt with a moist, soft cloth, wiping from the centre to the edge.
Caution for using CD-R/RW discs ■ When using CD-R/CD-RW discs, only the discs that have been
"finalised" can be used.
■ Discs that are created with a PC may not play according to the
application programme setup and
environment.
■ CD-R/CD-RW discs, especially bulk discs, may not work if they are
exposed to direct light or high
temperature, or if they are kept
inside your vehicle for a long time.
Page 195 of 221
Audio players195
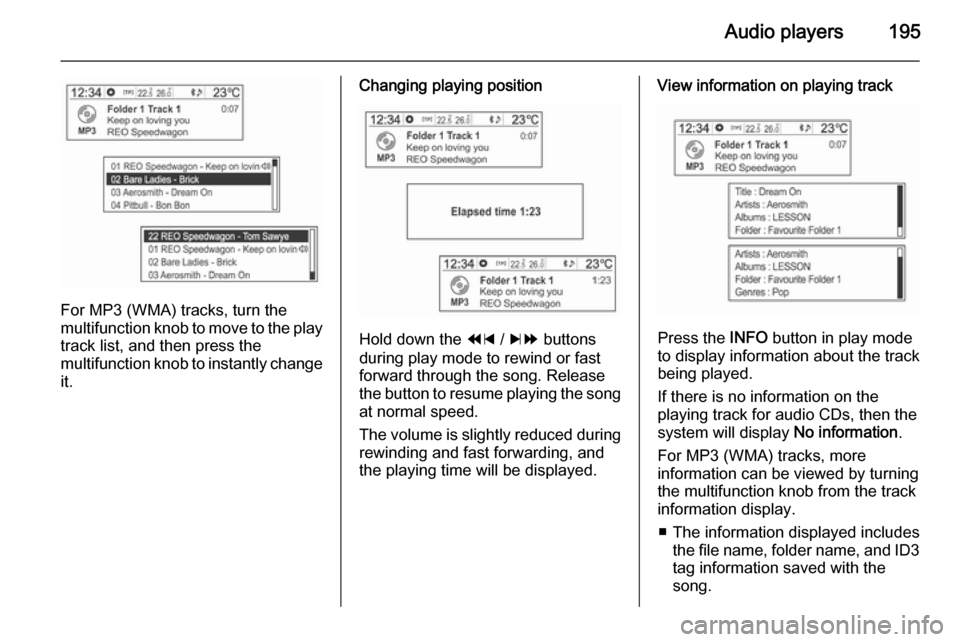
For MP3 (WMA) tracks, turn the
multifunction knob to move to the play
track list, and then press the
multifunction knob to instantly change it.
Changing playing position
Hold down the 1 / 8 buttons
during play mode to rewind or fast
forward through the song. Release
the button to resume playing the song
at normal speed.
The volume is slightly reduced during rewinding and fast forwarding, and
the playing time will be displayed.
View information on playing track
Press the INFO button in play mode
to display information about the track
being played.
If there is no information on the
playing track for audio CDs, then the
system will display No information.
For MP3 (WMA) tracks, more information can be viewed by turning
the multifunction knob from the track
information display.
■ The information displayed includes the file name, folder name, and ID3
tag information saved with the
song.