VAUXHALL MOKKA 2015.5 Owner's Manual
MOKKA 2015.5
VAUXHALL
VAUXHALL
https://www.carmanualsonline.info/img/38/19530/w960_19530-0.png
VAUXHALL MOKKA 2015.5 Owner's Manual
Trending: fuel tank capacity, warning light, check transmission fluid, air filter, service indicator, fuel reserve, reset infotainment system
Page 171 of 229
Vehicle care169
Lift the wiper arm, press button to
disengage the wiper blade and
remove.
Attach the wiper blade slightly angled
to the wiper arm and push until it
engages.
Lower wiper arm carefully.
Wiper blade on the rear window
1. Remove the wiper cover from the wiper assembly.
2. Lift wiper blade.
3. Press slider holder pin.
4. Pull wiper blade out.
Bulb replacement
Switch off the ignition and turn off the
relevant switch or close the doors.
Only hold a new bulb at the base. Do not touch the bulb glass with bare
hands.
Use only the same bulb type for
replacement.
Replace headlight bulbs from within
the engine compartment.
Halogen headlights
Low beam and high beam
Page 172 of 229
170Vehicle care
Remove protective cover.Low beam
1. Disconnect the headlight bulb socket connector.
2. Press spring clip, disengage it.
3. Remove the bulb from the bulbsocket and replace the bulb.
4. When fitting a new bulb, engage the lugs in the recesses on the
reflector.
5. Reinstall the headlight assembly.
6. Engage the spring clip.
7. Connect the bulb socket connector.
8. Place headlight protective cover in position and close.
High beam
1. Remove the bulb socket by pulling.
2. Remove the bulb from the bulb socket and replace the bulb.
Page 173 of 229
Vehicle care171
3. When fitting a new bulb, engagethe lugs in the recesses on the
reflector.
4. Reinstall the headlight assembly. 5. Place headlight protective cover in position and close.
Sidelights
1. Remove the socket from the assembly by turning
anticlockwise.
2. Remove bulb socket from reflector.
3. Detach plug connector from bulb.
4. Remove bulb from socket.
5. Insert new bulb.
6. Plug connector onto bulb.
7. Insert socket in reflector.
8. Reinstall the assembly.
Xenon headlights
9 Danger
Xenon headlights work under
extremely high electrical voltage.
Do not touch. Have bulbs replaced by a workshop.
Cornering lights
1. Remove the protective cover.
Page 174 of 229
172Vehicle care
2. Remove the bulb socket bypulling.
3. Remove the bulb from the bulbsocket and replace the bulb.
4. When fitting a new bulb, engage the lugs in the recesses on the
reflector.
5. Reinstall the headlight assembly.
6. Place headlight protective cover in position and close.
Fog lights
Have bulbs replaced by a workshop.
Front turn signal lights
1. Rotate bulb holder anticlockwise and disengage.
2. Push bulb into socket slightly,rotate anticlockwise, remove and
renew bulb.
3. Insert bulb holder in reflector, rotate clockwise to engage.
Tail lights
Left-hand side
1. Remove both covers and unscrew
screws. Remove the panel.
Page 175 of 229
Vehicle care173
2. Remove the cover.
Right-hand side
1. Remove the storage door and the
tyre repair kit.
2. Remove the cover.
3. Tail/Stop light (1)
Turn signal light (2)Back-up lamp (3)
4. Remove bulb holder. Remove and renew bulb.
5. Insert bulb holder into the tail light
assembly. Install tail light
assembly in body and tighten.
Close covers and engage.
6. Switch on ignition, operate and check all lights.
Page 176 of 229
174Vehicle careSide turn signal lights
If the lights do not operate, have themchecked by a workshop.
Centre high-mounted
brake light
If the centre high-mounted brake light does not operate, have it checked by
a workshop.
Number plate light
1. Prise the light out with a screwdriver.
2. Remove bulb housing downwards, taking care not to pull
on the cable.
Rotate bulb holder anticlockwise
to disengage.
3. Remove bulb from holder and renew bulb.
4. Insert bulb holder in bulb housing and rotate clockwise.
5. Insert bulb housing and secure using a screwdriver.
Page 177 of 229

Vehicle care175Interior lightsCourtesy lights 1. To remove it, prise the opposite side of the light switch using a flat-blade screwdriver.
2. Remove the bulb.
3. Replace the bulb.
4. Reinstall the light assembly.
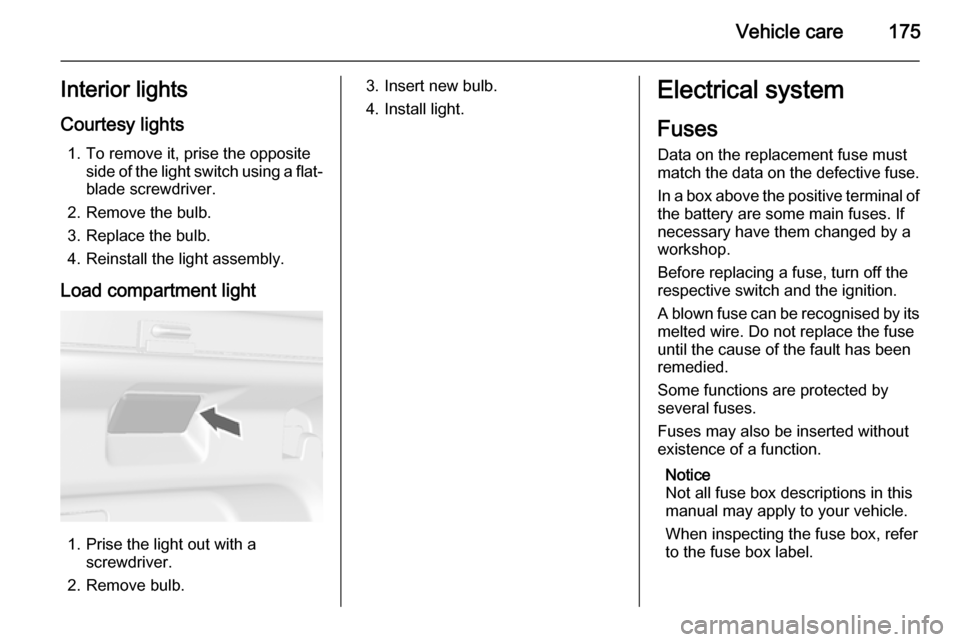
Load compartment light
1. Prise the light out with a screwdriver.
2. Remove bulb.
3. Insert new bulb.
4. Install light.Electrical system
Fuses
Data on the replacement fuse must
match the data on the defective fuse.
In a box above the positive terminal of the battery are some main fuses. If
necessary have them changed by a
workshop.
Before replacing a fuse, turn off the
respective switch and the ignition.
A blown fuse can be recognised by its
melted wire. Do not replace the fuse
until the cause of the fault has been
remedied.
Some functions are protected by
several fuses.
Fuses may also be inserted without
existence of a function.
Notice
Not all fuse box descriptions in this
manual may apply to your vehicle.
When inspecting the fuse box, refer
to the fuse box label.
Page 178 of 229
176Vehicle care
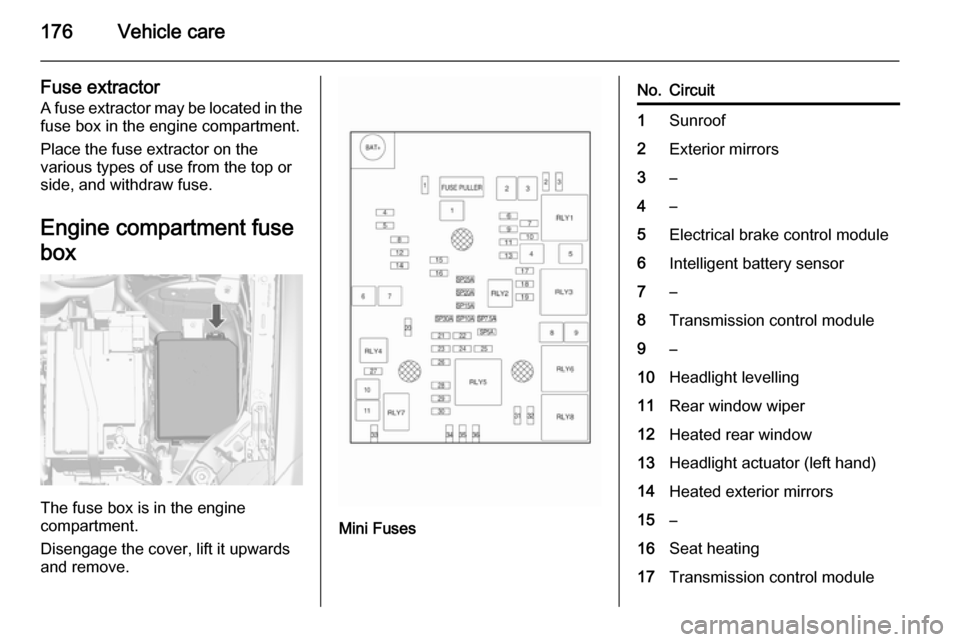
Fuse extractorA fuse extractor may be located in the fuse box in the engine compartment.
Place the fuse extractor on the
various types of use from the top or
side, and withdraw fuse.
Engine compartment fuse
box
The fuse box is in the engine
compartment.
Disengage the cover, lift it upwards
and remove.
Mini Fuses
No.Circuit1Sunroof2Exterior mirrors3–4–5Electrical brake control module6Intelligent battery sensor7–8Transmission control module9–10Headlight levelling11Rear window wiper12Heated rear window13Headlight actuator (left hand)14Heated exterior mirrors15–16Seat heating17Transmission control module
Page 179 of 229
Vehicle care177
No.Circuit18Engine control module19Fuel pump20–21Cooling fan22–23Ignition coil/Engine control
module24Washer pump25Headlamp actuator (right hand)26Engine control module27–28Engine control module29Engine control module30Exhaust system31Left-hand high beam32Right-hand high beam33Engine control moduleNo.Circuit34Horn35Air conditioning system36Front fog lamp
J-cases Fuses
No.Circuit1Electrical brake control module2Front wiper3Cooling fan4Power terminal of instrument
panel fuse box5–6Fuel heater7–8Cooling fan9Cooling fanNo.Circuit10Engine control module/Glow
plug11Starter
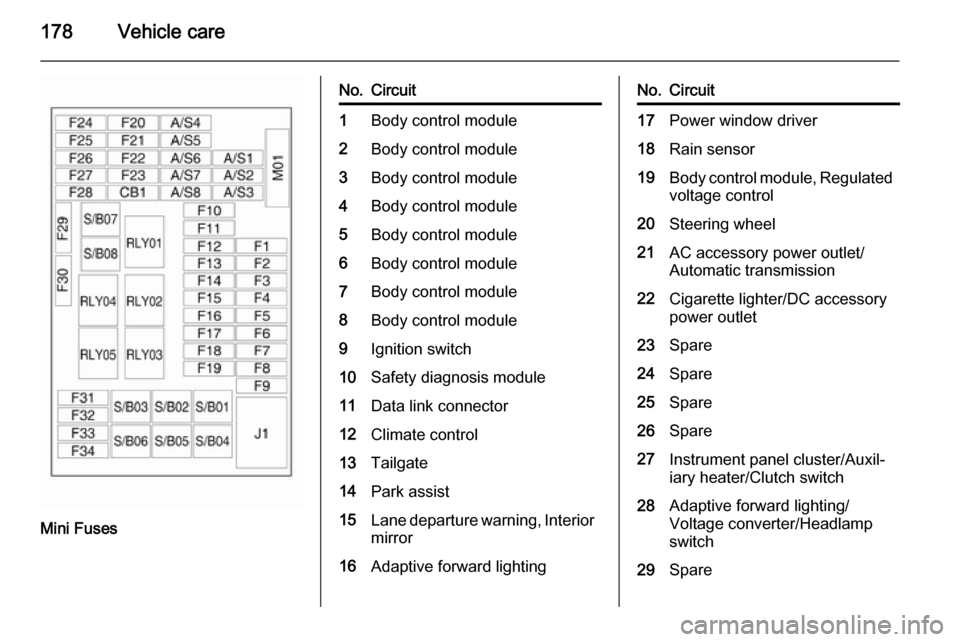
Instrument panel fuse box
Interior fuse block is located on the
underside of the driver's side
instrument panel.
To access the fuses, remove the
storage.
To remove the storage, open and pull it.
Page 180 of 229
178Vehicle care
Mini Fuses
No.Circuit1Body control module2Body control module3Body control module4Body control module5Body control module6Body control module7Body control module8Body control module9Ignition switch10Safety diagnosis module11Data link connector12Climate control13Tailgate14Park assist15Lane departure warning, Interior
mirror16Adaptive forward lightingNo.Circuit17Power window driver18Rain sensor19Body control module, Regulated
voltage control20Steering wheel21AC accessory power outlet/
Automatic transmission22Cigarette lighter/DC accessory
power outlet23Spare24Spare25Spare26Spare27Instrument panel cluster/Auxil‐
iary heater/Clutch switch28Adaptive forward lighting/
Voltage converter/Headlamp
switch29Spare
Trending: snow chains, bulb, ECU, change language, oil pressure, garage door opener, dimensions


