infotainment VAUXHALL MOKKA X 2017 Infotainment system
[x] Cancel search | Manufacturer: VAUXHALL, Model Year: 2017, Model line: MOKKA X, Model: VAUXHALL MOKKA X 2017Pages: 155, PDF Size: 2.85 MB
Page 32 of 155
32Radio●Besides high-quality digital audio
services, DAB is also able to
transmit programme-associated
data and a multitude of other data services including travel andtraffic information.
● As long as a given DAB receiver can pick up the signal sent out bya broadcasting station (even if
the signal is very weak), sound
reproduction is ensured.
● In the event of poor reception, the
volume is reduced automatically
to avoid the output of
disagreeable noises.
If the DAB signal is too weak to
be picked up by the receiver,
reception is interrupted
completely. This can be avoided
by activating DAB to DAB
Linking and/or DAB to FM
Linking in the DAB menu (see
below).
● Interference caused by stations that are on nearby frequencies (aphenomenon that is typical of AMand FM reception) does not
occur with DAB.● If the DAB signal is reflected by natural obstacles or buildings,
the reception quality of DAB is
improved, whereas AM or FM
reception is considerably
impaired in such cases.
● When DAB reception is enabled, the FM tuner of the Infotainmentsystem remains active in the
background and continually
searches for the best receivable FM stations. If TP 3 30 is
activated, traffic announcements
of the FM station with the best
reception are issued. Deactivate
TP if you do not wish DAB
reception to be interrupted by FM traffic announcements.
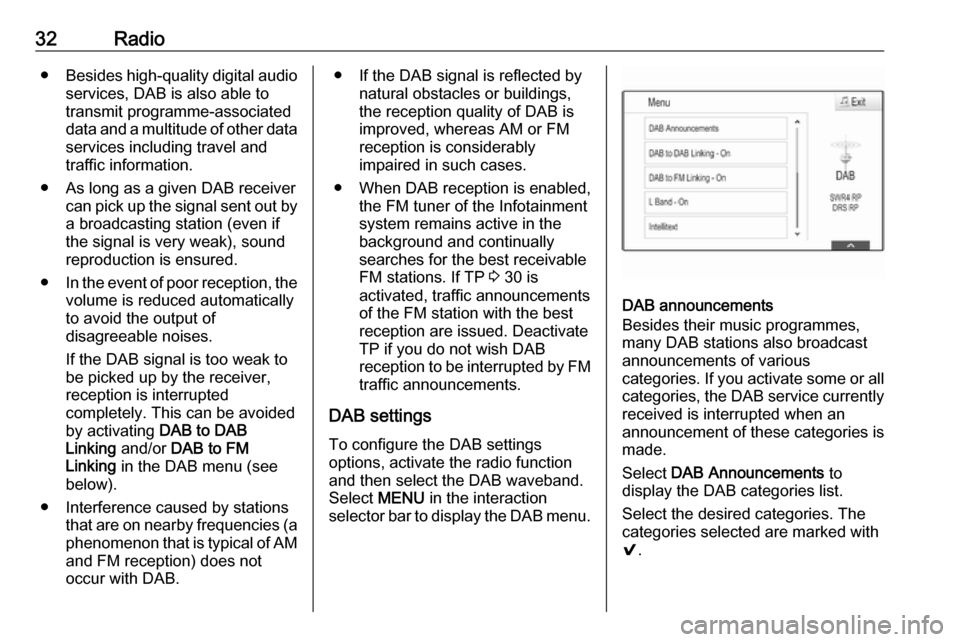
DAB settings To configure the DAB settings
options, activate the radio function
and then select the DAB waveband.
Select MENU in the interaction
selector bar to display the DAB menu.
DAB announcements
Besides their music programmes,
many DAB stations also broadcast
announcements of various
categories. If you activate some or all categories, the DAB service currently received is interrupted when an
announcement of these categories is
made.
Select DAB Announcements to
display the DAB categories list.
Select the desired categories. The
categories selected are marked with
9 .
Page 33 of 155

Radio33Notice
DAB announcements can only be
received if the DAB waveband is
activated.
DAB to DAB Linking
If this function is activated, the device
switches over to the same service
(programme) on another DAB
ensemble (if available) when the DAB
signal is too weak to be picked up by
the receiver.
Set DAB to DAB Linking - On or DAB
to DAB Linking - Off .
DAB to FM Linking
If this function is activated, the device switches over to a corresponding FM
station of the active DAB service (if
available) when the DAB signal is too
weak to be picked up by the receiver.
Set DAB to FM Linking - On or DAB
to FM Linking - Off .
L Band
If L Band is activated, the
Infotainment system receives an additional frequency range. Thefrequencies for L-band comprise
earth and satellite radio (1452 - 1492
MHz).
Set L Band - On or L Band - Off .
Intellitext
The Intellitext function allows for the
reception of additional information
such as announcements, financial
information, sports, news etc.
Select one of the categories and
choose a specific item to display
detailed information.
Page 34 of 155
34External devicesExternal devicesGeneral information.....................34
Playing audio ............................... 35
Playing movies ............................. 36
Using smartphone applications ...37
Using apps ................................... 37General information
A USB socket for the connection of external devices is located in thecentre console.
Notice
The sockets must always be kept
clean and dry.
USB port
An MP3 player, USB device or
smartphone can be connected to the
USB port.
The Infotainment system can play
music files and movies contained in
these devices.
When connected to the USB port, the devices mentioned above can be
operated via the controls and menus
of the Infotainment system.
Notice
Not all auxiliary devices are
supported by the Infotainment
system. Check the compatibility list
on our website.
Connecting/disconnecting a device
Connect the USB device to the USB port.Notice
If a non-readable USB device is
connected, a corresponding error
message appears and the
Infotainment system automatically
switches to the previous function.
To disconnect the USB device, select
another function and then remove the USB storage device.Caution
Avoid disconnecting the device
during playback. This may
damage the device or the
Infotainment system.
Bluetooth
Devices which support the Bluetooth
music profiles A2DP and AVRCP can be connected wirelessly to the
Infotainment system.
The Infotainment system can play
music files contained in these
devices.
Connecting/disconnecting a device
For a detailed description on the
Bluetooth connection 3 65.
Page 35 of 155
External devices35Bluetooth device management
To change the Bluetooth device
connected, select MENU in the
interaction selector bar.
Select Manage Bluetooth Devices to
display the device list.
For a detailed description 3 65.
File formats Only devices formatted in the FAT32,
NTFS and HFS+ file systems are
supported.
Notice
Some files may not be played
properly. This might be due to a
different recording format or the
condition of the file.
Files from online shops to which
Digital Rights Management (DRM)
has been applied cannot be played.
The Infotainment system can play the following audio and movie files stored
on external devices.
Audio files
The playable audio file formats are
MP3, WMA, AAC, M4A and AIF.When playing a file with ID3 tag
information, the Infotainment system
can display information, e.g. on the
track title and artist.
Movie files
The playable movie file formats are
AVI, MPG, MP4, XVID and WMV.
Common audio and video
combinations for mobile devices are
generally supported.
Playing audio Starting playback
If not connected, connect the device
3 34.
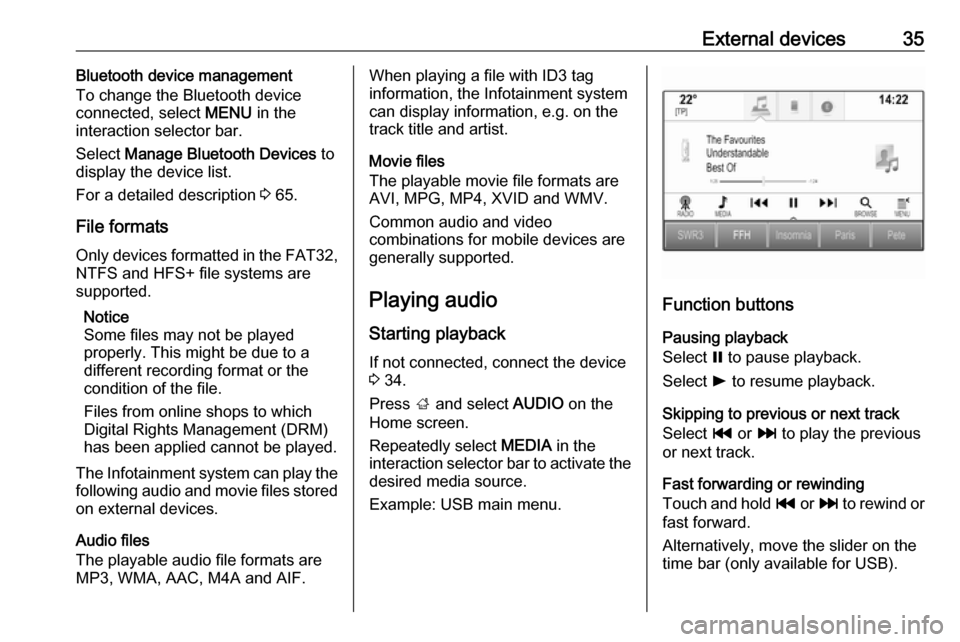
Press ; and select AUDIO on the
Home screen.
Repeatedly select MEDIA in the
interaction selector bar to activate the desired media source.
Example: USB main menu.
Function buttons
Pausing playback
Select = to pause playback.
Select l to resume playback.
Skipping to previous or next track
Select t or v to play the previous
or next track.
Fast forwarding or rewinding
Touch and hold t or v to rewind or
fast forward.
Alternatively, move the slider on the
time bar (only available for USB).
Page 37 of 155

External devices37Alternatively, move the slider on the
time bar.
Video menu
To display the video menu, select
MENU in the interaction selector bar.
Using smartphone applications
The phone projection applications
Apple CarPlay™ and Android™ Auto
display selected apps from your
smartphone on the Infotainment
screen and allow their operation
directly via the Infotainment controls.
Check with the device's manufacturer
if this function is compatible with your smartphone and if this application is
available in the country you are in.
Preparing the smartphone
Android phone: Download the
Android Auto app to your smartphone from the Google Play™ Store.
iPhone ®
: Make sure Siri ®
is activated
on your smartphone.Activating phone projection in the
settings menu
Press ; and then select SETTINGS
on the Home screen.
Scroll through the list and select
Apple CarPlay or Android Auto to
display a submenu.
Make sure the respective application
is activated.
To display a list of all devices
registered for this function, select
Manage Devices .
Connecting the mobile phone Connect the smartphone to the USBport 3 34.
Starting phone projection To start the phone projection function,
press ; and then select
PROJECTION .
Notice
If the application is recognised by
the Infotainment system, the
application icon may change to
Apple CarPlay or Android Auto .To start the function, you can
alternatively press and hold ; for a
few seconds.
The phone projection screen
displayed depends on your
smartphone and software version.
Returning to the Infotainment
screen
Press ;.
Using apps Via the SHOP application, external
apps can be downloaded to the
Infotainment system.
User registration
When first starting the SHOP, a user
registration is required.
Press ; and then select SHOP.
Follow the instructions on the screen: 1. Start the registration process.
2. Enter your first and last name.
3. Choose your country.
4. Accept the terms of use and privacy notice.
Page 38 of 155
38External devicesNotice
To read the terms of use and/or the
privacy notice, display the text on the
screen or send it to your email
account.
When the registration process is
completed, the app shop main page
is displayed.
Notice
The apps in the app shop can only
be downloaded if the Infotainment
system is connected to the internet.
Internet connection
An internet connection is required
either via the in-vehicle OnStar Wi-Fi
hotspot or an external device, e.g.
smartphone.
Press ; and then select SETTINGS.
Select Wi-Fi to display the Wi-Fi
menu.
Make sure that Wi-Fi is activated.
Select Manage Wi-Fi Networks to
display a submenu for internet
connections. Select Add Other
Network to establish a new
connection. Follow the instructions on the screen.Downloading an app
Before the external apps can be used
on the Infotainment system, they
have to be downloaded.
Press ; and then select SHOP.
Choose the browse tab to gain
access to all apps available for
download. Select the desired app to
display its main page and then start
the download process.
Notice
Apps which have been downloaded
to the Infotainment system are also
accessible via the home screen.
Starting an app
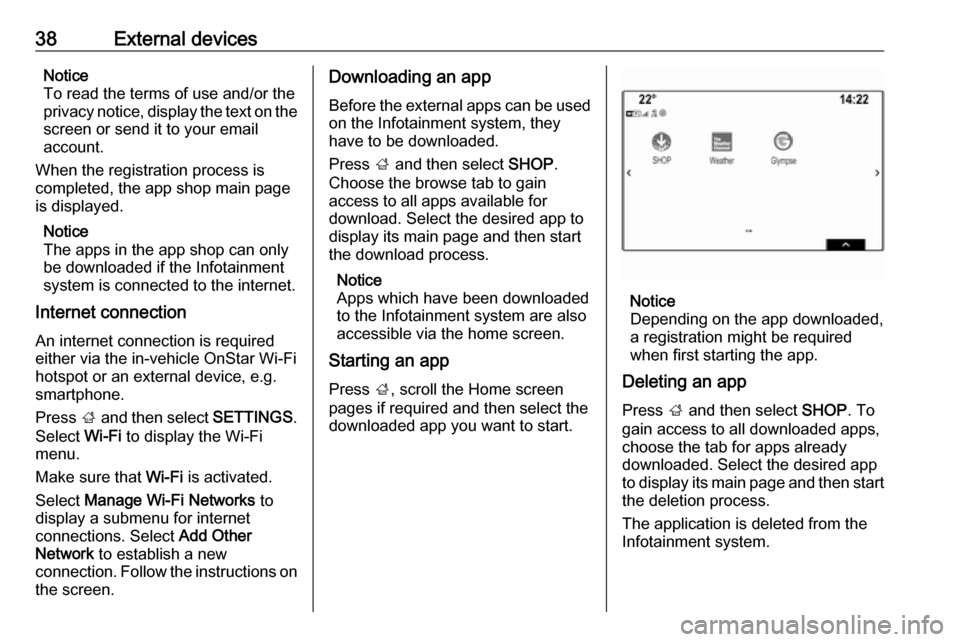
Press ;, scroll the Home screen
pages if required and then select the
downloaded app you want to start.
Notice
Depending on the app downloaded,
a registration might be required
when first starting the app.
Deleting an app
Press ; and then select SHOP. To
gain access to all downloaded apps,
choose the tab for apps already
downloaded. Select the desired app
to display its main page and then start
the deletion process.
The application is deleted from the
Infotainment system.
Page 40 of 155
40NavigationNavigationGeneral information.....................40
Usage .......................................... 41
Destination input ..........................47
Guidance ..................................... 53General information
The navigation system will reliably guide you to your destination.
The current traffic situation is taken
into account in the route calculation.
For this purpose, the Infotainment
system receives traffic
announcements in the current
reception area via RDS-TMC.
The navigation system cannot,
however, take into account traffic
incidents, traffic regulations changed
at short notice and hazards or
problems that arise suddenly (e.g.
road works).Caution
The usage of the navigation
system does not release the driver
from the responsibility for a
correct, vigilant attitude in road
traffic. The relevant traffic
regulations must always be
followed. If a navigation instruction contradicts traffic regulations, the
traffic regulations always apply.
Functioning of the navigation
system
The position and movement of the
vehicle are detected by the navigation
system using sensors. The travelled
distance is determined by the
vehicle's speedometer signal, turning
movements on bends by a gyro
sensor. The position is determined by the GPS (Global Positioning System)
satellites.
By comparing the sensor signals with the digital maps, it is possible to
determine the position with an
accuracy of approx. 10 metres.
The system will also work with poor
GPS reception. However, the
accuracy of the determination of the
position will be reduced.
After the entry of the destination
address or point of interest (nearest
petrol station, hotel, etc.), the route is
calculated from the current location to
the destination selected.
Route guidance is provided by voice
output and an arrow, as well as with
the aid of a multi-colour map display.
Page 41 of 155
Navigation41Important informationTMC traffic information system and
dynamic route guidance
The TMC traffic information system
receives all current traffic information from TMC radio stations. This
information is included in the
calculation of the overall route. During
this process, the route is planned so that traffic problems related to pre-
selected criteria are avoided.
If there is a traffic problem during
active route guidance, depending on
the pre-settings, a message appears
as to whether the route should be
changed.
TMC traffic information is displayed in
the map display as symbols or as
detailed text on the TMC messages
menu.
To be able to use TMC traffic
information, the system must receive
TMC stations in the relevant region.
The TMC traffic stations can be
selected in the navigation menu
3 41.Map data
All required map data is stored within
the Infotainment system. To update
your map software via the USB port,
contact your workshop.
Usage
To display the navigation map,
press ; and select NAV on the Home
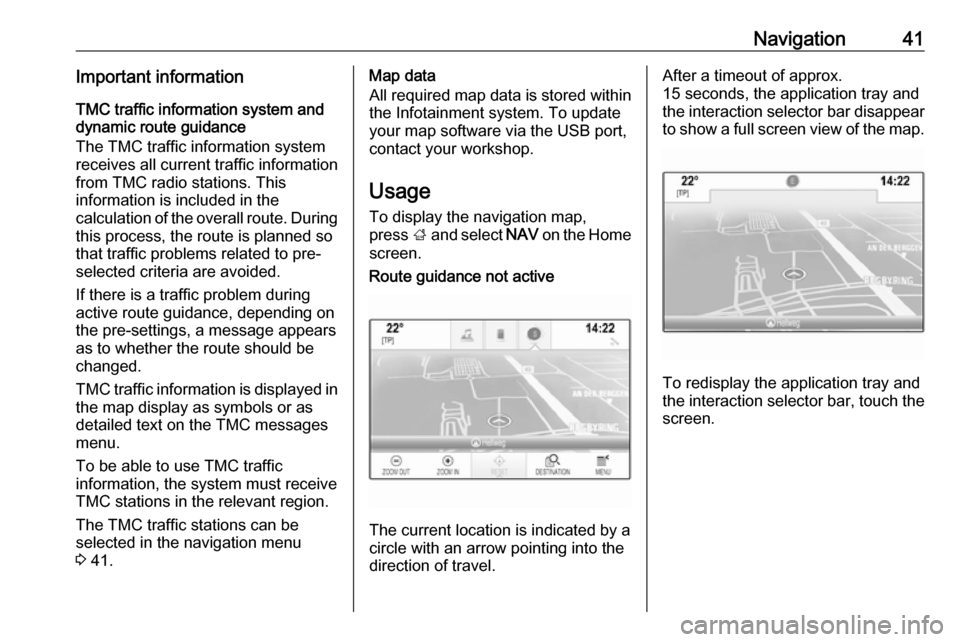
screen.Route guidance not active
The current location is indicated by a
circle with an arrow pointing into the
direction of travel.
After a timeout of approx.
15 seconds, the application tray and
the interaction selector bar disappear
to show a full screen view of the map.
To redisplay the application tray and
the interaction selector bar, touch the
screen.
Page 45 of 155

Navigation45Recent destinations list
Select Recent Destinations to display
the respective submenu.
To delete all entries in the recent destinations list, select Delete All
Destinations . Confirm the message
displayed to delete the entire recent
destinations list.
To delete individual destinations, select Delete Individual Destinations .
The recent destinations list is
displayed. Select ─ next to the
respective destination. Confirm the
message displayed to delete the
destination.
Downloaded POIs
Select My POIs to display the
respective submenu.
POIs which were previously
downloaded to the system may be
deleted. The other POIs remain within the system.
To delete all entries in the contacts
list, select Delete All My POIs .
Confirm the message displayed to
delete the entire POIs list.To delete only individual categories,
select Delete Individual Categories to
display a list of POI categories. Select ─ next to the respective category.
Confirm the message displayed to
delete the category.
Uploading destination data to a USB
device
For later use, e.g. in other vehicles,
you can store the vehicle contacts list
and POIs previously downloaded
(see "Creating and downloading user defined POIs" below) on a USB
device:
Select Upload Saved Locations .
The contacts list and POI data is
stored on the connected USB device
in the folders "F:\myContacts"
respective "F:\myPOIs", where "F:\" is
the root folder of the USB device.
Notice
This function may only be carried out
if a USB device with sufficient
storage space is connected.
Autocomplete function
To delete the list of destination entries used by the autocomplete function,
select Delete Autocomplete .Downloading contacts data
You can exchange your vehicle
contacts list data with Infotainment
systems in other vehicles:
To upload the data to a USB device,
see "Uploading navigation data to a
USB device" above.
Connect the USB device to the
Infotainment system of another
vehicle 3 34.
A message is displayed that prompts
you to confirm the download.
After confirmation, the contacts data
is downloaded to the Infotainment
system.
The downloaded contacts are then
selectable via the CONTACTS menu
3 20.
Creating and downloading user
defined POIs (My POIs)
In addition to the predefined POIs
already stored in the Infotainment
system, you can create user defined
POIs that meet your personal
requirements. After creation, such
Page 46 of 155
46Navigationuser defined POIs can be
downloaded to the Infotainment
system.
For each POI, you need to define the GPS coordinates (longitude and
latitude values) of the respective
location and a descriptive name.
After downloading the POI data to the Infotainment system, you will find the
respective POIs as selectable
destinations in the My POIs menu,
see "POIs entry" in chapter
"Destination input" 3 47.
Creating a text file with POI data
Create a text file (e.g. by using a
simple text editor software) with an arbitrary name and the file
extension .poi, e.g. "TomsPOIs.poi".
Notice
Character encoding UTF-8
(Unicode) needs to be selected
when storing the text file. Otherwise
the POI data may not be imported
correctly to the system.
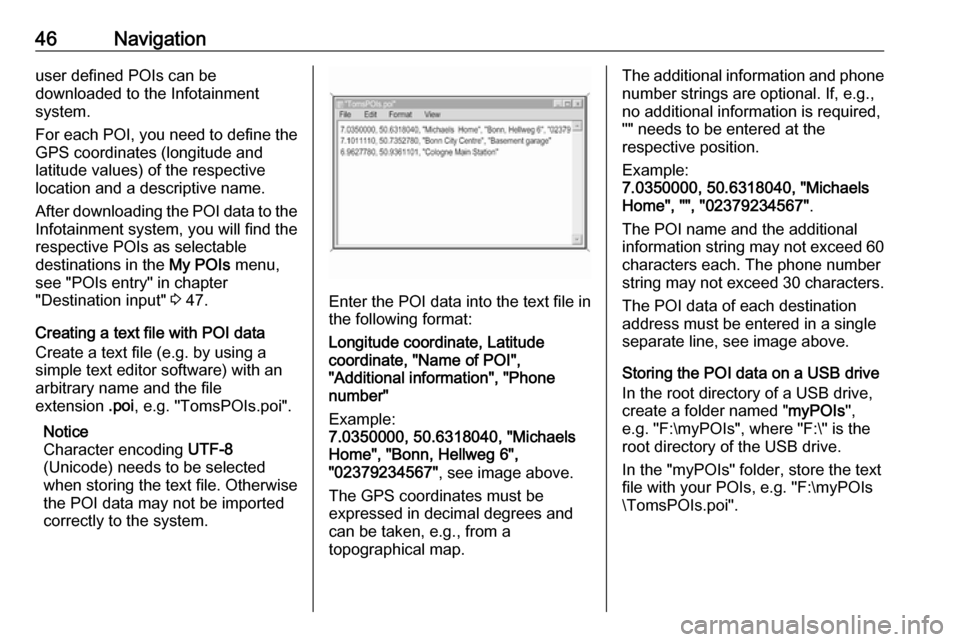
Enter the POI data into the text file in the following format:
Longitude coordinate, Latitude
coordinate, "Name of POI",
"Additional information", "Phone
number"
Example:
7.0350000, 50.6318040, "Michaels
Home", "Bonn, Hellweg 6",
"02379234567" , see image above.
The GPS coordinates must be
expressed in decimal degrees and
can be taken, e.g., from a
topographical map.
The additional information and phone
number strings are optional. If, e.g., no additional information is required,
"" needs to be entered at the
respective position.
Example:
7.0350000, 50.6318040, "Michaels
Home", "", "02379234567" .
The POI name and the additional
information string may not exceed 60 characters each. The phone number
string may not exceed 30 characters.
The POI data of each destination
address must be entered in a single
separate line, see image above.
Storing the POI data on a USB drive
In the root directory of a USB drive,
create a folder named " myPOIs",
e.g. "F:\myPOIs", where "F:\" is the
root directory of the USB drive.
In the "myPOIs" folder, store the text
file with your POIs, e.g. "F:\myPOIs
\TomsPOIs.poi".