warning VAUXHALL MOKKA X 2017 Owner's Guide
[x] Cancel search | Manufacturer: VAUXHALL, Model Year: 2017, Model line: MOKKA X, Model: VAUXHALL MOKKA X 2017Pages: 245, PDF Size: 6.77 MB
Page 52 of 245
50Seats, restraints
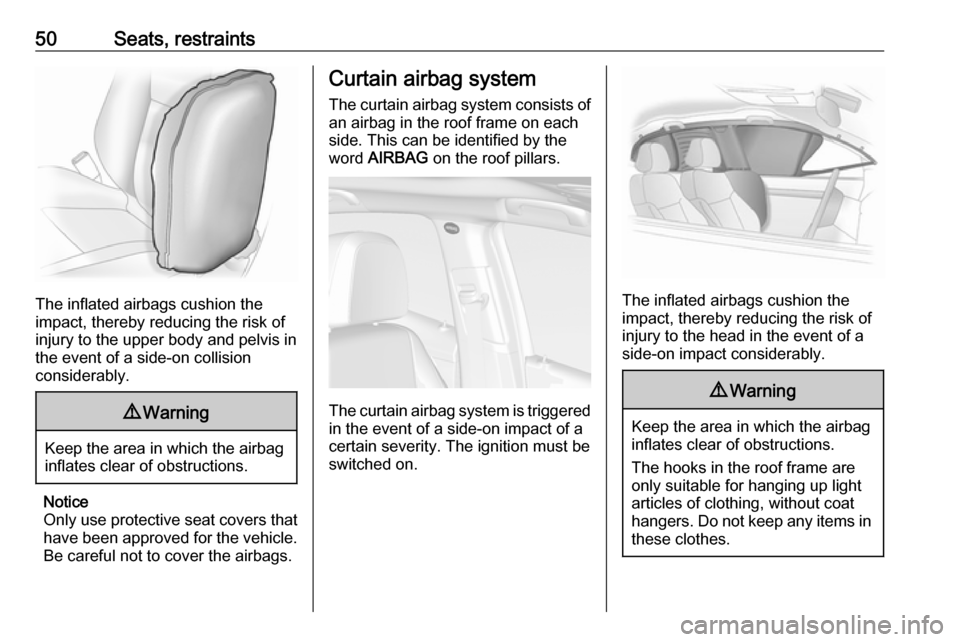
The inflated airbags cushion the
impact, thereby reducing the risk of
injury to the upper body and pelvis in
the event of a side-on collision
considerably.
9 Warning
Keep the area in which the airbag
inflates clear of obstructions.
Notice
Only use protective seat covers that
have been approved for the vehicle.Be careful not to cover the airbags.
Curtain airbag system
The curtain airbag system consists of an airbag in the roof frame on each
side. This can be identified by the
word AIRBAG on the roof pillars.
The curtain airbag system is triggered
in the event of a side-on impact of a
certain severity. The ignition must be
switched on.
The inflated airbags cushion the
impact, thereby reducing the risk of
injury to the head in the event of a
side-on impact considerably.
9 Warning
Keep the area in which the airbag
inflates clear of obstructions.
The hooks in the roof frame are
only suitable for hanging up light
articles of clothing, without coat
hangers. Do not keep any items in these clothes.
Page 54 of 245

52Seats, restraintsChild restraintsChild restraint systems
We recommend the Vauxhall child
restraint system which is tailored
specifically to the vehicle.
When a child restraint system is being
used, pay attention to the following
usage and installation instructions
and also those supplied with the child restraint system.
Always comply with local or national
regulations. In some countries, the
use of child restraint systems is
forbidden on certain seats.9 Warning
When using a child restraint
system on the front passenger
seat, the airbag systems for the
front passenger seat must be
deactivated; if not, the triggering of the airbags poses a risk of fatal
injury to the child.
This is especially the case if rear-
facing child restraint systems are
used on the front passenger seat.
Airbag deactivation 3 51.
Airbag label 3 46.
Selecting the right system The rear seats are the most
convenient location to fasten a child
restraint system.
Children should travel facing
rearwards in the vehicle as long as
possible. This ensures that the child's backbone, which is still very weak, is
under less strain in the event of an
accident.
Suitable are restraint systems that
comply with valid UN ECE
regulations. Check local laws and
regulations for mandatory use of child restraint systems.
Ensure that the child restraint system
to be installed is compatible with the
vehicle type.
Ensure that the mounting location of
the child restraint system within the
vehicle is correct, see following
tables.
Allow children to enter and exit the
vehicle only on the side facing away
from the traffic.When the child restraint system is not in use, secure the seat with a seat beltor remove it from the vehicle.
Notice
Do not affix anything on the child
restraint systems and do not cover
them with any other materials.
A child restraint system which has
been subjected to stress in an
accident must be replaced.
Page 60 of 245
58StorageStorageStorage compartments................58
Glovebox ................................... 58
Cupholders ................................ 58
Front storage ............................. 59
Sunglasses storage ...................59
Underseat storage .....................60
Centre console storage .............60
Rear carrier system ...................60
Load compartment .......................70
Load compartment cover ...........72
Rear floor storage cover ............72
Lashing eyes ............................. 72
Warning triangle ........................72
First aid kit ................................. 73
Roof rack system .........................73
Roof rack ................................... 73
Loading information .....................73Storage compartments9Warning
Do not store heavy or sharp
objects in the storage
compartments. Otherwise, the
storage compartment lid could
open and vehicle occupants could be injured by objects being thrown
around in the event of hard
braking, a sudden change in
direction or an accident.
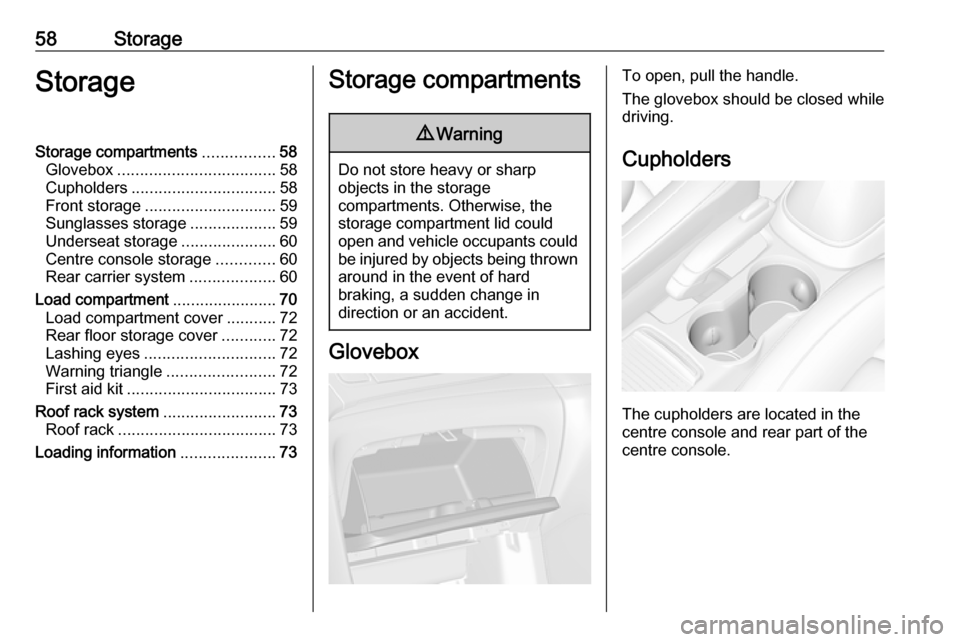
Glovebox
To open, pull the handle.
The glovebox should be closed while
driving.
Cupholders
The cupholders are located in the
centre console and rear part of the
centre console.
Page 63 of 245
Storage61rear carrier system. The maximum
load per bicycle on the adapter is
20 kg.
The wheelbase of a bicycle must not
exceed 1.15 metres. Otherwise the
secure fastening of a bicycle is not
possible.
If not in use, the rear carrier system
must be slid back into the vehicle
floor.
There must not be any objects on the
bicycles that could become loose
during transportation.Caution
If the rear carrier system is
extended and the vehicle is fully
loaded, the ground clearance will
be reduced.
Drive carefully whenever the road
has a steep inclination or when
driving over a ramp, bump, etc.
Caution
Consult your bicycle dealer before
attaching bicycles with carbon
frames. The bicycles may get
damaged.
Notice
The tail lights of the vehicle will be
deactivated if the tail lights of the rear carrier system are installed.
Extending
Open the tailgate.
9 Warning
No-one should be in the extension
zone of the rear carrier system,
risk of injury.
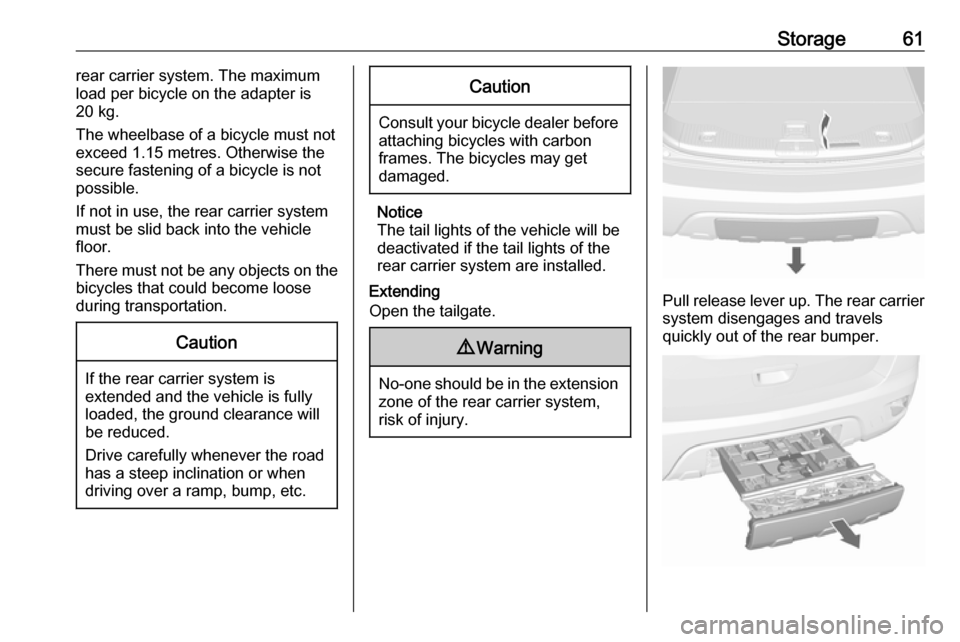
Pull release lever up. The rear carrier system disengages and travels
quickly out of the rear bumper.
Page 64 of 245
62StorageCompletely pull out the rear carriersystem until you hear it engage.
Ensure that it is not possible to push
in the rear carrier system without
pulling the release lever again.9 Warning
It is only permissible to fit objects
to the rear carrier system if the
system has been correctly
engaged. If the rear carrier system
will not engage correctly, do not fit
objects to the system and slide the system back. Seek the assistance
of a workshop.
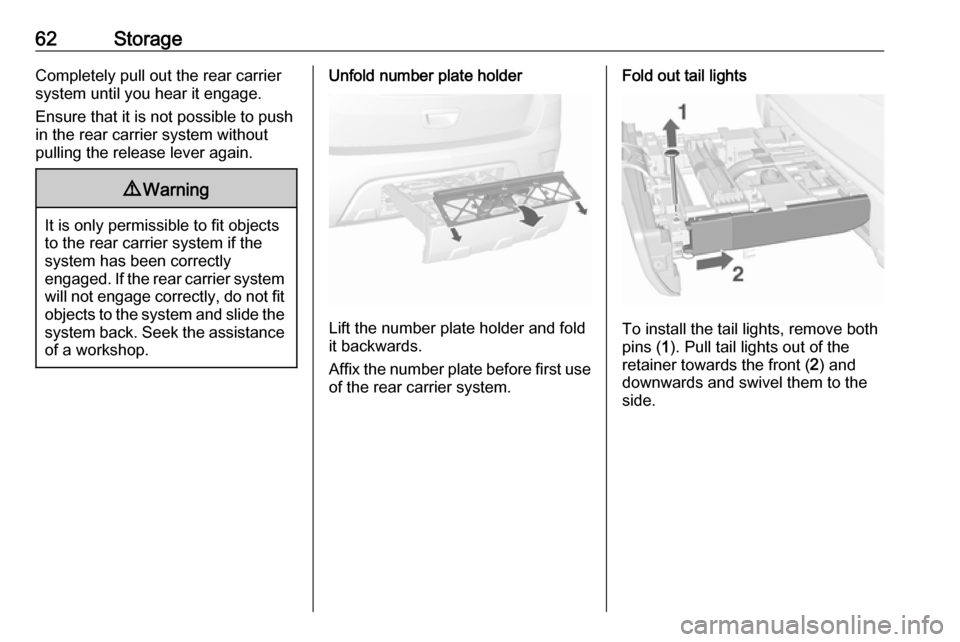
Unfold number plate holder
Lift the number plate holder and fold
it backwards.
Affix the number plate before first use of the rear carrier system.
Fold out tail lights
To install the tail lights, remove both
pins ( 1). Pull tail lights out of the
retainer towards the front ( 2) and
downwards and swivel them to the
side.
Page 68 of 245

66Storage
3. Position the bicycles on the rearcarrier system alternately aligned
to the left and to the right.
4. Align the bicycles with the one attached previously. The wheel
hubs of the bicycles must not
touch each other.
5. Attach the bicycles with mounting brackets and strap retainers as
described for the first bicycle. The
mounting brackets should be
fixed in parallel.
Use the long mounting bracket to
attach the second bicycle to the
rack.Use the short accessory mounting
bracket to attach the third bicycle. The bracket must be fixed
between the frames of the second and third bicycle.
6. Additionally, secure both bicycle wheels of the third bicycle to the
wheel recesses using the
tensioning straps.
It is recommended to attach a
warning sign to the rearmost bicycle,
to increase visibility.
Fold the rear carrier system
backwards
The rear carrier system can be folded
backwards to gain access to the load compartment.
● Without attached adapter:
Push the lever ( 1) to disengage
and hold it.
Page 69 of 245
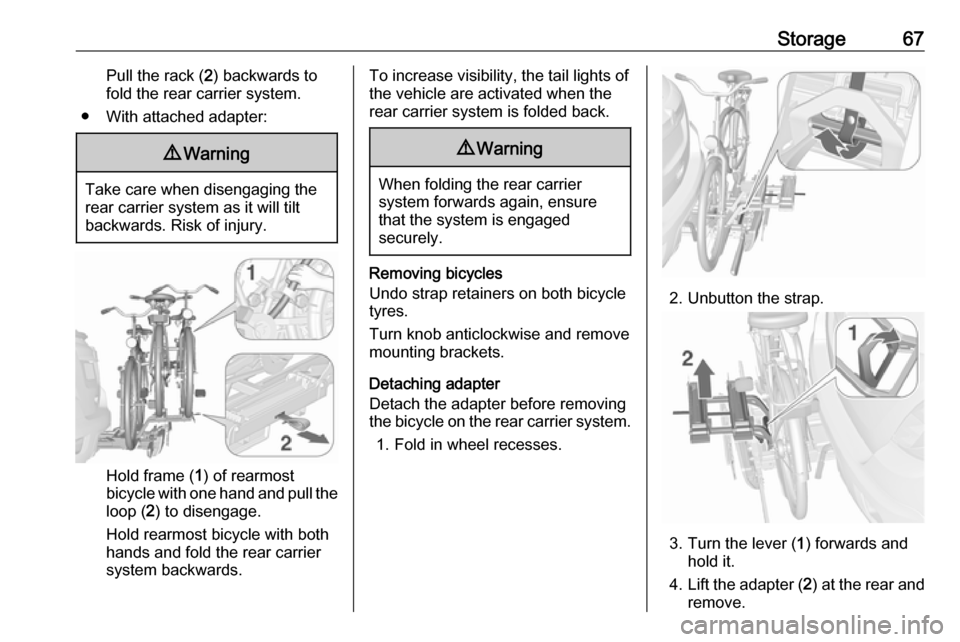
Storage67Pull the rack (2) backwards to
fold the rear carrier system.
● With attached adapter:9 Warning
Take care when disengaging the
rear carrier system as it will tilt
backwards. Risk of injury.
Hold frame ( 1) of rearmost
bicycle with one hand and pull the
loop ( 2) to disengage.
Hold rearmost bicycle with both
hands and fold the rear carrier
system backwards.
To increase visibility, the tail lights of
the vehicle are activated when the
rear carrier system is folded back.9 Warning
When folding the rear carrier
system forwards again, ensure
that the system is engaged
securely.
Removing bicycles
Undo strap retainers on both bicycle
tyres.
Turn knob anticlockwise and remove
mounting brackets.
Detaching adapter
Detach the adapter before removing
the bicycle on the rear carrier system.
1. Fold in wheel recesses.
2. Unbutton the strap.
3. Turn the lever ( 1) forwards and
hold it.
4. Lift the adapter ( 2) at the rear and
remove.
Page 72 of 245

70Storage9Warning
If the system cannot be correctly
engaged, seek the assistance of a workshop.
Load compartment
Load compartment extensionCaution
First fold down the rear seat
cushion before folding the rear
seat backrest.
Disregard may lead to damage to
the rear seat.
1. Push head restraints down by pressing the catch.
Notice
To ensure sufficient room for rear
seat cushion operation, slide the
front seat forward and move the front seat backrest upright.
2. Pull the loop under the seat cushion and fold down the seat
cushion.
3. Pull the release lever on top of the
rear backrest.
Page 73 of 245

Storage71
4. Fold the backrest forward anddown.
5.Put the seat belts for the outboard
seats into the belt guides.
To return the backrest to the original
position, pull out the seat belt from the
belt guides and lift backrest up.
Push backrest firmly into place.9 Warning
When folding up, ensure that
backrests are securely engaged in position before driving. Failure to
do so may result in personal injury or damage to the load or vehicle in
the event of hard braking or a
collision.
Ensure the seat belts are not pinched by the latch.
The centre rear seat belt may lock
when you raise the backrest. If this
happens, allow the belt go back all the
way and repeat operation.
If the seat belt is still locked, fold down the seat cushion and try again.
To return the rear seat cushion, put
the rear part of the seat cushion in its original position ensuring that the
seat belt buckle straps are not twisted
or caught under the seat cushion,
then push the front part of the seat
cushion firmly down until it latches.Caution
When returning rear seat backrest
to the upright position, place the
rear seat belt and buckles
between the rear seat backrest
and one cushion. Make sure the
rear seat belt and buckles do not
get pinched under the rear seat
cushion.
Ensure the seat belts are not twisted or caught in the seat
backrest and are arranged in their proper position.
Page 74 of 245
72StorageLoad compartment cover
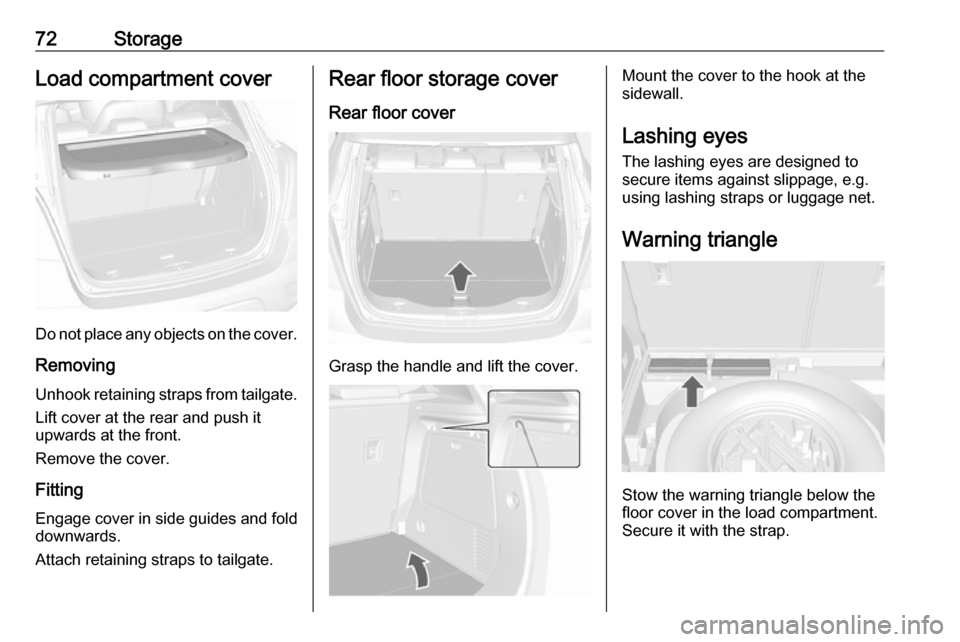
Do not place any objects on the cover.
Removing Unhook retaining straps from tailgate. Lift cover at the rear and push it
upwards at the front.
Remove the cover.
Fitting Engage cover in side guides and fold
downwards.
Attach retaining straps to tailgate.
Rear floor storage cover
Rear floor cover
Grasp the handle and lift the cover.
Mount the cover to the hook at the
sidewall.
Lashing eyes The lashing eyes are designed to
secure items against slippage, e.g.
using lashing straps or luggage net.
Warning triangle
Stow the warning triangle below the
floor cover in the load compartment. Secure it with the strap.