instrument cluster VAUXHALL MOKKA X 2018.5 User Guide
[x] Cancel search | Manufacturer: VAUXHALL, Model Year: 2018.5, Model line: MOKKA X, Model: VAUXHALL MOKKA X 2018.5Pages: 255, PDF Size: 7.01 MB
Page 157 of 255

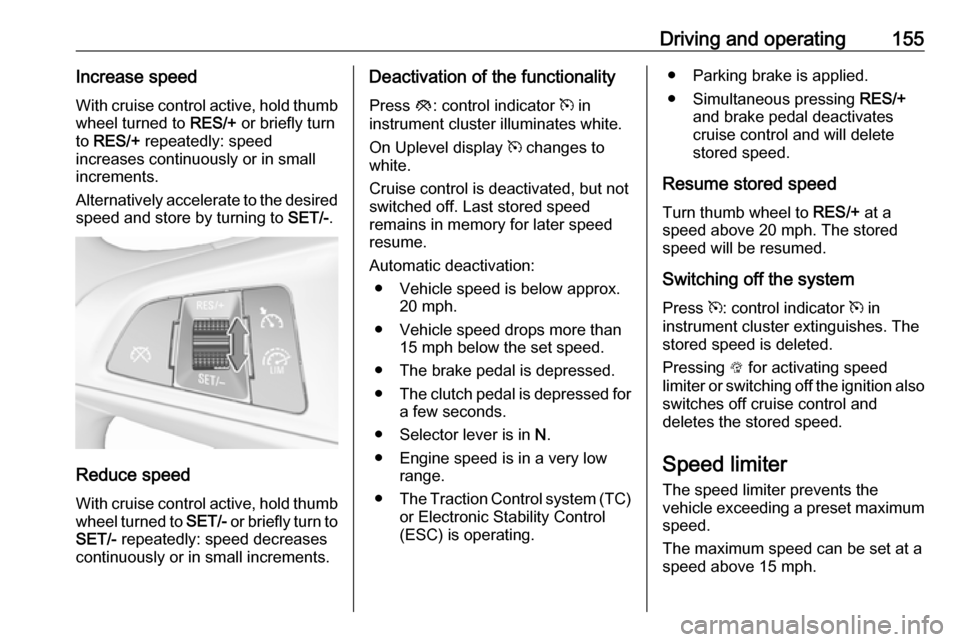
Driving and operating155Increase speedWith cruise control active, hold thumb
wheel turned to RES/+ or briefly turn
to RES/+ repeatedly: speed
increases continuously or in small
increments.
Alternatively accelerate to the desired speed and store by turning to SET/-.
Reduce speed
With cruise control active, hold thumb
wheel turned to SET/- or briefly turn to
SET/- repeatedly: speed decreases
continuously or in small increments.
Deactivation of the functionality
Press y: control indicator m in
instrument cluster illuminates white.
On Uplevel display m changes to
white.
Cruise control is deactivated, but not
switched off. Last stored speed
remains in memory for later speed
resume.
Automatic deactivation: ● Vehicle speed is below approx. 20 mph.
● Vehicle speed drops more than 15 mph below the set speed.
● The brake pedal is depressed.
● The clutch pedal is depressed for
a few seconds.
● Selector lever is in N.
● Engine speed is in a very low range.
● The Traction Control system (TC)
or Electronic Stability Control
(ESC) is operating.● Parking brake is applied.
● Simultaneous pressing RES/+
and brake pedal deactivates
cruise control and will delete
stored speed.
Resume stored speed
Turn thumb wheel to RES/+ at a
speed above 20 mph. The stored
speed will be resumed.
Switching off the system
Press m: control indicator m in
instrument cluster extinguishes. The stored speed is deleted.
Pressing L for activating speed
limiter or switching off the ignition also
switches off cruise control and
deletes the stored speed.
Speed limiter
The speed limiter prevents the
vehicle exceeding a preset maximum speed.
The maximum speed can be set at a
speed above 15 mph.
Page 159 of 255

Driving and operating157On Midlevel display the stored limited
speed is indicated in brackets.
On Uplevel display L changes to
white.
Additionally, a corresponding
message appears.
Speed limiter is deactivated, but not
switched off. Last stored speed
remains in memory for later speed
resume.
Resume limit speed
Turn thumb wheel to RES/+. The
stored speed limit will be obtained
and is indicated without brackets in
the Driver Information Centre.
Switching off the system
Press L, the speed limit indication
extinguishes in the Driver Information Centre. The stored speed is deleted.
By pressing m to activate cruise
control, speed limiter is also
deactivated and the stored speed is
deleted.By switching off the ignition, speed
limiter is also deactivated, but the
speed limit will be stored for next
speed limiter activation.
Forward collision alert The forward collision alert may help toavoid or reduce the harm caused by
front-end crashes.
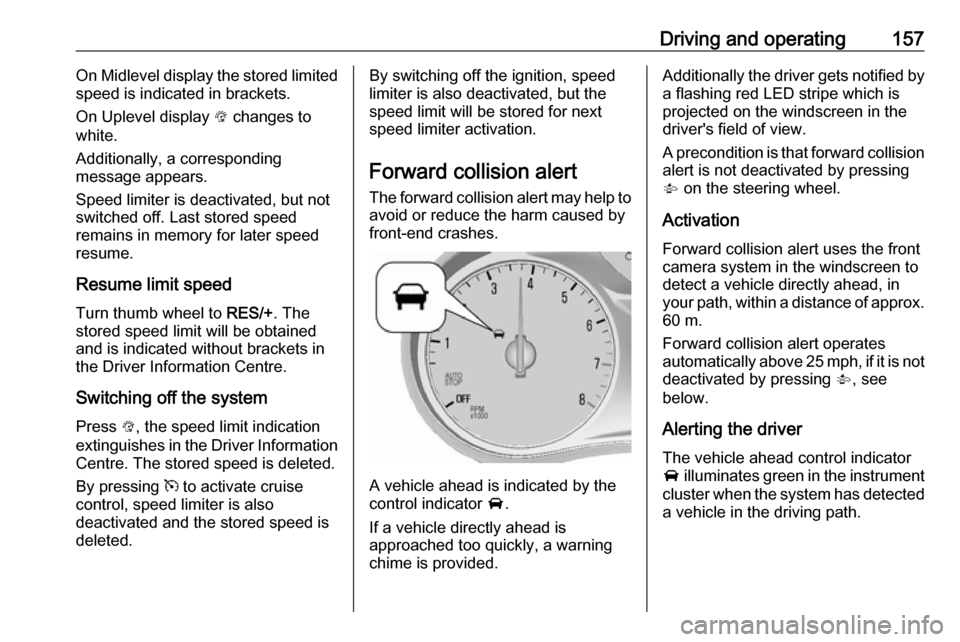
A vehicle ahead is indicated by the
control indicator A.
If a vehicle directly ahead is
approached too quickly, a warning
chime is provided.
Additionally the driver gets notified by
a flashing red LED stripe which is
projected on the windscreen in the
driver's field of view.
A precondition is that forward collision
alert is not deactivated by pressing
V on the steering wheel.
Activation
Forward collision alert uses the front
camera system in the windscreen to
detect a vehicle directly ahead, in
your path, within a distance of approx.
60 m.
Forward collision alert operates
automatically above 25 mph, if it is not deactivated by pressing V, see
below.
Alerting the driver
The vehicle ahead control indicator
A illuminates green in the instrument
cluster when the system has detected
a vehicle in the driving path.
Page 169 of 255

Driving and operating167Caution
The system is intended to help thedriver within a defined speed
range to discern certain traffic
signs. Do not ignore traffic signs
which are not displayed by the
system.
The system does not discern any other than the conventional traffic
signs that might give or end a
speed limit.
Do not let this special feature
tempt you into taking risks when
driving.
Always adapt speed to the road
conditions.
The driver assistance systems do not relieve the driver from full
responsibility for vehicle
operation.
Lane departure warning
The lane departure warning system
observes the lane markings between
which the vehicle is driving via a front camera. The system detects lane
changes and warns the driver in the
event of an unintended lane change
via visual and acoustic signals.
Criteria for the detection of an
unintended lane change are:
● no operation of turn signals
● no brake pedal operation
● no active accelerator operation or
speeding-up
● no active steering
If the driver is active, no warning will
be issued.
ActivationThe lane departure warning system isactivated by pressing ). The
illuminated LED in the button
indicates that the system is switched
on.
When the control indicator ) in the
instrument cluster illuminates green,
the system is ready to operate.
The system is only operable at
vehicle speeds above 35 mph and if
lane markings are available.
When the system recognises an
unintended lane change, the control
indicator ) changes to yellow and
flashes. Simultaneously a chime
sound is activated.
Page 197 of 255

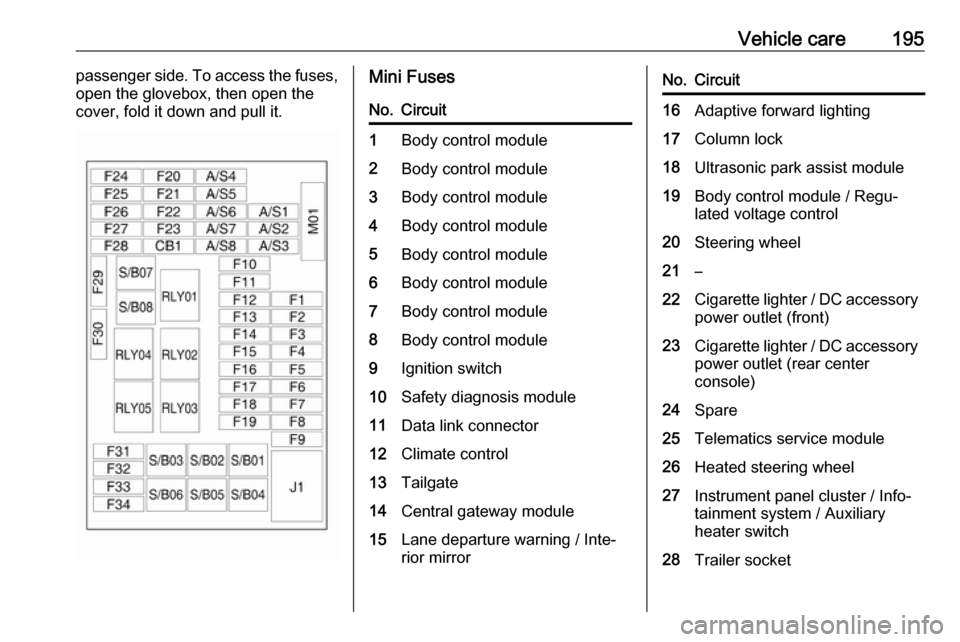
Vehicle care195passenger side. To access the fuses,
open the glovebox, then open the
cover, fold it down and pull it.Mini FusesNo.Circuit1Body control module2Body control module3Body control module4Body control module5Body control module6Body control module7Body control module8Body control module9Ignition switch10Safety diagnosis module11Data link connector12Climate control13Tailgate14Central gateway module15Lane departure warning / Inte‐
rior mirrorNo.Circuit16Adaptive forward lighting17Column lock18Ultrasonic park assist module19Body control module / Regu‐
lated voltage control20Steering wheel21–22Cigarette lighter / DC accessory
power outlet (front)23Cigarette lighter / DC accessory power outlet (rear center
console)24Spare25Telematics service module26Heated steering wheel27Instrument panel cluster / Info‐
tainment system / Auxiliary
heater switch28Trailer socket
Page 198 of 255

196Vehicle careNo.Circuit29Info Display / Infotainment
system30Transmission control module31Instrument panel cluster32Infotainment system33Trailer socket34Passive entry / Passive start
module
S/B Fuses
No.Circuit01Power seat switch02Spare03Power windows front04Power windows rear05Logistic mode06Power seat switchNo.Circuit07Spare08Spare
Midi Fuse
No.CircuitM01PTC
Load compartment fuse box
Located in the left side of rear
compartment.
To access the fuses, remove the cover.
Page 220 of 255

218Vehicle careWheels and tyres
Do not use high-pressure jet
cleaners.
Clean rims with a pH-neutral wheel
cleaner.
Rims are painted and can be treated
with the same agents as the body.
Paintwork damageRectify minor paintwork damage witha touch-up pen before rust forms.
Have more extensive damage or rust
areas repaired by a workshop.
Underbody Some areas of the vehicle underbody
have a PVC undercoating while other
critical areas have a durable
protective wax coating.
After the underbody is washed, check the underbody and have it waxed if
necessary.
Bitumen / rubber materials could
damage the PVC coating. Have
underbody work carried out by a
workshop.Before and after winter, wash the
underbody and have the protective
wax coating checked.
Liquid gas system9 Danger
Liquid gas is heavier than air and
can collect in sink points.
Take care when performing work
at the underbody in a pit.
For painting work and when using a
drying booth at a temperature above
60 °C, the liquid gas system must be
completely evacuated.
Do not make any modifications to the
liquid gas system.
Towing equipment
Do not clean the coupling ball bar with a steam-jet or high-pressure jet
cleaner.
Rear carrier system Clean the rear carrier system with a
steam-jet or high-pressure jet cleaner
at least once a year.
Operate the rear carrier system
periodically if not in regular use, in
particular during winter.
Interior care
Interior and upholstery Only clean the vehicle interior,
including the instrument panel fascia
and panelling, with a dry cloth or
interior cleaner.
Clean the leather upholstery with
clear water and a soft cloth. In case of
heavy soiling, use leather care.
The instrument cluster and the
displays should only be cleaned using
a soft damp cloth. If necessary use a
weak soap solution.
Clean fabric upholstery with a
vacuum cleaner and brush. Remove
stains with an upholstery cleaner.
Clothing fabrics may not be
colourfast. This could cause visible
discolourations, especially on light- coloured upholstery. Removable
stains and discolourations should be
cleaned as soon as possible.