low beam VAUXHALL MOKKA X 2019.5 User Guide
[x] Cancel search | Manufacturer: VAUXHALL, Model Year: 2019.5, Model line: MOKKA X, Model: VAUXHALL MOKKA X 2019.5Pages: 247, PDF Size: 7.08 MB
Page 121 of 247

Lighting119Rear⃒:onw:automatic switching on and off§:offReading lights
The front reading lights are located inthe overhead console.
Press s and t to turn each light on
or off.
Glove box lighting Illuminates when the glovebox is
opened.
Sunvisor lights Illuminates when the cover is opened.
Lighting features
Entry lighting
Welcome lighting Following lights are switched on for a
short time by unlocking the vehicle
with the radio remote control:
● low beam
● sidelights
● tail lights
● number plate lights
● instrument panel light
● interior lights
This function works only in the dark
and facilitates locating the vehicle.
Activation or deactivation of this
function can be changed in the
vehicle settings.
Vehicle personalisation 3 105.
The following lights will additionally
switch on when driver's door is
opened:
● illumination of some switches
● some interior lights
Page 122 of 247

120LightingExit lighting
Low beam, sidelights and tail lights
illuminate the surrounding area for an adjustable time after leaving the
vehicle.
Switching on
Activation, deactivation and duration of lighting of this function can be
changed in the vehicle settings.
Vehicle personalisation 3 105.
1. Switch off ignition.
2. Remove ignition key.
3. Open driver's door.
4. Pull turn signal lever.
5. Close driver's door.
If the driver's door is not closed the
lights switch off after a few seconds.
The lighting is switched off
immediately if the turn signal lever is pulled while the driver's door is open.
Battery discharge protection To prevent discharge of the battery
when the ignition is switched off,
some interior lights are switched off
automatically after some time.
Page 160 of 247

158Driving and operating
Trajectory lane of the vehicle is
shown in accordance with the
steering angle.
Warning symbols
Warning symbols are indicated as
triangles 9 on the picture which show
obstacles detected by the rear
sensors of the advanced parking
assist.
Additionally 9 appears on the top line
of the Info Display with the warning to
check the vehicle surrounding.
Deactivation
The camera is deactivated when acertain forward speed is exceeded or
if reverse gear is not engaged for
approx. 10 s.
Rear view camera can be manually
deactivated in the vehicle
personalisation menu in the Info
Display. Select the relevant setting in
Settings .
Vehicle personalisation 3 105.
Deactivation of guiding lines and
warning symbols7'' Colour Info Display: Activation or
deactivation of the visual guiding lines and the warning symbols can be
changed via touch buttons in the
lower zone of the display.
8'' Colour Info Display: Activation or
deactivation of the visual guiding lines
and the warning symbols can be
changed in the Settings menu in the
Info Display.
Info Display 3 101.
Vehicle personalisation 3 105.
Fault
Fault messages are displayed with a 9 on the top line of the Info Display.
The rear view camera may not
operate properly when:
● The surrounding is dark.
● The sun or the beam of headlights is shining directly into
the camera lens.
● Ice, snow, mud, or anything else covers the camera lens. Clean
the lens, rinse it with water, and
wipe it with a soft cloth.
● The vehicle is towing a trailer.
Page 185 of 247

Vehicle care183Halogen bulbs9Warning
Halogen bulbs have pressurized
gas inside and can burst if you
drop or scratch the bulb. You or others could be injured. Be sure to read and follow the instructions onthe bulb package.
LED lighting
This vehicle has several LED lights.
For replacement of any LED lighting
assembly, contact a workshop.
Halogen headlights
Baselevel headlight assembly
The base model vehicle has halogen
high beam and low beam headlights,
LED turn lights, a sidelight and
daytime running lights on the
headlight assembly.
Passenger side shown, driver side
similar.
On the driver side remove the
windscreen washer bottle filler neck,
before changing a bulb.
1. High beam headlights
2. Low beam headlights
High beam and low beam headlights 1. Open the bonnet.
Bonnet 3 176.2. Remove the protective cover.
3. Turn the bulb anticlockwise and pull straight back.
4. Disconnect the wiring harnessconnector from the bulb.
Page 186 of 247
184Vehicle care5. Install the new bulb in theheadlight assembly by turning
clockwise.
6. Reconnect the wiring harness connector.
7. Install the protective cover.
For the driver side, reinstall the
windscreen washer bottle filler neck
by firmly pushing it straight into the
bottle. Ensure that the filler neck clip
engages into the underhood electrical centre retainer.
Uplevel headlight assembly
The uplevel model vehicle has LED high beam and low beam headlights,turn lights, a sidelight and daytime
running lights on the headlight
assembly.Front fog lights
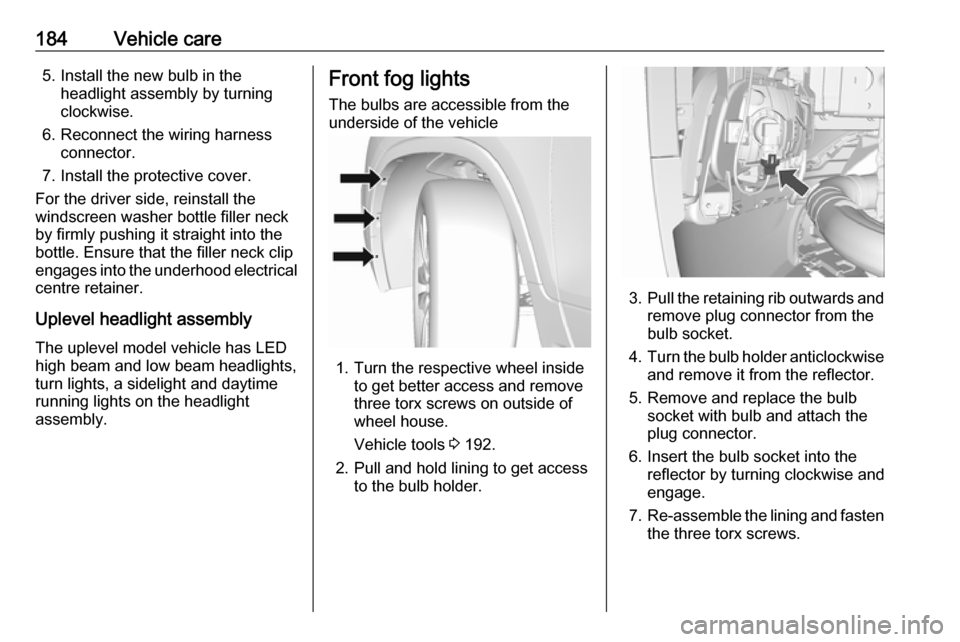
The bulbs are accessible from the
underside of the vehicle
1. Turn the respective wheel inside to get better access and remove
three torx screws on outside of
wheel house.
Vehicle tools 3 192.
2. Pull and hold lining to get access to the bulb holder.
3.Pull the retaining rib outwards and
remove plug connector from the
bulb socket.
4. Turn the bulb holder anticlockwise
and remove it from the reflector.
5. Remove and replace the bulb socket with bulb and attach the
plug connector.
6. Insert the bulb socket into the reflector by turning clockwise and
engage.
7. Re-assemble the lining and fasten
the three torx screws.
Page 191 of 247

Vehicle care189No.Circuit15LPG module / Fuel system
control module16Seat heating17Transmission control module R/
C / Water pump / Auxiliary
heater18Engine control module R/C19Fuel pump20–21Cooling fan22–23Ignition coil / Injectors24Washer pump25Headlamp actuator26Engine control sensors27–28Ignition29Ignition 1/2No.Circuit30Exhaust system31Left-hand high beam32Right-hand high beam33Engine control module34Horn35Air conditioning system36Front fog light
J-cases Fuses
No.Circuit1Electrical brake control module2Front wiper3Linear power module4Power terminal of instrument
panel fuse box5–6Fuel heater7StarterNo.Circuit8Cooling fan9Cooling fan10Engine control module / Glow
plug11Starter
Instrument panel fuse box
In right-hand drive vehicles, the
interior fuse box is located behind a
cover in the glovebox on the
Page 244 of 247

242Heated rear window ..................... 36
Heated steering wheel .................76
Heating ........................................ 42
Heating and ventilation system . 121
High beam ........................... 95, 111
High beam assist ..................95, 112
Hill start assist ........................... 146
Horn ....................................... 13, 77
I
Identification plate .....................218
Ignition switch positions .............129
Immobiliser ............................ 31, 95
Indicators ...................................... 83
Info Display ................................. 101
Information displays...................... 96
Initial drive information.................... 6
Instrument panel fuse box .........189
Instrument panel illumination control .................................... 118
Instrument panel overview ........... 10
Interior care ............................... 214
Interior lighting ............................ 118
Interior lights .............................. 118
Interior mirrors .............................. 33
Interruption of power supply ......143
Introduction .................................... 3
J
Jump starting ............................. 208K
Key, memorised settings ..............24
Keys ............................................. 20
Keys, locks ................................... 20
L
Lane departure warning .......93, 162
Lashing eyes ............................... 72
Lighting features .........................119
Light switch ................................ 110
Load compartment ................29, 70
Load compartment cover .............71
Load compartment fuse box ......191
Loading information .....................73
Low fuel ....................................... 94
LPG .............................. 85, 165, 220
M Malfunction indicator light ............92
Manual anti-dazzle ......................33
Manual mode ............................. 142
Manual transmission .................. 143
Manual windows ..........................34
Memorised settings ......................24
Midlevel display ............................ 96
Mirror adjustment ........................... 8
Misted light covers .....................118
N New vehicle running-in ..............128
Number plate light .....................186O
Object detection systems ...........155
Odometer ..................................... 83
Oil, engine .......................... 216, 220
Outside temperature ....................79
Overrun cut-off ........................... 133
P Parking ................................ 18, 135
Parking assist ............................ 155
Parking brake ............................ 145
Particulate filter ........................... 136
Performance .............................. 225
Performing work ........................176
Power button .............................. 130
Power outlets ............................... 82
Power steering fluid ....................178
Power windows ............................ 34
Preheating ................................... 94
Puncture ..................................... 203
R Radio Frequency Identification (RFID) ..................................... 238
Radio remote control ...................21
REACH ....................................... 233
Reading lights ............................ 119
Rear carrier system ......................60
Rear floor storage cover ..............72
Rear fog light ...............95, 117, 186
Rear view camera ...................... 157