tow bar VAUXHALL MOVANO_B 2014 Owner's Manual
[x] Cancel search | Manufacturer: VAUXHALL, Model Year: 2014, Model line: MOVANO_B, Model: VAUXHALL MOVANO_B 2014Pages: 201, PDF Size: 4.74 MB
Page 38 of 201

36Seats, restraints
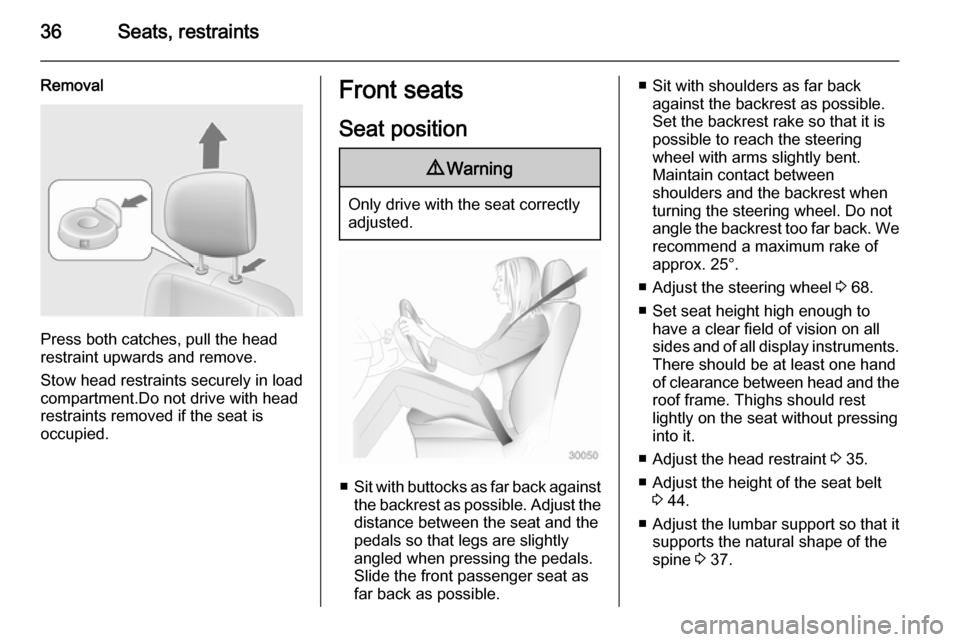
Removal
Press both catches, pull the head
restraint upwards and remove.
Stow head restraints securely in load
compartment.Do not drive with head
restraints removed if the seat is
occupied.
Front seats
Seat position9 Warning
Only drive with the seat correctly
adjusted.
■ Sit with buttocks as far back against
the backrest as possible. Adjust the distance between the seat and the
pedals so that legs are slightly
angled when pressing the pedals.
Slide the front passenger seat as
far back as possible.
■ Sit with shoulders as far back against the backrest as possible.
Set the backrest rake so that it is possible to reach the steering
wheel with arms slightly bent.
Maintain contact between
shoulders and the backrest when
turning the steering wheel. Do not
angle the backrest too far back. We recommend a maximum rake of
approx. 25°.
■ Adjust the steering wheel 3 68.
■ Set seat height high enough to have a clear field of vision on allsides and of all display instruments.
There should be at least one hand
of clearance between head and the
roof frame. Thighs should rest
lightly on the seat without pressing
into it.
■ Adjust the head restraint 3 35.
■ Adjust the height of the seat belt 3 44.
■ Adjust the lumbar support so that it
supports the natural shape of the
spine 3 37.
Page 49 of 201

Seats, restraints47
DA: Brug ALDRIG en bagudvendt
autostol på et forsæde med AKTIV
AIRBAG, BARNET kan komme I
LIVSFARE eller komme ALVORLIGT
TIL SKADE.
SV: Använd ALDRIG en bakåtvänd
barnstol på ett säte som skyddas med en framförvarande AKTIV AIRBAG.
DÖDSFALL eller ALLVARLIGA
SKADOR kan drabba BARNET.
FI: ÄLÄ KOSKAAN sijoita taaksepäin
suunnattua lasten turvaistuinta
istuimelle, jonka edessä on
AKTIIVINEN TURVATYYNY, LAPSI
VOI KUOLLA tai VAMMAUTUA
VAKAVASTI.
NO: Bakovervendt
barnesikringsutstyr må ALDRI brukes
på et sete med AKTIV
KOLLISJONSPUTE foran, da det kan føre til at BARNET utsettes for
LIVSFARE og fare for ALVORLIGE
SKADER.
PT: NUNCA use um sistema de
retenção para crianças voltado para
trás num banco protegido com um AIRBAG ACTIVO na frente domesmo, poderá ocorrer a PERDA DE
VIDA ou FERIMENTOS GRAVES na
CRIANÇA.
IT: Non usare mai un sistema di
sicurezza per bambini rivolto
all'indietro su un sedile protetto da
AIRBAG ATTIVO di fronte ad esso:
pericolo di MORTE o LESIONI
GRAVI per il BAMBINO!
EL: ΠΟΤΕ μη χρησιμοποιείτε παιδικό
κάθισμα ασφαλείας με φορά προς τα πίσω σε κάθισμα που προστατεύεται
από μετωπικό ΕΝΕΡΓΟ ΑΕΡΟΣΑΚΟ, διότι το παιδί μπορεί να υποστεί
ΘΑΝΑΣΙΜΟ ή ΣΟΒΑΡΟ
ΤΡΑΥΜΑΤΙΣΜΟ.
PL: NIE WOLNO montować fotelika
dziecięcego zwróconego tyłem do
kierunku jazdy na fotelu, przed
którym znajduje się WŁĄCZONA
PODUSZKA POWIETRZNA.
Niezastosowanie się do tego
zalecenia może być przyczyną
ŚMIERCI lub POWAŻNYCH
OBRAŻEŃ u DZIECKA.
TR: Arkaya bakan bir çocuk emniyet
sistemini KESİNLİKLE önünde bir
AKTİF HAVA YASTIĞI ilekorunmakta olan bir koltukta
kullanmayınız. ÇOCUK ÖLEBİLİR
veya AĞIR ŞEKİLDE
YARALANABİLİR.
UK: НІКОЛИ не використовуйте
систему безпеки для дітей, що
встановлюється обличчям назад,
на сидінні з УВІМКНЕНОЮ
ПОДУШКОЮ БЕЗПЕКИ, інакше це
може призвести до СМЕРТІ чи
СЕРЙОЗНОГО ТРАВМУВАННЯ
ДИТИНИ.
HU: SOHA ne használjon hátrafelé
néző biztonsági gyerekülést előlről
AKTÍV LÉGZSÁKKAL védett ülésen,
mert a GYERMEK HALÁLÁT vagy
KOMOLY SÉRÜLÉSÉT okozhatja.
HR: NIKADA nemojte koristiti sustav
zadržavanja za djecu okrenut prema
natrag na sjedalu s AKTIVNIM
ZRAČNIM JASTUKOM ispred njega,
to bi moglo dovesti do SMRTI ili
OZBILJNJIH OZLJEDA za DIJETE.
SL: NIKOLI ne nameščajte otroškega
varnostnega sedeža, obrnjenega v
nasprotni smeri vožnje, na sedež z
AKTIVNO ČELNO ZRAČNO
Page 132 of 201

130Driving and operating
In the case of trailer loads of
1200 kg or more, the vertical coupling load should not be less than 50 kg.
Rear axle load
When the trailer is coupled and the
towing vehicle fully loaded (including all occupants), the permissible rear
axle load (see identification plate or
vehicle documents) must not be
exceeded.
Towing equipmentCaution
When operating without a trailer,
remove the coupling ball bar.
Towing equipment audible
warning For vehicles fitted with towing
equipment, when connected to a
trailer the pitch of the audible warning
changes upon operation of the turn
signals.
The pitch of the audible warning will
change if a turn signal light on the
trailer or the towing vehicle fails.Auxiliary features
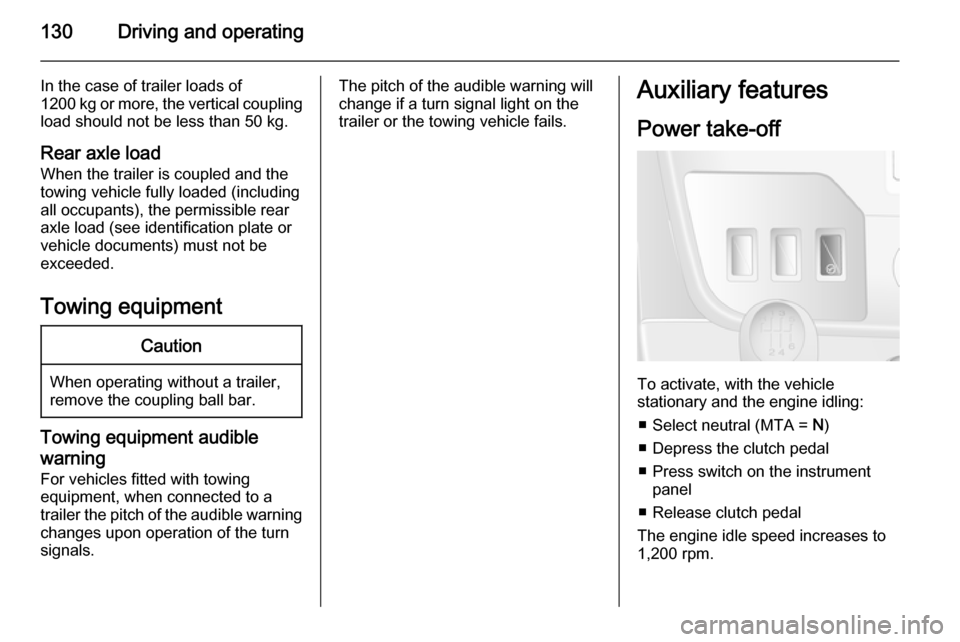
Power take-off
To activate, with the vehicle
stationary and the engine idling:
■ Select neutral (MTA = N)
■ Depress the clutch pedal
■ Press switch on the instrument panel
■ Release clutch pedal
The engine idle speed increases to 1,200 rpm.
Page 158 of 201

156Vehicle care
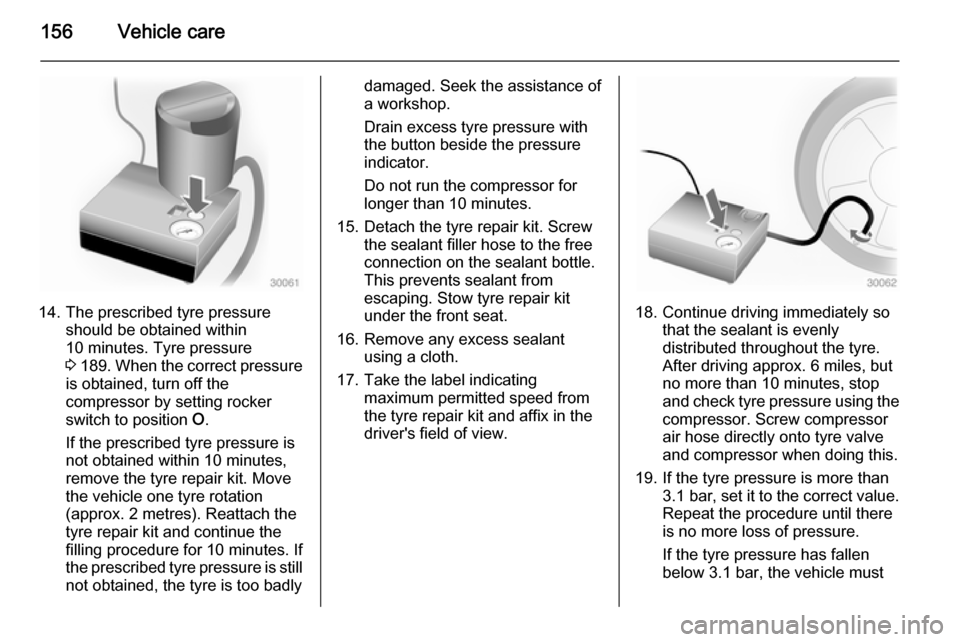
14. The prescribed tyre pressureshould be obtained within
10 minutes. Tyre pressure
3 189 . When the correct pressure
is obtained, turn off the
compressor by setting rocker
switch to position O.
If the prescribed tyre pressure is
not obtained within 10 minutes,
remove the tyre repair kit. Move
the vehicle one tyre rotation
(approx. 2 metres). Reattach the
tyre repair kit and continue the
filling procedure for 10 minutes. If
the prescribed tyre pressure is still not obtained, the tyre is too badly
damaged. Seek the assistance of
a workshop.
Drain excess tyre pressure with
the button beside the pressure
indicator.
Do not run the compressor for
longer than 10 minutes.
15. Detach the tyre repair kit. Screw the sealant filler hose to the free
connection on the sealant bottle.
This prevents sealant from
escaping. Stow tyre repair kit
under the front seat.
16. Remove any excess sealant using a cloth.
17. Take the label indicating maximum permitted speed from
the tyre repair kit and affix in the
driver's field of view.
18. Continue driving immediately so that the sealant is evenly
distributed throughout the tyre.
After driving approx. 6 miles, but
no more than 10 minutes, stop
and check tyre pressure using the
compressor. Screw compressor
air hose directly onto tyre valve
and compressor when doing this.
19. If the tyre pressure is more than 3.1 bar , set it to the correct value.
Repeat the procedure until there
is no more loss of pressure.
If the tyre pressure has fallen
below 3.1 bar, the vehicle must
Page 159 of 201

Vehicle care157
not be driven. Seek theassistance of a workshop.
20. Stow tyre repair kit under the front
seat.
Notice
The driving characteristics of the repaired tyre are severely affected, therefore have this tyre replaced.
If unusual noise is heard or the
compressor becomes hot, turn
compressor off for at least
30 minutes.
The built-in safety valve opens at a
pressure of 7 bar (102 psi).
Note the expiry date of the kit. After
this date its sealing capability is no
longer guaranteed. Pay attention to
storage information on sealant
bottle.
Replace the used sealant bottle. Dispose of the bottle as prescribed
by applicable laws.
The compressor and sealant can be used from approx. -30 °C.
The adapters supplied can be used
to pump up other items e.g.
footballs, air mattresses, inflatabledinghies etc. They are located on the underside of the compressor. To
remove, screw on compressor air hose and withdraw adapter.
Wheel changing Some vehicles are equipped with a
tyre repair kit instead of a spare wheel 3 154.
Make the following preparations and
observe the following information:
■ Park the vehicle on a level, firm and
non-slippery surface. The frontwheels must be in the straight-ahead position.
■ Apply the parking brake and engage first gear or reverse gear.
■ Switch off the air suspension system 3 110.
■ Remove the spare wheel 3 159.
■ Never change more than one wheel
at a time.
■ Use the jack only to change wheels
in case of puncture, not for
seasonal winter or summer tyre
change.■ If the ground on which the vehicle is standing is soft, a solid board
(max. 1 cm thick) should be placed
under the jack.
■ No people or animals may be in the
vehicle when it is jacked-up.
■ Never crawl under a jacked-up vehicle.
■ Do not start the engine when the vehicle is raised on the jack.
■ Clean wheel bolts/nuts and their threads before mounting the wheel.9 Warning
Do not grease wheel bolt, wheel
nut and wheel nut cone.
1. Remove the wheel cover using the hook supplied. Vehicle tools
3 150.
2. Install the wheel wrench ensuring that it locates securely and loosen
each wheel bolt/nut by half a turn.
Page 167 of 201

Vehicle care165
Windows and windscreen wiperblades
Use a soft lint-free cloth or chamois
leather together with window cleaner
and insect remover.
When cleaning the rear window from
inside, always wipe in parallel to the
heating element to prevent damage.
For mechanical removal of ice, use a
sharp-edged ice scraper. Press the
scraper firmly against the glass so
that no dirt can get under it and
scratch the glass.
Clean smearing wiper blades with a
soft cloth and window cleaner.
Wheels and tyres
Do not use high-pressure jet
cleaners.
Clean rims with a pH-neutral wheel
cleaner.
Rims are painted and can be treated
with the same agents as the body.Paintwork damage
Rectify minor paintwork damage with
a touch-up pen before rust forms.
Have more extensive damage or rust areas repaired by a workshop.
Underbody Some areas of the vehicle underbody
have a PVC undercoating while other
critical areas have a durable
protective wax coating.
After the underbody is washed, check the underbody and have it waxed if
necessary.
Bitumen/rubber materials could
damage the PVC coating. Have
underbody work carried out by a
workshop.
Before and after winter, wash the
underbody and have the protective
wax coating checked.
Towing equipment Do not clean the coupling ball bar with
a steam-jet or high-pressure jet
cleaner.Interior care
Interior and upholsteryOnly clean the vehicle interior,
including the instrument panel fascia
and panelling, with a dry cloth or
interior cleaner.
Clean leather upholstery with clear
water and a soft cloth. In case of
heavy soiling, use leather care.
The instrument cluster and the
displays should only be cleaned using
a soft damp cloth. If necessary use a
weak soap solution.
Clean fabric upholstery with a
vacuum cleaner and brush. Remove
stains with an upholstery cleaner.
Clothing fabrics may not be
colourfast. This could cause visible
discolourations, especially on light- coloured upholstery. Removable
stains and discolourations should be
cleaned as soon as possible.
Clean seat belts with lukewarm water or interior cleaner.
Page 197 of 201

195
Climate control systems...............94
Clock ............................................ 71
Control indicators.......................... 76
Control of the vehicle .................106
Controls ........................................ 68
Convex shape .............................. 30
Coolant ....................................... 135
Coolant and antifreeze ...............168
Coolant heater ............................ 100
Cornering light ......................89, 142
Coupling ball bar ........................130
Cruise control ...................... 82, 121
Cupholders .................................. 61
D Danger, Warnings and Cautions ...3
Dashboard .................................... 10
Daytime running lights .................88
Declaration of conformity ............191
Diesel fuel filter .......................... 138
Diesel fuel system bleeding .......139
Diesel particle filter ...............81, 112
Door open .................................... 82
Doors ............................................ 24
Drain fuel filter ............................. 81
Driver assistance systems ..........121
Driver Information Centre .............83
Driving characteristics and towing tips .............................. 129
Driving hints ................................ 106E
Electric adjustment ......................30
Electrical system......................... 148
Electronic climate control system 96
Electronic driving programmes ..116
Electronic Stability Program 80, 120
Emergency exit ............................. 34
End-of-life vehicle recovery .......133
Engine compartment fuse box ...149
Engine coolant ........................... 135
Engine coolant temperature ........80
Engine coolant temperature gauge ....................................... 74
Engine data ............................... 174
Engine exhaust .......................... 112
Engine identification ...........171, 172
Engine oil ................... 134, 168, 173
Engine oil level monitor ................74
Engine oil pressure ......................81
Event data recorders ..................191
Exhaust gases ............................ 112
Exit lighting .................................. 92
Exterior care .............................. 164
Exterior light ................................. 82
Exterior lighting ......................12, 87
Exterior mirrors ............................. 30F
Fault ........................................... 117
Fire extinguisher ..........................65
First aid ......................................... 65
First aid kit ................................... 65
Fixed air vents ........................... 104
Fog light ....................................... 82
Fog lights .............................. 89, 143
Folding mirrors ............................. 30
Front airbag system .....................49
Front fog lights ............................. 89
Front seats.................................... 36
Front storage ............................... 61
Front turn signal lights ...............143
Fuel consumption - CO 2-
Emissions ............................... 128
Fuel for diesel engines ..............127
Fuel gauge ................................... 74
Fuse box ..................................... 149
Fuses ......................................... 148
G Gauges ......................................... 73
General information ...................129
Glass panel .................................. 34 Glovebox ..................................... 61
Glovebox cooler ......................... 104
Page 199 of 201

197
Pollen filter ................................. 104
Power door locks ..........................22
Power outlets ............................... 71
Power side step ............................ 24
Power sliding door ........................24
Power steering fluid ....................136
Power take-off ........................... 130
Power windows ............................ 32
Preheating ................................... 81
Puncture ............................. 154, 157
R Radio Frequency Identification (RFID) ..................................... 192
Radio remote control ...................18
Reading lights .............................. 91
Rear air conditioning system .......99
Rear doors ................................... 26
Rear fog light ............................... 82
Rear fog lights ............................. 90
Rear heating system .................... 97
Rear seats .................................... 41
Rear view camera ...................... 126
Rear windows .............................. 32
Recommended fluids and lubricants ........................ 168, 173
Refuelling ................................... 127 Remote control ............................. 18
Reversing lights ........................... 90
Ride control systems ..................119Roof.............................................. 34
Roof load ...................................... 66
Roof rack ..................................... 66
S Safety belts ................................... 43
Safety net .................................... 65
Seat adjustment ....................... 7, 37
Seat belt ........................................ 8
Seat belt reminder .......................78
Seat belts ..................................... 43
Seat heating ................................. 40
Seat position ................................ 36
Selector lever ............................. 114
Service ............................... 105, 167
Service display ............................ 75
Service information ....................167
Service vehicle soon .................... 79
Side airbag system ......................49
Sidelights ...................................... 87
Side turn signal lights ................145
Sliding door .................................. 24
Spare wheel ............................... 159
Speedometer ............................... 73
Speed regulator ............................ 73
Starting and operating ................106
Starting off ................................... 16
Starting the engine ............107, 114
Steering column controls ..............69
Steering wheel adjustment ......9, 68Steering wheel controls ...............68
Stop engine .................................. 79
Stop-start system.................. 82, 108
Storage ......................................... 60
Storage compartments .................60
Sunglasses storage .....................61
Sun visors .................................... 34
Suspension seat ........................... 37
Symbols ......................................... 4
T
Tachograph ............................ 82, 86
Tachometer ................................. 73
Tail lights ................................... 144
Technical data ............................ 174
Three-point seat belt .................... 44
Tools .......................................... 150
Top-tether fastening eyes ............59
Tow bar....................................... 129
Towing ........................................ 129
Towing another vehicle .............163
Towing a trailer ........................... 129
Towing equipment .....................130
Towing eye ................................. 162
Towing the vehicle .....................162
Traction Control system ............. 119
Trailer coupling ........................... 129
Trailer towing ............................. 129
Transmission ............................... 15
Transmission display ...........75, 114