run flat VAUXHALL MOVANO_B 2020 Owner's Manual
[x] Cancel search | Manufacturer: VAUXHALL, Model Year: 2020, Model line: MOVANO_B, Model: VAUXHALL MOVANO_B 2020Pages: 351, PDF Size: 9.32 MB
Page 103 of 351

Instruments and controls101AdBlue level is low. Refill AdBlue as
soon as possible, to avoid prevention
of engine starts.
Illuminates together with control indicator j to indicate a system
failure or as a warning that engine
starting may not be possible after a
certain distance. Seek the assistance
of a workshop immediately.
A corresponding message may
appear in the Driver Information
Centre 3 104.
AdBlue 3 233.
Tyre pressure monitoring system
w illuminates or flashes yellow.
Illuminates briefly when the ignition is switched on.
Illuminates
Tyre pressure loss. Stop immediately
and check tyre pressure.
Control indicator w illuminates
together with C 3 99 and a
corresponding message appears inthe Driver Information Centre when a
puncture or severely under-inflated
tyre is detected.
Flashes
Fault in system. After a delay the
control indicator illuminates
continuously. Consult a workshop.
Control indicator w illuminates
together with j 3 98 and a
corresponding message appears in
the Driver Information Centre when a tyre without a pressure sensor is
mounted (e.g. spare wheel).
Tyre pressure monitoring system 3 291.
Engine oil pressure
I illuminates red.
Illuminates briefly when the ignition is switched on.Illuminates when the engine is
runningCaution
Engine lubrication may be
interrupted. This may result in
damage to the engine and/or
locking of the drive wheels.
1. Depress clutch.
2. Select neutral gear, set selector lever to N.
3. Move out of the flow of traffic as quickly as possible without
impeding other vehicles.
4. Switch off ignition.
Page 292 of 351

290Vehicle careWheels and tyres
Tyre condition, wheel condition Drive over edges slowly and at right
angles if possible. Driving over sharp
edges can cause tyre and wheel
damage. Do not trap tyres on the kerb when parking.
Regularly check the wheels for
damage. Seek the assistance of a
workshop in the event of damage or
unusual wear.
We recommend not swapping the
front wheels with the rear wheels and
vice versa, as this can affect vehicle
stability. Always use less worn tyres
on the rear axle.
Tyres
Factory-fitted tyres are matched to
the chassis and offer optimum driving comfort and safety.Winter tyres
Winter tyres improve driving safety at temperatures below 7 °C and should
therefore be fitted on all wheels.
In accordance with country-specific
regulations, affix the maximum speed
sticker in the driver's field of view.
Tyre designations
E.g. 215/65 R 16 C 109 R215:tyre width, mm65:cross-section ratio (tyre height
to tyre width), %R:belt type: RadialRF:type: RunFlat16:wheel diameter, inchesC:cargo or commercial use88:load index e.g. 109 is
equivalent to approx. 1030 kgR:speed code letter
Speed code letter:
Q:up to 100 mphS:up to 112 mphT:up to 118 mphH:up to 130 mphV:up to 150 mphW:up to 168 mphChoose a tyre appropriate for the
maximum speed of your vehicle.
The maximum speed is achievable at kerb weight with driver (75 kg) plus
125 kg payload. Optional equipment
could reduce the maximum speed of
the vehicle.
Directional tyres
Fit directional tyres such that they roll in the direction of travel. The rolling
direction is indicated by a symbol
(e.g. an arrow) on the sidewall.
Tyre pressure
Check the pressure of cold tyres at
least every 14 days and before any
long journey. Do not forget the spare
wheel. This also applies to vehicles
with tyre pressure monitoring system.
The tyre pressure information label
on the driver's door frame indicates the original equipment tyres and the
correspondent tyre pressures.
Always inflate tyres to the pressures
shown on the label.
Tyre pressures 3 315.
Page 298 of 351

296Vehicle care
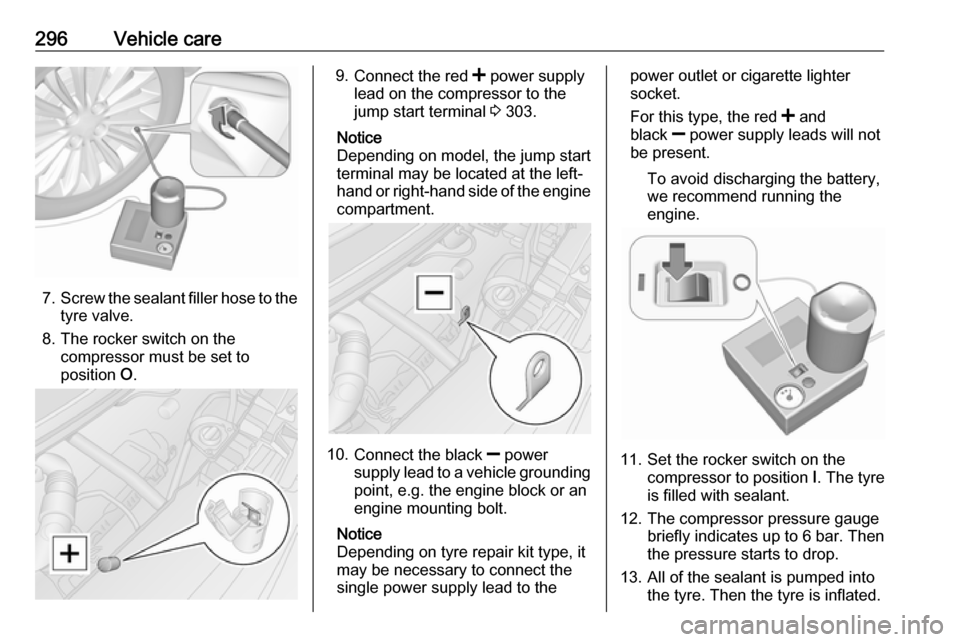
7.Screw the sealant filler hose to the
tyre valve.
8. The rocker switch on the compressor must be set to
position O.
9.
Connect the red < power supply
lead on the compressor to the
jump start terminal 3 303.
Notice
Depending on model, the jump start
terminal may be located at the left-
hand or right-hand side of the engine
compartment.
10. Connect the black ] power
supply lead to a vehicle grounding
point, e.g. the engine block or an
engine mounting bolt.
Notice
Depending on tyre repair kit type, it
may be necessary to connect the
single power supply lead to the
power outlet or cigarette lighter
socket.
For this type, the red < and
black ] power supply leads will not
be present.
To avoid discharging the battery,
we recommend running the
engine.
11. Set the rocker switch on the compressor to position I. The tyre
is filled with sealant.
12. The compressor pressure gauge briefly indicates up to 6 bar. Then
the pressure starts to drop.
13. All of the sealant is pumped into the tyre. Then the tyre is inflated.