tyre pressure VAUXHALL VIVA 2019 User Guide
[x] Cancel search | Manufacturer: VAUXHALL, Model Year: 2019, Model line: VIVA, Model: VAUXHALL VIVA 2019Pages: 189, PDF Size: 5.22 MB
Page 89 of 189
Instruments and controls87maintenance items and tyre pressure
(only with tyre pressure monitoring
system).
To look at the information in greater
detail, select the link within the email and log in to your account.
Destination download
A desired destination can be directly
downloaded to the navigation system.
Press Z to call an advisor and
describe the destination or point of
interest.
The advisor can look up any address
or point of interest and directly send
the destination to the built-in
navigation system.
OnStar settings
OnStar PIN
To have full access to all OnStar
services, a four-digit PIN is required. The PIN has to be personalised when
first talking to an advisor.
To change the PIN, press Z to call an
advisor.Account data
An OnStar subscriber has an account
where all the data is stored. To
request a change of the account
information, press Z and talk to an
advisor or log in to your account.
If the OnStar service is used on
another vehicle, press Z and request
that the account be transferred to the
new vehicle.
Notice
In any case, if the vehicle is disposed of, sold or otherwise transferred,
immediately inform OnStar about
the changes and terminate the
OnStar service on this vehicle.
Vehicle location
The vehicle location is transmitted to
OnStar when service is requested or
triggered. A message on the Info Display informs about this
transmission.
To activate or deactivate the
transmission of the vehicle location,
press and hold j until an audio
message is heard.The deactivation is indicated by the
status light flashing red and green for
a short period of time and each time
the vehicle is started.
Notice
If the transmission of the vehicle
location is deactivated, some
services are no longer available.
Notice
The vehicle location always remains accessible to OnStar in the case of
an emergency.
Find the privacy policy in your
account.
Software updates
OnStar may remotely carry out software updates without further notice or consent. These updates are
to enhance or maintain safety and
security or the operation of the
vehicle.
These updates may concern privacy
issues. Find the privacy policy in your account.
Page 126 of 189
124Vehicle careVehicle careGeneral Information...................124
Accessories and vehicle modifications .......................... 124
Vehicle storage ........................125
End-of-life vehicle recovery .....125
Vehicle checks ........................... 126
Performing work ......................126
Bonnet ..................................... 126
Engine oil ................................. 127
Engine coolant ......................... 128
Washer fluid ............................ 129
Brakes ..................................... 129
Brake fluid ............................... 129
Vehicle battery ......................... 129
Wiper blade replacement ........131
Bulb replacement .......................132
Halogen headlights ..................132
Front fog lights ......................... 134
Front turn lights .......................134
Tail lights ................................. 135
Side turn lights ......................... 136
Centre high-mounted brake light ......................................... 136
Number plate light ...................137Interior lights ............................ 137
Instrument panel illumination ...137
Electrical system ........................138
Fuses ....................................... 138
Engine compartment fuse box . 139
Instrument panel fuse box .......141
Vehicle tools .............................. 142
Tools ........................................ 142
Wheels and tyres .......................143
Winter tyres ............................. 143
Tyre designations ....................143
Tyre pressure .......................... 144
Tyre pressure monitoring
system .................................... 145
Tread depth ............................. 148
Changing tyre and wheel size . 148 Wheel covers ........................... 148
Tyre chains .............................. 149
Tyre repair kit .......................... 149
Wheel changing .......................152
Spare wheel ............................ 153
Jump starting ............................. 157
Towing ....................................... 158
Towing the vehicle ...................158
Appearance care .......................159
Exterior care ............................ 159
Interior care ............................. 161General Information
Accessories and vehiclemodifications
We recommend the use of genuine
parts and accessories and factory approved parts specific for your
vehicle type. We cannot assess or
guarantee reliability of other products
- even if they have a regulatory or
otherwise granted approval.
Any modification, conversion or other changes made to standard vehicle
specifications (including, without
limitation, software modifications,
modifications of the electronic control
units) may invalidate the warranty
offered by Vauxhall. Furthermore,
such changes may affect driver
assistance systems, fuel
consumption, CO 2 emissions and
other emissions of the vehicle. They may also invalidate the vehicle
operating permit.
Page 127 of 189
Vehicle care125Caution
When transporting the vehicle on
a train or on a recovery vehicle, the
mud flaps might be damaged.
Vehicle storage
Storage for a long period of time
If the vehicle is to be stored for several months:
● Wash and wax the vehicle.
● Have the wax in the engine compartment and underbody
checked.
● Clean and preserve the rubber seals.
● Fill up fuel tank completely.
● Change the engine oil.
● Drain the washer fluid reservoir.
● Check the coolant antifreeze and
corrosion protection.
● Adjust tyre pressure to the value specified for full load.
● Park the vehicle in a dry, wellventilated place. Engage first or
reverse gear. Prevent the vehicle from rolling.
● Do not apply the parking brake.
● Open the bonnet, close all doors and lock the vehicle.
● Disconnect the clamp from the negative terminal of the vehicle
battery. Beware that all systems are not functional, e.g. anti-theft
alarm system.
Putting back into operation When the vehicle is to be put back into
operation:
● Connect the clamp to the negative terminal of the vehicle
battery. Activate the electronics
of the power windows.
● Check tyre pressure.
● Fill up the washer fluid reservoir.
● Check the engine oil level.
● Check the coolant level.
● Fit the number plate if necessary.End-of-life vehicle recovery
Information on end-of-life vehicle
recovery centres and the recycling of
end-of-life vehicles is available on our
website. Only entrust this work to an
authorised recycling centre.
Gas vehicles must be recycled by a
service centre authorised for gas
vehicles.
Page 146 of 189

144Vehicle careDirectional tyres
Directional tyres must be mounted so that they rotate in the correct
direction. The proper rotation
direction is indicated by a symbol
(e.g. an arrow) on the sidewall.
Tyre pressure
Check the pressure of cold tyres at
least every 14 days and before any
long journey.
Do not forget the spare wheel. This also applies to vehicles with tyre
pressure monitoring system.
Tyre pressure 3 172.
The tyre pressure information label
on the driver's door frame indicates
the original equipment tyres and the
correspondent tyre pressures.
The tyre pressure data refers to cold
tyres. It applies to summer and winter tyres.
The ECO tyre pressure serves to
achieve the smallest amount of fuel
consumption possible.
Incorrect tyre pressures will impair
safety, vehicle handling, comfort and fuel economy and will increase tyre
wear.
Tyre pressures differ depending on
various options.
For the correct tyre pressure value,
follow the procedure below:
● Identify the engine identifier code.
Engine data 3 169.
● Identify the respective tyre.
For the tyres approved for your
vehicle, refer to the EEC Certificate of
Conformity provided with your vehicle or other national registration
documents.The driver is responsible for correct adjustment of tyre pressure.9 Warning
If the pressure is too low, this can
result in considerable tyre warm-
up and internal damage, leading to tread separation and even to tyre
blow-out at high speeds.
9 Warning
For specific tyres the
recommended tyre pressure as
shown in the tyre pressure table may exceed the maximum tyre
pressure as indicated on the tyre.
Never exceed the maximum tyre
pressure as indicated on the tyre.
If the tyre pressure must be reduced
or increased, switch off ignition. After
adjusting tyre pressure switch on
ignition and select the relevant setting on the page Tyre Load in the Driver
Information Centre 3 73.
Page 147 of 189
Vehicle care145Temperature dependencyThe tyre pressure depends on the
temperature of the tyre. During
driving, tyre temperature and
pressure increase. Tyre pressure
values provided on the tyre
information label and tyre pressure
chart are valid for cold tyres, which
means at 20 °C.
The pressure increases by nearly
1.5 psi for a 10 °C temperature
increase. This must be considered
when warm tyres are checked.
The tyre pressure value displayed in
the Driver Information Centre shows
the real tyre pressure. A cooled down tyre will show a decreased value,
which does not indicate an air leak.
Tyre pressure monitoring system
The tyre pressure monitoring system
checks the pressure of all four tyres
once a minute when vehicle speed
exceeds a certain limit.Caution
Tyre pressure monitoring system
warns only about low tyre pressure condition and does not replace
regular tyre maintenance by the
driver.
All wheels must be equipped with pressure sensors and the tyres must
have the prescribed pressure.
Notice
In countries where the tyre pressure
monitoring system is legally
required, the use of wheels without
pressure sensors will invalidate the
vehicle operating permit.
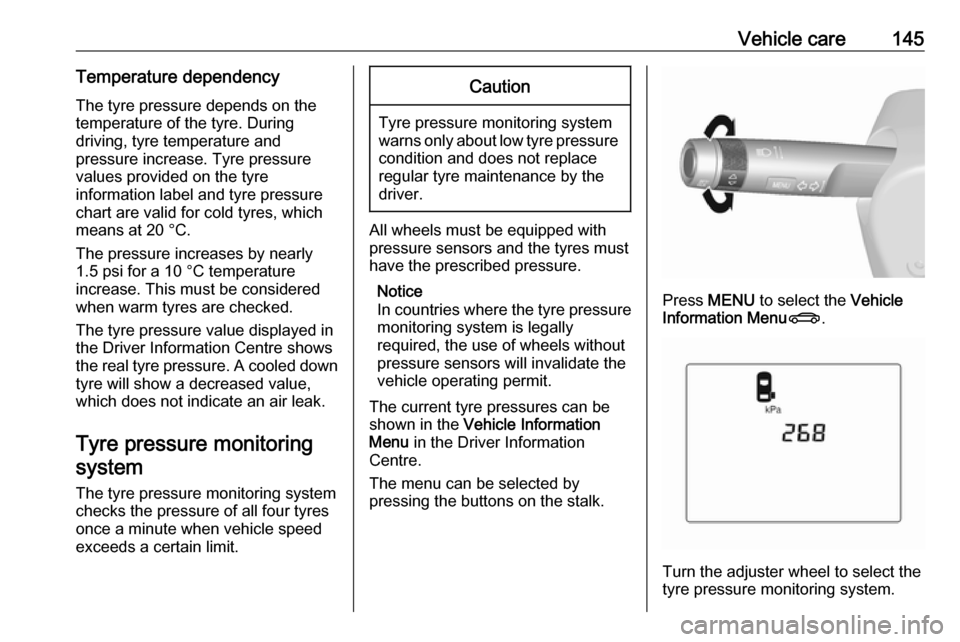
The current tyre pressures can be
shown in the Vehicle Information
Menu in the Driver Information
Centre.
The menu can be selected by
pressing the buttons on the stalk.
Press MENU to select the Vehicle
Information Menu X.
Turn the adjuster wheel to select the
tyre pressure monitoring system.
Page 148 of 189

146Vehicle careSystem status and pressure warningsare displayed by a message with the
corresponding tyre flashing in the
Driver Information Centre.
The system considers the tyre
temperature for the warnings.
Temperature dependency 3 144.
A detected low tyre pressure
condition is indicated by the control
indicator w 3 71.
If w illuminates, stop as soon as
possible and inflate the tyres as
recommended 3 172.
If
w flashes for 60-90 seconds then
illuminates continuously, there is a
fault in the system. Consult a
workshop.
After inflating, some driving may be
required to update the tyre pressure
values in the Driver Information
Centre. During this time w may
illuminate.
If w illuminates at lower temperatures
and extinguishes after some driving,
this could be an indicator for
approaching a low tyre pressure
condition. Check tyre pressure.
Vehicle messages 3 79.
If the tyre pressure must be reduced
or increased, switch off ignition.
Only mount wheels with pressure
sensors, otherwise the tyre pressure
will not be displayed and w
illuminates continuously.
A temporary spare wheel is not
equipped with pressure sensors. The
tyre pressure monitoring system is
not operational for these tyres.
Control indicator w illuminates. For
the further three tyres, the system remains operational.The use of commercially-available
liquid tyre repair kits can impair the
function of the system. Factory-
approved repair kits can be used.
Operating electronic devices or being close to facilities using similar wave
frequencies could disrupt the tyre
pressure monitoring system.
Each time the tyres are replaced, tyre
pressure monitoring system sensors
must be dismounted and serviced.
For the screwed sensor; replace
valve core and sealing ring. For the
clipped sensor; replace complete
valve stem.
Vehicle loading status
Adjust tyre pressure to load condition according to the tyre information labelor tyre pressure chart 3 172, and
select the appropriate setting in the menu Tyre Load in the Driver
Information Centre, Vehicle
Information Menu 3 73 . This setting is
the reference for the tyre pressure
warnings.
The Tyre Load menu only appears if
the vehicle is in a standstill and the
parking brake is applied.
Page 149 of 189

Vehicle care147
Select:● Lo for comfort pressure up to
3 people.
● Eco for Eco pressure up to
3 people.
● Hi for full loading.
Tyre pressure sensor matching
process
Each tyre pressure sensor has a
unique identification code. The
identification code must be matched
to a new tyre / wheel position after
rotating the tyres or exchanging the
complete wheel set and if one or more
tyre pressure sensors were replaced.
The tyre pressure sensor matching
process should also be performed
after replacing a spare tyre with a
road tyre containing the tyre pressure sensor.
The malfunction light w and the
warning message or code should go
off at the next ignition cycle. The
sensors are matched to the wheel
positions, using a relearn tool, in the
following order: left side front wheel,
right side front wheel, right side rear
wheel and left side rear wheel. The
turn light at the current active position
is illuminated until sensor is matched.
Consult a workshop for service. There
are 2 minutes to match the first wheel position, and 5 minutes overall to
match all four wheel positions. If it
takes longer, the matching process
stops and must be restarted.
The tyre pressure sensor matching
process is:
1. Apply the parking brake.
2. Turn the ignition on.
3. Select neutral.4. Use MENU on the stalk to select
the Vehicle Information Menu in
the Driver Information Centre.
5. Turn the adjuster wheel to scroll to
the tyre pressure menu.
6. Press SET/CLR to begin the
sensor matching process. A
message requesting acceptance
of the process should be
displayed.
7. Press SET/CLR again to confirm
the selection. The horn sounds
twice to indicate that the receiver
is in relearn mode.
8. Start with the left side front wheel.
9. Place the relearn tool against the tyre sidewall, near the valve stem.Then press the button to activatethe tyre pressure sensor. A horn
chirp confirms that the sensor
identification code has been
matched to this wheel position.
10. Proceed to the right side front wheel, and repeat the procedure
in Step 9.
11. Proceed to the right side rear wheel, and repeat the procedure
in Step 9.
Page 150 of 189

148Vehicle care12. Proceed to the left side rearwheel, and repeat the procedure
in Step 9. The horn sounds twice
to indicate that the sensor
identification code has been
matched to the left side rear
wheel, and the tyre pressure
sensor matching process is no
longer active.
13. Turn off the ignition.
14. Set all four tyres to the recommended air pressure level
as indicated on the tyre
information label.
15. Ensure the tyre loading status is set according to the selected
pressure 3 73.
Tread depth Check tread depth at regular
intervals.
Tyres should be replaced for safety
reasons at a tread depth of 2-3 mm
(4 mm for winter tyres).
For safety reasons it is recommended
that the tread depth of the tyres on
one axle should not vary by more than 2 mm.
The legally permissible minimum
tread depth (1.6 mm) has been
reached when the tread has worn
down as far as one of the tread wear
indicators (TWI). Their position is
indicated by markings on the
sidewall.
Tyres age, even if they are not used.
We recommend tyre replacement
every 6 years.
Changing tyre and wheel
size
If tyres of a different size than thosefitted at the factory are used, it may be necessary to reprogramme the
nominal tyre pressure and make
other vehicle modifications.
After converting to a different tyre
size, have the label with tyre
pressures replaced 3 145.9 Warning
Use of unsuitable tyres or wheels
may lead to accidents and will
invalidate the vehicle type
approval.
Wheel covers
Wheel covers and tyres that are
factory approved for the respective
vehicle and comply with all of the
relevant wheel and tyre combination requirements must be used.
If the wheel covers and tyres used are
not factory approved, the tyres must
not have a rim protection ridge.
Page 151 of 189

Vehicle care149Wheel covers must not impair brake
cooling.9 Warning
Use of unsuitable tyres or wheel
covers could lead to sudden
pressure loss and thereby
accidents.
Tyre chains
Tyre chains are only permitted on the
front wheels.
Always use fine mesh chains that add no more than 10 mm to the tyre tread
and the inboard sides (including chain lock).9 Warning
Damage may lead to tyre blowout.
Tyre chains are only permitted on
tyres of size 165/65 R14.
Tyre chains are not permitted on tyres of size 185/55 R15 and 195/45 R16.
The use of tyre chains is not permitted on the temporary spare wheel.
Tyre repair kit Minor damage to the tyre tread can be
repaired with the tyre repair kit.
Do not remove foreign bodies from
the tyres.
Tyre damage exceeding 4 mm or that is at the tyre's sidewall cannot be
repaired with the tyre repair kit.
9 Warning
Do not drive faster than 50 mph.
Do not use for a lengthy period.
Steering and handling may be
affected.
If you have a flat tyre:
Apply the parking brake and engage
first gear or reverse gear.
The tyre repair kit is in the tool box
under the floor cover in the load
compartment.
Page 153 of 189

Vehicle care151
Set the rocker switch on the
compressor to I. The tyre is filled
with sealant.
10. The compressor pressure gauge briefly indicates up to 6 bar whilstthe sealant bottle is emptying
(approx. 30 seconds). Then the
pressure starts to drop.
11. All of the sealant is pumped into the tyre. Then the tyre is inflated.
12. The prescribed tyre pressure should be obtained within
10 minutes.
Tyre pressure 3 172.
When the correct pressure is
obtained, switch off the
compressor.
If the prescribed tyre pressure is
not obtained within 10 minutes,
remove the tyre repair kit. Move
the vehicle one tyre rotation.
Reattach the tyre repair kit and
continue the filling procedure for
10 minutes. If the prescribed tyre
pressure is still not obtained, the
tyre is too badly damaged. Seek
the assistance of a workshop.
Drain excess tyre pressure with
the button over the pressure indicator.
Depending on version the button
can be located on the air hose.
Do not run the compressor longer
than 10 min.
13. Detach the tyre repair kit. Push catch on bracket to remove
sealant bottle from bracket. Screw the tyre inflation hose to the freeconnection of the sealant bottle.
This prevents sealant from
escaping. Stow tyre repair kit in
load compartment.
14. Remove any excess sealant using a cloth.