winter tyres VAUXHALL VIVARO 2016.5 Owner's Manual
[x] Cancel search | Manufacturer: VAUXHALL, Model Year: 2016.5, Model line: VIVARO, Model: VAUXHALL VIVARO 2016.5Pages: 211, PDF Size: 5 MB
Page 146 of 211

144Vehicle careVehicle careGeneral Information...................145
Accessories and vehicle modifications .......................... 145
Vehicle storage ........................145
End-of-life vehicle recovery .....145
Vehicle checks ........................... 146
Performing work ......................146
Bonnet ..................................... 146
Engine oil ................................. 147
Engine air filter ........................ 148
Engine coolant ......................... 148
Power steering fluid .................149
Washer fluid ............................ 150
Brakes ..................................... 150
Brake fluid ............................... 150
Vehicle battery ......................... 150
Diesel fuel filter ........................152
Diesel fuel system bleeding .....152
Wiper blade replacement ........153
Bulb replacement .......................154
Headlights ............................... 154
Fog lights ................................. 154
Front turn signal lights .............155
Tail lights ................................. 155
Side turn signal lights ..............156Centre high-mounted brake
light ......................................... 156
Reversing light ......................... 157
Number plate light ...................157
Fog tail light ............................. 157
Interior lights ............................ 158
Instrument panel illumination ...158
Electrical system ........................159
Fuses ....................................... 159
Instrument panel fuse box .......160
Vehicle tools .............................. 163
Tools ........................................ 163
Wheels and tyres .......................164
Tyres ....................................... 164
Winter tyres ............................. 164
Tyre designations ....................164
Tyre pressure .......................... 164
Tyre pressure monitoring system .................................... 166
Tread depth ............................. 167
Changing tyre and wheel size . 168
Wheel covers ........................... 168
Tyre chains .............................. 168
Tyre repair kit .......................... 169
Wheel changing .......................171
Spare wheel ............................ 173
Jump starting ............................. 174Towing....................................... 176
Towing the vehicle ...................176
Towing another vehicle ...........177
Appearance care .......................177
Exterior care ............................ 177
Interior care ............................. 179
Page 166 of 211

164Vehicle careWheels and tyres
Tyre condition, wheel condition Drive over edges slowly and at right
angles if possible. Driving over sharp
edges can cause tyre and wheel
damage. Do not trap tyres on the kerb when parking.
Regularly check the wheels for
damage. Seek the assistance of a
workshop in the event of damage or
unusual wear.
We recommend not swapping the
front wheels with the rear wheels and
vice versa, as this can affect vehicle
stability. Always use less worn tyres
on the rear axle.
Tyres
Factory-fitted tyres are matched to
the chassis and offer optimum driving comfort and safety.Winter tyres
Winter tyres improve driving safety at temperatures below 7 °C and should
therefore be fitted on all wheels.
In accordance with country-specific
regulations, a notice indicating the
maximum permissible speed for the
tyres must be affixed within the
driver's field of vision.
Tyre designations
E.g. 195/65 R 16 C 88 Q195:Tyre width, mm65:Cross-section ratio (tyre height
to tyre width), %R:Belt type: RadialRF:Type: RunFlat16:Wheel diameter, inchesC:Cargo or commercial use88:Load index e.g. 88 is
equivalent to 567 kgQ:Speed code letter
Speed code letter:
Q:up to 100 mphS:up to 112 mphT:up to 118 mphH:up to 130 mphV:up to 150 mphW:up to 168 mph
Choose a tyre appropriate for the
maximum speed of your vehicle.
The maximum speed is achievable at kerb weight with driver (75 kg) plus
125 kg payload. Optional equipment
could reduce the maximum speed of
the vehicle.
Directional tyres
Fit directional tyres such that they roll in the direction of travel. The rolling
direction is indicated by a symbol
(e.g. an arrow) on the sidewall.
Tyre pressure
Check the pressure of cold tyres at
least every 14 days and before any
long journey. Do not forget the spare
wheel. This also applies to vehicles
with tyre pressure monitoring system.
Page 167 of 211

Vehicle care165
The tyre pressure information label
on the driver's door frame indicates
the original equipment tyres and the
correspondent tyre pressures.
Always inflate tyres to the pressures
shown on the label.
Tyre pressures 3 198.
The tyre pressure data refers to cold tyres. It applies to summer and winter tyres.
Always inflate the spare tyre to the
pressure specified for full load.
Incorrect tyre pressures will impair
safety, vehicle handling, comfort and
fuel economy and will increase tyre
wear.
Tyre pressures differ depending on
various options. For the correct tyre
pressure value, follow the procedure
below:
1. Identify the engine identifier code.
Engine data 3 187.
2. Identify the respective tyre.
The tyre pressure tables show all
possible tyre combinations 3 198.
For the tyres approved for your
vehicle, refer to the EEC Certificate of Conformity provided with your vehicle
or other national registration
documents.
The driver is responsible for correct adjustment of tyre pressure.9 Warning
If the pressure is too low, this can
result in considerable tyre warm-
up and internal damage, leading to tread separation and even to tyre
blow-out at high speeds.
9 Warning
For specific tyres the
recommended tyre pressure as
shown in the tyre pressure table may exceed the maximum tyre
pressure as indicated on the tyre.
Never exceed the maximum tyre
pressure as indicated on the tyre.
Temperature dependency
Tyre pressure depends on the
temperature of the tyre. During
driving, tyre temperature and
pressure increase.
Tyre pressure values provided on the
tyre information label and tyre
pressure chart are valid for cold tyres, which means at 20 °C. The pressure
increases by nearly 1.5 psi for a
10 °C temperature increase. This
must be considered when warm tyres
are checked.
Page 169 of 211

Vehicle care167PunctureA puncture or severely under-inflated
tyre is indicated by illumination of
control indicator w together with C
3 86 and a corresponding message
appears in the DIC. Stop vehicle and
switch off engine.
Tyre pressure 3 198, Tyre repair kit
3 169, Spare wheel 3 173, Wheel
changing 3 171.
Relearn function
After a puncture has been repaired
and the driver has inflated the tyres to
the correct tyre pressure, TPMS
needs to recalculate.
Tyre pressure 3 198, Tyre repair kit
3 169.
During driving, select the tyre
pressure menu in the DIC by pressing button on end of wiper lever. Press
and hold button for approx.
5 seconds to initialise recalculation. A
corresponding message appears in
the DIC.
Several minutes of driving at a speed above 25 mph may be required tocomplete the relearn process. The
system can only provide limited
information during this time.
If problems occur during the relearn
process, control indicator w remains
illuminated and a warning message is
displayed in the DIC.
Driver Information Centre (DIC) 3 90.
Vehicle messages 3 91.
General information The use of tyre chains or
commercially available liquid tyre
repair kits can impair the function of
the system. Factory-approved tyre
repair kits can be used.Tyre repair kit 3 169, Tyre chains
3 168.
External high-power radio equipment
could disrupt the tyre pressure
monitoring system.
Each time the tyres are replaced,
TPMS sensors must be dismounted
and serviced by a workshop.
Tread depth
Check tread depth at regular
intervals.
Tyres should be replaced for safety
reasons at a tread depth of 2-3 mm
(4 mm for winter tyres).
For safety reasons it is recommended
that the tread depth of the tyres on
one axle should not vary by more than 2 mm.
Page 175 of 211
Vehicle care173Put wheel bolts somewhere
where the threads will not be
soiled.
6. Change the wheel. Spare wheel 3 173.
7. Screw in the wheel bolts.
8. Lower the vehicle and remove jack.
9. Tighten each of the wheel bolts in
a crosswise sequence using the
wheel wrench. Ensure the wrench
locates securely. The wrench
should turn clockwise to tighten
the bolts. Invert the wrench if
necessary.
Tightening torque is 160 Nm.
10. Replace the wheel cover, ensuring that the valve hole in thewheel cover is aligned with the
tyre valve before installing.
Notice
If applicable, fit anti-theft bolts
nearest the tyre valve (otherwise it
may not be possible to refit the wheel
cover).11. Stow the replaced wheel 3 173
and the vehicle tools 3 163.
12. Have the new wheel balanced on the vehicle.
Check the tyre pressure of the
installed tyre 3 198.
Check the wheel bolt torque.
Have the defective tyre renewed or
repaired as soon as possible.
Spare wheel
Some vehicles are equipped with a
tyre repair kit instead of a spare wheel 3 169.
If mounting a spare wheel which is
different from the other wheels, this
wheel might be classified as a
temporary spare wheel and the
corresponding speed limits apply,
even though no label indicates this.
Seek the assistance of a workshop to
check the applicable speed limit.Caution
The use of a spare wheel that is smaller than the other wheels or in combination with winter tyres
could affect driveability. Have the defective tyre replaced as soon as
possible.
It may be necessary to jack the
vehicle up to gain access to the spare
wheel on a fully loaded vehicle with a
flat rear tyre.
Wheel changing 3 171.
Page 176 of 211

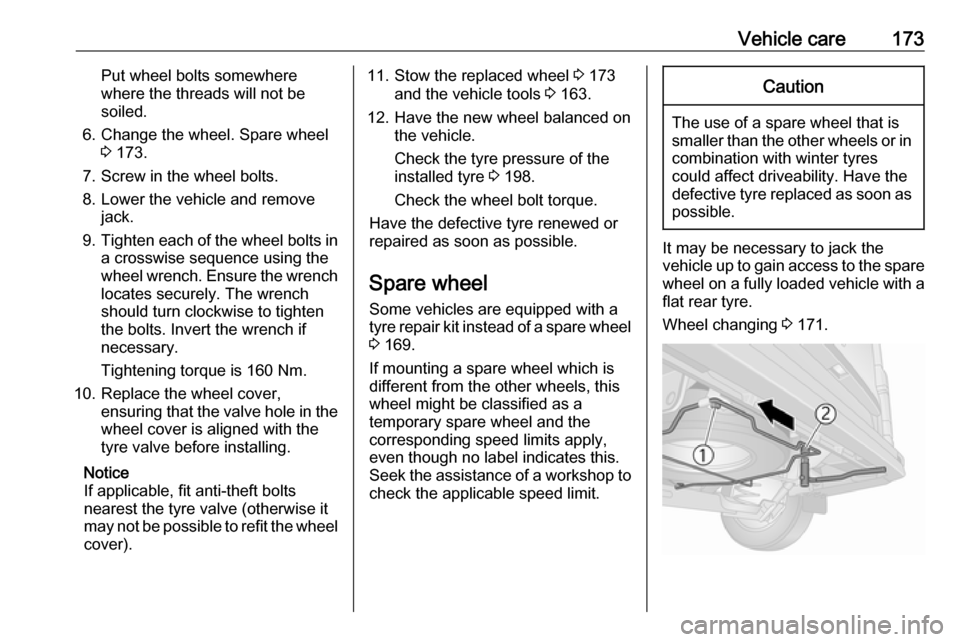
174Vehicle careThe spare wheel is mounted under
the rear underbody and may be
secured using a security bolt that can only be removed using the wheel bolt
sleeve supplied. Vehicle tools 3 163.9 Warning
Due to the weight of the tyre
assembly, exercise caution when
releasing the spare wheel carrier.
Do not fully remove bolt 1.
Support the spare wheel with a
suitable object to prevent the
wheel falling suddenly when
loosening the carrier bolts - risk of injury!
To release the spare wheel carrier,loosen bolt 1, ensuring it is not fully
removed. Fully remove bolt 2, then
pull the carrier to the left, until it clears bolt 1, and lower the carrier assembly.
When installing the wheel ensure that
the spare wheel carrier is correctly
positioned before tightening the bolts.
Summer and winter tyres
If you use winter tyres, the spare wheel may still be fitted with a
summer tyre.
If you use the spare wheel when it is
fitted with a summer tyre the vehicle's driveability may be affected,
especially on slippery road surfaces.
Directional tyres Fit directional tyres such that they rollin the direction of travel. The rolling
direction is indicated by a symbol
(e.g. an arrow) on the sidewall.
The following applies to tyres fitted
opposing the rolling direction:
● Driveability may be affected. Have the defective tyre renewed
or repaired as soon as possible
and fit it instead of the spare
wheel.
● Do not drive faster than 50 mph.
● Drive particularly carefully on wet
and snow-covered road
surfaces.Jump starting
Do not start with a quick charger.
A vehicle with a discharged battery
can be started using jump leads and the vehicle battery of another vehicle.9 Warning
Be extremely careful when starting
with jump leads. Any deviation
from the following instructions can
lead to injuries or damage caused
by battery explosion or damage to the electrical systems of both
vehicles.
9 Warning
Avoid contact of the battery with
eyes, skin, fabrics and painted
surfaces. The fluid contains
sulphuric acid which can cause
injuries and damage in the event
of direct contact.
● Never expose the battery to naked flames or sparks.
Page 181 of 211

Vehicle care179Remove dirt residues from smearing
wiper blades by using a soft cloth and
window cleaner. Also make sure to
remove any residues such as wax,
insect residues and similar from the
window.
Ice residues, pollution and continuous wiping on dry windows will damage or
even destroy the wiper blades.
Wheels and tyres Do not use high-pressure jet
cleaners.
Clean rims with a pH-neutral wheel
cleaner.
Rims are painted and can be treated
with the same agents as the body.
Paintwork damage Rectify minor paintwork damage with
a touch-up pen before rust forms.
Have more extensive damage or rust areas repaired by a workshop.Underbody
Some areas of the vehicle underbody
have a PVC undercoating while other critical areas have a durable
protective wax coating.
After the underbody is washed, check
the underbody and have it waxed if
necessary.
Bitumen/rubber materials could
damage the PVC coating. Have
underbody work carried out by a
workshop.
Before and after winter, wash the
underbody and have the protective
wax coating checked.
Towing equipment
Do not clean the coupling ball bar with a steam-jet or high-pressure jet
cleaner.Interior care
Interior and upholstery Only clean the vehicle interior,
including the instrument panel fascia
and panelling, with a dry cloth or
interior cleaner.
Clean any leather upholstery with
clear water and a soft cloth. In case of
heavy soiling, use leather care.
The instrument cluster and the
displays should only be cleaned using
a soft damp cloth. If necessary use a
weak soap solution.
Clean fabric upholstery with a
vacuum cleaner and brush. Remove
stains with an upholstery cleaner.
Clothing fabrics may not be
colourfast. This could cause visible
discolourations, especially on light-
coloured upholstery. Removable
stains and discolourations should be
cleaned as soon as possible.
Clean seat belts with lukewarm water or interior cleaner.
Page 209 of 211

207Vehicle dimensions .................... 192
Vehicle Identification Number ....184
Vehicle jack ................................ 163
Vehicle messages .......................91
Vehicle security ............................ 33
Vehicle shutdown ......................119
Vehicle specific data ......................3
Vehicle storage ........................... 145
Vehicle tools ....................... 163, 176
Vehicle unlocking ........................... 6
Vehicle weight ........................... 189
Ventilation ................................... 103
W
Warning chimes ........................... 92
Warning lights ............................... 79
Warning messages .......................91
Warning triangle .......................... 72
Washer and wiper systems .........14
Washer fluid ............................... 150
Washing the vehicle ...................177
Welcome lighting ........................101
Wheel changing .........................171
Wheel cover hook .......................163
Wheel covers ............................. 168
Wheels and tyres .......................164
Wheel wrench ............................. 163
Wide view mirror ........................... 38
Windows ................................. 39, 40
Windscreen................................... 39Windscreen stickers .....................39
Windscreen wiper/washer ...........76
Winter tyres ............................... 164
Wiper blade replacement ..........153