Interior VAUXHALL VIVARO C 2020 User Guide
[x] Cancel search | Manufacturer: VAUXHALL, Model Year: 2020, Model line: VIVARO C, Model: VAUXHALL VIVARO C 2020Pages: 289, PDF Size: 10.16 MB
Page 43 of 289
Keys, doors and windows41Windows
Windscreen
Windscreen stickers
Do not attach stickers such as toll
road stickers or similar on the
windscreen in the area of the interior
mirror. Otherwise the detection zone
of the sensor and the view area of the camera in the mirror housing could be
restricted.
Windscreen replacementCaution
If the vehicle has a front-looking
camera sensor for the driver
assistance systems, it is very
important that any windscreen
replacement is performed
accurately according to Vauxhall
specifications. Otherwise, these systems may not work properly
and there is a risk of unexpected
behaviour and / or messages from these systems.
Power windows9 Warning
Take care when operating the
power windows. Risk of injury,
particularly to children.
If there are children on the rear seats, switch on the child safety
system for the power windows.
Keep a close watch on the
windows when closing them.
Ensure that nothing becomes
trapped in them as they move.
Switch on ignition to operate power
windows.
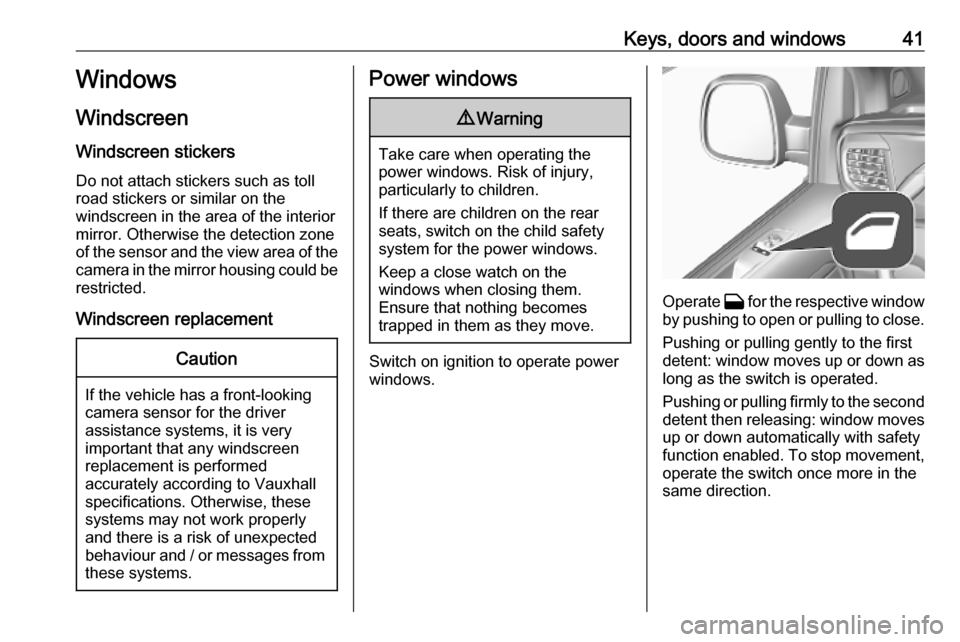
Operate G for the respective window
by pushing to open or pulling to close.
Pushing or pulling gently to the first
detent: window moves up or down as long as the switch is operated.
Pushing or pulling firmly to the second
detent then releasing: window moves
up or down automatically with safety
function enabled. To stop movement,
operate the switch once more in the
same direction.
Page 93 of 289

Storage91● Do not place any objects on therear luggage cover or the
instrument panel, and do not
cover the sensor on top of the
instrument panel.
● The load must not obstruct the operation of the pedals, parking
brake and gear selector, or
hinder the freedom of movement of the driver. Do not place any
unsecured objects in the interior.
● Do not drive with an open load compartment.9Warning
Always make sure that the load in
the vehicle is securely stowed.
Otherwise objects can be thrown
around inside the vehicle and
cause personal injury or damage
to the load or car.
● The payload is the difference between the permitted gross
vehicle weight (see identification
plate) and the EC kerb weight.
Identification plate 3 264.
To calculate the payload, enter
the data for your vehicle in the
weights table at the front of this
manual.
The EC kerb weight includes
weights for the driver (68 kg),
luggage (7 kg) and all fluids (fuel
tank 90% full).
Optional equipment and
accessories increase the kerb
weight.
● Driving with a roof load increases
the sensitivity of the vehicle to
cross-winds and has a
detrimental effect on vehicle
handling due to the vehicle's
higher centre of gravity.
Distribute the load evenly and secure it properly with retaining
straps. Adjust the tyre pressure
and vehicle speed according to
the load conditions. Check and
retighten the straps frequently.
Do not drive faster than 75 mph.
Page 131 of 289
Lighting129LightingExterior lighting.......................... 129
Light switch .............................. 129
Automatic light control .............130
High beam ............................... 130
High beam assist .....................130
Headlight flash ......................... 131
Headlight range adjustment ....131
Headlights when driving abroad .................................... 132
Daytime running lights .............132
Cornering lights .......................132
Hazard warning flashers ..........132
Turn lights ................................ 133
Front fog lights ......................... 133
Rear fog light ........................... 133
Reversing lights .......................134
Misted light covers ...................134
Interior lighting ........................... 134
Instrument panel illumination control ..................................... 134
Interior lights ............................ 134
Reading lights .......................... 135
Sunvisor lights ......................... 136
Lighting features ........................136
Centre console lighting ............136Entry lighting ............................ 136
Exit lighting .............................. 136
Vehicle locator lighting ............137
Peripheral lighting ....................137
Battery discharge protection ....137Exterior lighting
Light switch
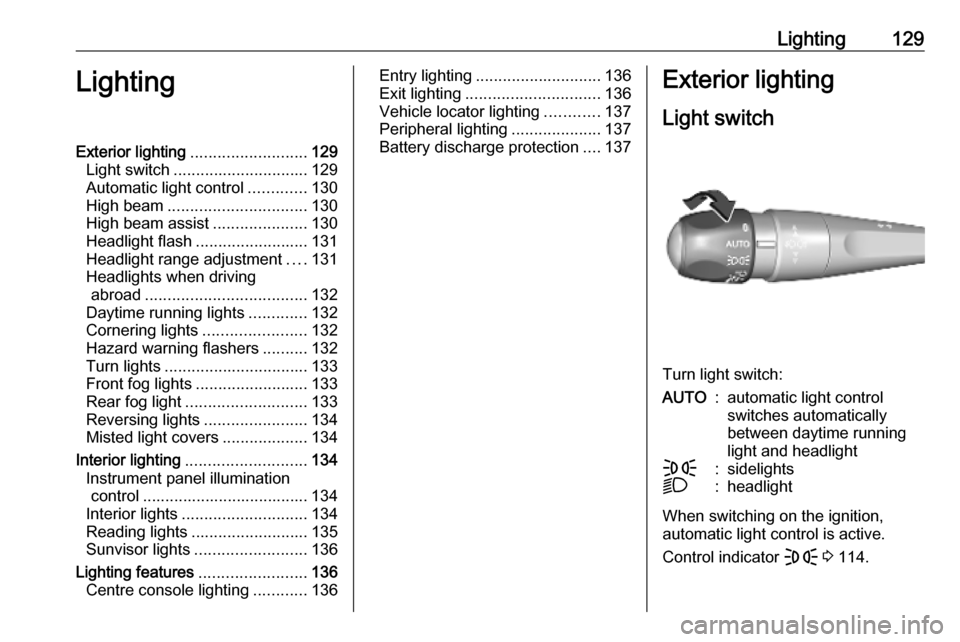
Turn light switch:
AUTO:automatic light control
switches automatically
between daytime running
light and headlightF:sidelightsD:headlight
When switching on the ignition,
automatic light control is active.
Control indicator F 3 114.
Page 136 of 289
134LightingTurn the control wheel twice to
activate or deactivate the rear fog
light.
Light switch in position AUTO:
switching on rear fog light will switch
headlights on automatically.
Reversing lights
The reversing light comes on when
the ignition is on and reverse gear is
selected.
Misted light covers
The inside of the light housing may
mist up briefly in poor, wet and cold weather conditions, in heavy rain or
after washing. The mist disappears
quickly by itself. To help, switch on the headlights.Interior lighting
Instrument panel illumination control
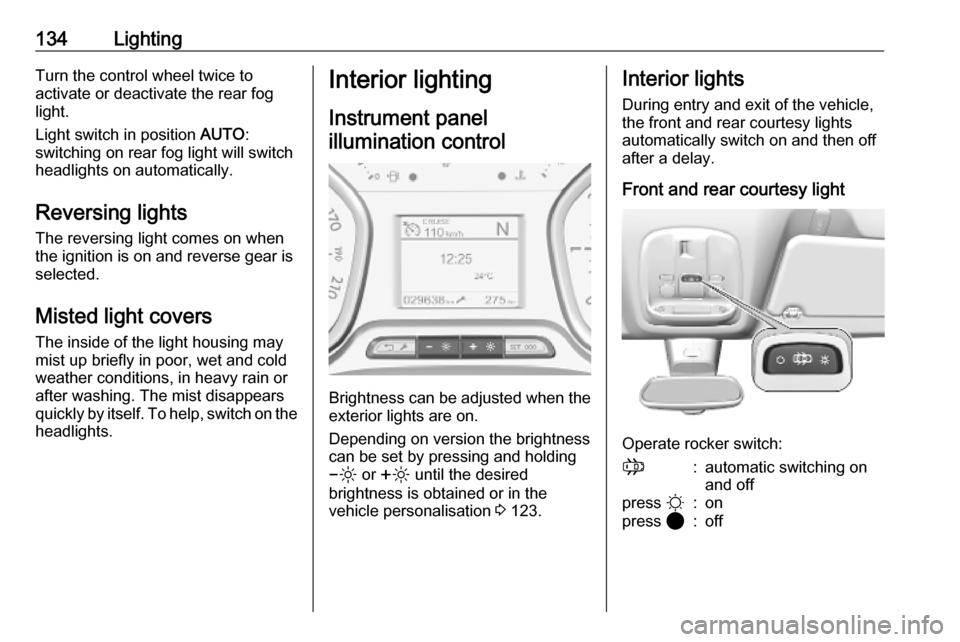
Brightness can be adjusted when the exterior lights are on.
Depending on version the brightness
can be set by pressing and holding
0 or ß until the desired
brightness is obtained or in the
vehicle personalisation 3 123.
Interior lights
During entry and exit of the vehicle,
the front and rear courtesy lights
automatically switch on and then off
after a delay.
Front and rear courtesy light
Operate rocker switch:
;:automatic switching on
and offpress §:onpress 2:off
Page 138 of 289

136LightingIllustration shows rear courtesy lights.
Sunvisor lights Illuminates when the cover is opened.Lighting features
Centre console lighting A spotlight integrated in the overheadconsole illuminates the centre
console when headlights are
switched off.
The brightness can be adjusted in the vehicle personalisation 3 123.
Entry lighting
Welcome lighting
Some or all of the following lights are
switched on for a short time by
unlocking the vehicle with the radio
remote control:
● headlights
● tail lights
● interior lights
The number of activated lights
depends on the surrounding light
conditions.
The lighting switches off immediately
when the ignition is switched on.
Starting off 3 18.This function can be activated or
deactivated in the vehicle
personalisation 3 123.
The following lights will additionally
switch on when the driver's door is
opened:
● illumination of some switches
● Driver Information Centre
Exit lighting
The following lights are switched on if
the key is removed from the ignition
switch:
● interior lights
● instrument panel light
They will switch off automatically after
a delay. This function works only in
the dark.
Path lighting Headlights, tail lights and number
plate lights illuminate the surrounding
area for an adjustable time after
leaving the vehicle.
Page 139 of 289
Lighting137Manual path lighting
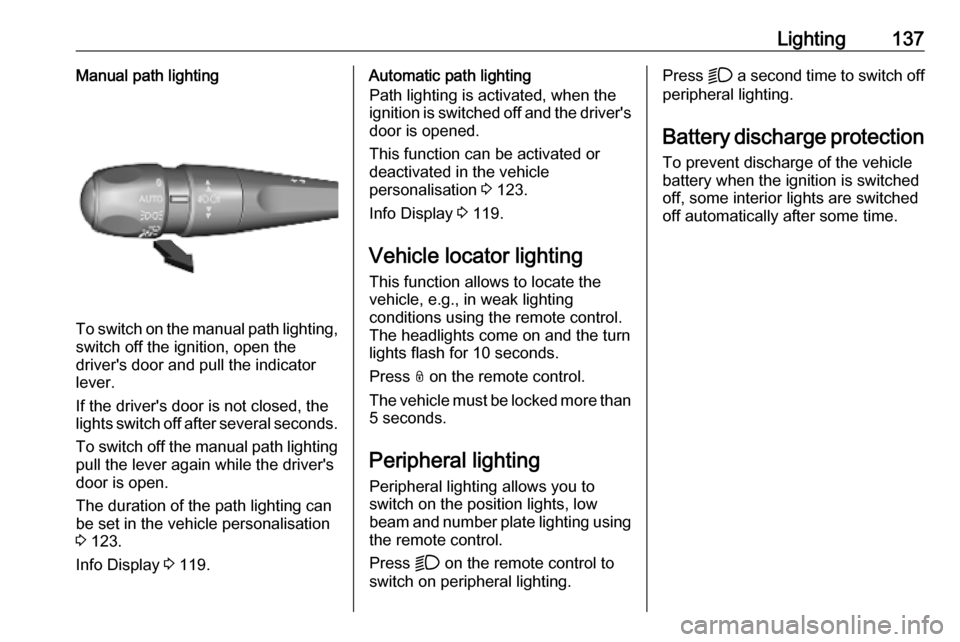
To switch on the manual path lighting,switch off the ignition, open the
driver's door and pull the indicator
lever.
If the driver's door is not closed, the
lights switch off after several seconds.
To switch off the manual path lighting
pull the lever again while the driver's
door is open.
The duration of the path lighting can
be set in the vehicle personalisation
3 123.
Info Display 3 119.
Automatic path lighting
Path lighting is activated, when the
ignition is switched off and the driver's door is opened.
This function can be activated or
deactivated in the vehicle
personalisation 3 123.
Info Display 3 119.
Vehicle locator lighting This function allows to locate the
vehicle, e.g., in weak lighting
conditions using the remote control.
The headlights come on and the turn
lights flash for 10 seconds.
Press N on the remote control.
The vehicle must be locked more than
5 seconds.
Peripheral lighting Peripheral lighting allows you to
switch on the position lights, low
beam and number plate lighting using the remote control.
Press D on the remote control to
switch on peripheral lighting.Press D a second time to switch off
peripheral lighting.
Battery discharge protection To prevent discharge of the vehicle
battery when the ignition is switched
off, some interior lights are switched
off automatically after some time.
Page 148 of 289
146Climate control● Air conditioning and automaticmode are automatically switchedon. The LED in the button A/C
illuminates, AUTO is shown in the
display.
● Temperature and air distribution are set automatically and the fan
runs at high speed.
● Switch on heated rear window è.
● Switch on heated windscreen 9 .
● To return to previous mode, press h again.
Notice
If h is pressed while the engine is
running, an Autostop will be inhibited until h is pressed again.
If h is pressed while the engine is
in an Autostop, the engine will restart
automatically.
Heated rear window è 3 43.
Heated exterior mirrors m 3 39.
Heated windscreen 9 3 44.
Stop-start system 3 156.Deactivation of electronic climate
control system
Press s subsequently until the
electronic climate control system is
deactivated.
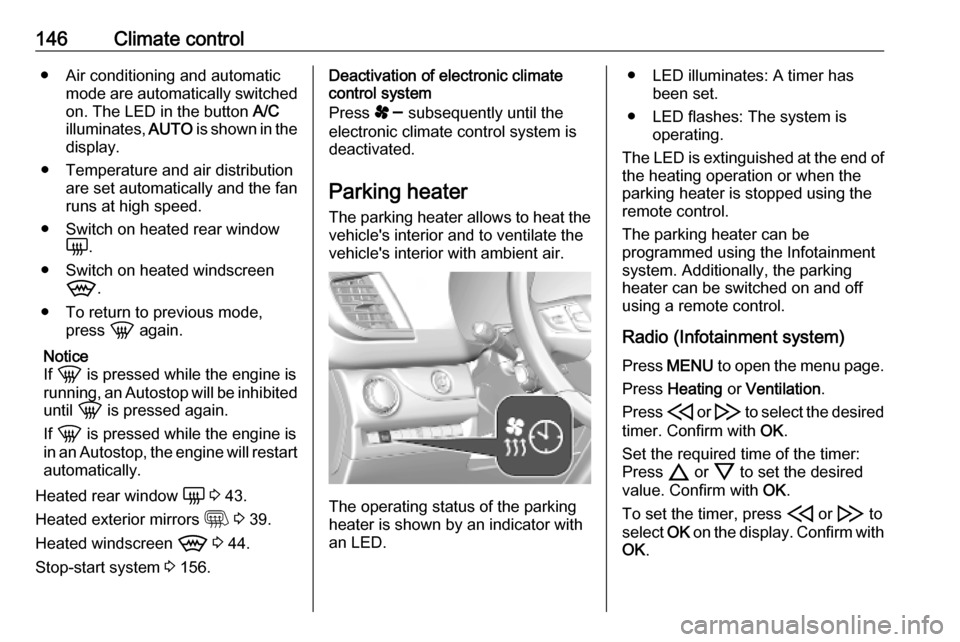
Parking heater
The parking heater allows to heat the vehicle's interior and to ventilate the
vehicle's interior with ambient air.
The operating status of the parking
heater is shown by an indicator with
an LED.
● LED illuminates: A timer has been set.
● LED flashes: The system is operating.
The LED is extinguished at the end of
the heating operation or when the
parking heater is stopped using the
remote control.
The parking heater can be
programmed using the Infotainment
system. Additionally, the parking
heater can be switched on and off
using a remote control.
Radio (Infotainment system) Press MENU to open the menu page.
Press Heating or Ventilation .
Press H or I to select the desired
timer. Confirm with OK.
Set the required time of the timer:
Press 7 or 8 to set the desired
value. Confirm with OK.
To set the timer, press H or I to
select OK on the display. Confirm with
OK .
Page 162 of 289
160Driving and operatingEngine exhaust9Danger
Engine exhaust gases contain
poisonous carbon monoxide,
which is colourless and odourless and could be fatal if inhaled.
If exhaust gases enter the interior
of the vehicle, open the windows.
Have the cause of the fault
rectified by a workshop.
Avoid driving with an open load
compartment, otherwise exhaust
gases could enter the vehicle.
Exhaust filter
Automatic cleaning process
The exhaust filter system filters soot particles out of the exhaust gases.
The start of saturation of the exhaust
filter is indicated by the temporary
illumination of + or C ,
accompanied by a message in the
Driver Information Centre and a
chime.
As soon as the traffic conditions
permit, regenerate the filter by driving at a vehicle speed of at least 40 mph
until the control indicator
extinguishes.
Notice
On a new vehicle, the first exhaust
filter regeneration operations may
be accompanied by a burning smell,
which is normal. Following
prolonged operation of the vehicle at very low speed or at idle, water
vapour can be emitted at the
exhaust on acceleration. This does
not affect the behaviour of the
vehicle or the environment.
Cleaning process not possible
If + or C stays on, accompanied
by an audible signal and a message,
this indicates that the exhaust filter
additive level is too low.
The reservoir must be topped-up
without delay. Seek the assistance of
a workshop.Catalytic converter
The catalytic converter reduces the
amount of harmful substances in the
exhaust gases.Caution
Fuel grades other than those listed on page 3 268 could damage the
catalytic converter or electronic
components.
Unburnt petrol will overheat and damage the catalytic converter.
Therefore avoid excessive use of
the starter, running the fuel tank
dry and starting the engine by
pushing or towing.
In the event of misfiring, uneven
engine running, a reduction in engine performance or other unusual
problems, have the cause of the fault
rectified by a workshop as soon as
possible. In an emergency, driving
can be continued for a short period,
keeping vehicle speed and engine
speed low.
Page 196 of 289
194Driving and operatingSystem limitations
In the event of a fault or if the system does not work temporarily, e.g.
because of high external noise level
or other interference factors, H
illuminates in the instrument cluster.
A message is displayed in the Driver
Information Centre.9 Warning
Under certain circumstances,
various reflective surfaces on
objects or clothing as well as
external noise sources may cause the system to fail to detect
obstacles.
Special attention must be paid to
low obstacles which can damage
the lower part of the bumper.
Caution
Performance of the system can be reduced when sensors are
covered, e.g. by ice or snow.
Performance of the parking assist
system can be reduced due to
heavy loading.
Special conditions apply if there
are taller vehicles in the vicinity
(e.g. off-road vehicles, mini vans,
vans). Object identification and correct distance indication in the
upper part of these vehicles
cannot be guaranteed.
Objects with a very small reflection
cross-section, e.g. objects of
narrow size or soft materials, may
not be detected by the system.
Parking assist systems do not
detect objects outside the
detection range.
Side blind spot alert
The side blind spot alert system
detects and reports objects on either
side of the vehicle, within a specified
blind spot zone. The system displays
a visual alert in each exterior mirror,
when detecting objects that may not
be visible in the interior and exterior
mirrors.
Side blind spot alert uses some of the
parking assist sensors which are
located in the front and rear bumper
on both sides of the vehicle.9 Warning
Side blind spot alert does not
replace driver vision.
The system does not detect:
● vehicles outside the side blind zones which may be rapidly
approaching
● pedestrians, cyclists or animals
Before changing a lane, always
check all mirrors, look over the
shoulder and use the turn signal.
Page 201 of 289
Driving and operating199The panoramic view system may not
operate properly when:
● The surrounding is dark.
● The sun or the beam of headlights is shining directly into
the camera lenses.
● During nighttime driving.
● Weather limits visibility, such as fog, rain, or snow.
● The camera lenses are blocked by snow, ice, slush, mud, dirt.
● The vehicle is towing a trailer.
● The vehicle had an accident.
● There are extreme temperature changes.
Rear view camera Depending on version, camera is
mounted above the license plate in
the tailgate / left rear door.9 Warning
The rear view camera does not
replace driver vision. Note that
objects that are outside the
camera's field of view and the
parking assist sensors, e.g. below
the bumper or underneath the
vehicle, are not displayed.
Do not reverse or park the vehicle
using only the rear view camera.
Always check the surrounding of
the vehicle before driving.
The view of the camera is displayed
in the Info Display 3 119 or in the
interior mirror 3 40.
The area displayed by the camera is
limited. The distance of the image that
appears on the display differs from
the actual distance.
Switching on Rear view camera is automatically
activated when reverse gear is
engaged.
Switching off
The camera is switched off when a
forward gear is engaged.
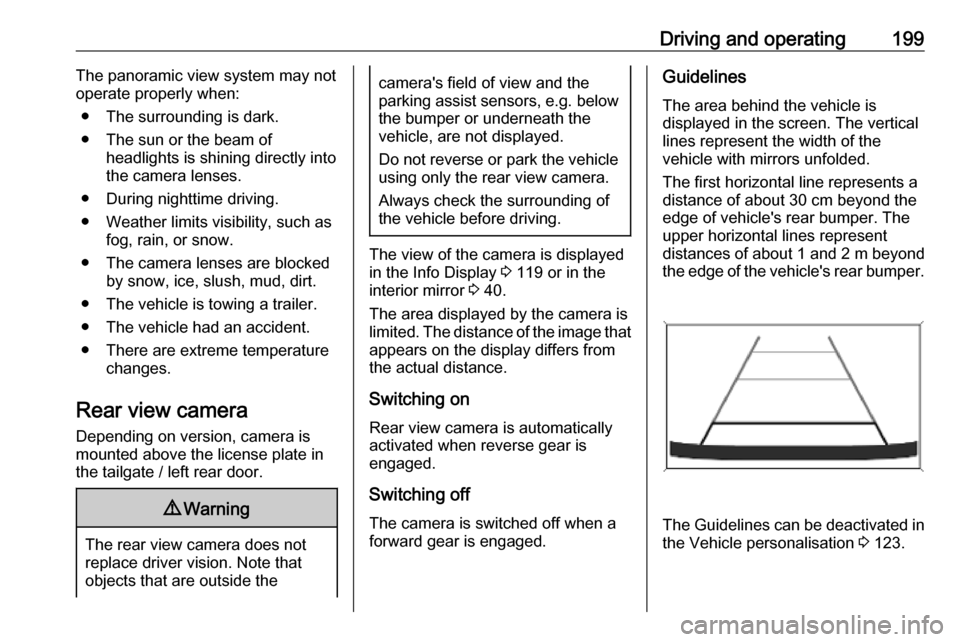
Guidelines
The area behind the vehicle is
displayed in the screen. The vertical
lines represent the width of the
vehicle with mirrors unfolded.
The first horizontal line represents a
distance of about 30 cm beyond the
edge of vehicle's rear bumper. The
upper horizontal lines represent
distances of about 1 and 2 m beyond
the edge of the vehicle's rear bumper.
The Guidelines can be deactivated in
the Vehicle personalisation 3 123.