steering wheel VAUXHALL VIVARO C 2020 User Guide
[x] Cancel search | Manufacturer: VAUXHALL, Model Year: 2020, Model line: VIVARO C, Model: VAUXHALL VIVARO C 2020Pages: 289, PDF Size: 10.16 MB
Page 118 of 289

116Instruments and controls
Press button.
Move thumb wheel upwards or
downwards on the steering wheel.
Baselevel instrument cluster
Press F .
Midlevel instrument clusterPress SET 000 .Uplevel instrument cluster
Press 000.
Vehicle and service messages are
popped up in the Driver Information
Centre, if required. Scroll messages
by using the above mentioned
controls or buttons.
Vehicle messages 3 122.
Page 135 of 289
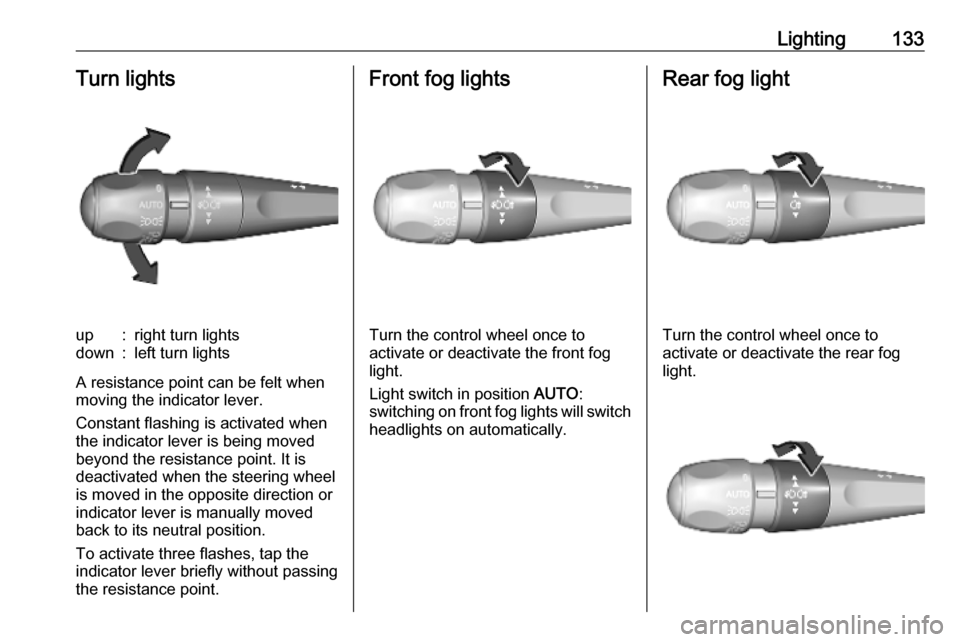
Lighting133Turn lightsup:right turn lightsdown:left turn lights
A resistance point can be felt when
moving the indicator lever.
Constant flashing is activated when
the indicator lever is being moved
beyond the resistance point. It is
deactivated when the steering wheel
is moved in the opposite direction or
indicator lever is manually moved
back to its neutral position.
To activate three flashes, tap the indicator lever briefly without passing
the resistance point.
Front fog lights
Turn the control wheel once to
activate or deactivate the front fog
light.
Light switch in position AUTO:
switching on front fog lights will switch headlights on automatically.
Rear fog light
Turn the control wheel once to
activate or deactivate the rear fog
light.
Page 155 of 289
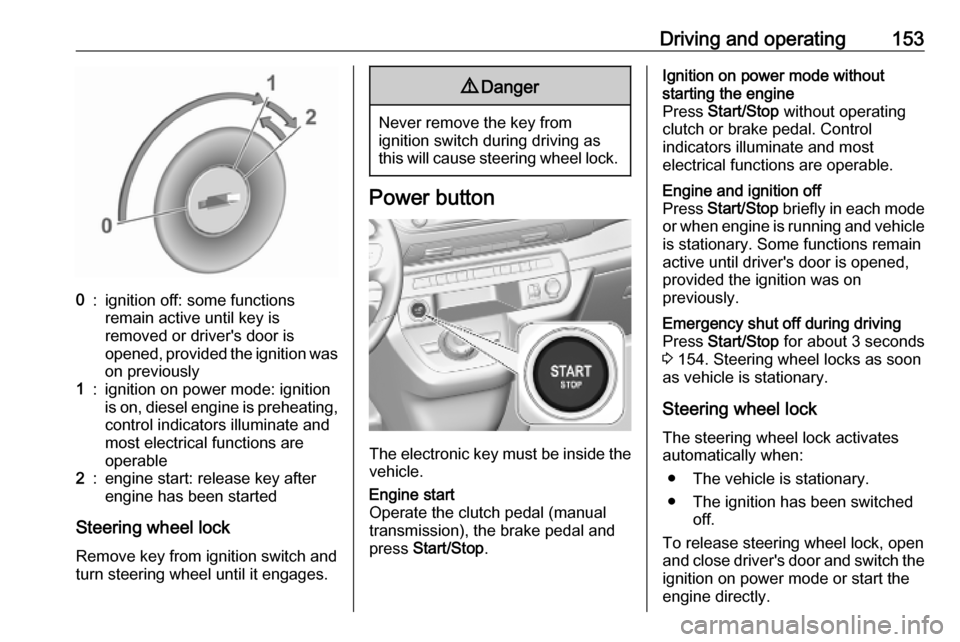
Driving and operating1530:ignition off: some functions
remain active until key is
removed or driver's door is
opened, provided the ignition was
on previously1:ignition on power mode: ignition
is on, diesel engine is preheating, control indicators illuminate and
most electrical functions are
operable2:engine start: release key after
engine has been started
Steering wheel lock
Remove key from ignition switch and
turn steering wheel until it engages.
9 Danger
Never remove the key from
ignition switch during driving as
this will cause steering wheel lock.
Power button
The electronic key must be inside the
vehicle.
Engine start
Operate the clutch pedal (manual
transmission), the brake pedal and
press Start/Stop .Ignition on power mode without
starting the engine
Press Start/Stop without operating
clutch or brake pedal. Control
indicators illuminate and most
electrical functions are operable.Engine and ignition off
Press Start/Stop briefly in each mode
or when engine is running and vehicle
is stationary. Some functions remain
active until driver's door is opened,
provided the ignition was on
previously.Emergency shut off during driving
Press Start/Stop for about 3 seconds
3 154. Steering wheel locks as soon
as vehicle is stationary.
Steering wheel lock
The steering wheel lock activates
automatically when:
● The vehicle is stationary.
● The ignition has been switched off.
To release steering wheel lock, open
and close driver's door and switch the ignition on power mode or start the
engine directly.
Page 156 of 289
154Driving and operating9Warning
If the vehicle battery is discharged,
the vehicle must not be towed,
tow-started or jump-started as the
steering wheel lock cannot be
disengaged.
Operation on vehicles with
electronic key system in case of
failure
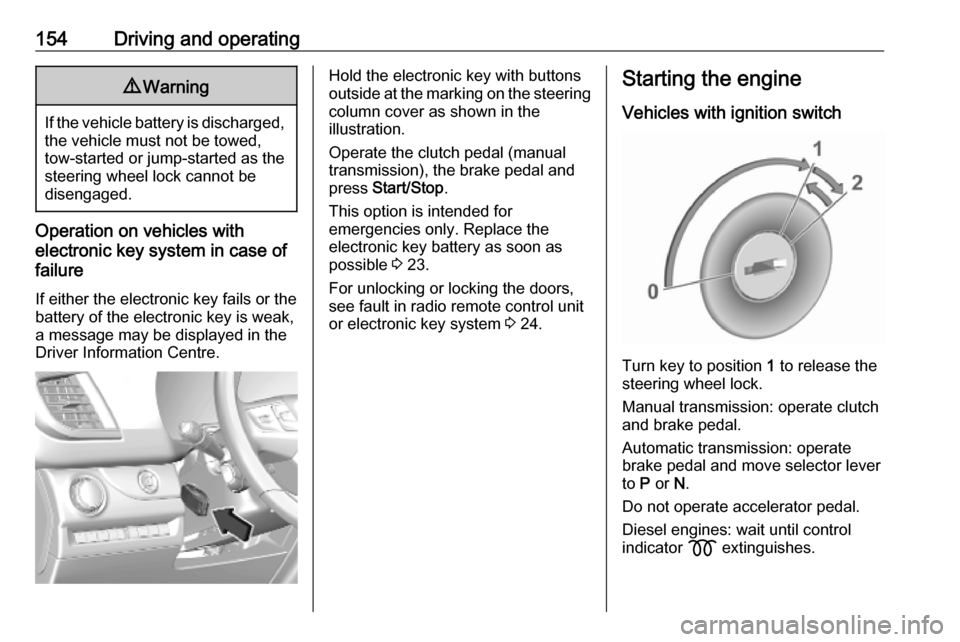
If either the electronic key fails or the
battery of the electronic key is weak,
a message may be displayed in the
Driver Information Centre.
Hold the electronic key with buttons
outside at the marking on the steering column cover as shown in the
illustration.
Operate the clutch pedal (manual
transmission), the brake pedal and
press Start/Stop .
This option is intended for
emergencies only. Replace the
electronic key battery as soon as
possible 3 23.
For unlocking or locking the doors,
see fault in radio remote control unit
or electronic key system 3 24.Starting the engine
Vehicles with ignition switch
Turn key to position 1 to release the
steering wheel lock.
Manual transmission: operate clutch
and brake pedal.
Automatic transmission: operate
brake pedal and move selector lever
to P or N.
Do not operate accelerator pedal.
Diesel engines: wait until control
indicator z extinguishes.
Page 161 of 289
Driving and operating159Parking9Warning
● Do not park the vehicle on an
easily ignitable surface. The
high temperature of the
exhaust system could ignite the
surface.
● Always apply the parking brake.
● If the vehicle is on a level surface or uphill slope, engage
first gear or set the selector
lever to position P (automatic
transmission type A) / N
(automatic transmission type B). On an uphill slope, turn the
front wheels away from the
kerb.
If the vehicle is on a downhill
slope, engage reverse gear or
set the selector lever to position P (automatic transmission type
A) / N (automatic transmission
type B). Turn the front wheels
towards the kerb.
● Close the windows.
● Switch off the engine.
● Remove the ignition key from the ignition switch or switch off
ignition on vehicles with power
button. Turn the steering wheel
until the steering wheel lock is
felt to engage.
● Lock the vehicle.
● Activate the anti-theft alarm system.
● The engine cooling fans may run
after the engine has been
switched off 3 212.
Caution
After running at high engine
speeds or with high engine loads,
operate the engine briefly at a low load or run in neutral for
approx. 30 seconds before
switching off, in order to protect
the turbocharger.
Notice
In the event of an accident with airbag deployment, the engine is
switched off automatically if the
vehicle comes to a standstill within a
certain time.
In countries with extreme low
temperatures it may be necessary to park the vehicle without applied
parking brake. Make sure to park the
vehicle on a level surface.
Page 166 of 289

164Driving and operating
4. Unscrew protective cap from thefiller neck.
5. Open AdBlue canister.
6. Mount one end of the hose on the
canister and screw the other end
on the filler neck.
7. Lift the canister until it is empty, or
until the flow from the canister has stopped. This can take up to 5
minutes.
8. Place the canister on the ground to empty the hose, wait 15 s.
9. Unscrew the hose from the filler neck.
10. Mount the protective cap and turn
clockwise until it engages.
Notice
Dispose of AdBlue canister
according to environmental
requirements. Hose can be reused
after flushing with clear water before
AdBlue dries out.Automatic transmission
The automatic transmission permits
automatic gearshifting (automatic
mode) or manual gearshifting
(manual mode).
Manual shifting is possible in manual
mode.Type A
Move gear selector to position D,
press M next to the selector gear
selector and shift with the steering
wheel paddles + and -.Type B
Move gear selector to M and shift with
the steering wheel paddles + and -.
Manual mode 3 166.
Gear selection 3 165.
Page 168 of 289

166Driving and operatingR:reverse gear, engage only when
the vehicle is stationaryN:neutralA:automatic modeM:manual mode
The engine can only be started with
the gear selector in position N. When
position N is selected, press the brake
pedal and start the engine.
Do not accelerate while engaging a
gear. Never depress the accelerator
pedal and brake pedal at the same
time.
When a gear is engaged, the vehicle
slowly begins to creep when the
brake is released.
Engine braking To utilise the engine braking effect,select a lower gear when driving
downhill.
Parking
Type A:
Apply the parking brake and select P.Type B
Apply the parking brake and select
N or leave the selected gear selector
position.
Manual mode 1. Activate manual mode a) Automatic transmission type A:Manual mode M can be activated
from position D in each driving
situation and speed.
Press button M.
b) Automatic transmission type B:
Move gear selector to position M
if vehicle is at a standstill.
2. Pull steering wheel paddles to select gears manually.
Pull right steering wheel paddle + to
shift to a higher gear.
Pull left steering wheel paddle - to
shift to a lower gear.
Multiple pulls allow gears to be
skipped.
The selected gear is indicated in the
instrument cluster.
If a higher gear is selected when
vehicle speed is too low, or a lower
gear when vehicle speed is too high,
the shift is not executed. This can
cause a message in the Driver
Information Centre.
Page 199 of 289
Driving and operating197ActivationPanoramic view system is activated
by:
● engaging reverse gear
● driving up to 6 mph
Functionality
Different views can be selected in the left part of the display. Change the
type of view at any time during a
manoeuvre by touching in the left
lower zone of the display:
● Standard view
● AUTO Mode
● Zoom view
● 180° view
The display is immediately updated
with the type of view selected.
AUTO Mode is activated by default. In
this mode, the system selects the
best view, standard or zoom, to
display according to the information
from the parking sensors.
The state of the system is not kept in memory when the ignition is switched
off.Rear view / Standard view
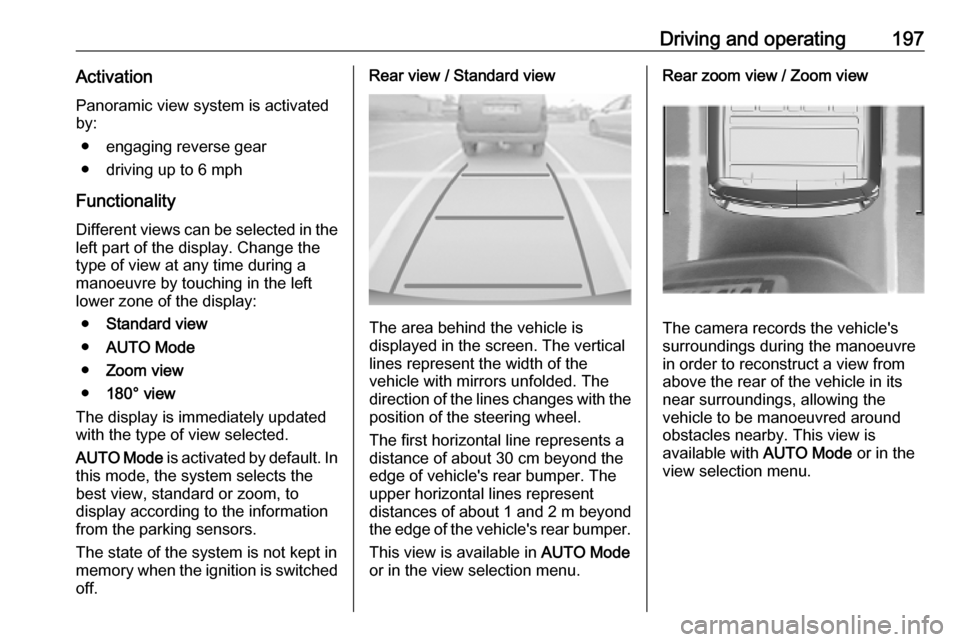
The area behind the vehicle is
displayed in the screen. The vertical
lines represent the width of the
vehicle with mirrors unfolded. The
direction of the lines changes with the position of the steering wheel.
The first horizontal line represents a
distance of about 30 cm beyond the
edge of vehicle's rear bumper. The
upper horizontal lines represent
distances of about 1 and 2 m beyond
the edge of the vehicle's rear bumper.
This view is available in AUTO Mode
or in the view selection menu.
Rear zoom view / Zoom view
The camera records the vehicle's
surroundings during the manoeuvre in order to reconstruct a view fromabove the rear of the vehicle in its
near surroundings, allowing the
vehicle to be manoeuvred around
obstacles nearby. This view is
available with AUTO Mode or in the
view selection menu.
Page 203 of 289

Driving and operating201At speeds below 37 mph the system
is inoperable.
FaultInfo Display without touchscreen
The LED of the Q flashes.Info Display with touchscreen
The control indicator Q flashes and
an error message is displayed.
Seek the assistance of a workshop.
The system cannot operate when no
lane marking is detected.
System limitationsThe system may not operate properly
when:
● vehicle speed is below 37 mph
● driving on winding or hilly roads
● driving in the dark
● weather limits visibility, such as fog, rain, or snow
● the camera is blocked by snow, ice, slush, mud, dirt, windscreen
damage or affected by foreign
items, e.g. stickers
● the sun is shining directly into the
camera lens
● close vehicles ahead ● banked roads
● road edges
● roads with poor lane markings
● sudden lighting changes
Driver alert
The driver alert system monitores the driving time and the vigilance of the
driver. Monitoring the vigilance of the
driver is based on the trajectory
variations of the vehicle compared to the lane markings.
The system includes a driving time alert combined with driver drowsiness
detection.9 Warning
The system cannot replace the
need for vigilance on the part of
the driver. Taking a break is
recommended as soon as feeling
tired or at least every 2 hours. Do
not take the steering wheel when
feeling tired.
Activation or Deactivation
The system can be activated or
deactivated in the vehicle
personalisation 3 123.
The state of the system stays in
memory when the ignition is switched off.
Driving time alert
The driver gets notified by a pop-up reminder symbol Y in the Driver
Information Centre simultaneously with an acoustic alert if the driver has
not taken a break after 2 hours of
driving at a speed above 40 mph. The alert is repeated hourly until the
vehicle is stopped, no matter how
vehicle speed evolves.
Page 211 of 289
Driving and operating209Type C
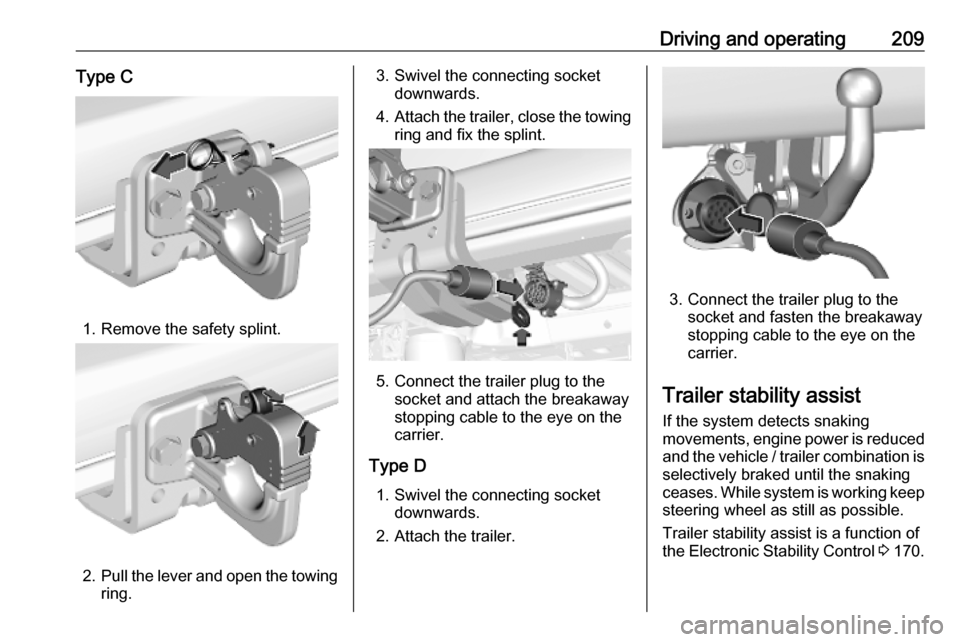
1. Remove the safety splint.
2.Pull the lever and open the towing
ring.
3. Swivel the connecting socket downwards.
4. Attach the trailer, close the towing
ring and fix the splint.
5. Connect the trailer plug to the socket and attach the breakaway
stopping cable to the eye on the
carrier.
Type D 1. Swivel the connecting socket downwards.
2. Attach the trailer.
3. Connect the trailer plug to the socket and fasten the breakaway
stopping cable to the eye on the
carrier.
Trailer stability assist
If the system detects snaking
movements, engine power is reduced
and the vehicle / trailer combination is
selectively braked until the snaking ceases. While system is working keep
steering wheel as still as possible.
Trailer stability assist is a function of
the Electronic Stability Control 3 170.