lights VAUXHALL VIVARO C 2020 Owner's Guide
[x] Cancel search | Manufacturer: VAUXHALL, Model Year: 2020, Model line: VIVARO C, Model: VAUXHALL VIVARO C 2020Pages: 289, PDF Size: 10.16 MB
Page 220 of 289

218Vehicle care● See the Owner's Manual forfurther information.
● Explosive gas may be present in the vicinity of the vehicle battery.
Heating functionalities Notice
Individual heating functionalities,
such as heated seats or heated
steering wheel, may be temporarily
unavailable in the event of electrical
loading constraints. Functions will
be resumed after some minutes.
Power saving mode
This mode deactivates electrical
consumers to avoid excessive
discharging of the vehicle battery.
These consumers, such as the
Infotainment system, windscreen
wipers, low beam headlights,
courtesy light, etc. can be used for a
total maximum time of about
40 minutes after ignition is switched
off.Deactivating power saving mode
Power saving mode is deactivated
automatically when the engine is
restarted. Run the engine for a
sufficient charge:
● for less than 10 minutes to use the consumers for approx.
5 minutes
● for more than 10 minutes to use the consumers for up to approx.
30 minutes
Diesel fuel system bleeding If the tank has been run dry, the diesel fuel system must be bled. The
bleeding procedure differs between
the engine types 3 268. Fuel up with
at least five litres of diesel before
starting the bleeding procedure.
Engines DV5RUCd, DV5RUC 1. Switch on the ignition.
2. Wait 1 minute and switch off the
ignition.
3. Try to start the engine.
If the engine does not start after a
short time, repeat the procedure.Engines DW10FEU, DW10FD,
DW10FDCU, DW10F
1. Switch on the ignition.
2. Wait 6 seconds and switch off the ignition.
3. Repeat steps 1 and 2 for ten times.
4. Try to start the engine.
If the engine does not start after a
short time, repeat the procedure.
Engine DV6DU1. Open the engine bonnet.
2. If necessary, unclip the engine
style cover to access the priming
pump.
3. Operate the priming pump
repeatedly until resistance is felt
(there may be resistance at the first
press).
4. Try to start the engine. If the engine
does not start after a short time, wait
around 15 seconds before trying
again. If the engine does not start
after a few attempts, repeat step 3
and try again to start the engine.
5. Put the engine style cover in place
and clip it in.
Page 221 of 289
Vehicle care2196. Close the bonnet.
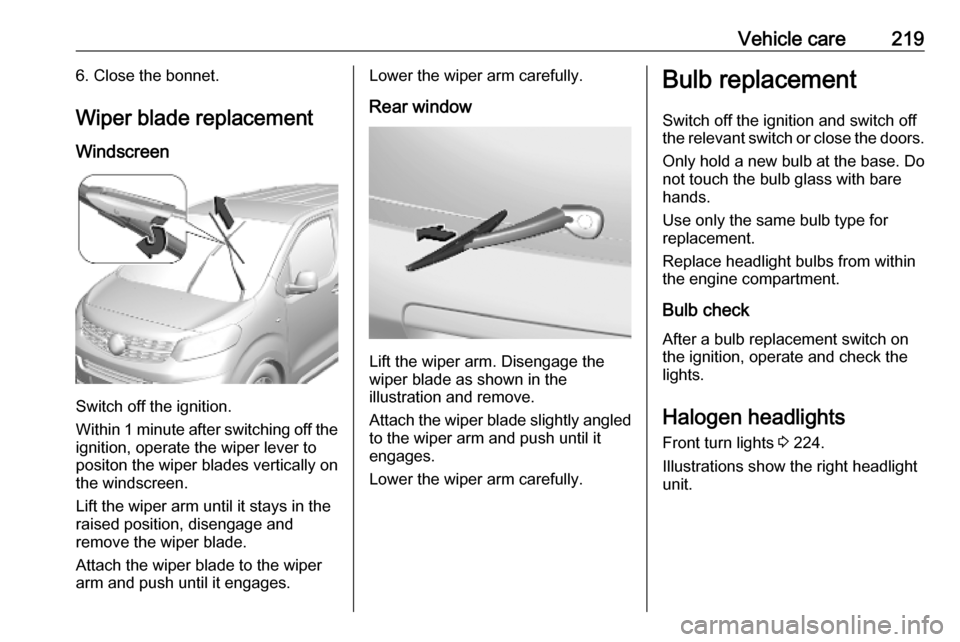
Wiper blade replacement Windscreen
Switch off the ignition.
Within 1 minute after switching off the ignition, operate the wiper lever to
positon the wiper blades vertically on
the windscreen.
Lift the wiper arm until it stays in the
raised position, disengage and
remove the wiper blade.
Attach the wiper blade to the wiper
arm and push until it engages.
Lower the wiper arm carefully.
Rear window
Lift the wiper arm. Disengage the
wiper blade as shown in the
illustration and remove.
Attach the wiper blade slightly angled
to the wiper arm and push until it
engages.
Lower the wiper arm carefully.
Bulb replacement
Switch off the ignition and switch off
the relevant switch or close the doors.
Only hold a new bulb at the base. Do not touch the bulb glass with bare
hands.
Use only the same bulb type for
replacement.
Replace headlight bulbs from within
the engine compartment.
Bulb check
After a bulb replacement switch on
the ignition, operate and check the
lights.
Halogen headlights Front turn lights 3 224.
Illustrations show the right headlight
unit.
Page 225 of 289

Vehicle care223Xenon headlights
Front turn lights 3 224.
Illustrations show the right headlight
unit.
Low beam bulb sits in outer chamber
( 2 )
High beam bulb sits in inner chamber
( 1 )
Low beam9 Danger
Xenon headlights work under
extremely high electrical voltage.
Do not touch. Have bulbs replaced by a workshop.
High beam
1. Remove the protective cover.
2. Press latch and remove the bulb socket from reflector housing.
Withdraw the bulb holder from the
reflector housing.
Page 226 of 289
224Vehicle care3. Detach the bulb from the bulbsocket and replace the bulb.
4. Insert the bulb socket into the reflector housing.
5. Fit the cover.
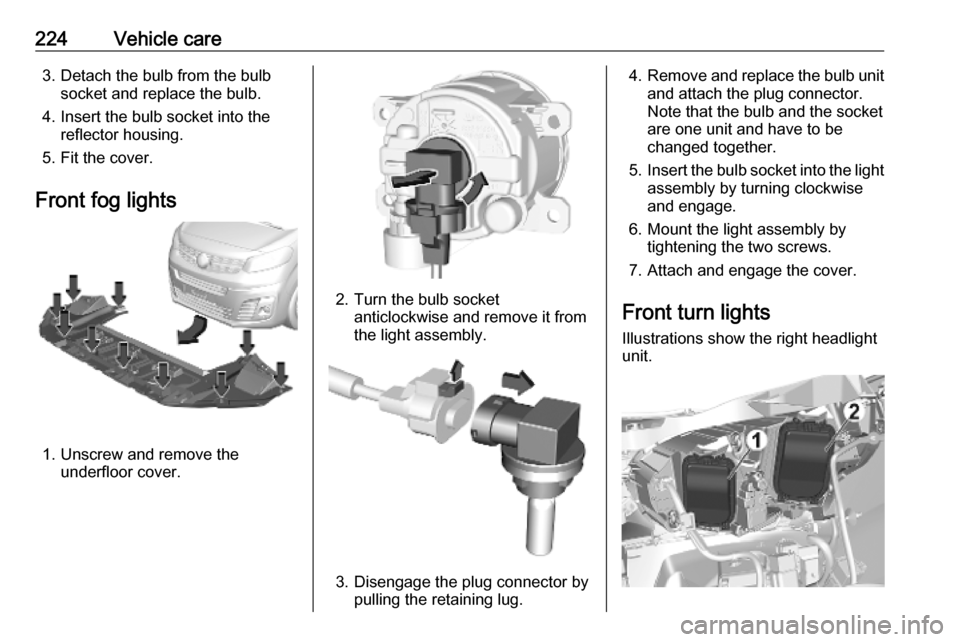
Front fog lights
1. Unscrew and remove the underfloor cover.
2. Turn the bulb socketanticlockwise and remove it from
the light assembly.
3. Disengage the plug connector by pulling the retaining lug.
4.Remove and replace the bulb unit
and attach the plug connector.
Note that the bulb and the socket
are one unit and have to be
changed together.
5. Insert the bulb socket into the light
assembly by turning clockwise
and engage.
6. Mount the light assembly by tightening the two screws.
7. Attach and engage the cover.
Front turn lights Illustrations show the right headlight
unit.
Page 227 of 289
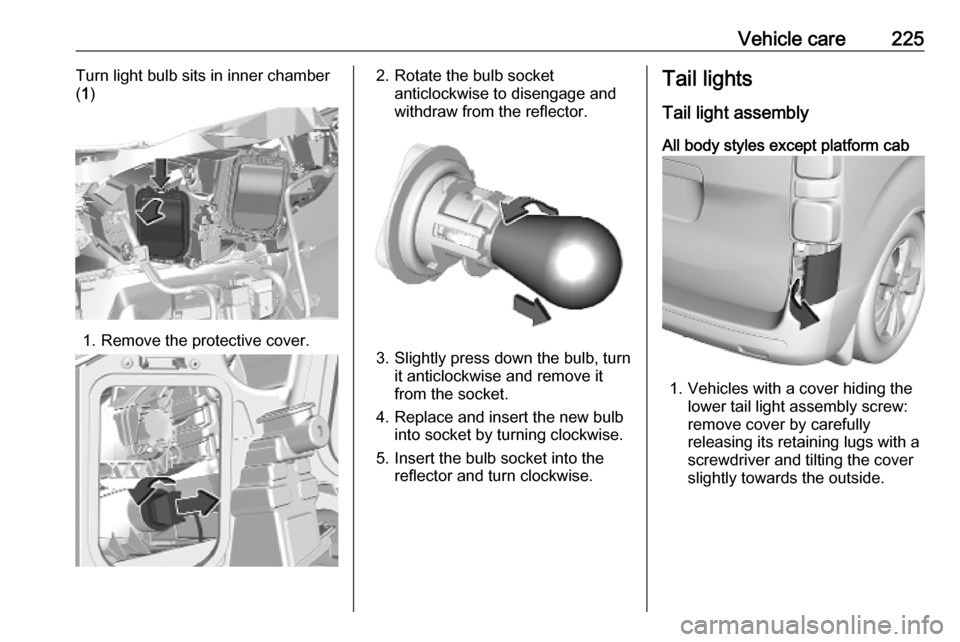
Vehicle care225Turn light bulb sits in inner chamber
( 1 )
1. Remove the protective cover.
2. Rotate the bulb socket
anticlockwise to disengage and
withdraw from the reflector.
3. Slightly press down the bulb, turn it anticlockwise and remove it
from the socket.
4. Replace and insert the new bulb into socket by turning clockwise.
5. Insert the bulb socket into the reflector and turn clockwise.
Tail lights
Tail light assembly All body styles except platform cab
1. Vehicles with a cover hiding the lower tail light assembly screw:
remove cover by carefully
releasing its retaining lugs with a
screwdriver and tilting the cover
slightly towards the outside.
Page 230 of 289
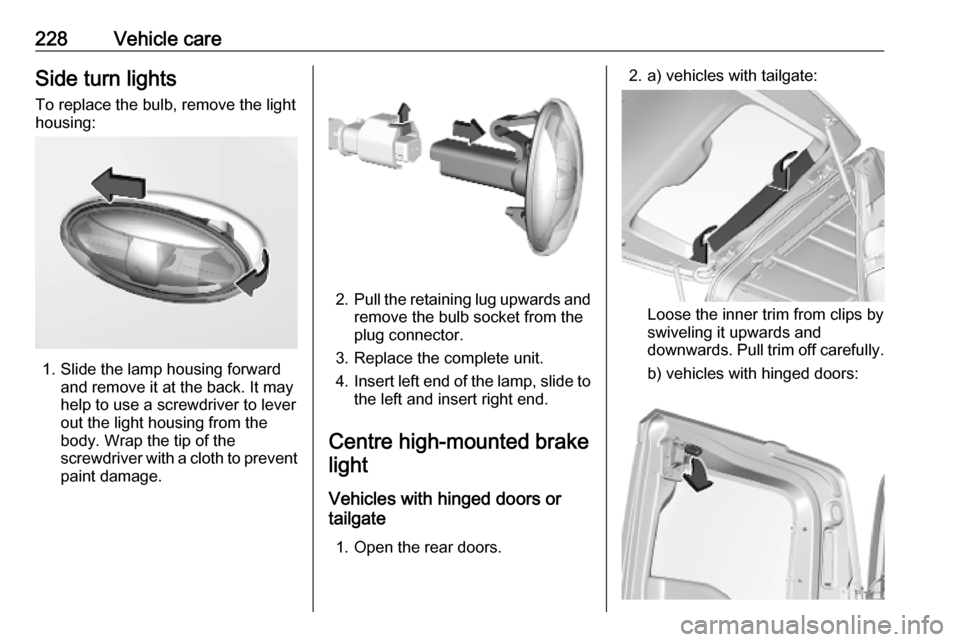
228Vehicle careSide turn lightsTo replace the bulb, remove the light
housing:
1. Slide the lamp housing forward and remove it at the back. It may
help to use a screwdriver to lever
out the light housing from the
body. Wrap the tip of the
screwdriver with a cloth to prevent
paint damage.
2. Pull the retaining lug upwards and
remove the bulb socket from the
plug connector.
3. Replace the complete unit.
4. Insert left end of the lamp, slide to
the left and insert right end.
Centre high-mounted brake light
Vehicles with hinged doors or
tailgate
1. Open the rear doors.
2. a) vehicles with tailgate:
Loose the inner trim from clips by
swiveling it upwards and
downwards. Pull trim off carefully.
b) vehicles with hinged doors:
Page 232 of 289
230Vehicle care2. Pull the bulb from the bulb holderand replace it.
3. Attach the cover.
Interior lights
Have the following lights replaced by
a workshop:
● courtesy light, reading lights
● load compartment light
● instrument panel illuminationElectrical system
Fuses Data on the replacement fuse must
match the data on the defective fuse.
There are two fuse boxes in the
vehicle:
● engine compartment
● instrument panel
Before replacing a fuse, turn off the
respective switch and the ignition.
A blown fuse can be recognised by its melted wire.Caution
Do not replace the fuse until the
cause of the fault has been
remedied.
Some functions are protected by
several fuses.
Fuses may also be inserted without
existence of a function.
Fuse extractor
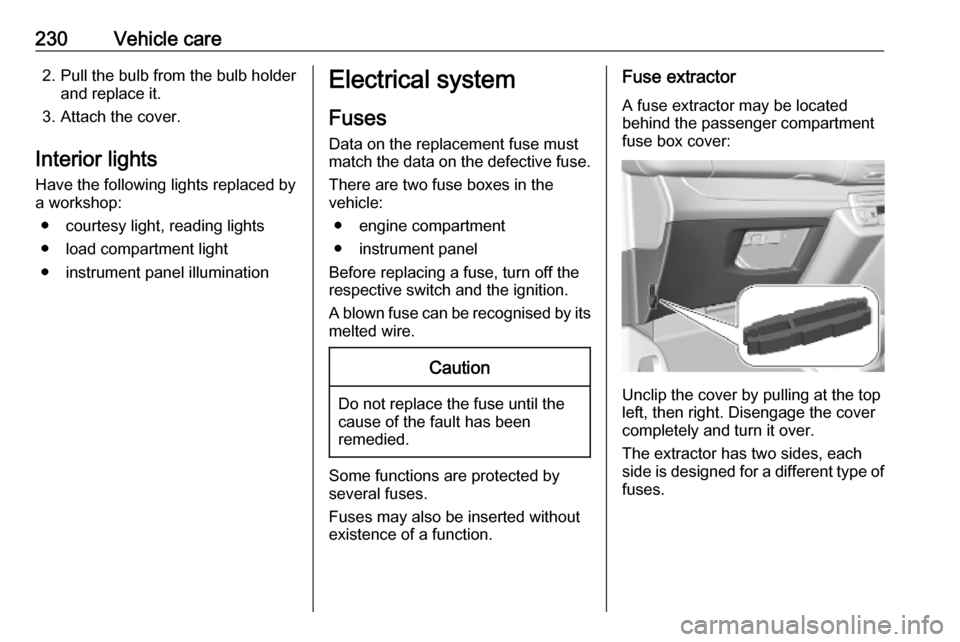
A fuse extractor may be located
behind the passenger compartment fuse box cover:
Unclip the cover by pulling at the top
left, then right. Disengage the cover
completely and turn it over.
The extractor has two sides, each side is designed for a different type of
fuses.
Page 234 of 289
232Vehicle care
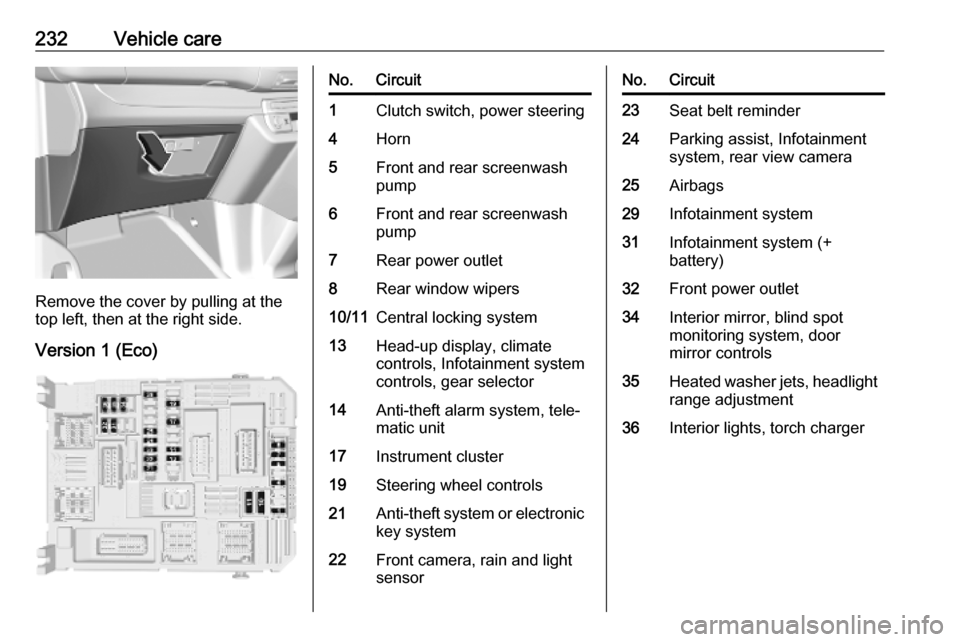
Remove the cover by pulling at the
top left, then at the right side.
Version 1 (Eco)
No.Circuit1Clutch switch, power steering4Horn5Front and rear screenwash
pump6Front and rear screenwash
pump7Rear power outlet8Rear window wipers10/11Central locking system13Head-up display, climate
controls, Infotainment system
controls, gear selector14Anti-theft alarm system, tele‐
matic unit17Instrument cluster19Steering wheel controls21Anti-theft system or electronic key system22Front camera, rain and light
sensorNo.Circuit23Seat belt reminder24Parking assist, Infotainment
system, rear view camera25Airbags29Infotainment system31Infotainment system (+
battery)32Front power outlet34Interior mirror, blind spot
monitoring system, door
mirror controls35Heated washer jets, headlight
range adjustment36Interior lights, torch charger
Page 235 of 289
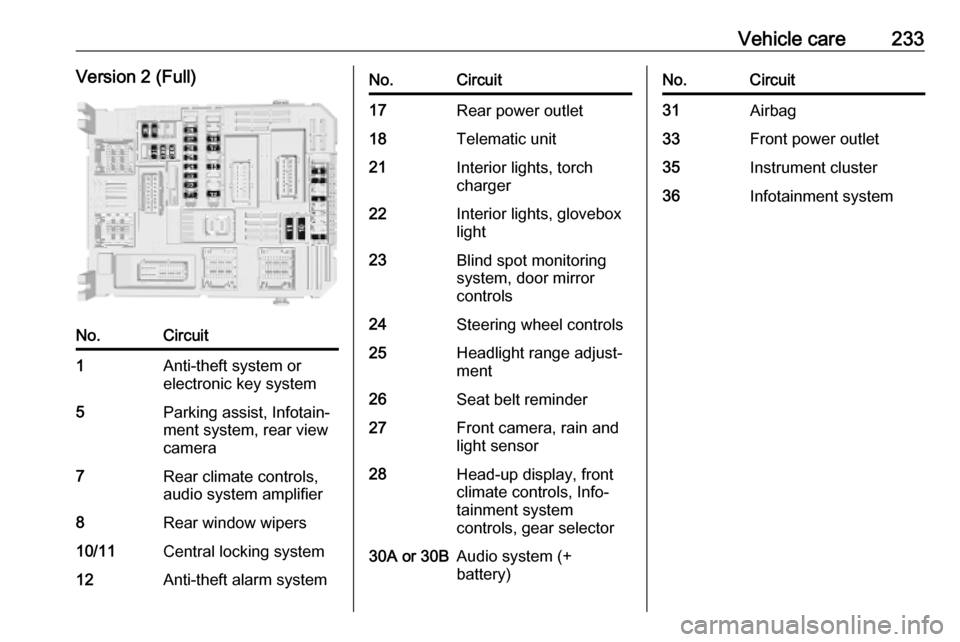
Vehicle care233Version 2 (Full)No.Circuit1Anti-theft system or
electronic key system5Parking assist, Infotain‐
ment system, rear view
camera7Rear climate controls,
audio system amplifier8Rear window wipers10/11Central locking system12Anti-theft alarm systemNo.Circuit17Rear power outlet18Telematic unit21Interior lights, torch
charger22Interior lights, glovebox
light23Blind spot monitoring
system, door mirror
controls24Steering wheel controls25Headlight range adjust‐
ment26Seat belt reminder27Front camera, rain and
light sensor28Head-up display, front
climate controls, Info‐
tainment system
controls, gear selector30A or 30BAudio system (+
battery)No.Circuit31Airbag33Front power outlet35Instrument cluster36Infotainment system
Page 252 of 289

250Vehicle care● A discharged vehicle battery canalready freeze at a temperature
of 0 °C. Defrost the frozen battery before connecting jump leads.
● Wear eye protection and protective clothing when
handling a battery.
● Use a booster battery with the same voltage (12 V). Its capacity
(Ah) must not be much less than
that of the discharged vehicle
battery.
● Use jump leads with insulated terminals and a cross section of
at least 16 mm 2
(25 mm 2
for
diesel engines).
● Do not disconnect the discharged
vehicle battery from the vehicle.
● Switch off all unnecessary electrical consumers.
● Do not lean over the vehicle battery during jump starting.
● Do not allow the terminals of one
lead to touch those of the other
lead.● The vehicles must not come into contact with each other during
the jump starting process.
● Apply the parking brake, transmission in neutral,
automatic transmission in P.
Open the positive terminal protection
caps of both vehicle batteries.
Lead connection order: 1. Connect the red lead to the positive terminal of the booster
battery.
2. Connect the other end of the red lead to the positive terminal of the
discharged battery.
3. Connect the black lead to the negative terminal of the boosterbattery.
4. Connect the other end of the black
lead to a vehicle grounding point
of your vehicle in the engine
compartment.
Route the leads so that they cannot
catch on rotating parts in the engine
compartment.
To start the engine: 1. Start the engine of the vehicle providing the jump.
2. After 5 minutes, start the other engine. Start attempts should be
made for no longer than 15
seconds at an interval of 1 minute.
3. Allow both engines to idle for approx. three minutes with the
leads connected.
4. Switch on electrical consumers e.g. headlights, heated rear
window of the vehicle receiving
the jump start.
5. Reverse above sequence exactly when removing leads.