steering wheel VAUXHALL ZAFIRA 2014.5 Owner's Guide
[x] Cancel search | Manufacturer: VAUXHALL, Model Year: 2014.5, Model line: ZAFIRA, Model: VAUXHALL ZAFIRA 2014.5Pages: 219, PDF Size: 7.83 MB
Page 113 of 219

Lighting111
However, when driving in countries
where traffic drives on the opposite
side of the road, adjust the headlights to prevent dazzling of oncoming
traffic.
Vehicles with halogen headlight
system
Have the headlights adjusted by a
workshop.
Vehicles with adaptive forward
lightingAdapting the aim of the headlight
beam:
1. Pull lever and hold.
2. Switch on ignition.
3. An acoustic signal sounds after approx. 3 seconds.
Control indicator B 3 93.
Daytime running lights
With the ignition on and the light switch set to 7 or AUTO , the sidelights
are switched on. When the engine is
running, headlights illuminate.
On vehicle without automatic light
control, 9 must be switched on when
it gets dark for illumination of the
instrument panel.
The daytime running lights switch off when the ignition is switched off.
Adaptive forward lighting
Adaptive forward lighting with Bi-
Xenon headlights improves lighting in
curves and increases headlight
range.Curve lighting
The light beam pivots based on
steering wheel position and speed.
Motorway lighting
At higher speeds and continuous
straight ahead travel, the beam
automatically raises slightly, thereby
increasing headlight range.
Control indicator B 3 93.
Page 114 of 219

112LightingHazard warning flashers
Operated with the ¨ button.
The hazard warning flashers activate
automatically if the airbags deploy.
Turn and lane-change
signalsLever up=right turn signalLever down=left turn signal
The lever always springs back to its
original position.
If the lever is moved past the
resistance point, the turn signal is
switched on constantly. When the
steering wheel moves back, the turn
signal is automatically deactivated.
For three flashes, e.g. when changing lanes, press the lever until resistance
is felt and then release.
Move the lever to the resistance point
and hold for longer indication.
Switch the turn signal off manually by moving the lever slightly.
Front fog lights
The front fog lights can only be
switched on when both the ignition and headlights or sidelights are on.
Operated with the > button.
Page 128 of 219

126Driving and operatingIgnition switch positions0=Ignition off1=Steering wheel lock released,ignition off2=Ignition on, for diesel engine:
preheating3=StartingStarting the engine
Starting engine with ignition
switch
Operate clutch and brake, automatic
transmission in P or N.
Do not operate accelerator pedal.
Diesel engines: turn the key to
position 2 for preheating until control
indicator ! goes out.
Turn key briefly to position 3 and
release key when engine is running.
Before restarting or to switch off the engine, turn key back to 0.
Starting engine with the
Start/Stop button
The electronic key must be inside the
vehicle. Operate clutch and brake,
automatic transmission in P or N.
Do not operate accelerator pedal.
Diesel engines: press the button
briefly to start preheating, move the
steering wheel slightly to release the
steering wheel lock, wait until control
indicator ! goes out and then press
button for 1 second and release when
the engine is running.
Page 129 of 219

Driving and operating127
To repeat the starting procedure or to
switch off the engine, press the button again.
Starting the vehicle at low
temperatures
The start of the engine without
additional heaters is possible down to -25 °С for diesel engines and -30 °C
for petrol engines. Required is an engine oil with the correct viscosity,
the correct fuel, performed services
and a sufficiently charged battery.
With temperatures below -30 °C the
automatic transmission and the
manual transmission automated
need a warming phase of approx. 5
minutes. The selector lever must be
in position P respectively N.
Overrun cut-off The fuel supply is automatically cut off
during overrun, i.e. when the vehicle
is driven with a gear engaged but
accelerator is released.Parking
■ Do not park the vehicle on an easily
ignitable surface. The high
temperature of the exhaust system
could ignite the surface.
■ Always apply parking brake without
pressing release button. Apply as
firmly as possible on downhill or
uphill slopes. Depress the foot
brake at same time to reduce
operating force.
■ Switch off the engine and ignition. Turn the steering wheel until the
steering wheel lock engages.
■ If the vehicle is on a level surface or
uphill slope, engage first gear or set
the selector lever to P before
switching off the ignition. On an
uphill slope, turn the front wheels
away from the kerb.
If the vehicle is on a downhill slope, engage reverse gear or set theselector lever to P before switchingoff the ignition. Turn the front
wheels towards the kerb.
■ Lock the vehicle and activate the anti-theft locking system and the
anti-theft alarm system.
Page 181 of 219
Vehicle care179
Always use fine mesh chains that addno more than 10 mm to the tyre tread
and the inboard sides (including chain
lock).9 Warning
Damage may lead to tyre blowout.
Tyre chains are permitted on tyres of
size 195/65 R 15, 195/60 R 16,
205/55 R16, 205/50 R 17 and
225/45 R17.
Tyre chains are not permitted on tyres of size 225/40 R 18, 225/40 ZR 18
and 235/35 R 19.
The use of tyre chains is not permitted on the temporary spare wheel.
Tyre repair kit
Minor damage to the tyre tread can be
repaired with the tyre repair kit.
Do not remove foreign bodies from
the tyres.
Tyre damage exceeding 4 mm or that
is near the rim cannot be repaired with the tyre repair kit.
9 Warning
Do not drive faster than 80 km/h.
Do not use for a lengthy period.
Steering and handling may be
affected.
If you have a flat tyre:
Apply parking brake and engage first
gear, reverse gear or P.
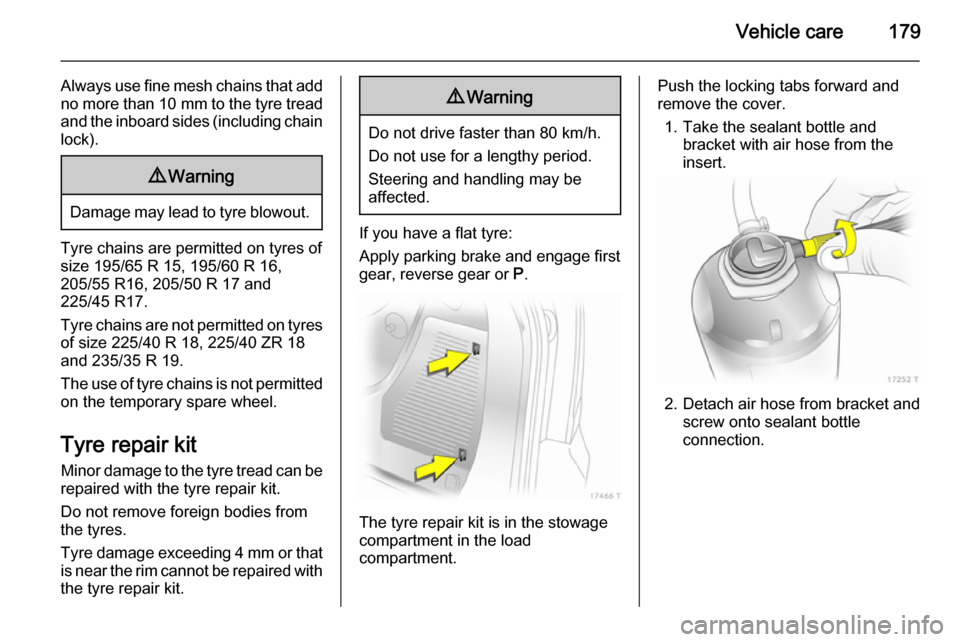
The tyre repair kit is in the stowage
compartment in the load
compartment.
Push the locking tabs forward and
remove the cover.
1. Take the sealant bottle and bracket with air hose from the
insert.
2. Detach air hose from bracket and screw onto sealant bottle
connection.
Page 190 of 219
188Vehicle care
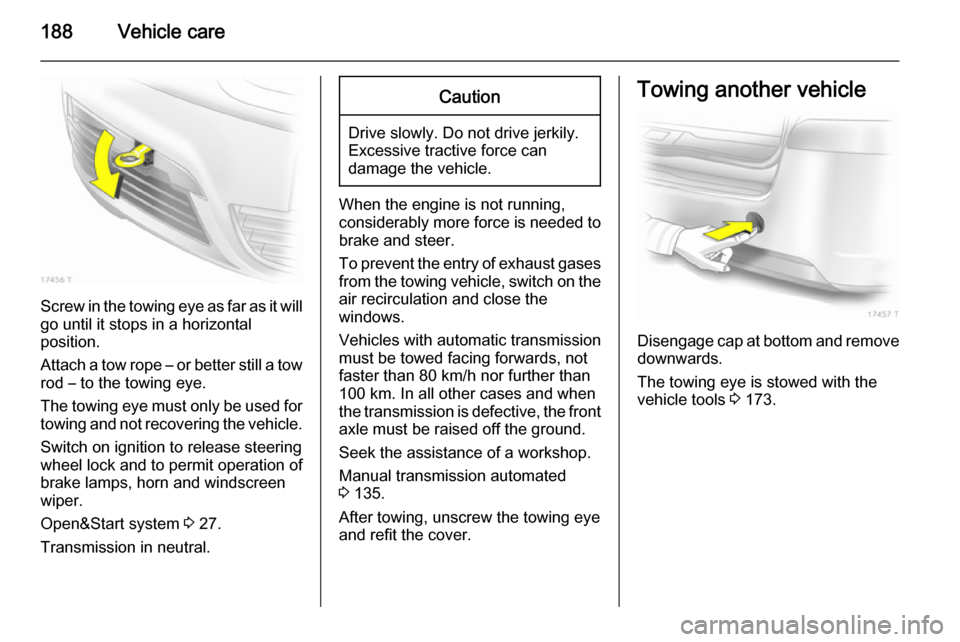
Screw in the towing eye as far as it will
go until it stops in a horizontal
position.
Attach a tow rope – or better still a tow
rod – to the towing eye.
The towing eye must only be used for towing and not recovering the vehicle.
Switch on ignition to release steering
wheel lock and to permit operation of
brake lamps, horn and windscreen
wiper.
Open&Start system 3 27.
Transmission in neutral.
Caution
Drive slowly. Do not drive jerkily.
Excessive tractive force can
damage the vehicle.
When the engine is not running,
considerably more force is needed to
brake and steer.
To prevent the entry of exhaust gases from the towing vehicle, switch on the
air recirculation and close the
windows.
Vehicles with automatic transmission
must be towed facing forwards, not faster than 80 km/h nor further than
100 km. In all other cases and when
the transmission is defective, the front axle must be raised off the ground.
Seek the assistance of a workshop.
Manual transmission automated
3 135.
After towing, unscrew the towing eye
and refit the cover.
Towing another vehicle
Disengage cap at bottom and remove
downwards.
The towing eye is stowed with the
vehicle tools 3 173.
Page 217 of 219

215
Performance .............................. 203
Performing work ........................153
Pollen filter ................................. 124
Power outlets ............................... 82
Power windows ............................ 39
Preheating and diesel particle filter .......................................... 91
Puncture ..................................... 182
Q Quickheat ................................... 123
R
Radio Frequency Identification (RFID) ..................................... 210
Radio remote control ...................26
Reading lights ............................ 115
Rear floor storage cover ..............71
Rear fog light ............................... 93
Rear fog lights ........................... 113
Rear seats .................................... 49
Rear window wiper/washer .......... 80 Recommended fluids and lubricants ........................ 194, 199
Refuelling ................................... 145 Reversing lights .........................113
Ride control systems ..................140
Roof .............................................. 42
Roof panelling .............................. 70Roof rack ..................................... 76
Run-flat tyres ............................. 174
S Safety net .................................... 73
Seat adjustment ....................... 7, 45
Seat belt ........................................ 8
Seat belt reminder .......................88
Seat belts ..................................... 53
Seat folding .................................. 48
Seat position ................................ 45
Seats in second row ....................19
Seats in third row .........................20
Second row seats ........................49
Selector lever ..................... 130, 135
Service ............................... 124, 193
Service display ............................ 85
Service information ....................193
Service vehicle soon .................... 89
Side airbag system ......................61
Sidelights .................................... 109
Side turn signal lights ................164
Spare wheel ............................... 184
Speedometer ............................... 84
Sport mode .................... 23, 90, 141
Starting and operating ................125
Starting off ................................... 16
Starting the engine ............126, 135
Steering wheel adjustment ......9, 78
Steering wheel controls ...............78Stop watch ................................. 107
Storage ......................................... 68
Storage compartments .................68
Sunglasses storage .....................69
Sunvisor lights ........................... 115
Sun visors .................................... 41
Symbols ......................................... 4
T
Tachometer ................................. 85
Tail lights ................................... 163
Third row seats ............................ 51
Three-point seat belt .................... 54
Tools .......................................... 173
Top-tether child restraint systems 67
Tow bar....................................... 147 Towing ................................ 147, 187
Towing another vehicle .............188
Towing equipment .....................148
Towing hitch installation dimensions ............................. 208
Towing the vehicle .....................187
Trailer coupling ........................... 147
Trailer stability assist .................151
Trailer towing ............................. 148
Transmission ............................... 15
Transmission display .........129, 135
Tread depth ............................... 177
Trip computer .............................. 22