window VAUXHALL ZAFIRA 2014.5 Owner's Guide
[x] Cancel search | Manufacturer: VAUXHALL, Model Year: 2014.5, Model line: ZAFIRA, Model: VAUXHALL ZAFIRA 2014.5Pages: 219, PDF Size: 7.83 MB
Page 124 of 219
122Climate control
Individual menu items are marked by
turning the centre control and
selected by pressing it.
To exit a menu, turn the centre control until Return or Main appear and
select.
Air distribution
Turn the centre control. The Air
distribut. menu is activated, showing
the possible air distribution settings:Top=to windscreen and front
door windows.Centre=to vehicle occupants.Bottom=to foot well.
The Air distribut. menu can also be
called up via the Climate menu.
Return to automatic air distribution:
Deactivate corresponding setting or
press button AUTO.
Cooling
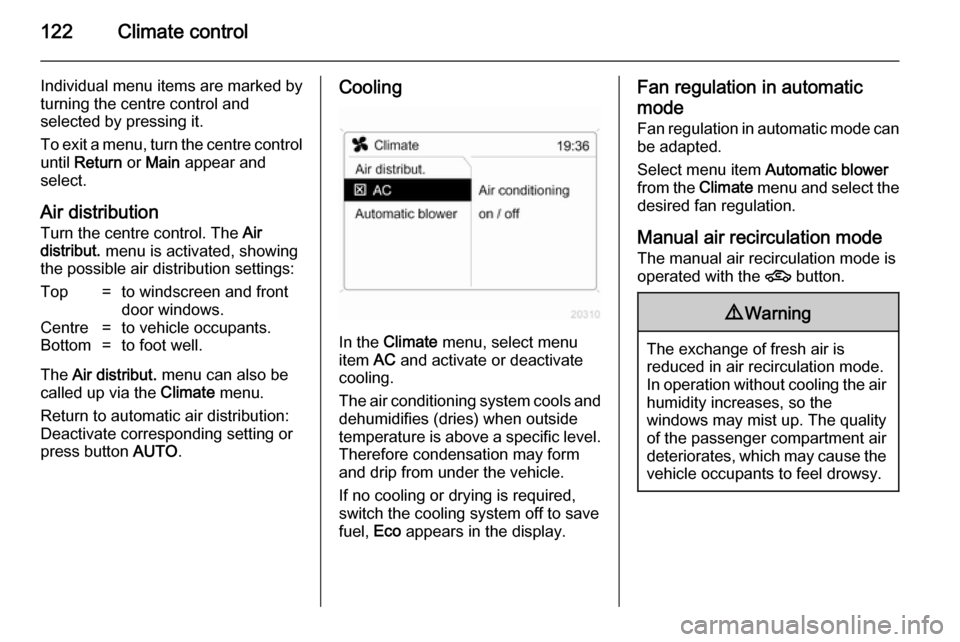
In the Climate menu, select menu
item AC and activate or deactivate
cooling.
The air conditioning system cools and
dehumidifies (dries) when outside
temperature is above a specific level. Therefore condensation may form
and drip from under the vehicle.
If no cooling or drying is required,
switch the cooling system off to save
fuel, Eco appears in the display.
Fan regulation in automatic
mode
Fan regulation in automatic mode can
be adapted.
Select menu item Automatic blower
from the Climate menu and select the
desired fan regulation.
Manual air recirculation mode The manual air recirculation mode is
operated with the 4 button.9Warning
The exchange of fresh air is
reduced in air recirculation mode.
In operation without cooling the air humidity increases, so the
windows may mist up. The quality
of the passenger compartment air
deteriorates, which may cause the vehicle occupants to feel drowsy.
Page 126 of 219

124Climate control
Open slats and adjust direction of airflow.
To close the vents, direct slats
downwards.9 Warning
Do not attach any objects to the
slats of the air vents. Risk of
damage and injury in case of an
accident.
Fixed air vents
Additional air vents are located
beneath the windscreen and door windows and in the foot wells.
Maintenance
Air intake
The air intakes in front of the
windscreen in the engine
compartment must be kept clear to
allow air intake. Remove any leaves,
dirt or snow.
Pollen filter
The pollen filter cleans dust, soot,
pollen and spores from the air
entering the vehicle through the air
intake.
Air conditioning regular
operation In order to ensure continuously
efficient performance, cooling must
be operated for a few minutes once a
month, irrespective of the weather
and time of year. Operation with
cooling is not possible when outside
temperature is too low.
Service For optimal cooling performance, it isrecommended that the climate control
system be checked annually, starting three years after initial vehicle
registration, including:
■ Functionality and pressure test■ Heating functionality
■ Leakage check
■ Check of drive belts
■ Cleaning of condenser and evaporator drainage
■ Performance check
Page 130 of 219
128Driving and operatingEngine exhaust9Danger
Engine exhaust gases contain
poisonous carbon monoxide,
which is colourless and odourless and could be fatal if inhaled.
If exhaust gases enter the interior
of the vehicle, open the windows.
Have the cause of the fault
rectified by a workshop.
Avoid driving with an open load
compartment, otherwise exhaust
gases could enter the vehicle.
Diesel particle filter
The diesel particle filter system filters
harmful soot particles out of the
exhaust gases. The system includes
a self-cleaning function that runs
automatically during driving. The filter
is cleaned by burning off the soot
particles at high temperature. This
process takes place automatically
under set driving conditions and may
take up to 25 minutes. Fuel
consumption may be higher during
this period. The emission of smells
and smoke during this process is
normal.
Under certain driving conditions, e.g.
short distances, the system cannot
clean itself automatically.
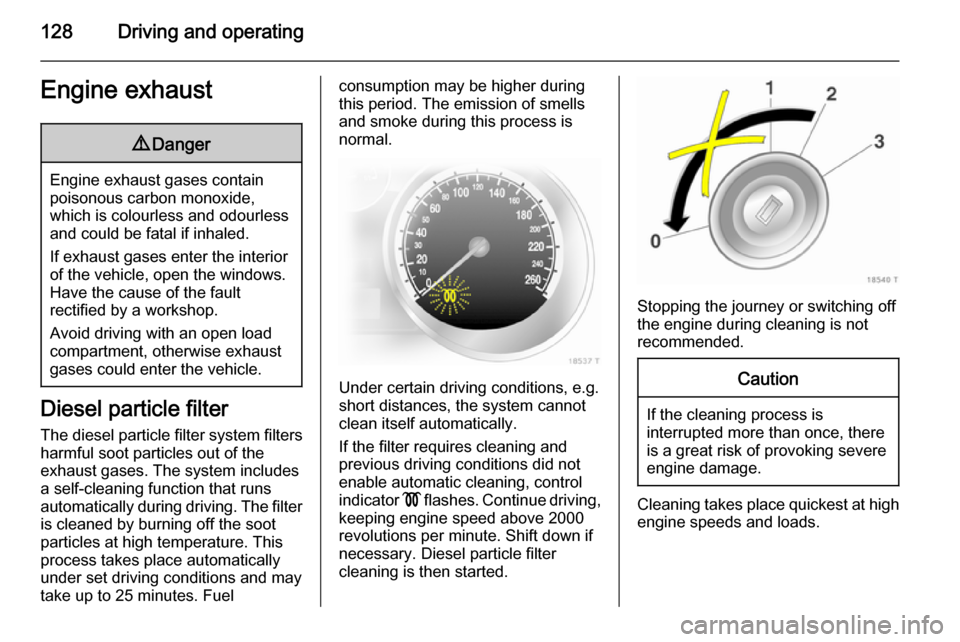
If the filter requires cleaning and
previous driving conditions did not
enable automatic cleaning, control
indicator ! flashes. Continue driving,
keeping engine speed above 2000
revolutions per minute. Shift down if
necessary. Diesel particle filter
cleaning is then started.
Stopping the journey or switching off
the engine during cleaning is not
recommended.
Caution
If the cleaning process is
interrupted more than once, there
is a great risk of provoking severe
engine damage.
Cleaning takes place quickest at high
engine speeds and loads.
Page 155 of 219

Vehicle care153
■ Open bonnet, close all doors andlock the vehicle.
■ Disconnect the clamp from the negative terminal of the vehicle
battery. Beware that all systems are
not functional, e.g. anti-theft alarm
system.
Putting back into operation
Following must be done if the vehicle
is putting back into operation:
■ Connect the clamp to the negative terminal of the vehicle battery.
Activate the electronics of the
power windows.
■ Check tyre pressure.
■ Fill up the washer fluid reservoir.
■ Check the engine oil level.
■ Check the coolant level.
■ Fit the number plate if necessary.End-of-life vehicle
recovery
Information on end-of-life vehicle
recovery centres and the recycling of
end-of-life vehicles is available on our website. Only entrust this work to an
authorised recycling centre.Vehicle checks
Performing work9 Warning
Only perform engine compartment
checks when the ignition is off.
The cooling fan may start
operating even if the ignition is off.
Page 161 of 219
Vehicle care159
Wiper blades on the windscreen
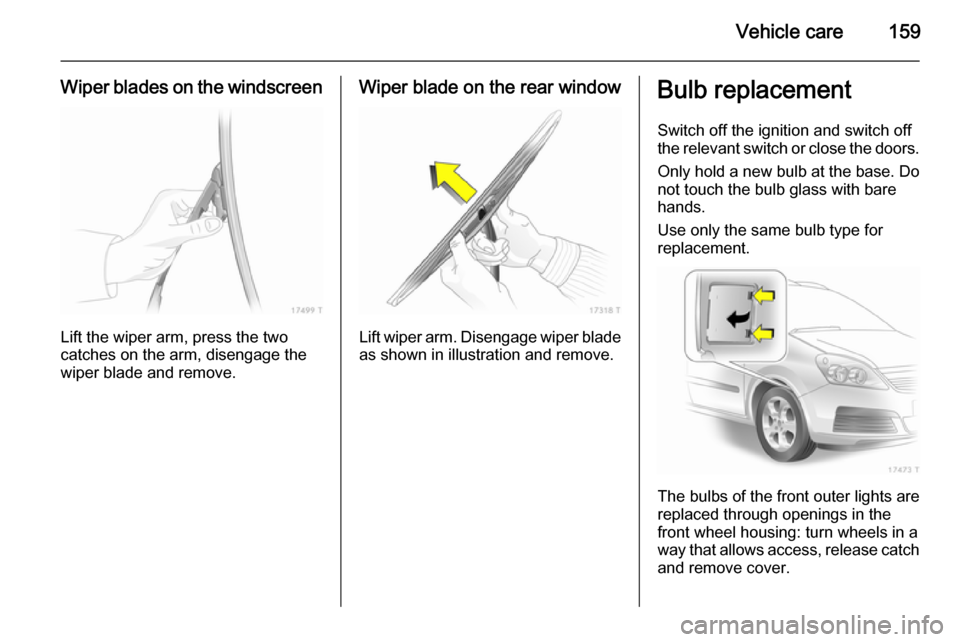
Lift the wiper arm, press the two
catches on the arm, disengage the
wiper blade and remove.
Wiper blade on the rear window
Lift wiper arm. Disengage wiper blade as shown in illustration and remove.
Bulb replacement
Switch off the ignition and switch off
the relevant switch or close the doors.
Only hold a new bulb at the base. Do not touch the bulb glass with bare
hands.
Use only the same bulb type for
replacement.
The bulbs of the front outer lights are
replaced through openings in the front wheel housing: turn wheels in a
way that allows access, release catch
and remove cover.
Page 170 of 219
168Vehicle careEngine compartment fuse
box
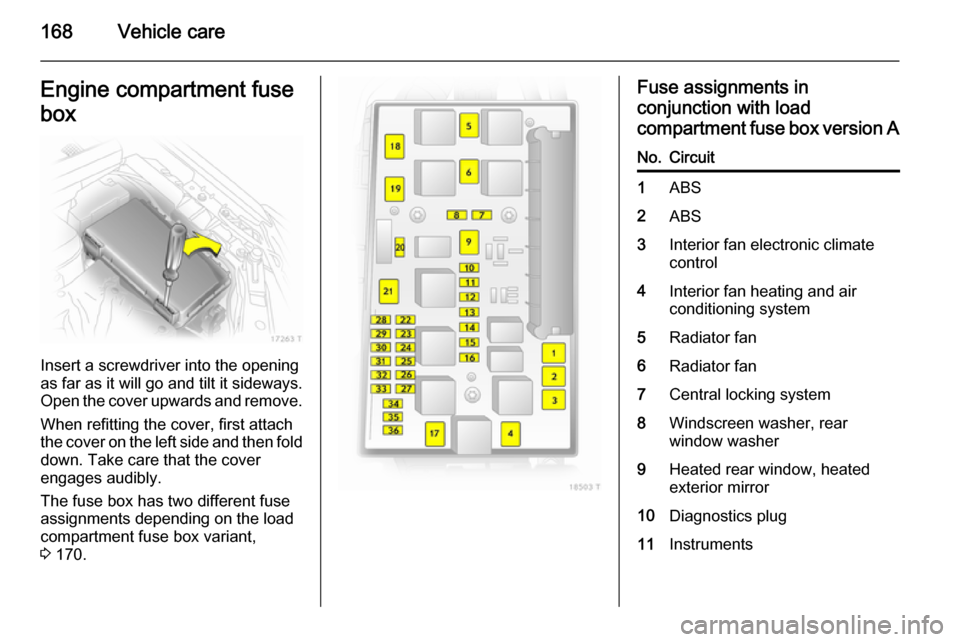
Insert a screwdriver into the opening
as far as it will go and tilt it sideways.
Open the cover upwards and remove.
When refitting the cover, first attach
the cover on the left side and then fold
down. Take care that the cover
engages audibly.
The fuse box has two different fuse
assignments depending on the load
compartment fuse box variant,
3 170.
Fuse assignments in
conjunction with load
compartment fuse box version ANo.Circuit1ABS2ABS3Interior fan electronic climate
control4Interior fan heating and air
conditioning system5Radiator fan6Radiator fan7Central locking system8Windscreen washer, rear
window washer9Heated rear window, heated
exterior mirror10Diagnostics plug11Instruments
Page 171 of 219

Vehicle care169
No.Circuit12Mobile telephone, Infotainment
system, display13Courtesy light14Windscreen wiper15Windscreen wiper16Horn, ABS, brake light switch,
air conditioning system17Diesel fuel filter or air condi‐
tioning system18Starter19–20Horn21Engine electronics22Engine electronics23Headlight range adjustment24Fuel pump25–26Engine electronicsNo.Circuit27Heating, air conditioning
system, air quality sensor28–29Power steering30Engine electronics31Rear window wiper32Brake light switch33Headlight range adjustment,
light switch, clutch switch,
instrument, driver's door
module34Steering column control unit35Infotainment system36Cigarette lighter, front power
outletFuse assignments in
conjunction with load
compartment fuse box version BNo.Circuit1ABS2ABS3Interior fan electronic climate control4Interior fan heating and air
conditioning system5Radiator fan6Radiator fan7Windscreen washer system8Horn9Headlight washer system10Emergency unlocking of central
locking system11–12–
Page 173 of 219
Vehicle care171
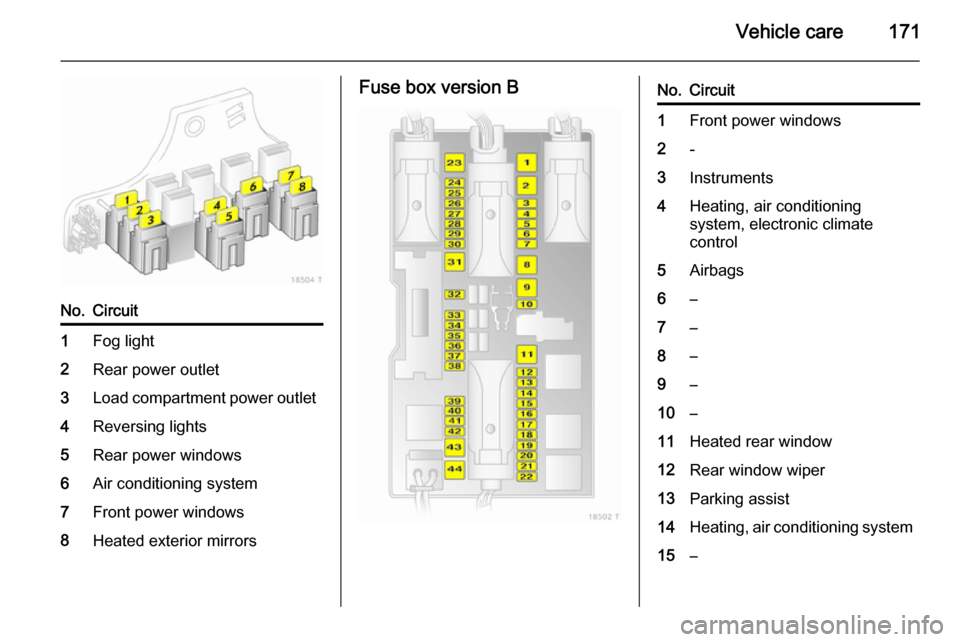
No.Circuit1Fog light2Rear power outlet3Load compartment power outlet4Reversing lights5Rear power windows6Air conditioning system7Front power windows8Heated exterior mirrorsFuse box version BNo.Circuit1Front power windows2-3Instruments4Heating, air conditioning
system, electronic climate
control5Airbags6–7–8–9–10–11Heated rear window12Rear window wiper13Parking assist14Heating, air conditioning system15–
Page 174 of 219

172Vehicle care
No.Circuit16Open&Start system17Rain sensor, air quality sensor,
tyre pressure monitoring
system, interior mirror18Instruments, switches19–20CDC21Heated exterior mirrors22–23Rear power windows24Diagnostics plug25–26Electrical foldable exterior
mirrors27Ultrasonic sensor, anti-theft
alarm system28–No.Circuit29Cigarette lighter, front power
outlet30Rear power outlet31–32–33Open&Start system34–35Rear power outlet36Socket for towing equipment37–38Central locking system, terminal
3039Left seat heating40Right seat heating41–42–No.Circuit43–44–
Page 189 of 219
Vehicle care187
3. Connect the black lead to thenegative terminal of the booster
battery.
4. Connect the other end of the black
lead to a vehicle grounding point,
such as the engine block or an
engine mounting bolt. Connect as far away from the discharged
battery as possible, however at
least 60 cm.
Route the leads so that they cannot
catch on rotating parts in the engine
compartment.
To start the engine: 1. Start the engine of the vehicle providing the jump.
2. After 5 minutes, start the other engine. Start attempts should be
made for no longer than
15 seconds at an interval of
1 minute.
3. Allow both engines to idle for approx. 3 minutes with the leads
connected.4. Switch on electrical consumers (e.g. headlights, heated rear
window) of the vehicle receiving
the jump start.
5. Reverse above sequence exactly when removing leads.Towing
Towing the vehicle
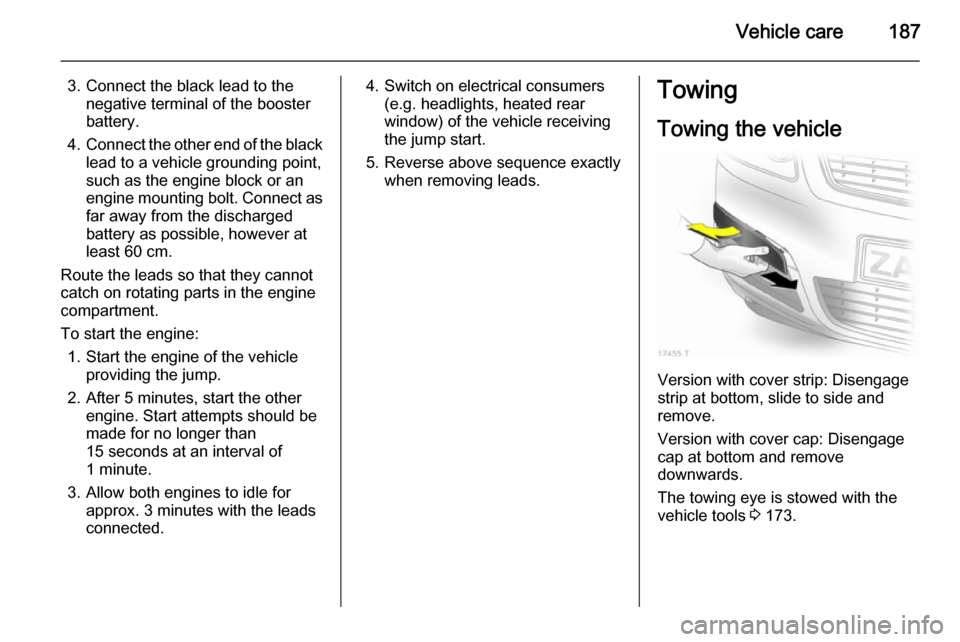
Version with cover strip: Disengage
strip at bottom, slide to side and
remove.
Version with cover cap: Disengage
cap at bottom and remove
downwards.
The towing eye is stowed with the vehicle tools 3 173.