battery VAUXHALL ZAFIRA TOURER 2016.5 Owner's Guide
[x] Cancel search | Manufacturer: VAUXHALL, Model Year: 2016.5, Model line: ZAFIRA TOURER, Model: VAUXHALL ZAFIRA TOURER 2016.5Pages: 307, PDF Size: 9.2 MB
Page 225 of 307

Vehicle care223Vehicle careGeneral Information...................224
Accessories and vehicle modifications .......................... 224
Vehicle storage ........................224
End-of-life vehicle recovery .....224
Vehicle checks ........................... 225
Performing work ......................225
Bonnet ..................................... 225
Engine oil ................................. 226
Engine coolant ......................... 227
Power steering fluid .................228
Washer fluid ............................ 229
Brakes ..................................... 229
Brake fluid ............................... 229
Vehicle battery ......................... 229
Diesel fuel system bleeding .....231
Wiper blade replacement ........231
Bulb replacement .......................232
Halogen headlights ..................232
Adaptive forward lighting .........234
Fog lights ................................. 235
Tail lights ................................. 236
Side turn signal lights ..............238
Number plate light ...................239Interior lights ............................ 239
Instrument panel illumination ...240
Electrical system ........................240
Fuses ....................................... 240
Engine compartment fuse box . 241
Instrument panel fuse box .......243
Load compartment fuse box ....244
Vehicle tools .............................. 246
Tools ........................................ 246
Wheels and tyres .......................247
Winter tyres ............................. 247
Tyre designations ....................247
Tyre pressure .......................... 247
Tyre pressure monitoring system .................................... 248
Tread depth ............................. 251
Changing tyre and wheel size . 252
Wheel covers ........................... 252
Tyre chains .............................. 253
Tyre repair kit .......................... 253
Wheel changing .......................256
Spare wheel ............................ 258
Jump starting ............................. 262
Towing ....................................... 263
Towing the vehicle ...................263
Towing another vehicle ...........264Appearance care .......................265
Exterior care ............................ 265
Interior care ............................. 267
Page 226 of 307
224Vehicle careGeneral Information
Accessories and vehicle modifications
We recommend the use of genuine
parts and accessories and factory
approved parts specific for your
vehicle type. We cannot assess or guarantee reliability of other products
- even if they have a regulatory or
otherwise granted approval.
Do not make any modifications to the electrical system, e.g. changes of
electronic control units (chip tuning).Caution
When transporting the vehicle on
a train or on a recovery vehicle, the
mud flaps might be damaged.
Vehicle storage
Storage for a long period of time
If the vehicle is to be stored for several months:
● Wash and wax the vehicle.
● Have the wax in the engine compartment and underbody
checked.
● Clean and preserve the rubber seals.
● Fill up fuel tank completely.
● Change the engine oil.
● Drain the washer fluid reservoir.
● Check the coolant antifreeze and
corrosion protection.
● Adjust tyre pressure to the value specified for full load.
● Park the vehicle in a dry, well ventilated place. Engage first or
reverse gear or set selector lever
to P. Prevent the vehicle from
rolling.
● Do not apply the parking brake.● Open the bonnet, close all doors and lock the vehicle.
● Disconnect the clamp from the negative terminal of the vehicle
battery. Beware that all systems
are not functional, e.g. anti-theft
alarm system.
Putting back into operation
When the vehicle is to be put back into
operation:
● Connect the clamp to the negative terminal of the vehicle
battery. Activate the electronics
of the power windows.
● Check tyre pressure.
● Fill up the washer fluid reservoir.
● Check the engine oil level.
● Check the coolant level.
● Fit the number plate if necessary.
End-of-life vehicle recovery
Information on end-of-life vehicle
recovery centres and the recycling of
end-of-life vehicles is available on our
Page 231 of 307
Vehicle care229Washer fluid
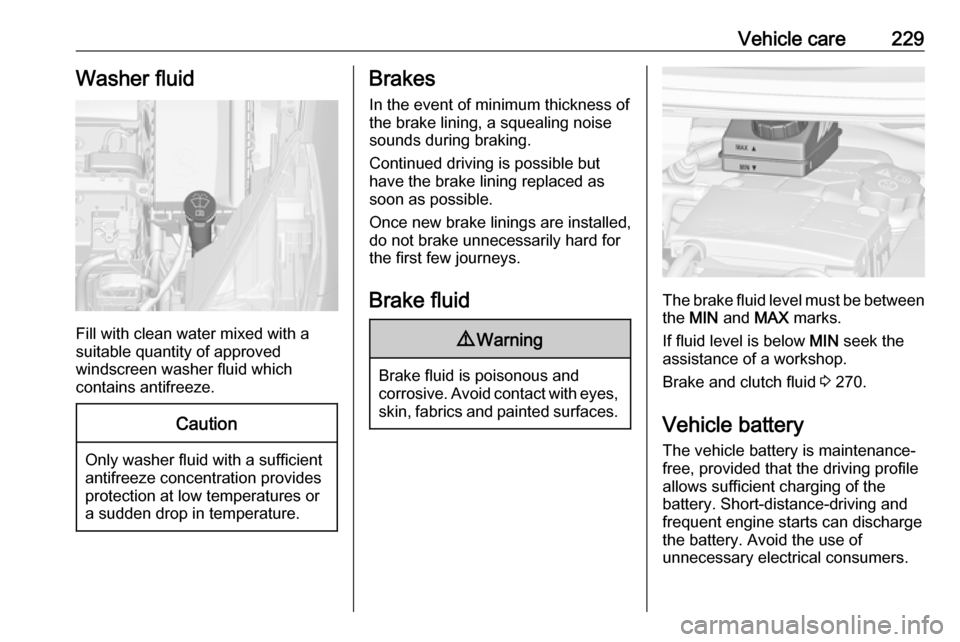
Fill with clean water mixed with a
suitable quantity of approved
windscreen washer fluid which
contains antifreeze.
Caution
Only washer fluid with a sufficient
antifreeze concentration provides
protection at low temperatures or
a sudden drop in temperature.
Brakes
In the event of minimum thickness of
the brake lining, a squealing noise
sounds during braking.
Continued driving is possible but
have the brake lining replaced as
soon as possible.
Once new brake linings are installed,
do not brake unnecessarily hard for
the first few journeys.
Brake fluid9 Warning
Brake fluid is poisonous and
corrosive. Avoid contact with eyes, skin, fabrics and painted surfaces.
The brake fluid level must be betweenthe MIN and MAX marks.
If fluid level is below MIN seek the
assistance of a workshop.
Brake and clutch fluid 3 270.
Vehicle battery
The vehicle battery is maintenance-
free, provided that the driving profile
allows sufficient charging of the
battery. Short-distance-driving and
frequent engine starts can discharge
the battery. Avoid the use of
unnecessary electrical consumers.
Page 232 of 307
230Vehicle care
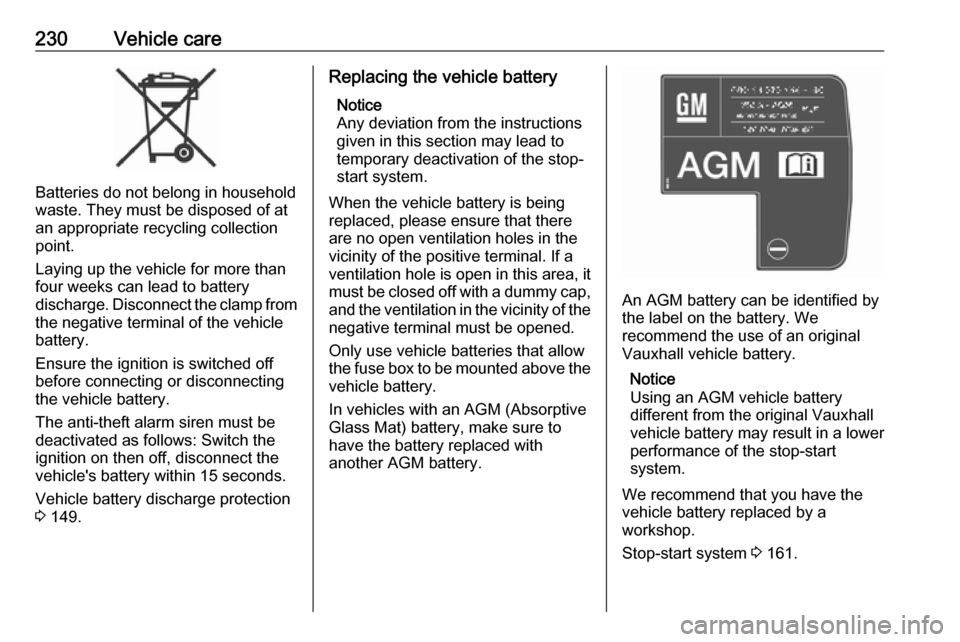
Batteries do not belong in household
waste. They must be disposed of at
an appropriate recycling collection
point.
Laying up the vehicle for more than
four weeks can lead to battery
discharge. Disconnect the clamp from the negative terminal of the vehicle
battery.
Ensure the ignition is switched off
before connecting or disconnecting
the vehicle battery.
The anti-theft alarm siren must be
deactivated as follows: Switch the
ignition on then off, disconnect the
vehicle's battery within 15 seconds.
Vehicle battery discharge protection
3 149.
Replacing the vehicle battery
Notice
Any deviation from the instructions
given in this section may lead to
temporary deactivation of the stop-
start system.
When the vehicle battery is being
replaced, please ensure that there
are no open ventilation holes in the
vicinity of the positive terminal. If a
ventilation hole is open in this area, it
must be closed off with a dummy cap, and the ventilation in the vicinity of the
negative terminal must be opened.
Only use vehicle batteries that allow
the fuse box to be mounted above the vehicle battery.
In vehicles with an AGM (Absorptive
Glass Mat) battery, make sure to
have the battery replaced with
another AGM battery.
An AGM battery can be identified by
the label on the battery. We
recommend the use of an original
Vauxhall vehicle battery.
Notice
Using an AGM vehicle battery
different from the original Vauxhall vehicle battery may result in a lower
performance of the stop-start
system.
We recommend that you have the
vehicle battery replaced by a
workshop.
Stop-start system 3 161.
Page 233 of 307
Vehicle care231Charging the vehicle battery9Warning
On vehicles with stop-start
system, ensure that the charging potential does not exceed
14.6 volts when using a battery
charger. Otherwise the vehicle
battery might be damaged.
Jump starting 3 262.
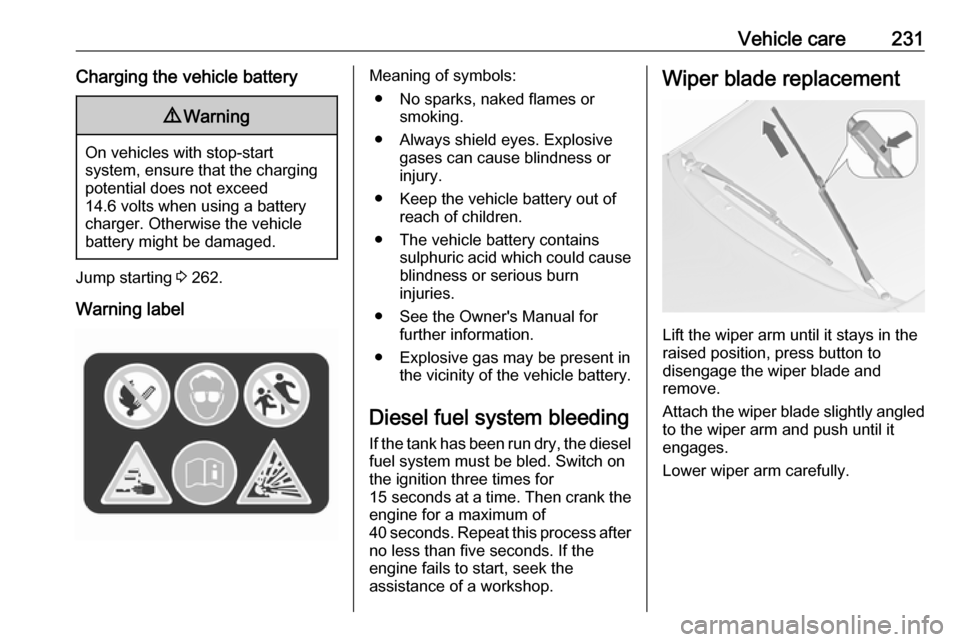
Warning label
Meaning of symbols: ● No sparks, naked flames or smoking.
● Always shield eyes. Explosive gases can cause blindness or
injury.
● Keep the vehicle battery out of reach of children.
● The vehicle battery contains sulphuric acid which could cause
blindness or serious burn
injuries.
● See the Owner's Manual for further information.
● Explosive gas may be present in the vicinity of the vehicle battery.
Diesel fuel system bleeding If the tank has been run dry, the diesel
fuel system must be bled. Switch on
the ignition three times for
15 seconds at a time. Then crank the
engine for a maximum of 40 seconds. Repeat this process after
no less than five seconds. If the
engine fails to start, seek the
assistance of a workshop.Wiper blade replacement
Lift the wiper arm until it stays in the
raised position, press button to
disengage the wiper blade and
remove.
Attach the wiper blade slightly angled
to the wiper arm and push until it
engages.
Lower wiper arm carefully.
Page 244 of 307
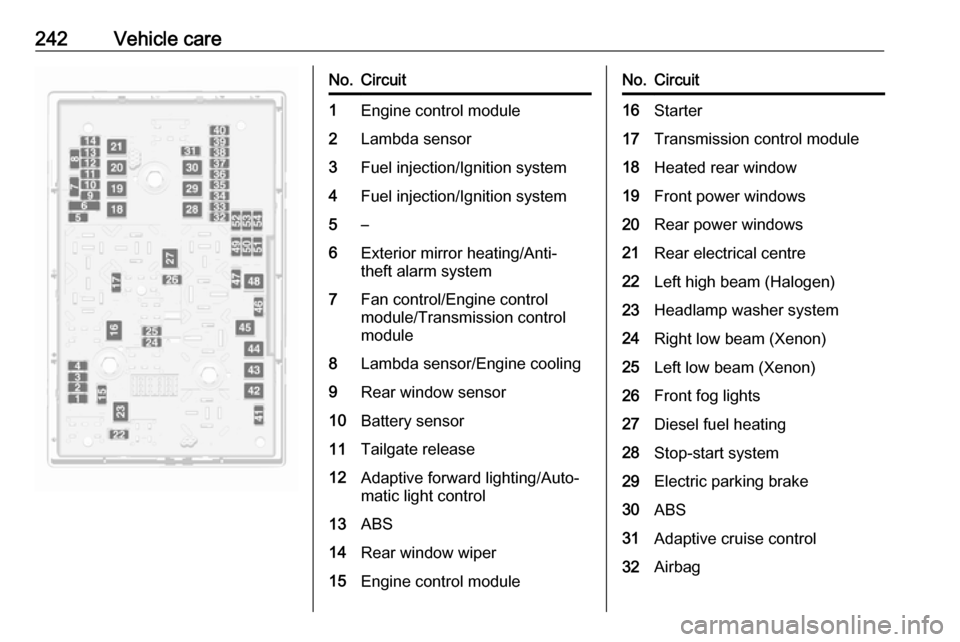
242Vehicle careNo.Circuit1Engine control module2Lambda sensor3Fuel injection/Ignition system4Fuel injection/Ignition system5–6Exterior mirror heating/Anti-
theft alarm system7Fan control/Engine control
module/Transmission control
module8Lambda sensor/Engine cooling9Rear window sensor10Battery sensor11Tailgate release12Adaptive forward lighting/Auto‐
matic light control13ABS14Rear window wiper15Engine control moduleNo.Circuit16Starter17Transmission control module18Heated rear window19Front power windows20Rear power windows21Rear electrical centre22Left high beam (Halogen)23Headlamp washer system24Right low beam (Xenon)25Left low beam (Xenon)26Front fog lights27Diesel fuel heating28Stop-start system29Electric parking brake30ABS31Adaptive cruise control32Airbag
Page 256 of 307
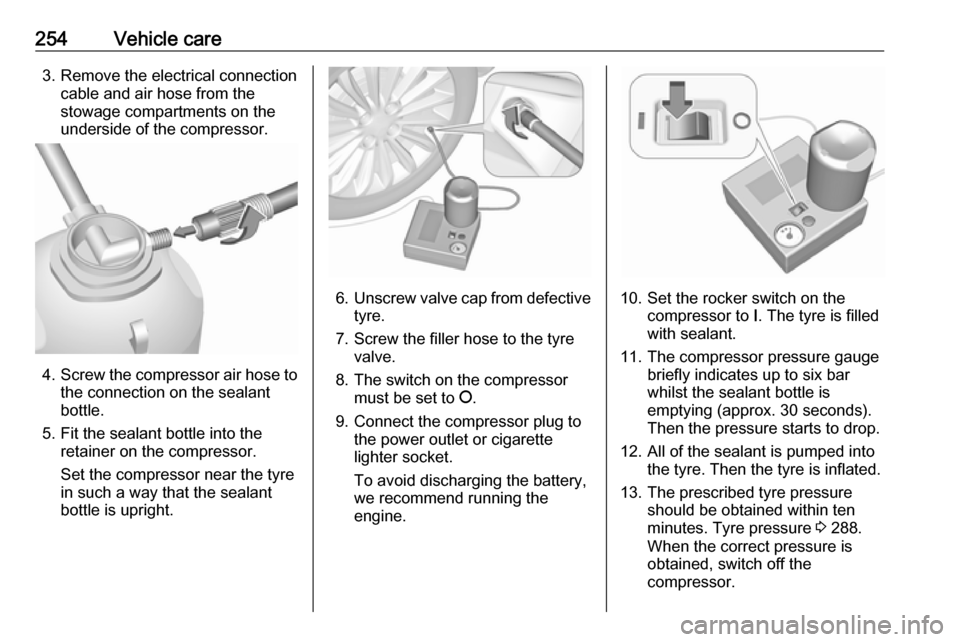
254Vehicle care3. Remove the electrical connectioncable and air hose from the
stowage compartments on the
underside of the compressor.
4. Screw the compressor air hose to
the connection on the sealant
bottle.
5. Fit the sealant bottle into the retainer on the compressor.
Set the compressor near the tyre
in such a way that the sealant
bottle is upright.
6. Unscrew valve cap from defective
tyre.
7. Screw the filler hose to the tyre valve.
8. The switch on the compressor must be set to J.
9. Connect the compressor plug to the power outlet or cigarette
lighter socket.
To avoid discharging the battery, we recommend running the
engine.10. Set the rocker switch on the compressor to I. The tyre is filled
with sealant.
11. The compressor pressure gauge briefly indicates up to six bar
whilst the sealant bottle is
emptying (approx. 30 seconds).
Then the pressure starts to drop.
12. All of the sealant is pumped into the tyre. Then the tyre is inflated.
13. The prescribed tyre pressure should be obtained within ten
minutes. Tyre pressure 3 288.
When the correct pressure is
obtained, switch off the
compressor.
Page 264 of 307
262Vehicle careJump startingDo not start with quick charger.
A vehicle with a discharged battery
can be started using jump leads and the battery of another vehicle.9 Warning
Be extremely careful when starting
with jump leads. Any deviation
from the following instructions can
lead to injuries or damage caused
by battery explosion or damage to the electrical systems of both
vehicles.
9 Warning
Avoid contact of the battery with
eyes, skin, fabrics and painted
surfaces. The fluid contains
sulphuric acid which can cause
injuries and damage in the event
of direct contact.
● Never expose the battery to naked flames or sparks.
●A discharged battery can already
freeze at a temperature of 0 °C.
Defrost the frozen battery before
connecting jump leads.
● Wear eye protection and protective clothing when
handling a battery.
● Use a booster battery with the same voltage (12 Volts). Its
capacity (Ah) must not be much less than that of the discharged
battery.
● Use jump leads with insulated terminals and a cross section of
at least 16 mm 2
(25 mm 2
for
diesel engines).
● Do not disconnect the discharged
battery from the vehicle.
● Switch off all unnecessary electrical consumers.
● Do not lean over the battery during jump starting.
● Do not allow the terminals of one
lead to touch those of the other
lead.
● The vehicles must not come into contact with each other during
the jump starting process.● Apply the parking brake, transmission in neutral,
automatic transmission in P.
● Open the positive terminal protection caps of both batteries.
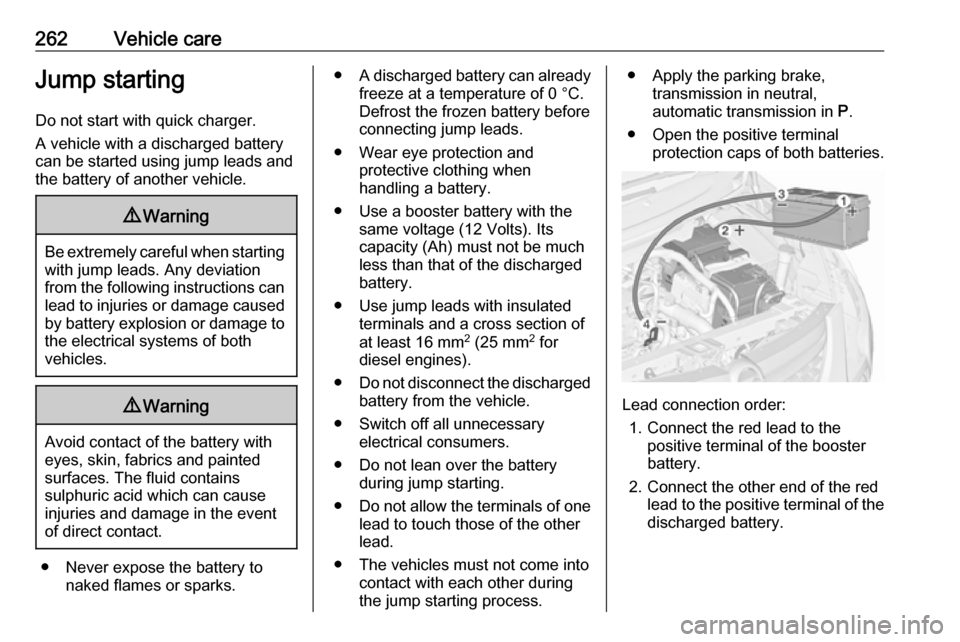
Lead connection order:
1. Connect the red lead to the positive terminal of the booster
battery.
2. Connect the other end of the red lead to the positive terminal of the
discharged battery.
Page 265 of 307
Vehicle care2633. Connect the black lead to thenegative terminal of the booster
battery.
4. Connect the other end of the black
lead to a vehicle grounding point,
such as the engine block or an
engine mounting bolt. Connect as far away from the discharged
battery as possible, however at
least 60 cm.
Route the leads so that they cannot
catch on rotating parts in the engine
compartment.
To start the engine: 1. Start the engine of the vehicle providing the jump.
2. After five minutes, start the other engine. Start attempts should be
made for no longer than
15 seconds at an interval of one
minute.
3. Allow both engines to idle for approx. three minutes with the
leads connected.4. Switch on electrical consumers (e.g. headlights, heated rear
window) of the vehicle receiving
the jump start.
5. Reverse above sequence exactly when removing leads.Towing
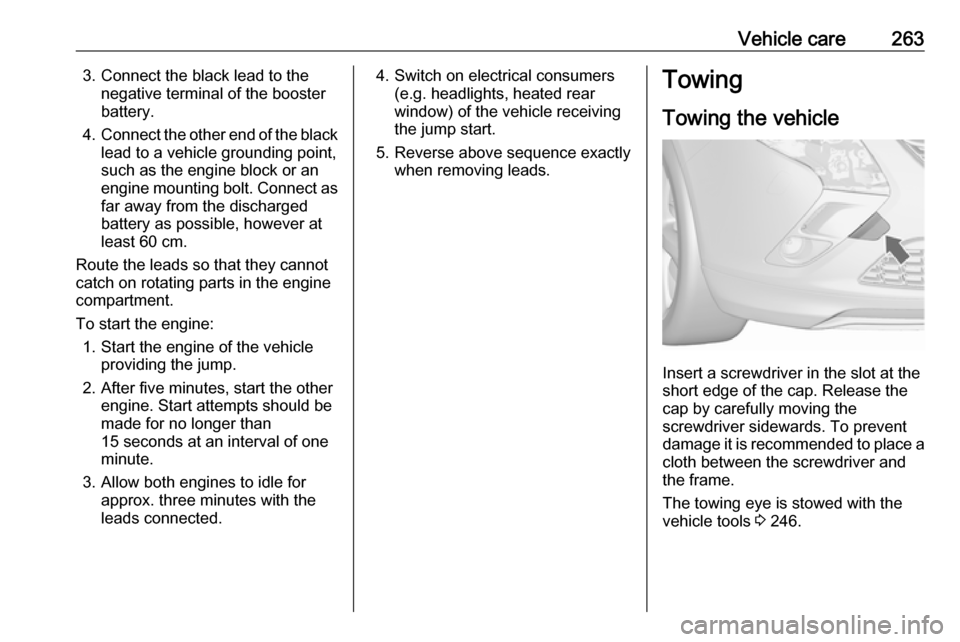
Towing the vehicle
Insert a screwdriver in the slot at the
short edge of the cap. Release the
cap by carefully moving the
screwdriver sidewards. To prevent
damage it is recommended to place a cloth between the screwdriver and
the frame.
The towing eye is stowed with the vehicle tools 3 246.
Page 302 of 307

300IndexAAccessories and vehicle modifications .......................... 224
Active Emergency Braking .........192
Active head restraints ...................37
Adaptive cruise control .......116, 182
Adaptive forward lighting ..115,
142, 234
AdBlue ........................ 114, 166, 270
Adjustable air vents ...................156
Airbag and belt tensioners .........110
Airbag deactivation ..............58, 111
Airbag label................................... 54
Airbag system .............................. 54
Air conditioning regular operation ................................ 157
Air conditioning system .............. 151
Air intake .................................... 157
Air vents...................................... 156
Antilock brake system ................ 173
Antilock brake system (ABS) .....112
Anti-theft alarm system ................26
Anti-theft locking system .............. 26
Appearance care ........................265
Armrest ......................................... 42
Armrest storage ........................... 69
Ashtrays ..................................... 103
Automatic anti-dazzle ..................30
Automatic light control ...............139
Automatic locking ........................24Automatic transmission .............169
Autostop ..................................... 161
Auxiliary heater ........................... 156
B Battery discharge protection ......149
Battery voltage ........................... 126
Bicycle rack .................................. 70
BlueInjection ............................... 166
Bonnet ....................................... 225
Brake and clutch fluid .................270
Brake and clutch system ...........111
Brake assist ............................... 175
Brake fluid .................................. 229
Brakes ............................... 173, 229
Breakdown.................................. 263
Bulb replacement ....................... 232
C Capacities .................................. 286
Cargo management system ........88
Car Pass ...................................... 20
Catalytic converter .....................165
Central locking system ................21
Centre console lighting ..............148
Centre console storage ...............70
Changing tyre and wheel size ...252
Charging system ........................ 111
Child locks ................................... 24
Child restraint installation locations ................................... 62