light VAUXHALL ZAFIRA TOURER 2016.5 Manual PDF
[x] Cancel search | Manufacturer: VAUXHALL, Model Year: 2016.5, Model line: ZAFIRA TOURER, Model: VAUXHALL ZAFIRA TOURER 2016.5Pages: 307, PDF Size: 9.2 MB
Page 221 of 307

Driving and operating219Driving characteristics and
towing tips
Before attaching a trailer, lubricate
the coupling ball. However, do not do
so if a stabiliser, which acts on the
coupling ball, is being used to reduce snaking movements.
For trailers with low driving stability
and caravan trailers with a permitted
gross vehicle weight of more than
1300 kg the use of a stabiliser is
strongly recommended when driving
above 50 mph.
If the trailer starts snaking, drive more slowly, do not attempt to correct the
steering and brake sharply if
necessary.
When driving downhill, drive in the
same gear as if driving uphill and
drive at a similar speed.
Adjust tyre pressure to the value
specified for full load 3 288.Trailer towing
Trailer loadsThe permissible trailer loads are
vehicle and engine-dependent
maximum values which must not be
exceeded. The actual trailer load is the difference between the actual
gross weight of the trailer and the
actual coupling socket load with the
trailer coupled.
The permissible trailer loads are
specified in the vehicle documents. In general, they are valid for gradients
up to max. 12%.
The permitted trailer load applies up
to the specified incline and up to an
altitude of 1000 metres above sea
level. Since engine power decreases
as altitude increases due to the air
becoming thinner, therefore reducing
climbing ability, the permissible gross
train weight also decreases by 10%
for every 1000 metres of additional
altitude. The gross train weight does
not have to be reduced when driving
on roads with slight inclines (less than
8%, e.g. motorways).The permissible gross train weight
must not be exceeded. This weight is specified on the identification plate3 272.
Vertical coupling load The vertical coupling load is the load
exerted by the trailer on the coupling
ball. It can be varied by changing the
weight distribution when loading the
trailer.
The maximum permissible vertical
coupling load (75 kg) is specified on
the towing equipment identification
plate and in the vehicle documents.
Notice
Engines B16DTH, B16DTJ,
B20DTH and B20DTJ: Depending
on the equipment the maximum
permissible vertical coupling load
can be 75 kg or 60 kg.
Always aim for the maximum load,
especially in the case of heavy
trailers. The vertical coupling load
should never fall below 25 kg.
Page 225 of 307

Vehicle care223Vehicle careGeneral Information...................224
Accessories and vehicle modifications .......................... 224
Vehicle storage ........................224
End-of-life vehicle recovery .....224
Vehicle checks ........................... 225
Performing work ......................225
Bonnet ..................................... 225
Engine oil ................................. 226
Engine coolant ......................... 227
Power steering fluid .................228
Washer fluid ............................ 229
Brakes ..................................... 229
Brake fluid ............................... 229
Vehicle battery ......................... 229
Diesel fuel system bleeding .....231
Wiper blade replacement ........231
Bulb replacement .......................232
Halogen headlights ..................232
Adaptive forward lighting .........234
Fog lights ................................. 235
Tail lights ................................. 236
Side turn signal lights ..............238
Number plate light ...................239Interior lights ............................ 239
Instrument panel illumination ...240
Electrical system ........................240
Fuses ....................................... 240
Engine compartment fuse box . 241
Instrument panel fuse box .......243
Load compartment fuse box ....244
Vehicle tools .............................. 246
Tools ........................................ 246
Wheels and tyres .......................247
Winter tyres ............................. 247
Tyre designations ....................247
Tyre pressure .......................... 247
Tyre pressure monitoring system .................................... 248
Tread depth ............................. 251
Changing tyre and wheel size . 252
Wheel covers ........................... 252
Tyre chains .............................. 253
Tyre repair kit .......................... 253
Wheel changing .......................256
Spare wheel ............................ 258
Jump starting ............................. 262
Towing ....................................... 263
Towing the vehicle ...................263
Towing another vehicle ...........264Appearance care .......................265
Exterior care ............................ 265
Interior care ............................. 267
Page 227 of 307
Vehicle care225website, where legally required. Only
entrust this work to an authorised
recycling centre.
Gas vehicles must be recycled by a service centre authorised for gas
vehicles.Vehicle checks
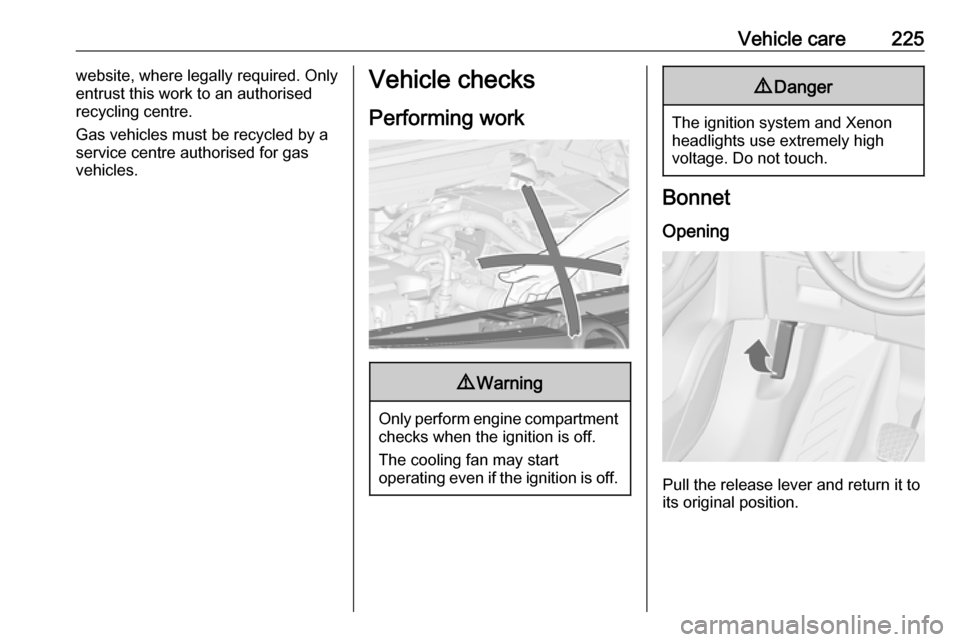
Performing work9 Warning
Only perform engine compartment
checks when the ignition is off.
The cooling fan may start
operating even if the ignition is off.
9 Danger
The ignition system and Xenon
headlights use extremely high
voltage. Do not touch.
Bonnet
Opening
Pull the release lever and return it to
its original position.
Page 233 of 307
Vehicle care231Charging the vehicle battery9Warning
On vehicles with stop-start
system, ensure that the charging potential does not exceed
14.6 volts when using a battery
charger. Otherwise the vehicle
battery might be damaged.
Jump starting 3 262.
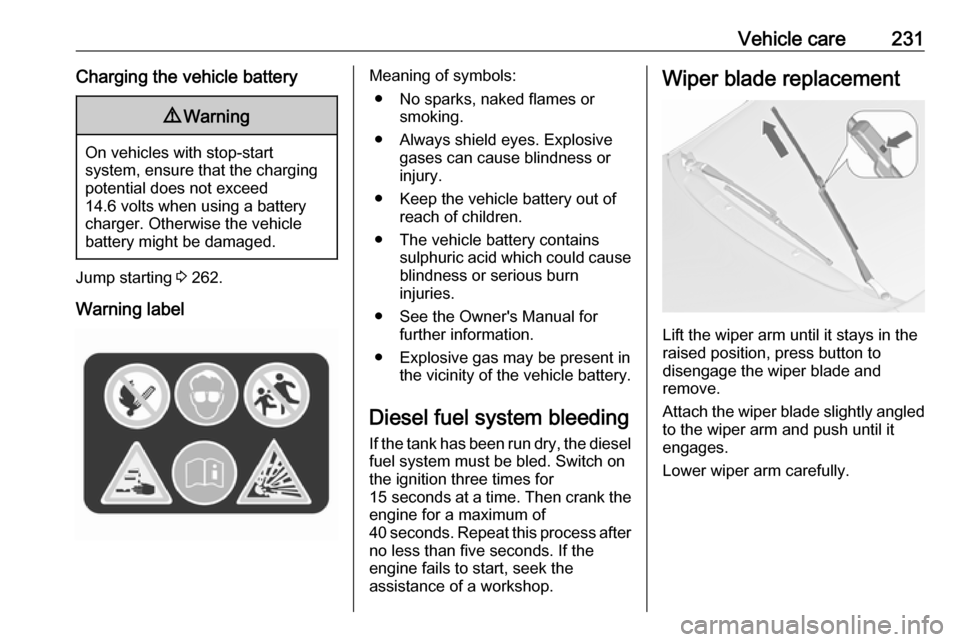
Warning label
Meaning of symbols: ● No sparks, naked flames or smoking.
● Always shield eyes. Explosive gases can cause blindness or
injury.
● Keep the vehicle battery out of reach of children.
● The vehicle battery contains sulphuric acid which could cause
blindness or serious burn
injuries.
● See the Owner's Manual for further information.
● Explosive gas may be present in the vicinity of the vehicle battery.
Diesel fuel system bleeding If the tank has been run dry, the diesel
fuel system must be bled. Switch on
the ignition three times for
15 seconds at a time. Then crank the
engine for a maximum of 40 seconds. Repeat this process after
no less than five seconds. If the
engine fails to start, seek the
assistance of a workshop.Wiper blade replacement
Lift the wiper arm until it stays in the
raised position, press button to
disengage the wiper blade and
remove.
Attach the wiper blade slightly angled
to the wiper arm and push until it
engages.
Lower wiper arm carefully.
Page 234 of 307
232Vehicle careWiper blade on the rear window
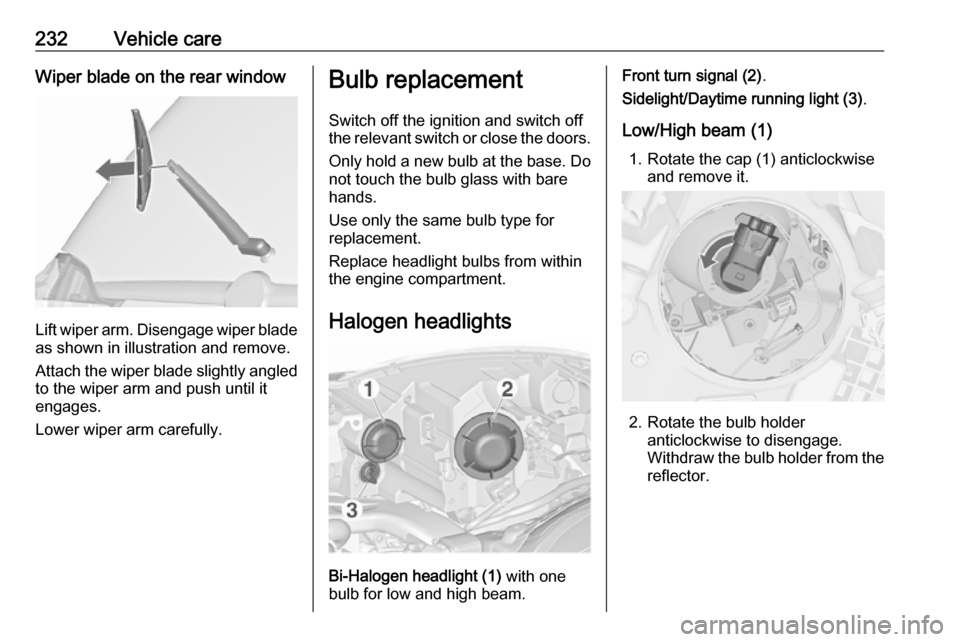
Lift wiper arm. Disengage wiper bladeas shown in illustration and remove.
Attach the wiper blade slightly angled
to the wiper arm and push until it
engages.
Lower wiper arm carefully.
Bulb replacement
Switch off the ignition and switch off
the relevant switch or close the doors.
Only hold a new bulb at the base. Do not touch the bulb glass with bare
hands.
Use only the same bulb type for
replacement.
Replace headlight bulbs from within
the engine compartment.
Halogen headlights
Bi-Halogen headlight (1) with one
bulb for low and high beam.
Front turn signal (2) .
Sidelight/Daytime running light (3) .
Low/High beam (1) 1. Rotate the cap (1) anticlockwise and remove it.
2. Rotate the bulb holder anticlockwise to disengage.
Withdraw the bulb holder from the
reflector.
Page 235 of 307
Vehicle care233
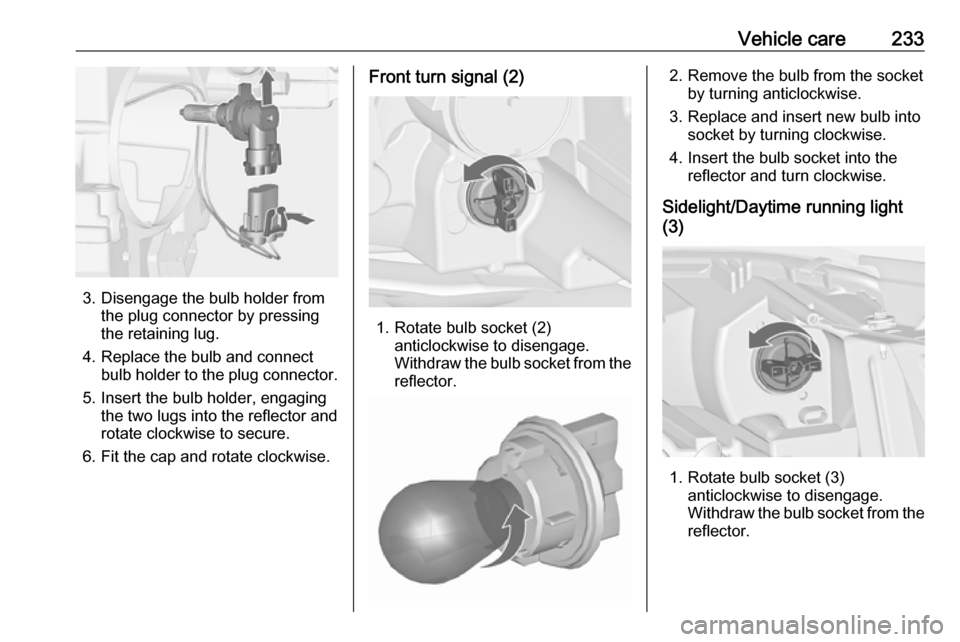
3. Disengage the bulb holder fromthe plug connector by pressing
the retaining lug.
4. Replace the bulb and connect bulb holder to the plug connector.
5. Insert the bulb holder, engaging the two lugs into the reflector and
rotate clockwise to secure.
6. Fit the cap and rotate clockwise.
Front turn signal (2)
1. Rotate bulb socket (2) anticlockwise to disengage.
Withdraw the bulb socket from the
reflector.
2. Remove the bulb from the socket by turning anticlockwise.
3. Replace and insert new bulb into socket by turning clockwise.
4. Insert the bulb socket into the reflector and turn clockwise.
Sidelight/Daytime running light
(3)
1. Rotate bulb socket (3) anticlockwise to disengage.
Withdraw the bulb socket from the
reflector.
Page 236 of 307
234Vehicle care
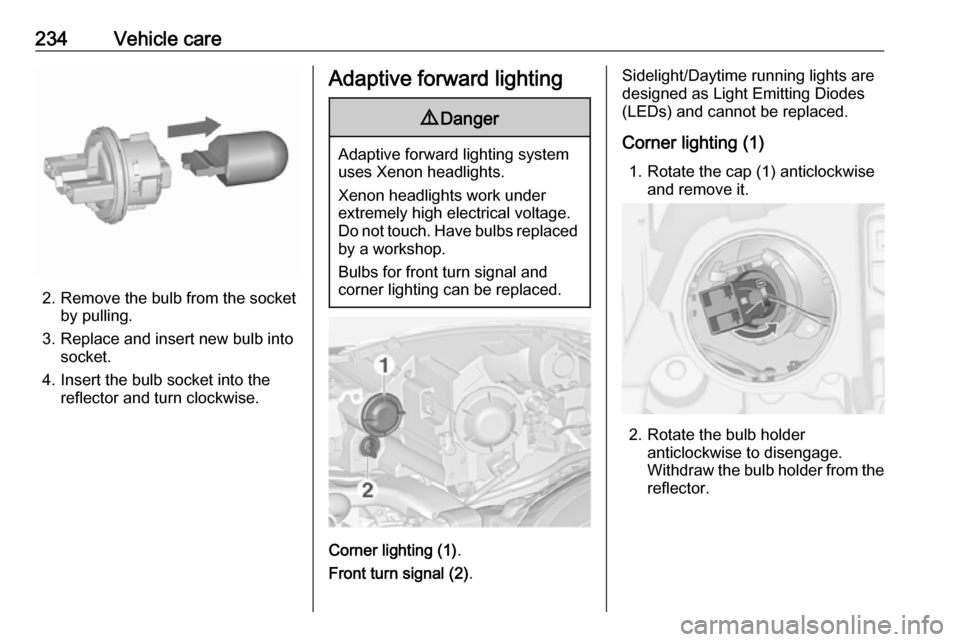
2. Remove the bulb from the socketby pulling.
3. Replace and insert new bulb into socket.
4. Insert the bulb socket into the reflector and turn clockwise.
Adaptive forward lighting9 Danger
Adaptive forward lighting system
uses Xenon headlights.
Xenon headlights work under
extremely high electrical voltage.
Do not touch. Have bulbs replaced by a workshop.
Bulbs for front turn signal and
corner lighting can be replaced.
Corner lighting (1) .
Front turn signal (2) .
Sidelight/Daytime running lights are
designed as Light Emitting Diodes
(LEDs) and cannot be replaced.
Corner lighting (1) 1. Rotate the cap (1) anticlockwise and remove it.
2. Rotate the bulb holder anticlockwise to disengage.
Withdraw the bulb holder from the
reflector.
Page 237 of 307
Vehicle care235
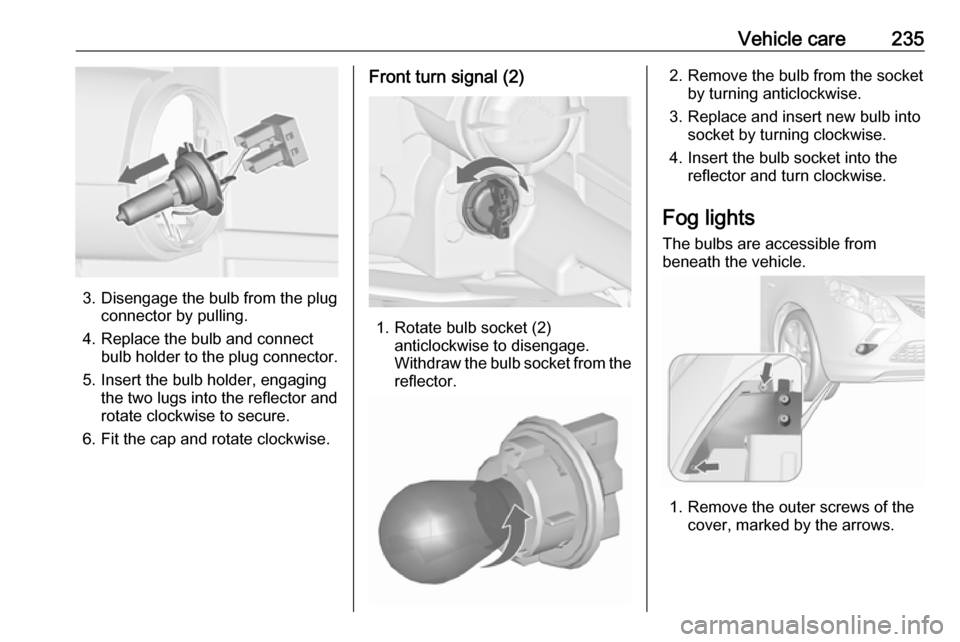
3. Disengage the bulb from the plugconnector by pulling.
4. Replace the bulb and connect bulb holder to the plug connector.
5. Insert the bulb holder, engaging the two lugs into the reflector and
rotate clockwise to secure.
6. Fit the cap and rotate clockwise.
Front turn signal (2)
1. Rotate bulb socket (2) anticlockwise to disengage.
Withdraw the bulb socket from the
reflector.
2. Remove the bulb from the socket by turning anticlockwise.
3. Replace and insert new bulb into socket by turning clockwise.
4. Insert the bulb socket into the reflector and turn clockwise.
Fog lights
The bulbs are accessible from
beneath the vehicle.
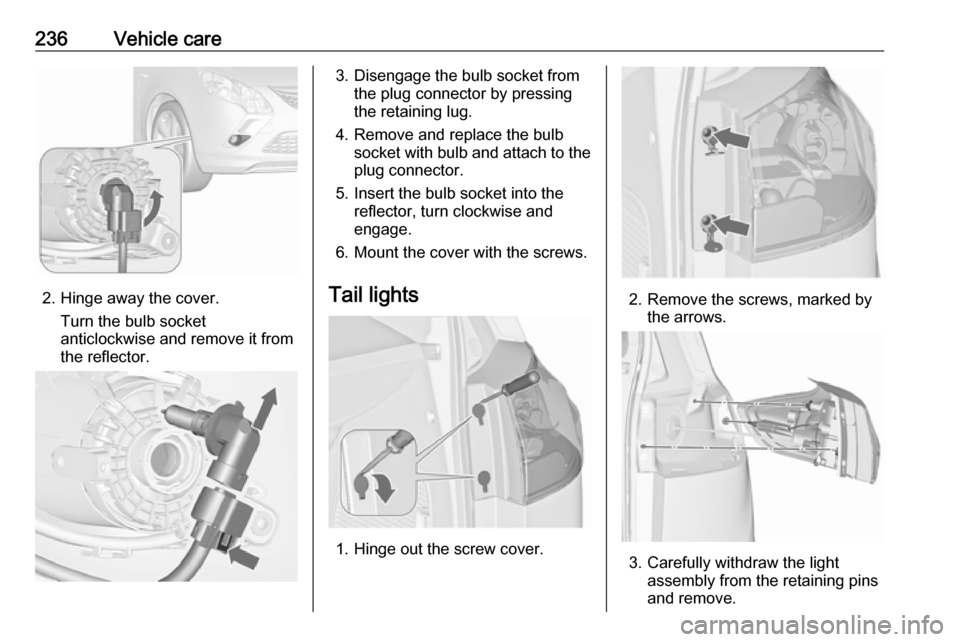
1. Remove the outer screws of the cover, marked by the arrows.
Page 238 of 307
236Vehicle care
2. Hinge away the cover.Turn the bulb socket
anticlockwise and remove it from
the reflector.
3. Disengage the bulb socket from the plug connector by pressing
the retaining lug.
4. Remove and replace the bulb socket with bulb and attach to the
plug connector.
5. Insert the bulb socket into the reflector, turn clockwise and
engage.
6. Mount the cover with the screws.
Tail lights
1. Hinge out the screw cover.
2. Remove the screws, marked by the arrows.
3. Carefully withdraw the light assembly from the retaining pins
and remove.
Page 239 of 307
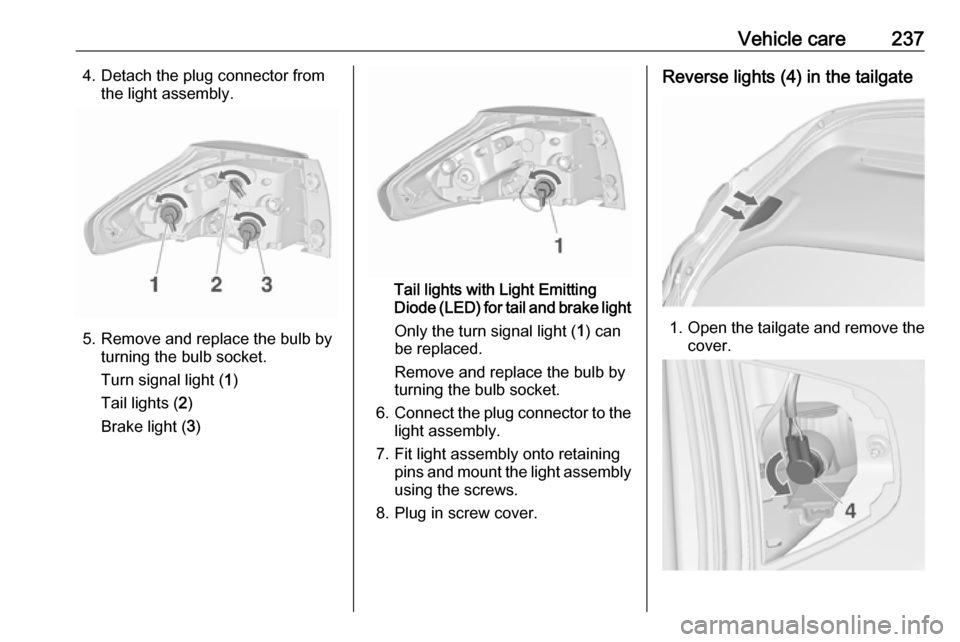
Vehicle care2374. Detach the plug connector fromthe light assembly.
5. Remove and replace the bulb by turning the bulb socket.
Turn signal light ( 1)
Tail lights ( 2)
Brake light ( 3)
Tail lights with Light Emitting
Diode (LED) for tail and brake light
Only the turn signal light ( 1) can
be replaced.
Remove and replace the bulb by
turning the bulb socket.
6. Connect the plug connector to the
light assembly.
7. Fit light assembly onto retaining pins and mount the light assembly
using the screws.
8. Plug in screw cover.
Reverse lights (4) in the tailgate
1. Open the tailgate and remove the
cover.