clock VAUXHALL ZAFIRA TOURER 2017.5 User Guide
[x] Cancel search | Manufacturer: VAUXHALL, Model Year: 2017.5, Model line: ZAFIRA TOURER, Model: VAUXHALL ZAFIRA TOURER 2017.5Pages: 291, PDF Size: 8.9 MB
Page 212 of 291
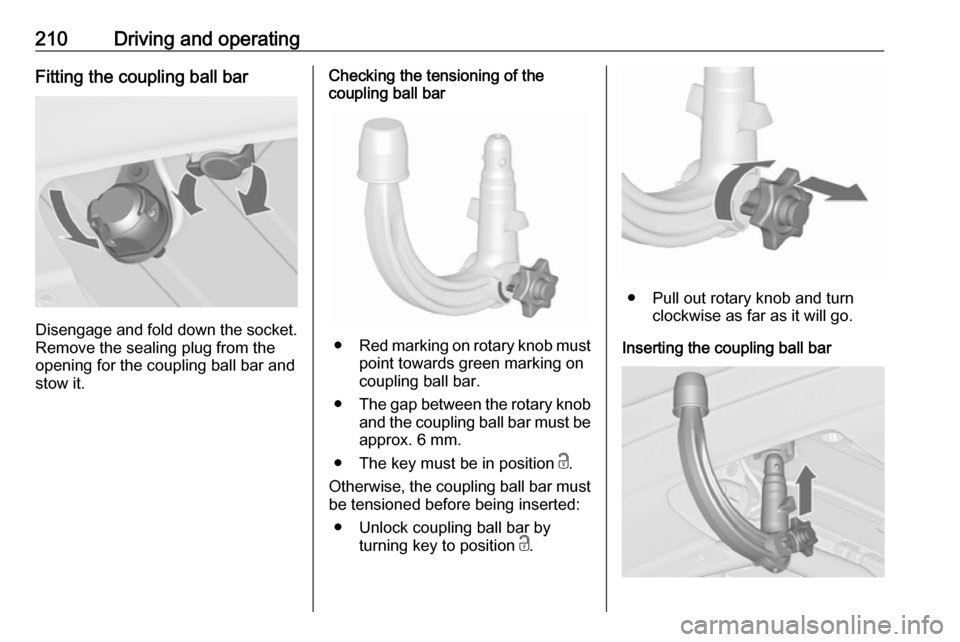
210Driving and operatingFitting the coupling ball bar
Disengage and fold down the socket.Remove the sealing plug from the
opening for the coupling ball bar and
stow it.
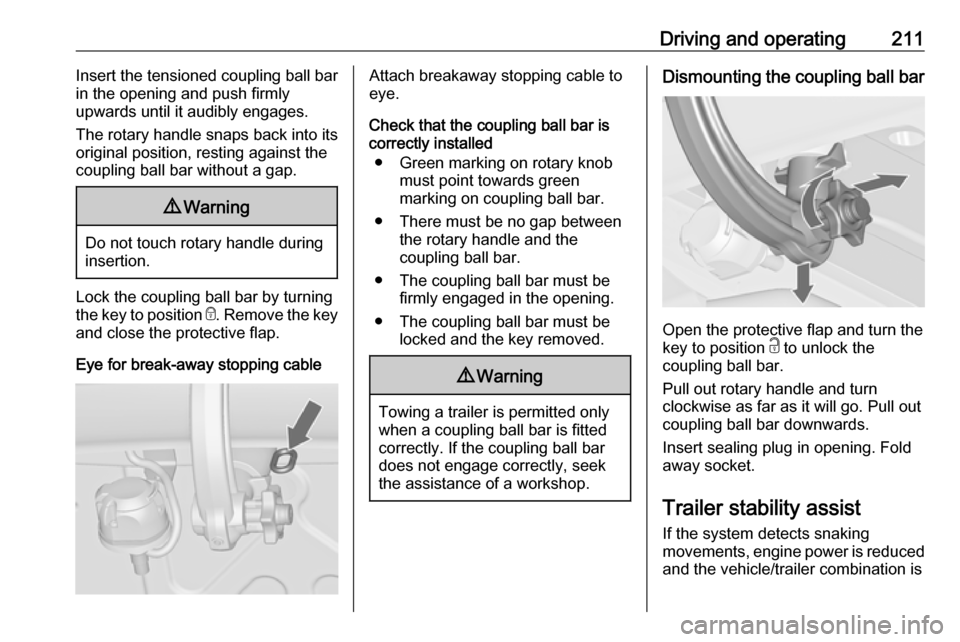
Checking the tensioning of the
coupling ball bar
● Red marking on rotary knob must
point towards green marking on
coupling ball bar.
● The gap between the rotary knob
and the coupling ball bar must be approx. 6 mm.
● The key must be in position c.
Otherwise, the coupling ball bar must be tensioned before being inserted:
● Unlock coupling ball bar by turning key to position c.
● Pull out rotary knob and turn
clockwise as far as it will go.
Inserting the coupling ball bar
Page 213 of 291
Driving and operating211Insert the tensioned coupling ball bar
in the opening and push firmly
upwards until it audibly engages.
The rotary handle snaps back into its
original position, resting against the
coupling ball bar without a gap.9 Warning
Do not touch rotary handle during
insertion.
Lock the coupling ball bar by turning
the key to position e. Remove the key
and close the protective flap.
Eye for break-away stopping cable
Attach breakaway stopping cable to
eye.
Check that the coupling ball bar is correctly installed
● Green marking on rotary knob must point towards green
marking on coupling ball bar.
● There must be no gap between the rotary handle and the
coupling ball bar.
● The coupling ball bar must be firmly engaged in the opening.
● The coupling ball bar must be locked and the key removed.9Warning
Towing a trailer is permitted only
when a coupling ball bar is fitted correctly. If the coupling ball bardoes not engage correctly, seekthe assistance of a workshop.
Dismounting the coupling ball bar
Open the protective flap and turn the
key to position c to unlock the
coupling ball bar.
Pull out rotary handle and turn
clockwise as far as it will go. Pull out coupling ball bar downwards.
Insert sealing plug in opening. Fold away socket.
Trailer stability assist
If the system detects snaking
movements, engine power is reduced
and the vehicle/trailer combination is
Page 225 of 291
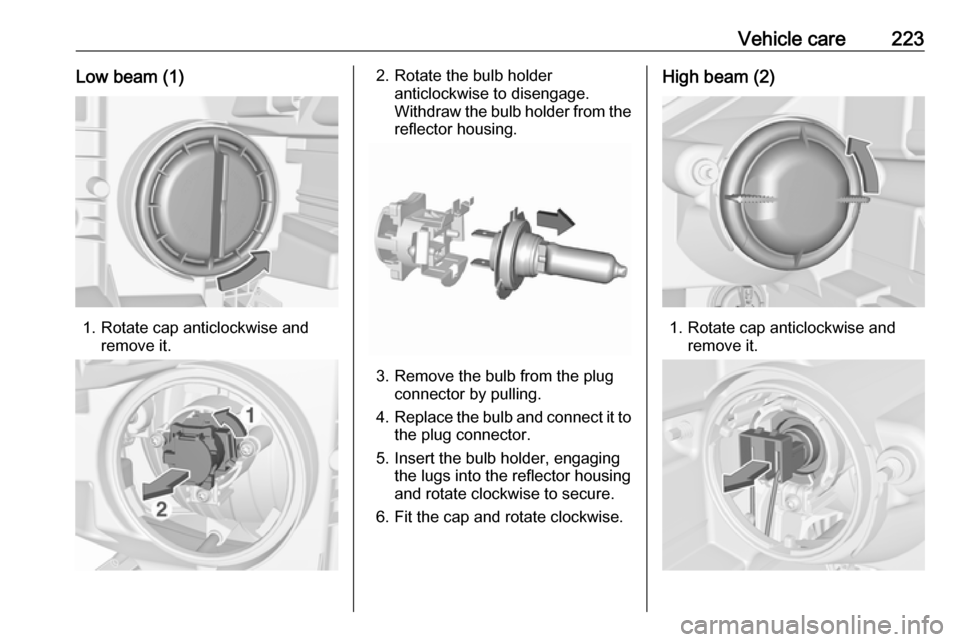
Vehicle care223Low beam (1)
1. Rotate cap anticlockwise andremove it.
2. Rotate the bulb holderanticlockwise to disengage.
Withdraw the bulb holder from the
reflector housing.
3. Remove the bulb from the plug connector by pulling.
4. Replace the bulb and connect it to
the plug connector.
5. Insert the bulb holder, engaging the lugs into the reflector housing
and rotate clockwise to secure.
6. Fit the cap and rotate clockwise.
High beam (2)
1. Rotate cap anticlockwise and remove it.
Page 226 of 291
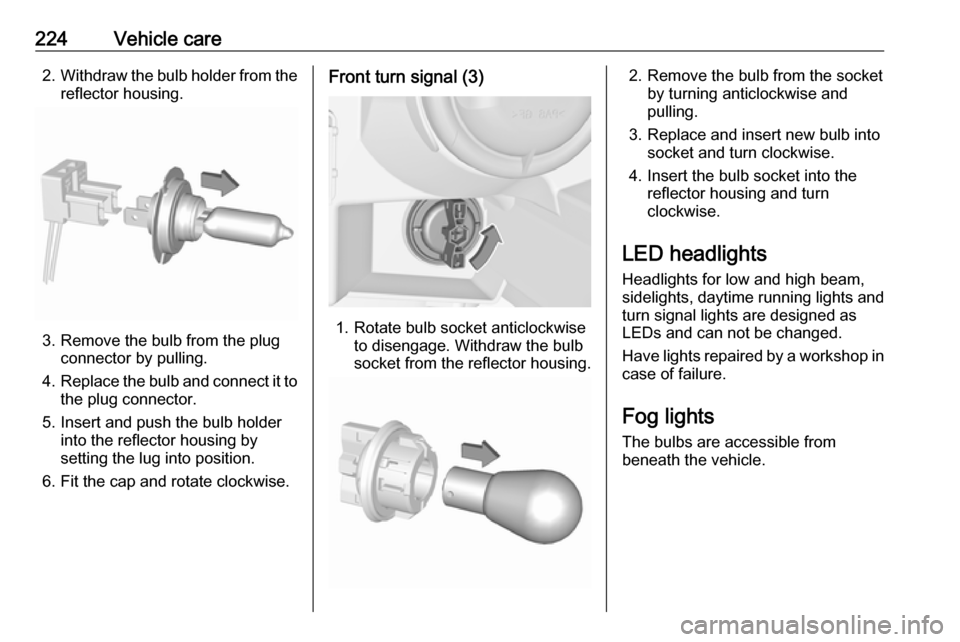
224Vehicle care2.Withdraw the bulb holder from the
reflector housing.
3. Remove the bulb from the plug connector by pulling.
4. Replace the bulb and connect it to
the plug connector.
5. Insert and push the bulb holder into the reflector housing by
setting the lug into position.
6. Fit the cap and rotate clockwise.
Front turn signal (3)
1. Rotate bulb socket anticlockwise to disengage. Withdraw the bulb
socket from the reflector housing.
2. Remove the bulb from the socket by turning anticlockwise and
pulling.
3. Replace and insert new bulb into socket and turn clockwise.
4. Insert the bulb socket into the reflector housing and turn
clockwise.
LED headlights
Headlights for low and high beam,
sidelights, daytime running lights and turn signal lights are designed as
LEDs and can not be changed.
Have lights repaired by a workshop in
case of failure.
Fog lights
The bulbs are accessible from
beneath the vehicle.
Page 227 of 291
Vehicle care225
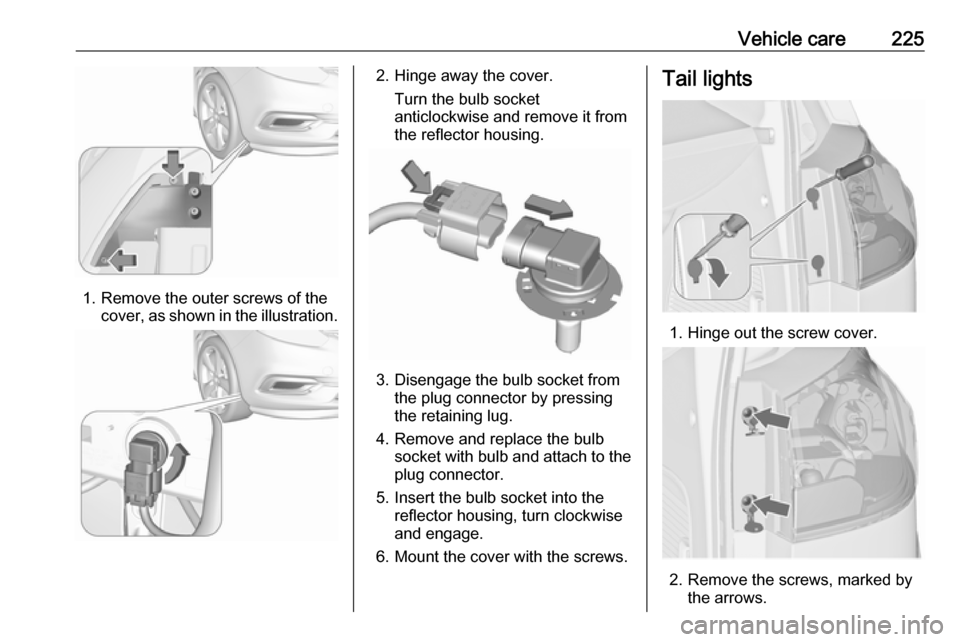
1. Remove the outer screws of thecover, as shown in the illustration.
2. Hinge away the cover.
Turn the bulb socket
anticlockwise and remove it from
the reflector housing.
3. Disengage the bulb socket from the plug connector by pressing
the retaining lug.
4. Remove and replace the bulb socket with bulb and attach to the
plug connector.
5. Insert the bulb socket into the reflector housing, turn clockwise
and engage.
6. Mount the cover with the screws.
Tail lights
1. Hinge out the screw cover.
2. Remove the screws, marked by the arrows.
Page 229 of 291
Vehicle care227
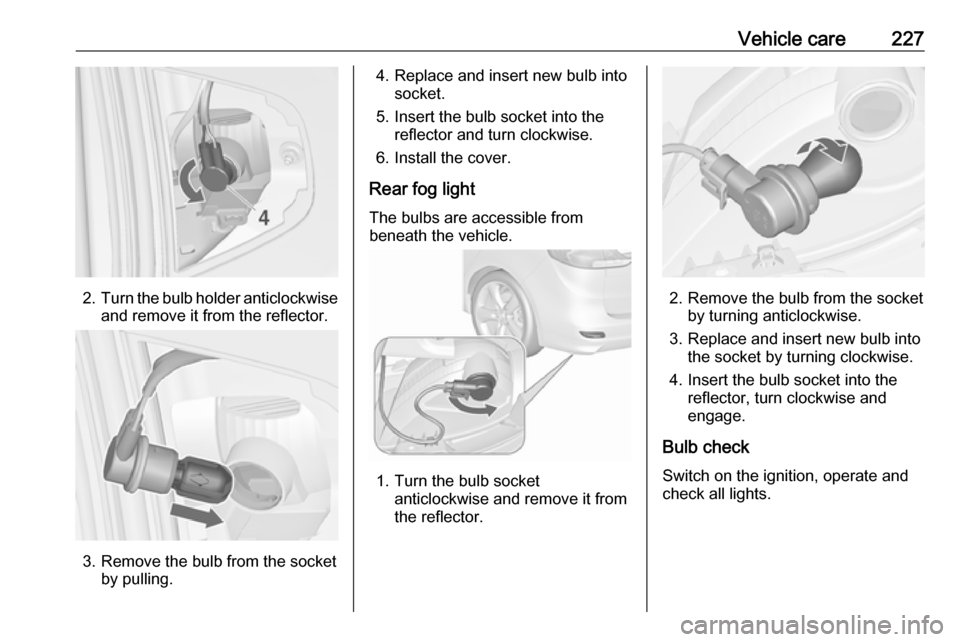
2.Turn the bulb holder anticlockwise
and remove it from the reflector.
3. Remove the bulb from the socket by pulling.
4. Replace and insert new bulb intosocket.
5. Insert the bulb socket into the reflector and turn clockwise.
6. Install the cover.
Rear fog light
The bulbs are accessible from
beneath the vehicle.
1. Turn the bulb socket anticlockwise and remove it from
the reflector.
2. Remove the bulb from the socket by turning anticlockwise.
3. Replace and insert new bulb into the socket by turning clockwise.
4. Insert the bulb socket into the reflector, turn clockwise and
engage.
Bulb check
Switch on the ignition, operate and
check all lights.
Page 230 of 291
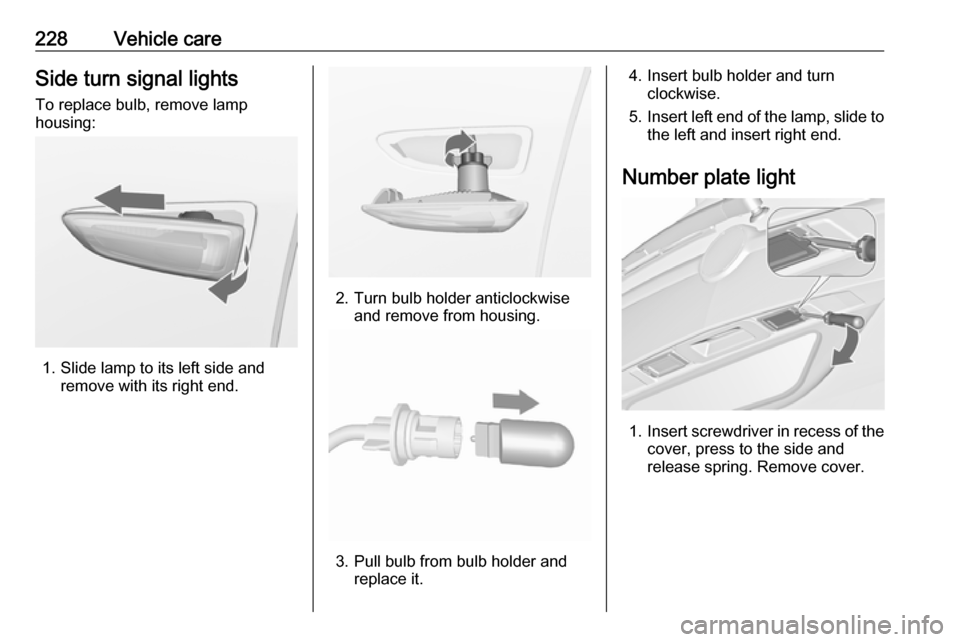
228Vehicle careSide turn signal lightsTo replace bulb, remove lamp
housing:
1. Slide lamp to its left side and remove with its right end.
2. Turn bulb holder anticlockwiseand remove from housing.
3. Pull bulb from bulb holder and replace it.
4. Insert bulb holder and turnclockwise.
5. Insert left end of the lamp, slide to
the left and insert right end.
Number plate light
1. Insert screwdriver in recess of the
cover, press to the side and
release spring. Remove cover.
Page 250 of 291
248Vehicle careFront arm position of the lifting
platform at the underbody.
Spare wheel If mounting a spare wheel which is
different from the other wheels, this
wheel might be classified as a
temporary spare wheel and the
corresponding speed limits apply,
even though no label indicates this.
Seek the assistance of a workshop to
check the applicable speed limit.
The spare wheel has a steel rim.Caution
The use of a spare wheel that is smaller than the other wheels or in combination with winter tyres
could affect driveability. Have the defective tyre replaced as soon as
possible.
The spare wheel is located in a holder
beneath the vehicle floor.
1. Open the storage in the load compartment 3 236.
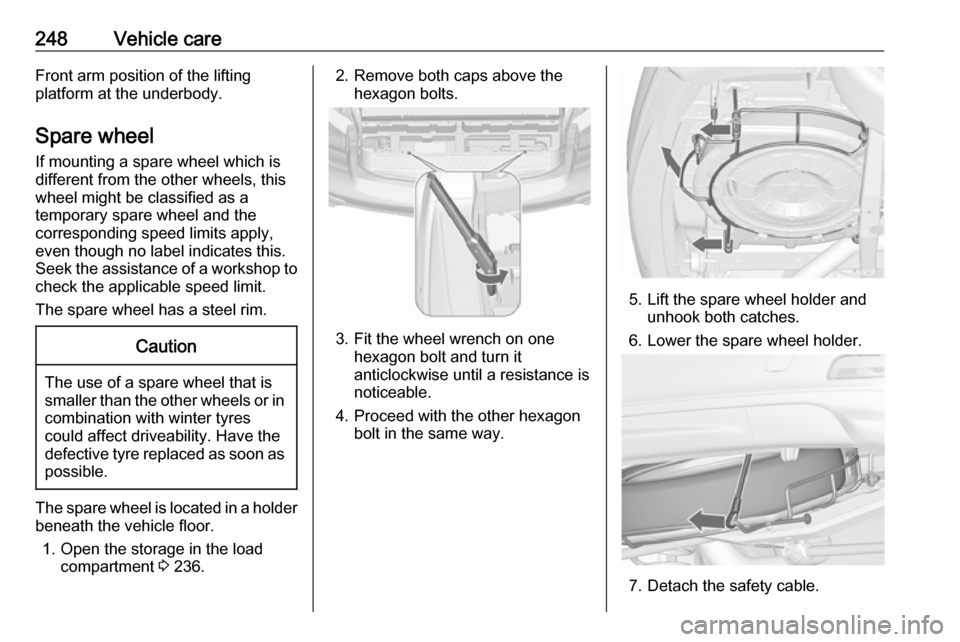
2. Remove both caps above the
hexagon bolts.
3. Fit the wheel wrench on one hexagon bolt and turn it
anticlockwise until a resistance is
noticeable.
4. Proceed with the other hexagon bolt in the same way.
5. Lift the spare wheel holder andunhook both catches.
6. Lower the spare wheel holder.
7. Detach the safety cable.
Page 251 of 291
Vehicle care249
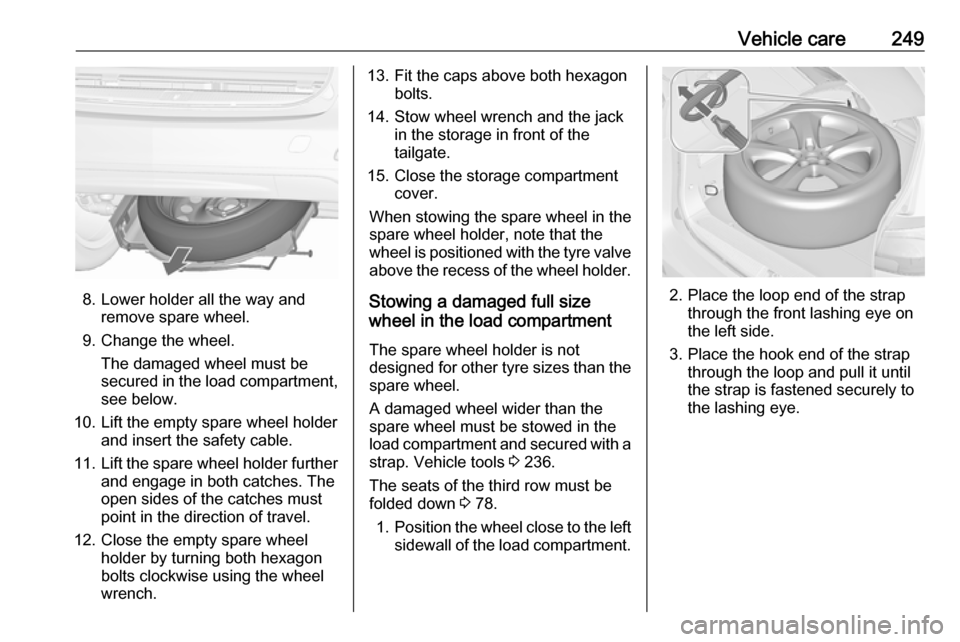
8. Lower holder all the way andremove spare wheel.
9. Change the wheel. The damaged wheel must be
secured in the load compartment,
see below.
10. Lift the empty spare wheel holder and insert the safety cable.
11. Lift the spare wheel holder further
and engage in both catches. The
open sides of the catches must
point in the direction of travel.
12. Close the empty spare wheel holder by turning both hexagon
bolts clockwise using the wheel
wrench.
13. Fit the caps above both hexagon bolts.
14. Stow wheel wrench and the jack in the storage in front of the
tailgate.
15. Close the storage compartment cover.
When stowing the spare wheel in the
spare wheel holder, note that the
wheel is positioned with the tyre valve
above the recess of the wheel holder.
Stowing a damaged full size
wheel in the load compartment
The spare wheel holder is not
designed for other tyre sizes than the
spare wheel.
A damaged wheel wider than the
spare wheel must be stowed in the
load compartment and secured with a strap. Vehicle tools 3 236.
The seats of the third row must be folded down 3 78.
1. Position the wheel close to the left
sidewall of the load compartment.
2. Place the loop end of the strap through the front lashing eye on
the left side.
3. Place the hook end of the strap through the loop and pull it until
the strap is fastened securely to
the lashing eye.
Page 287 of 291

285Child restraint systems ................59
Cigarette lighter .........................102
Climate control ............................. 15
Climate control systems .............141
Clock........................................... 100
Code ........................................... 122
Collision damage repair ..............280
Control indicators........................ 106
Control of the vehicle .................150
Controls ........................................ 96
Convex shape .............................. 28
Coolant and antifreeze ...............259
Cruise control ....................115, 172
Cupholders .................................. 65
Curtain airbag system .................. 57
Curve lighting.............................. 135
D Danger, Warnings and Cautions ...4
Daytime running lights ...............134
Declaration of conformity ............277
DEF ............................................ 158
Diesel exhaust fluid ....................158
Diesel fuel system bleeding .......221
Diesel particle filter .............114, 156
Door open .................................. 116
Door panel storage .......................67
Doors ............................................ 24
Driver assistance systems ..........172
Driver Information Centre ...........116Driving characteristics and
towing tips .............................. 208
Driving hints ................................ 150
E Electric adjustment ......................28
Electrical system......................... 229
Electric parking brake .........112, 165
Electric parking brake fault .........112
Electronic climate control system 143
Electronic driving programmes ..162
Electronic Stability Control.......... 169
Electronic Stability Control and Traction Control system ..........113
Electronic Stability Control off..... 113
End-of-life vehicle recovery .......215
Engine compartment fuse box ...231
Engine coolant ........................... 217
Engine coolant temperature gauge ..................................... 105
Engine data ............................... 267
Engine exhaust .......................... 156
Engine identification ...................263
Engine oil ................... 216, 259, 264
Engine oil pressure ....................114
Entry lighting .............................. 139
Event data recorders ..................282
Exit lighting ................................ 139
Exterior care .............................. 254
Exterior light ............................... 115Exterior lighting ....................12, 131
Exterior mirrors ............................. 28
F
Fault ........................................... 163
First aid kit ................................... 91
Fixed air vents ........................... 148
Flex-Fix system ............................ 69
Fog light ..................................... 115
Fog lights ................................... 224
Folding mirrors ............................. 28
Folding tray .................................. 91
Following distance ......................113
Following distance indication ......184
Forward collision alert................. 181
Front airbag system .....................56
Front fog lights ........................... 136
Front seats.................................... 37
Front storage ................................ 67
Fuel............................................. 197
Fuel consumption - CO 2-
Emissions ............................... 207
Fuel for diesel engines ..............198
Fuel for liquid gas operation .......200
Fuel for natural gas operation ...199
Fuel for petrol engines ...............197
Fuel gauge ................................. 104
Fuel selector .............................. 104
funnel .......................................... 202
Fuses ......................................... 229