oil change VOLKSWAGEN BEETLE 2004 Owners Manual
[x] Cancel search | Manufacturer: VOLKSWAGEN, Model Year: 2004, Model line: BEETLE, Model: VOLKSWAGEN BEETLE 2004Pages: 138, PDF Size: 48.59 MB
Page 20 of 138
Downloaded from www.Manualslib.com manuals search engine L
l:l If several w arning reports a re detecte d, the
L!J symbols will appear f or s eve ra l seconds, on e
a ft e r a
noth er. T he symbols will continue to appear
until the fa ults a re rectifie d .
l:l If w arni ng messages about malfunctions are
L!J displa ye d when th e ig nition is switched on, it
m ay
not be possib le to a dju st some settings as de-
Service interval display
A
scribed, or the information display m ay appea r dif
f e rently .
If this is the case, take the ve hicl e to a
qualified
workshop to have the m alfunction re cti -
fied .
<
B
BSG-0022
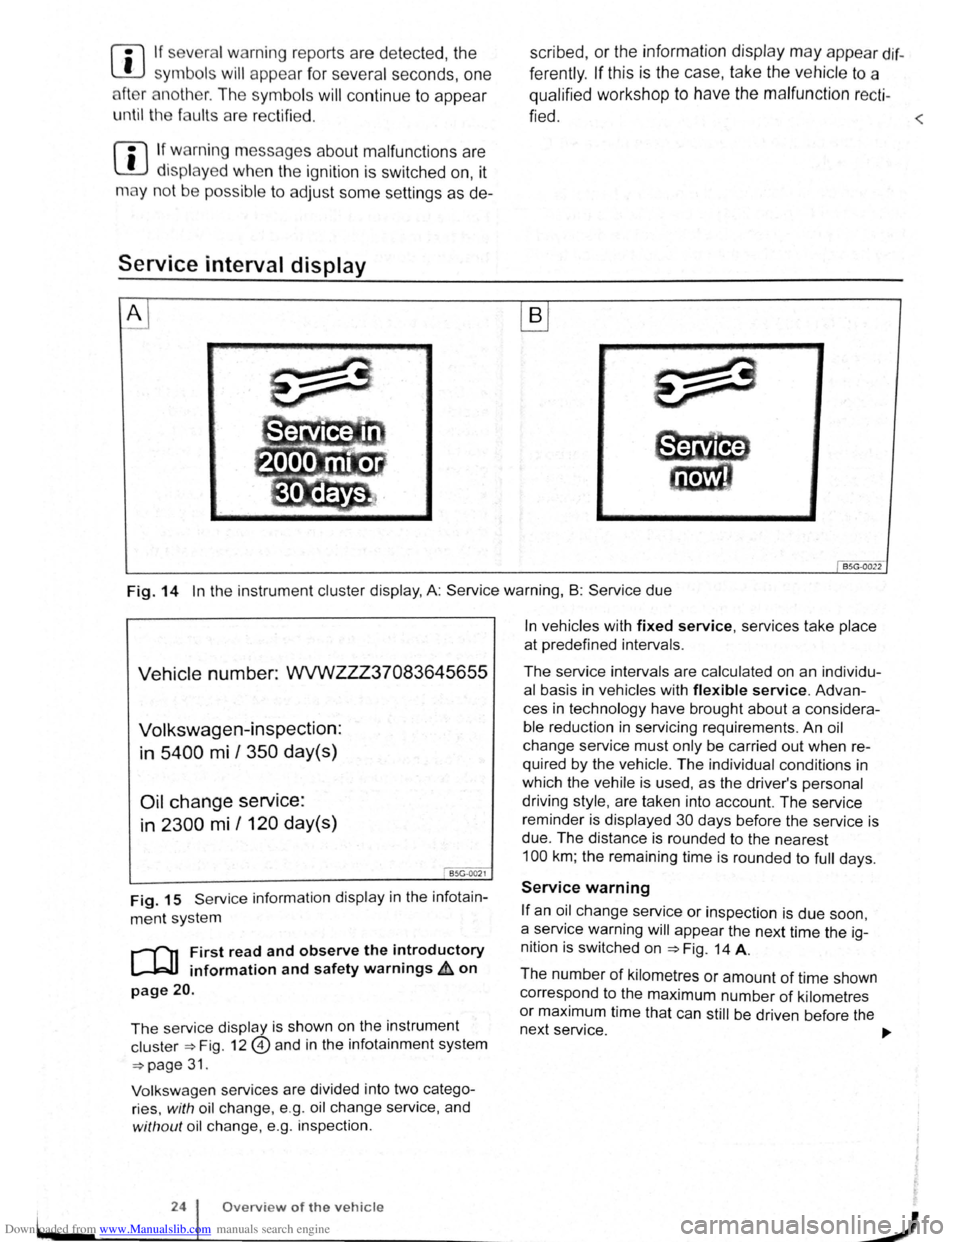
Fig. 14 In th e instrum ent cluster display , A: Service warning, B : Serv ice due
Vehicle number: WVWZZZ37083645655
Volkswagen-inspection:
in
5400 mi I 350 day(s)
Oil change service:
in 2300 mi /120 day(s)
I BSG-0021
Fig. 15 Servi ce informatio n displ ay in the infot ain
m ent sy ste m
r-f"n First read and observe the introductory
l-J=JJ information and safety warnings£ on
page 20 .
The se rvice disp la y i s s hown on th e instrum ent
cl us te r ~Fig. 12@) a nd in th e infota inment syste m
~page 3 1.
V ol
ksw age n se rvi ces are divid ed into two cate go
r ies,
w ith oil c h a nge, e.g . o il ch a ng e se rvice , and
with out oil cha nge, e.g. in spectio n .
24 Overview of the vehicle
In ve hicles with fixed service, services ta ke place
at prede fin ed int ervals .
The service intervals are calculated on an individu
al basis in ve hicles with flexible service. Advan
c es in technology have brought about a considera
ble redu ction in servi cing re quirements . An oil
chang e service must only be carried out when re
quired by the vehicle. The individual conditions in
which the ve hile is used , as the driver's pe rsonal
driv i
ng style , are taken into account. The se rvice
reminder is displayed 30 da ys befor e the service is
due . The dista nce is round ed to the nearest
100 km ; th e re maining time is rounded to full days.
Service warning
If an oil change service or inspection is due soon,
a service warning
will appear th e next time the ig
nition is switched on
~Fig. 14 A.
Th e numb er
of kilometr es or amount of time shown
c orr espond to the maximum number
of kilometr es
or maximum time that can still be driv en b efo re the
n ext servic
e. ..,..
J
Page 30 of 138
Downloaded from www.Manualslib.com manuals search engine Menu 1submenu
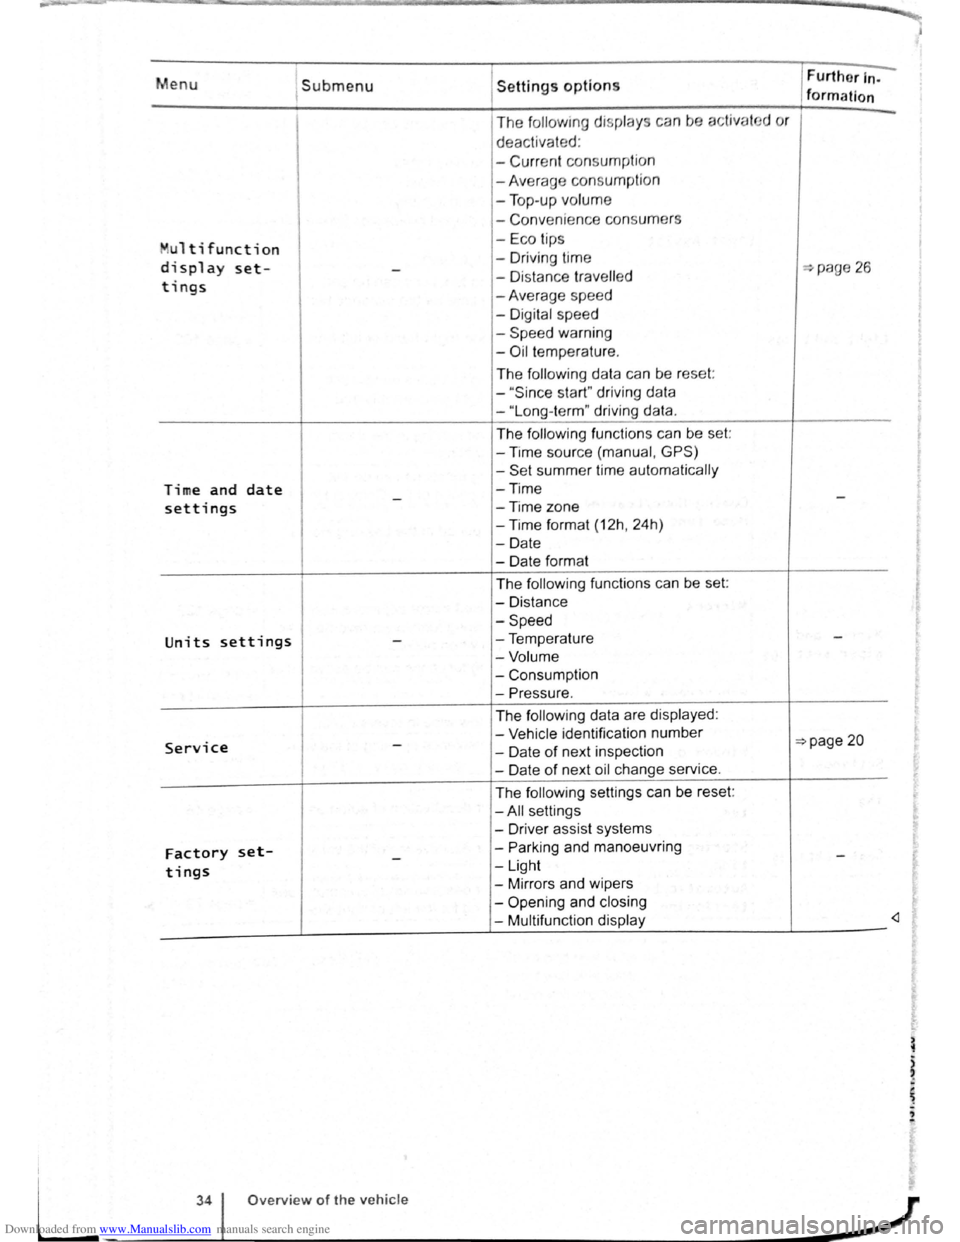
Multi function
display set--
tings
Time and date -settings
Units settings -
Service -
Factory set--tings
Settings options
The following display s ca n be activat
deactivated :
-
Curr ent consu mption
-Average consumpti on
- Top -up volume
- Conveni ence consum ers
- Eco tips
- Driv ing time
- Di stance
travell ed
-Average spee d
- Digital speed
-
Speed warning
-Oil t empe rature .
The
foll ow ing data can be reset:
-
" Sin ce start" driving data
-"Long -term" driving data.
The following functions can be set:
-Time source (manual , GPS)
-Set summer time automatically
-Time
-Time
zone
-Time format (12h, 24h)
-Date
- Date format
The
following functions can be set:
-Distance
-Speed
-Temperature
-Volume
-Consumption
-Pressure.
The follow ing data are displayed :
- Vehicle identification number
- Date
of next inspection
-Date of next oil change service.
The
following settings can be reset:
-All settings
- Driver assist systems
-
Parking and manoeuvring
-Light
-Mirrors and wipers
-
Opening and closing
- Multifunction display Further
In-
formation ~ ~
d
or
...,page 26
-
-
=>page 20
-
-
"'
L
34 Overview of the vehicle
-~~------------~J
Page 58 of 138
Downloaded from www.Manualslib.com manuals search engine Lit up Possible cause Solution
Tr ailer turn signal. -......
Q\~ The indica tor lamp goe s out if a tra iler turn Check the trailer l ighting as required.
signal
or all trailer lig ht s st op working .
Main beam is swi tc h e d on or the headlight
----D =>pa ge 106 .
flasher is being opera ted .
-
0 Main beam ass ist swi tc hed on. =>page 110 .
-1
) A separate display appears in the instrumen t cluster if there is a bend lighting fault.
>) Displayed in colour on an instru ment cluster with colour display .
Several warning and indicato r lamps will light up
briefly as a
functiona l check when the ign iti on i s
switched
on. T he y will swi tc h off after a few sec
onds.
--·--~-
Failure to observe illuminated warning lamps
and text messages can lead to your vehicle
breaking down in traffic, and can cause acci
dent and serious injury.
• Never ignore any illuminated warning
lamps or text messages.
• Stop the vehicle as soon as possible and
when safe to do so.
Turn signal and main beam lever
®
B5K ·0415
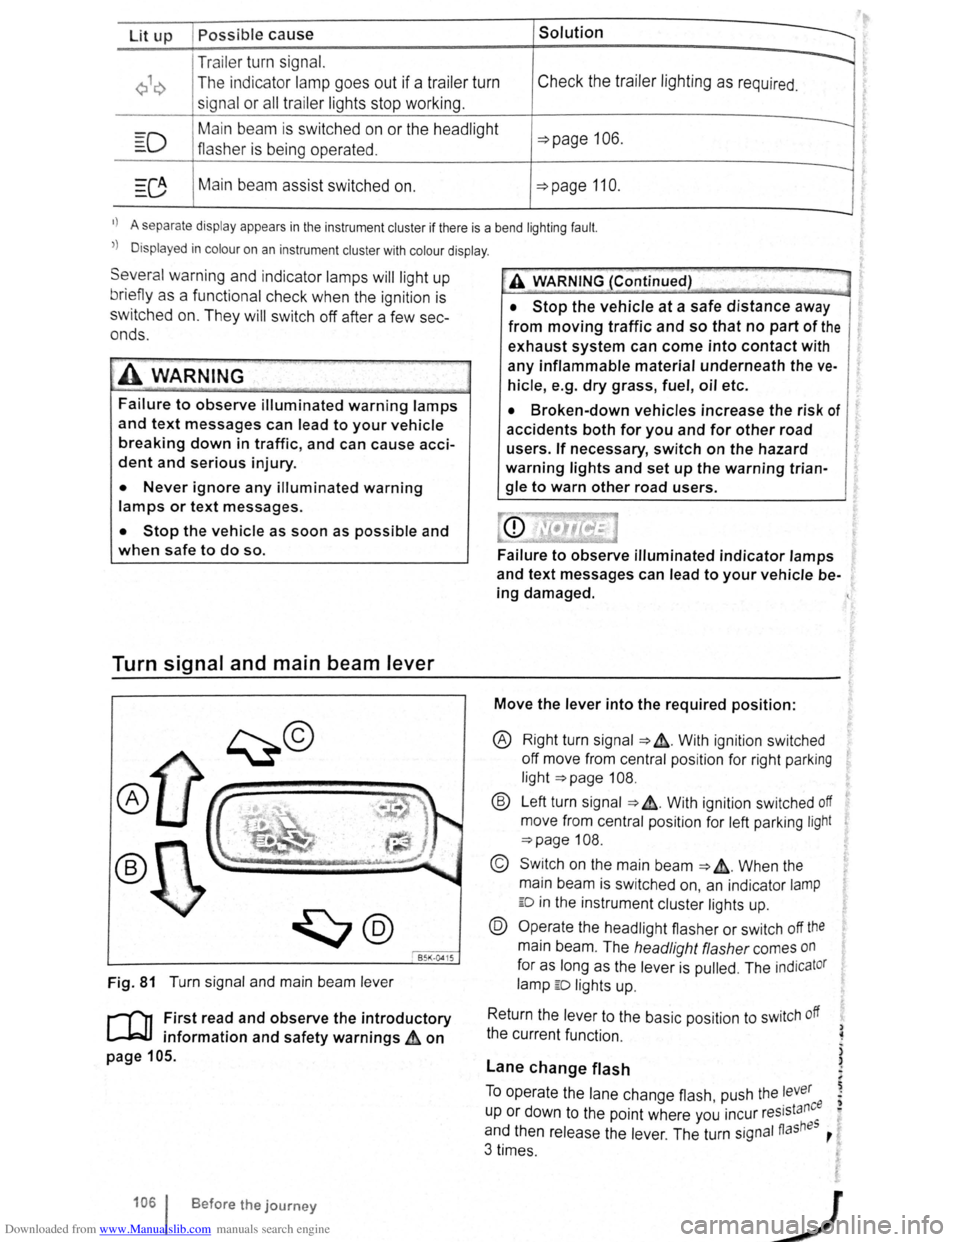
Fig. 81 T urn signa l and main beam lever
r-('n F irst read and observe the introductory
1.-J=JJ information and safety warnings~ on
page 105 .
1061 Before the journey
--
~>A WARNING (Continued) -
• Stop the vehicle at a safe distance away
from moving traffic and so that no part of the
exhaust system can come into contact with
any inflammable material underneath the ve
hicle, e .g . dry grass, fuel, oil etc.
• Broken-down vehicles increase the risk of
accidents both for you and for other road
users. If necessary, switch on the hazard
warning lights and set up the warning trian
gle to warn other road users.
Failure to observe illuminated indicator lamps
and text messages can lead to your vehicle be
ing damaged.
Move the lever into the required position:
® Right turn signa l ~ &. W it h ignit ion swi tched
off m ove from centr al posit io n for right parking
li g ht
~page 108.
® Left turn sig na l ~ ~. W ith ignition switched off
move from centra l posi tion for left parking light
~page 108 .
© Switch on the main beam ~ &. Whe n the
main beam is switc hed on, an indicator
lamp
ED in the instr ument cluster lights up.
@ Operate the headlight flasher or switch off the
main beam. The h eadligh t flasher comes on
for as long as the leve r is pulled . The indicator
lamp ED lights u p .
R etu
rn the le ver to the basic position to switch off
the c urrent fu nc tio n.
Lane change flash
) ~
)
)
To o pe rate the la ne c hange flash push the lever ' . nee I) u p or d own to the poin t where you incur reslsta eo
and th en release the le ver. The turn signal fiashBS ,
3 times .
Page 70 of 138
Downloaded from www.Manualslib.com manuals search engine Place the windscreen wiper arms back onto the
winds creen before driving away. With the ignition
swit ched on, briefly press the windscreen wiper
lever
down to bring the windscreen wiper arms
ba ck
to the original position.
Lifting the windscreen wiper blades
• Move the wiper arms to the service position be
fore lifting ~CD.
• When lifting a wiper arm hold it only by the wip
er blade mounting .
Rain sensor
1}®
c®
85K ·0419
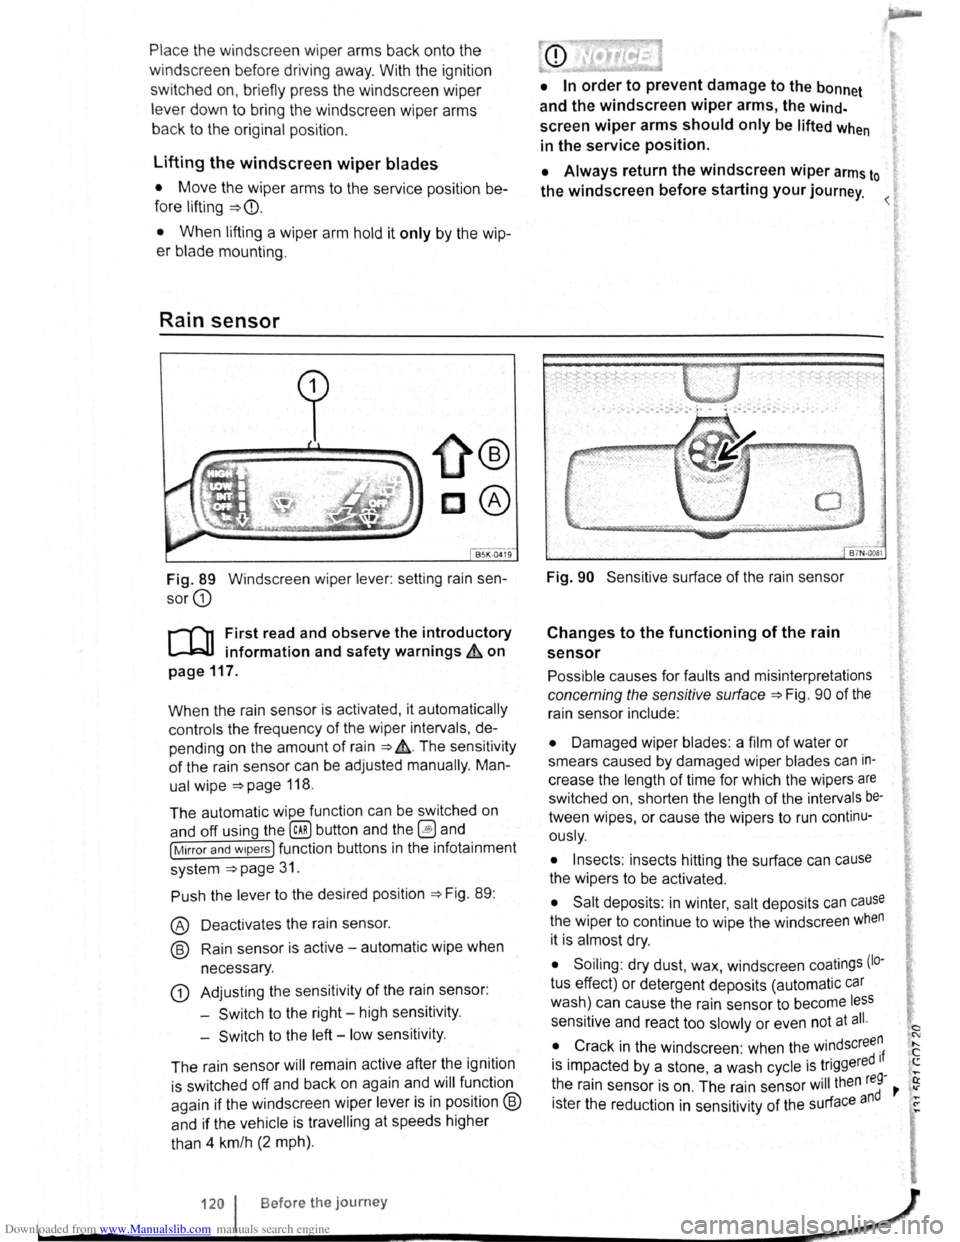
Fig. 89 Windscreen wiper lever: setting rain sen
sor G)
r-('n First read and observe the introductory
L-J,::JJ information and safety warnings & on
page
117.
When the rain sensor is activated , it automatically
controls the frequency
of the wiper intervals, de
pending on the amount of rain ~ ,&. The sensitivity
of the rain sensor can be adjusted manually. Man
ual
wipe ~page 118 .
The automatic wipe function can be switched on
and off using the
(ill) button and the 0 and
[Mirror and wipers ] function buttons in the infotainment
system
~page 31.
Push the lever to the desired position ~Fig. 89:
® Deactivat es the rain sensor.
@ Rain sensor is active -automatic wipe when
necessary .
G) Adjusting the sensitivity of the rain sensor :
-
Switch to the right -high sensitivity.
-
Switch to the left -low sensitivity .
The rain sensor
will remain active after the ignition
is switched off and back on again and
will function
again
if the windscreen wiper lever is in position @
and if the vehicle is travelling at speeds higher
than 4 km/h
(2 mph).
• In order to prevent damage to the bonnet
and the windscreen
wiper arms, the wind
screen wiper arms should only be lifted when
in the service position.
• Always return the windscreen wiper arms to
the windscreen before starting your journey.
Fig. 90 Sensitive surface of the rain sensor
Changes to the functioning of the rain
sensor
Possible causes for faults and misinterpretations
concerning the sensitive surface~ Fig. 90 of the
rain sensor include:
• Damaged wiper blades: a film of water or
smears caused by damaged wiper blades
can in
crease the length of time for which the wipers are
switched on, shorten the length of the intervals be
tween wipes, or cause the wipers to run continu
ously.
• Insects: insects hitting the surface can cause
the wipers to be activated.
• Salt deposits : in winter, salt deposits can cause
the wiper to continue to wipe the windscreen when
it is almost dry.
• Soiling : dry dust, wax, windscreen coatings (lo·
tus effect) or detergent deposits (automatic car
wash) can cause the rain sensor to become less
sensitive and react too slowly or even not at all.
• Crack
in the windscreen : when the windscree~
is impacted by a stone, a wash cycle is triggered If ....
~he rain sensor is on . The rain sensor will then reg-,. ~
1ster the reduction in sensitivity of the surface and ~
120 I Before the journey _,}
~----~------------------~~
Page 133 of 138
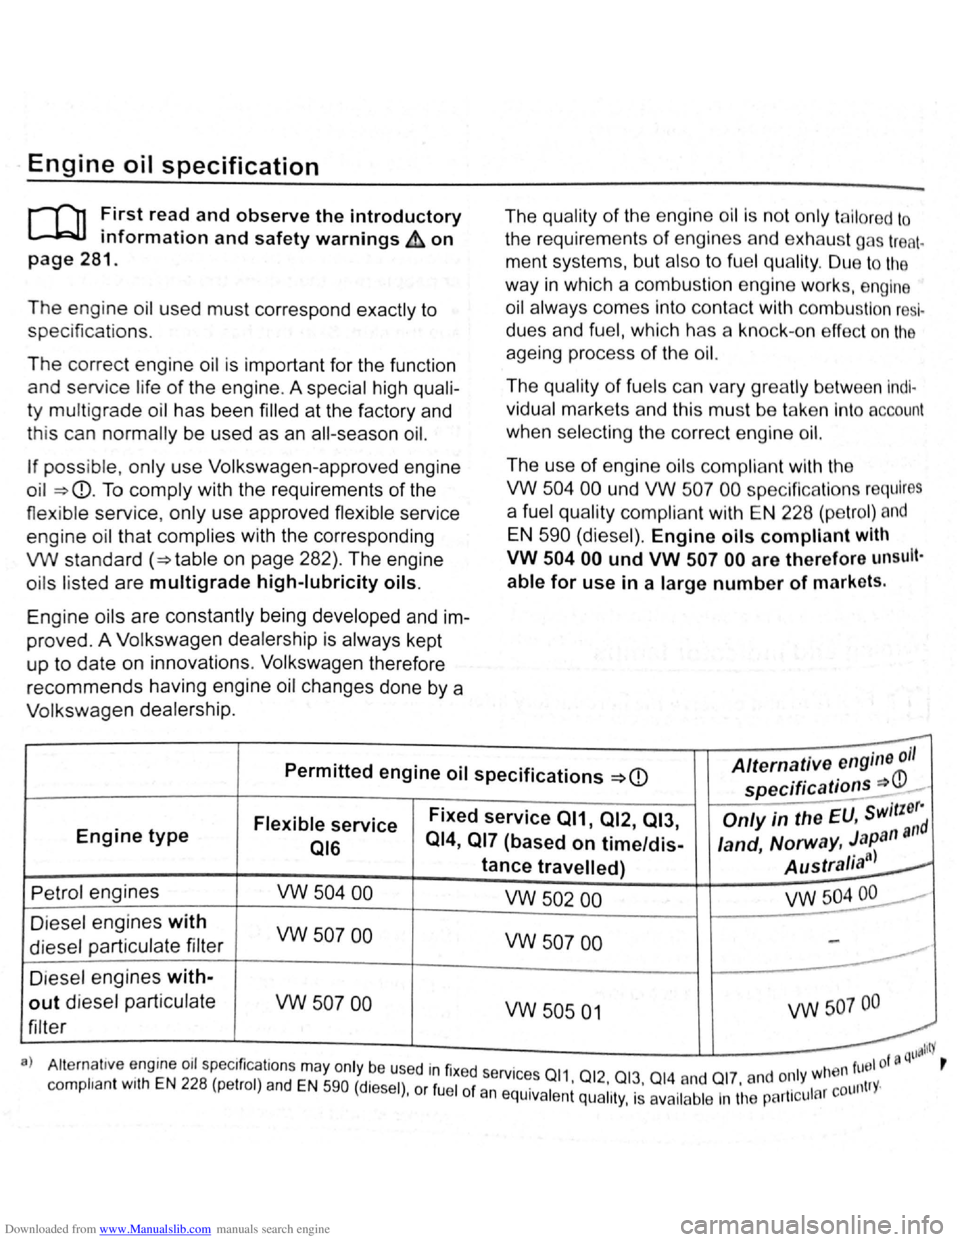
Downloaded from www.Manualslib.com manuals search engine Engine oil specification
r-T'n First read and observe the introductory
L-WJ information and safety warnings~ on
page 281.
The engine oil used must correspond exactly to
specifications .
The correct engine oil is important for the function
and service l
ife of the engine . A special high quali
ty multigrade oil has been filled at the factory and
th is can
normally be used as an all-season oil.
If possible , only use Volkswagen-approved engine
o il
~CD. To comply with the requirements of the
flexible service, only use approved flexible service
engine oil that
complies with the corresponding
VW standard (~table on page 282). The engine
o ils listed are
multigrade high-lubricity oils.
Engine oils are constantly being developed and
im
proved . A Volkswagen dealership is always kept
up to date on innovations . Volkswagen therefore
recommends having engine oil changes done by a
Volkswagen dealership. The
qu
ality of the engine oil is not only ta ilor ed to
the requirements of engines and exhaust gas treat.
ment systems, but also to fuel quality . Due to the
way
in which a combustion engine works, engine
oil always comes into contact with combustion
resl
dues and fuel, which has a kno ck-o n effect on the
ageing process of the oil.
The quality of fuels can var y gr ea tly between lndl·
vidual markets and this must be take n Into account
when selecting the correct engine oil.
The use of engine oils compliant with the
VW
504 00 und VW 507 00 specific ations requires
a fuel quality compliant with EN 228 (petrol) and
EN 590 (diesel). Engine oils compliant with
VW
504 00 und VW 507 00 are therefore unsult·
able for use in a large number of markets.
--Permitted engine oil specifications ~CD Alternative engine oil
specifications =:P-
Engine type Flexible service Fixed service 011, 012, 013, Only in the EU, switzerd
016 014,
017 (based on time/dis-land, Norway, Japan all
tance travelled) Australia")~
Petrol engines vw 504 00 vw 502 00 VW504~·
Die sel engines with vw 507 00 vw 507 00 diesel particulate filter
------D iesel engines with-
out diesel particulate vw 507 00
filter vw 505 01 vw 507 oo
t ill lit)'
a } Alternat1ve engme 011 spec1ficat1ons may only be used in fixed services 011 0 1 wtl
en fuel of !J Q r
complian t w1th EN 228 (petrol) and EN 590 (diesel) or fuel of an . 1 •
1
2
•.
01~· 014. a nd Ol 7
· and 0~ Y 1 r countrY· ' eqUiva ent qual1ty, IS ava1lable In tl1e partl cu a