manual transmission VOLKSWAGEN CC 2009 Owners Manual
[x] Cancel search | Manufacturer: VOLKSWAGEN, Model Year: 2009, Model line: CC, Model: VOLKSWAGEN CC 2009Pages: 578, PDF Size: 6.64 MB
Page 8 of 578
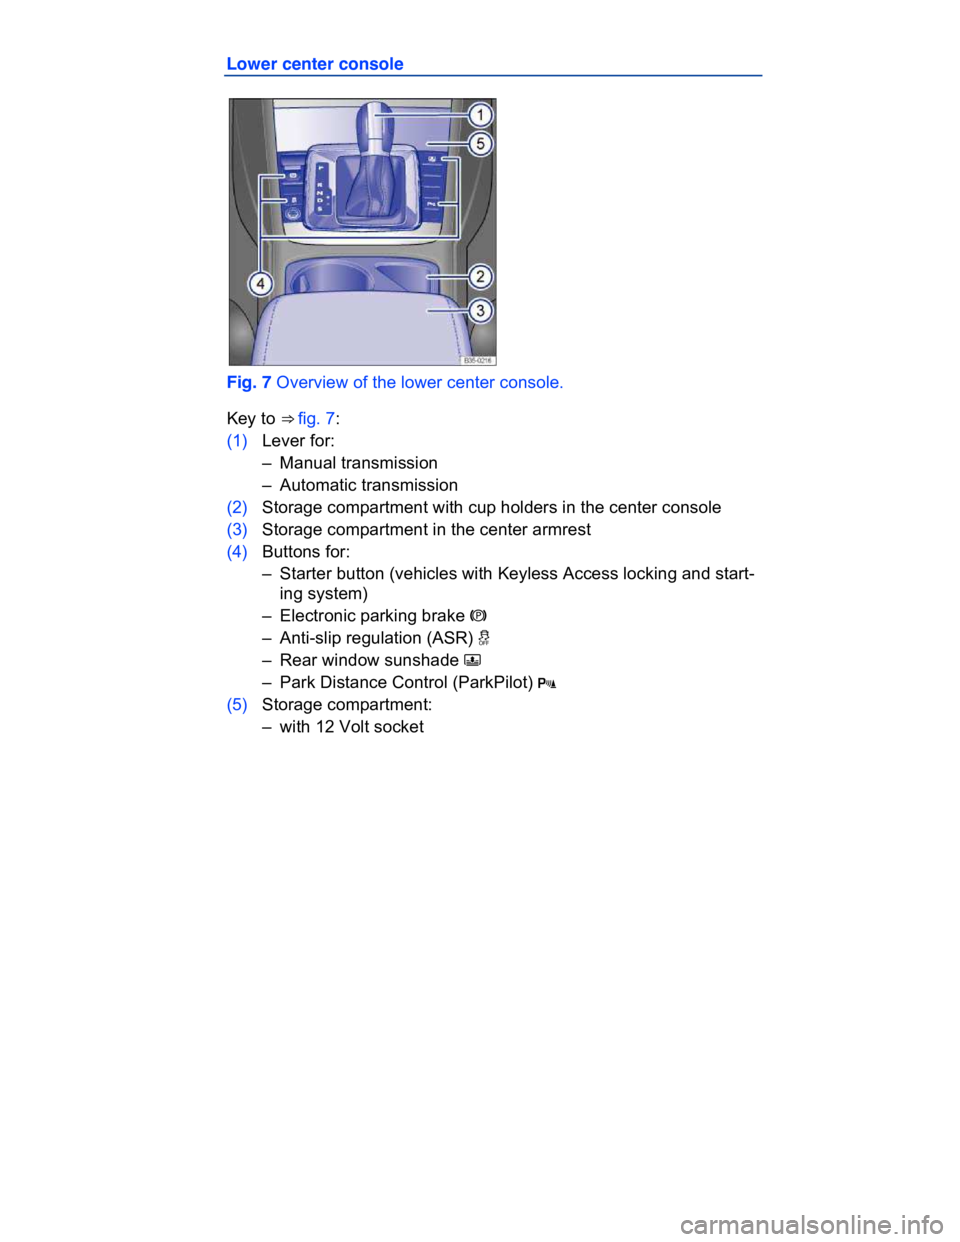
Lower center console
Fig. 7 Overview of the lower center console.
Key to ⇒ fig. 7:
(1) Lever for:
– Manual transmission
– Automatic transmission
(2) Storage compartment with cup holders in the center console
(3) Storage compartment in the center armrest
(4) Buttons for:
– Starter button (vehicles with Keyless Access locking and start-
ing system)
– Electronic parking brake �G
– Anti-slip regulation (ASR) �m
– Rear window sunshade �j
– Park Distance Control (ParkPilot) �'
(5) Storage compartment:
– with 12 Volt socket
Page 15 of 578

The trip odometer (trip) shows the distance driven since the last time
the trip odometer was reset. The last digit indicates 1/10 mile
(100 meters).
Outside temperature display
At outside temperatures below about +39 °F (+4 °C), a “snowflake
symbol” (icy road warning) appears in the display. The symbol flashes
at first, then stays on until the outside temperature rises above +43 °F
(+6 °C) ⇒ .
When the vehicle is not moving or when you are driving at very low
speeds, the temperature displayed may be slightly higher than the
actual outside temperature.
The measurement range is from -40 °F (-40 °C) to +122 °F (+50 °C).
Compass display (if applicable)
On vehicles equipped with compass display, the current compass
direction is indicated in the instrument cluster display when the igni-
tion and navigation system are switched on ⇒ Compass.
Selector lever positions
The selector lever position is shown both on the side of the selector
lever and in the instrument cluster display. The respective gear may
also be shown in the instrument cluster display in Drive D and Sport
Drive S, as well as in Tiptronic® mode.
Gear recommendation (manual transmission)
When the vehicle is moving, a fuel economy gear recommendation
may appear in the instrument cluster display ⇒ Shifting.
Page 123 of 578

Memory buttons
Personal settings for the front seats and outside mirrors can be as-
signed to each memory button.
These settings can be assigned to individual remote control vehicle
keys. The settings are applied after unlocking the vehicle and opening
the driver door.
Storing driver seat settings and forward driving settings for
outside mirrors
� Switch on the ignition.
� Manual transmission: Shift the transmission to Neutral (N) and set
the electronic parking brake.
� Automatic transmission: Shift the transmission to Park (P).
� Adjust the driver seat and outside mirrors.
� Press the �3�%�4 button for at least 1 second ⇒ fig. 57.
� Press the desired memory button 1 , 2 , or 3 within 10 seconds. A
chime sounds to confirm that the setting has been stored.
Storing front passenger seat settings to the front passenger seat
memory buttons
� Switch on the ignition.
� Adjust the passenger seat.
� Press the �3�%�4 button for at least 1 second ⇒ fig. 57.
� Press the desired memory button 1 , 2 , or 3 within 10 seconds. A
chime sounds to confirm that the setting has been stored.
Storing passenger-side outside mirror settings for backing up
� Set the electronic parking brake.
� Switch on the ignition.
� Shift the transmission to Neutral (N).
� Briefly press the desired memory button 1 , 2 , or 3 on the outside
of the driver seat.
� Shift the transmission into Reverse (R).
� Adjust the passenger outside mirror to provide good visibility of the
curb, for example.
� The adjusted mirror position is automatically stored and assigned
to the vehicle key used to unlock the vehicle. The preselected posi-
Page 219 of 578

Starting off with a trailer on hills
Depending on how steep the hill is and the combined towing weight, a
parked vehicle with trailer can roll backwards when you first start
moving.
When starting off with a trailer on a hill:
� Depress and hold the brake pedal (and depress and hold the clutch
- manual transmission).
� Press the �G button once to deactivate the electronic parking brake
⇒ Braking and parking.
� Press the �G button again and hold it to use the electronic parking
brake to help prevent the vehicle and trailer from rolling backwards. If
applicable, follow the instructions for the Hill Hold feature ⇒ Starting
assistance systems.
� Shift into first gear or Drive D ⇒ Shifting.
� Release the brake pedal.
� Drive ahead slowly at first. If your vehicle has manual transmission,
slowly let out the clutch.
� Do not release the �G button until the engine starts to move the
vehicle forward. If your vehicle has an automatic transmission, you
can also depress and hold the brake pedal for added braking and
then let up on the brake pedal when you feel that the vehicle “wants”
to move forward.
� Drive ahead slowly.
Page 311 of 578
WARNING
Rapid acceleration can cause skidding and loss of traction, es-
pecially on slippery roads, resulting in a loss of vehicle control,
collisions, and serious personal injury.
� Only use the kick-down feature or fast acceleration if visibil-
ity, weather, road, and traffic conditions permit and other driv-
ers will not be endangered by your driving and the vehicle's ac-
celeration.
WARNING
Constant braking causes the brakes to overheat and even to fail
leading to collisions and serious personal injury.
� Never “ride” the brakes or apply the brake pedal too often or
too long.
� Riding the brakes will substantially reduce braking perfor-
mance, increase stopping distance, and can cause complete
brake system failure.
NOTICE
� Never “ride” the brakes by keeping your foot on the brake pe-
dal when you do not want to brake. This will make the brakes
wear faster.
� Before driving downhill, especially on hills that are long or
steep, always reduce speed and shift into lower gear (manual or
automatic transmission). This will let the vehicle use engine
braking and reduce the load on the brakes. Otherwise, the brake
system could overheat and even fail. Only use the brakes when
you need them to slow the vehicle down more or to stop.
Warning and indicator lights
�
Page 313 of 578
WARNING
Failure to heed warning lights and instrument cluster text mes-
sages can cause the vehicle to break down in traffic and result
in a collision and serious personal injury.
� Never ignore warning lights or text WARNINGS.
� Always stop the vehicle as soon as it is safe to do so.
� Whenever stalled or stopped for repair, move the vehicle a
safe distance off the road, turn on the emergency flashers, stop
the engine, and use other warning devices to warn approaching
traffic.
NOTICE
Failure to heed warning lights or text WARNINGS can result in
vehicle damage.
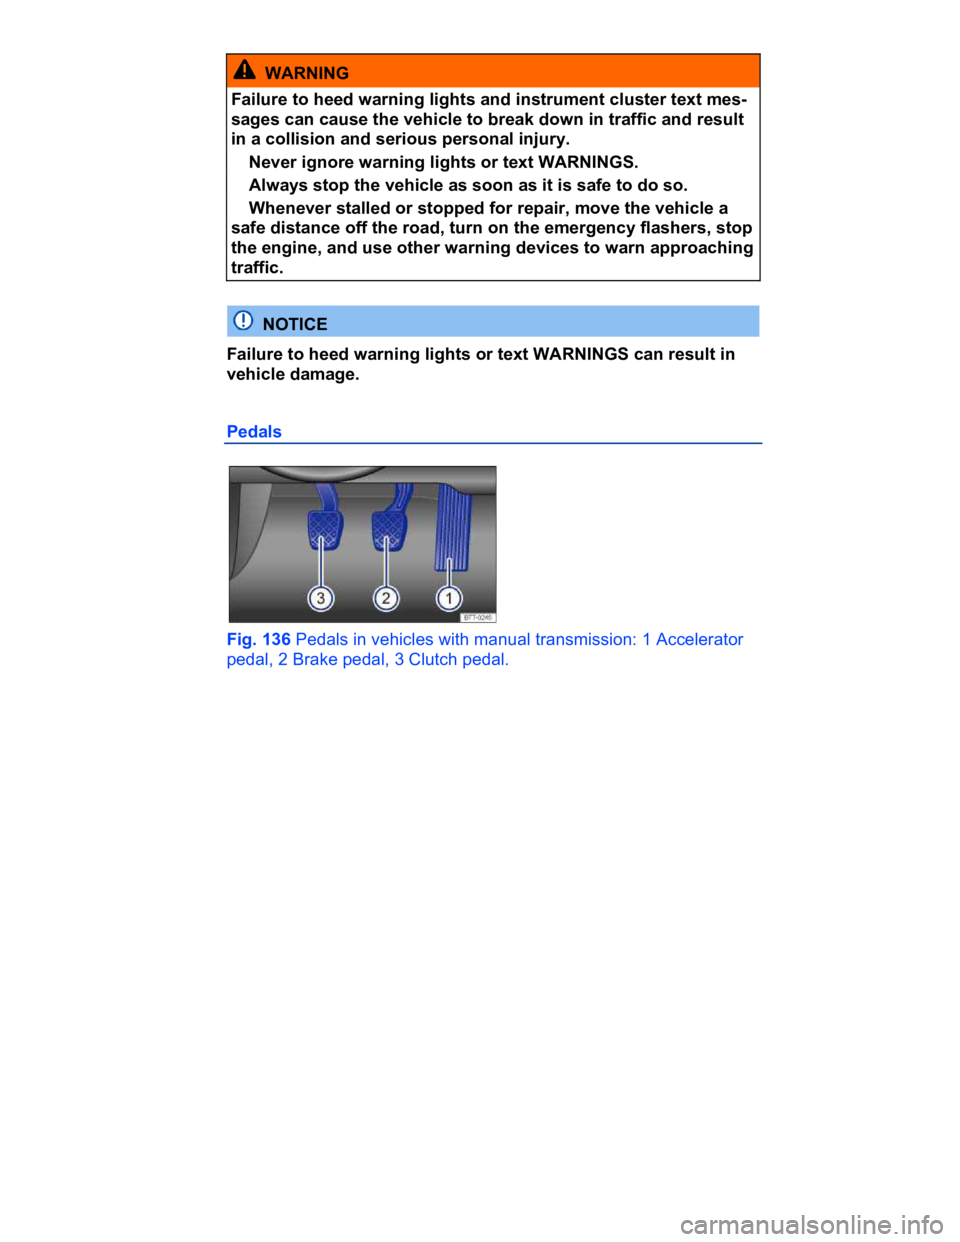
Pedals
Fig. 136 Pedals in vehicles with manual transmission: 1 Accelerator
pedal, 2 Brake pedal, 3 Clutch pedal.
Page 315 of 578
The brake pedal must be pressed farther and harder than nor-
mal.
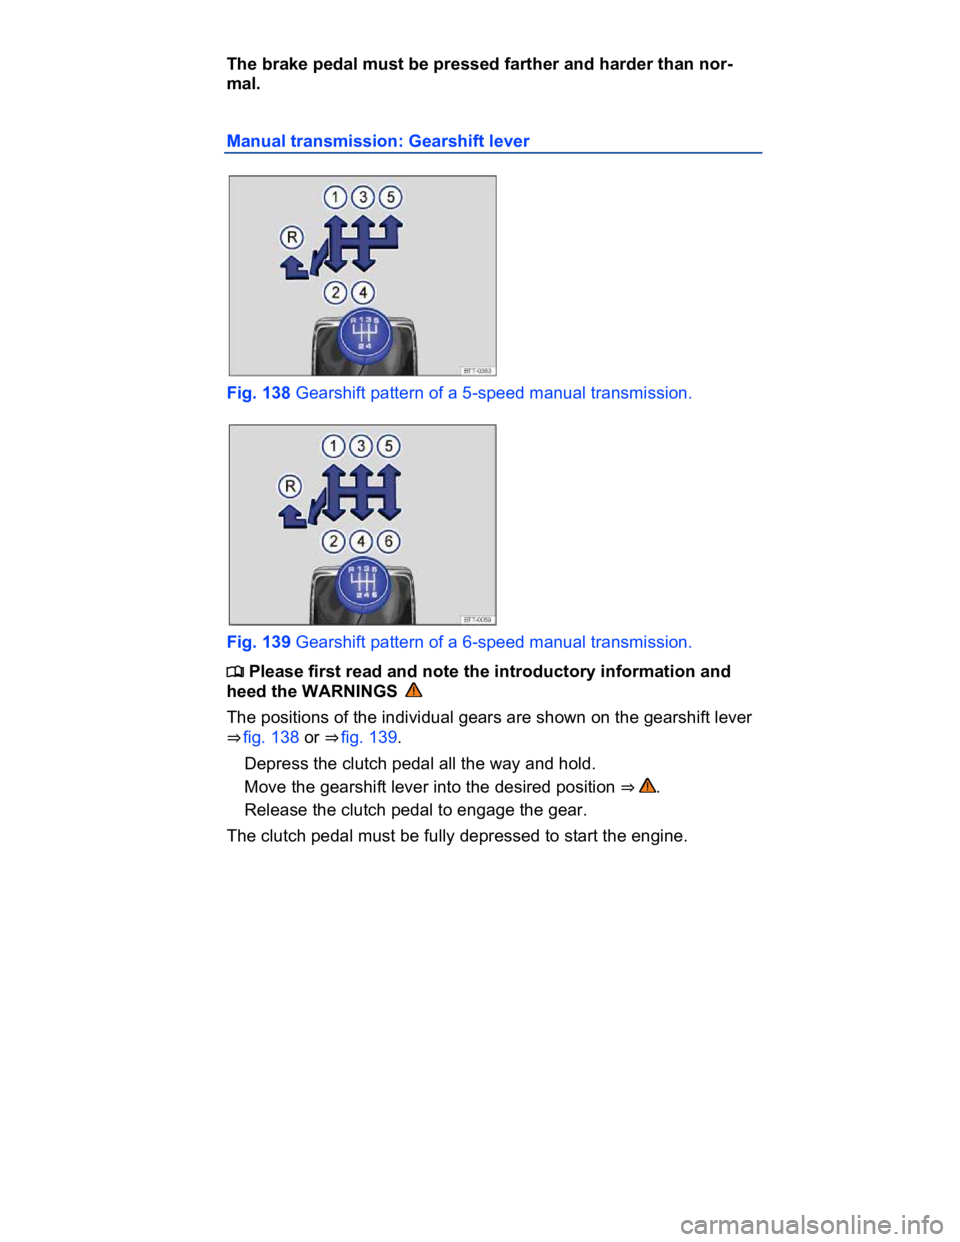
Manual transmission: Gearshift lever
Fig. 138 Gearshift pattern of a 5-speed manual transmission.
Fig. 139 Gearshift pattern of a 6-speed manual transmission.
�
Page 340 of 578
clutch pedal all the way down before you start driving so the system
recognizes that the parking brake should be released.
Emergency braking function
Only use the emergency braking function in an emergency, when you
cannot stop the vehicle using the brake pedal ⇒ !
� Pull and hold the button ⇒ fig. 144 to brake the vehicle hard. An
audio warning signal will sound at the same time.
� To stop the braking maneuver, release the button or press the ac-
celerator pedal.
WARNING
Improper use of the electronic parking brake can cause acci-
dents and severe injuries.
� Never use the parking brake to slow down the vehicle when it
is moving, except in an emergency. Braking distance is much
longer, since only the rear wheels are braked. Always use the
foot brake.
� Never press the accelerator pedal when a selector lever posi-
tion or gear is engaged and the engine is running. The vehicle
could begin moving, even if the electronic parking brake is set.
� Never activate the throttle manually from the engine com-
partment when the engine is running and the automatic trans-
mission is in gear. The vehicle will start to move even if the
parking brake is engaged.
NOTICE
Even though the transmission is in Park (P), the vehicle may
move a couple of inches (a few centimeters) forwards or back-
wards if you take your foot off the brake pedal after stopping the
vehicle without first firmly setting the parking brake.
Vehicles with manual transmission: the electronic parking brake
releases automatically when you release the clutch pedal and press
the accelerator pedal at the same time.
Page 344 of 578

Brake booster
The brake booster works only when the engine is running. It increas-
es the force on the brakes above and beyond the pressure put on the
brake pedal by the driver.
If the brake booster is not working, or if the vehicle has to be towed,
you will have to push the brake pedal harder to make up for the lack
of booster assistance and the resulting longer stopping distance ⇒ .
WARNING
New brake pads do not provide maximum braking performance.
� New brake pads do not have the best stopping power for the
first 200 miles (320 km) and must be “broken in.” You can com-
pensate for the slightly reduced braking force by putting more
pressure on the brake pedal.
� Drive with extra care while the new brake pads are being bro-
ken in. This reduces the risk of collisions and serious personal
injuries due to a loss of control over the vehicle.
� Never follow other vehicles too closely or put yourself into
other situations that might require sudden, hard braking, espe-
cially when the brake pads have not been broken in.
WARNING
Overheated brakes will reduce the vehicle's stopping power
and increase stopping distances considerably.
� When driving downhill, the brakes have to work especially
hard and heat up quickly.
� Before driving downhill, especially on hills that are long or
steep, always reduce speed and shift into lower gear (manual or
automatic transmission). This will let the vehicle use engine
braking and reduce the load on the brakes. Otherwise, the
brake system could overheat and possibly fail. Only use the
brakes when you need them to slow the vehicle down more or
to stop.
� A damaged front spoiler or a non-standard spoiler can re-
duce airflow to the brakes and make them overheat.
Page 345 of 578

WARNING
Wet brakes or brakes coated with ice or road salt react slower
and need longer stopping distances.
� Carefully apply the brakes to test them.
� Always dry brakes and clean off ice and salt coatings with a
few cautious brake applications when visibility, weather, road
and traffic conditions permit.
WARNING
Driving when the brake booster is not working increases stop-
ping distances and can cause accidents and serious personal
injuries.
� Never let the vehicle coast when the engine is switched off.
� If the brake booster is not working (such as when the vehicle
is being towed), a lot more pedal force is needed to slow down
and stop.
NOTICE
� Never “ride” the brakes by keeping your foot on the brake pe-
dal when you do not want to brake. Constant pressure on the
brake pedal can make the brakes overheat. Riding the brakes
will substantially reduce braking performance, increase stopping
distance, and can cause complete brake system failure.
� Before driving downhill, especially on hills that are long or
steep, always reduce speed and shift into lower gear (manual or
automatic transmission). This will let the vehicle use engine
braking and reduce the load on the brakes. Otherwise, the brake
system could overheat and possibly fail. Only use the brakes
when you need them to slow the vehicle down more or to stop.
When the front brakes are serviced, you should have the rear
brake pads inspected at the same time. The wear of all brake pads
should be visually checked regularly. The best way to check for brake
pad wear is to have your authorized Volkswagen dealer or authorized
Volkswagen Service Facility visually inspect the pads through the