key VOLKSWAGEN CORRADO 1990 User Guide
[x] Cancel search | Manufacturer: VOLKSWAGEN, Model Year: 1990, Model line: CORRADO, Model: VOLKSWAGEN CORRADO 1990Pages: 906, PDF Size: 6.56 MB
Page 340 of 906
A/C COMPRESSOR SERVICING
Article Text (p. 14)
1990 Volkswagen Corrado
For Volkswagen Technical Site: http://vw.belcom.ru
Copyright © 1998 Mitchell Repair Information Company, LLC
Thursday, March 23, 2000 09:41PM
ring and carbon seal contact surface of shaft seal seat for damage.
Make sure that "O" ring contact surface on front cover is not damaged.
Make sure refrigerant oil is applied to oil seal in shaft seal seat.
Installation
1) To install, reverse removal procedure. Ensure shaft seal
contact surface is free of dirt. Lubricate with refrigerant oil. Cap
end of compressor shaft.
2) Using Guard (KV994C1143), insert shaft seal. Be sure shaft
seal case is aligned with shaft. Apply force to turn seal to left and
right. Ensure shaft seal seats properly in shaft cut-out.
3) Fit "O" ring to outside groove of shaft seal seat. Ensure
"O" ring seats properly. Apply refrigerant oil on contact surfaces and
around shaft seal seat. Lightly coat surface of shaft with refrigerant
oil.
4) Install key on compressor shaft. Using snap ring pliers,
compress retainer ring and fit retainer ring into front cover. Seat
retainer ring firmly in groove. Thoroughly wipe grease or oil from
shaft surface.
5) Connect Installer (KV99412329) to shaft of compressor, and
turn shaft 5 or 6 times in a clockwise direction to seat seal. See
REFRIGERANT OIL & R-12 SPECIFICATIONS chart in this section for system
capacities.
MATSUSHITA ROTARY VANE CLUTCH R & I
Removal & Installation
1) Insert two 5 mm bolts into threaded holes in armature.
Using a screwdriver as lever in between bolts, remove center bolt.
remove armature and shim from shaft.
2) Remove snap ring. Using a puller, remove pulley.
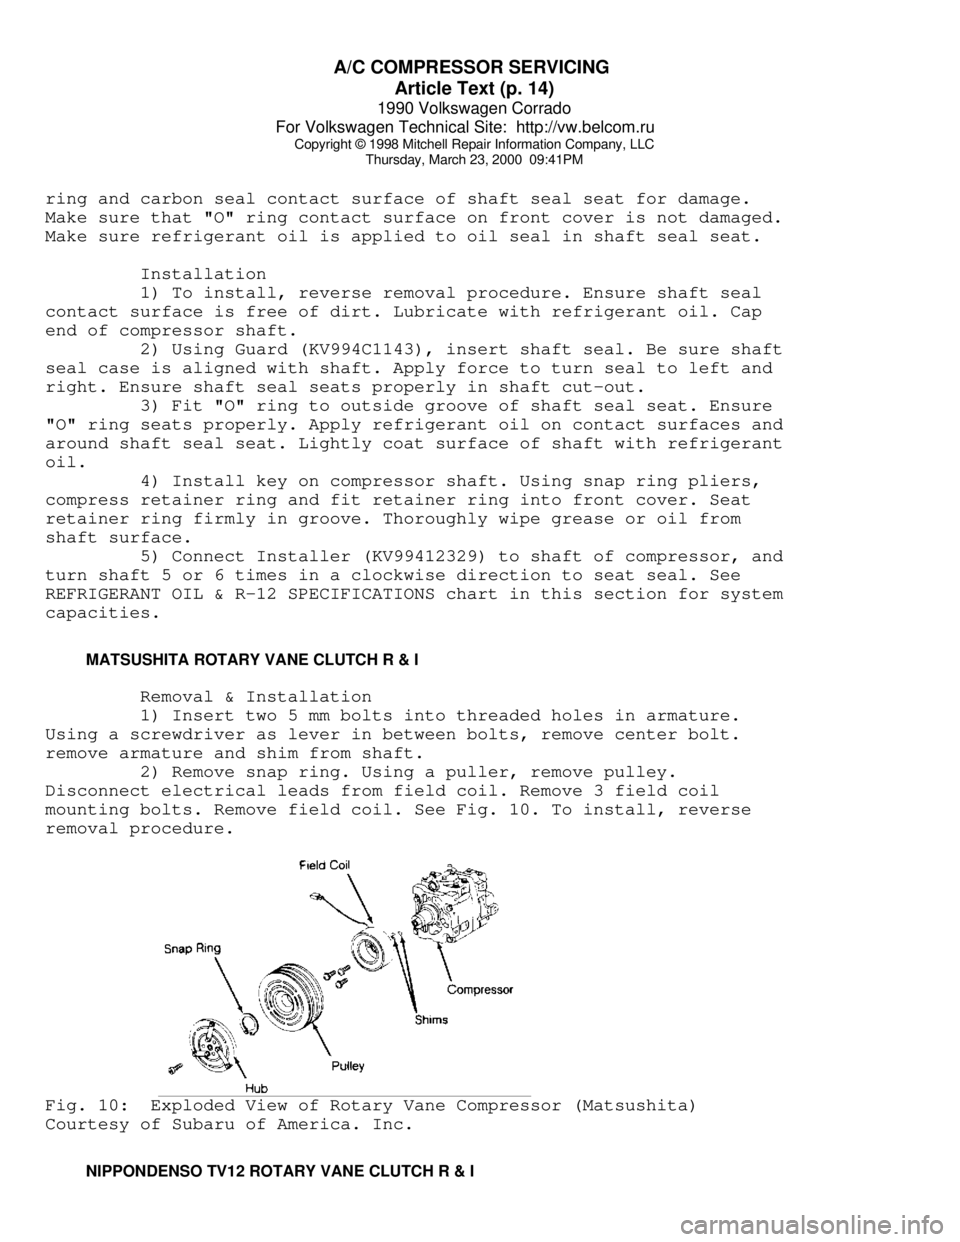
Disconnect electrical leads from field coil. Remove 3 field coil
mounting bolts. Remove field coil. See Fig. 10. To install, reverse
removal procedure.Fig. 10: Exploded View of Rotary Vane Compressor (Matsushita)
Courtesy of Subaru of America. Inc.
NIPPONDENSO TV12 ROTARY VANE CLUTCH R & I
Page 342 of 906
A/C COMPRESSOR SERVICING
Article Text (p. 16)
1990 Volkswagen Corrado
For Volkswagen Technical Site: http://vw.belcom.ru
Copyright © 1998 Mitchell Repair Information Company, LLC
Thursday, March 23, 2000 09:41PM
To install, reverse removal procedure. Ensure snap rings are
installed with beveled side up. tighten shaft bolt to 10 ft. lbs.
(14 N.m). Ensure clutch clearance is .014-.026" (.36-66 mm). adjust
clearance by adding or subtracting shims as necessary.
NIPPONDENSO 6 & 10-CYL SHAFT SEAL R & I
NOTE: Check compressor refrigerant oil level when replacing seals.
See COMPRESSOR OIL CHECKING article in the AIR CONDITIONING &
HEAT section.
Removal
1) Hold clutch hub stationary and remove center nut. Screw
remover into center of hub. Turn center bolt to remove pressure plate.
2) Remove shims from shaft. Remove snap ring from inside of
pulley. Tap pulley off of shaft with plastic mallet. Be careful not to
distort pulley while removing.
3) Disconnect clutch coil wires from compressor housing.
remove snap ring inside coil and lift coil off compressor. Pry dust
seal out from around compressor shaft (if equipped).
4) Place shaft key remover on shaft and turn to remove key.
Remove drain plug (if equipped). Remove service valves-to-compressor
body bolts. Remove valves. Discard "O" rings. Drain oil out of
compressor.
5) Remove 6 through bolts from front head of compressor and
discard washers. Tap head loose from compressor; be careful not to
scratch sealing surfaces. remove snap ring (if equipped) from front
housing. Press seal plate out. Remove seal from shaft. See Fig. 12.
Installation
1) Lubricate shaft seal with clean refrigerant oil and place
on compressor shaft. Lubricate seal plate and "O" ring (if equipped)
and install in front housing. Install snap ring (if equipped).
2) Place front housing on compressor body. Install through
bolts with new washers. Tighten bolts evenly and alternately to
18 ft. lbs. (24 N.m). Install shaft key using installer and plastic
mallet. Insert dust seal into front of compressor.
3) Install drain plug with new gasket. Add correct amount of
refrigerant oil to compressor. If service valves were removed, coat
new "O" rings with refrigerant oil and install service valves.
4) Place clutch coil on compressor and install snap ring.
Install shims on shaft to adjust pressure plate-to-rotor clearance to
.016-.028" (.41-.71 mm). Tighten shaft nut to 12 ft. lbs. (16 N.m).
Page 347 of 906
A/C COMPRESSOR SERVICING
Article Text (p. 21)
1990 Volkswagen Corrado
For Volkswagen Technical Site: http://vw.belcom.ru
Copyright © 1998 Mitchell Repair Information Company, LLC
Thursday, March 23, 2000 09:41PM
clutch coil on compressor.
2) Support compressor on rear mounting ears. Align rotor on
front housing hub. Use adapter and press to install rotor (or drive
into place with soft mallet). After rotor is seated, install front
snap ring.
SANDEN 5-CYL SHAFT SEAL R & I
NOTE: Check compressor refrigerant oil level when replacing seals.
Removal
1) Hold clutch hub stationary and remove shaft nut with thin
wall socket. Use clutch plate puller to remove clutch plate. Tap key
out of slot in crankshaft.
2) Remove seal retainer with seal remover and 3/4" socket
wrench. Use seal seat remover tongs to pull seal seat off compressor
shaft. Insert seal remover into front housing and turn to engage tangs
on seal. Lift seal out. Remove seal "O" ring from front housing, being
careful not to scratch shaft.
Installation
1) Coat "O" ring with refrigerant oil and install into
groove. Load a new seal onto installer, being careful not to touch
carbon sealing surface with fingers. Install shaft protector. Dip seal
in refrigerant oil and install on shaft. Rotate seal clockwise until
seal fits into flats on shaft. Remove seal installer by turning
counterclockwise.
2) Coat seal seat with refrigerant oil and install with
tongs. Reinstall seal seat retainer (with flat side down). Install
shims and shaft key. Rotate shaft several times to help break in seal.
3) Use a press to install clutch plate. Make sure that air
gap is .016-.031" (.41-.79 mm). Hold plate stationary and install
shaft nut.
Page 384 of 906

ABBREVIATIONS
Article Text (p. 7)
1990 Volkswagen Corrado
For Volkswagen Technical Site: http://vw.belcom.ru
Copyright © 1998 Mitchell Repair Information Company, LLC
Thursday, March 23, 2000 09:42PMÀÄÄÄÄÄÄÄÄÄÄÄÄÄÄÄÄÄÁÄÄÄÄÄÄÄÄÄÄÄÄÄÄÄÄÄÄÄÄÄÄÄÄÄÄÄÄÄÄÄÄÄÄÄÄÄÄÄÄÄÄÄÄÄÄÄÄÄÄÙ "J" ABBREVIATION TABLE
"J" ABBREVIATION TABLE
ÚÄÄÄÄÄÄÄÄÄÄÄÄÄÄÄÄÄÂÄÄÄÄÄÄÄÄÄÄÄÄÄÄÄÄÄÄÄÄÄÄÄÄÄÄÄÄÄÄÄÄÄÄÄÄÄÄÄÄÄÄÄÄÄÄÄÄÄÄ¿
³ABBREVIATION
³DEFINITION ³
ÃÄÄÄÄÄÄÄÄÄÄÄÄÄÄÄÄÄÅÄÄÄÄÄÄÄÄÄÄÄÄÄÄÄÄÄÄÄÄÄÄÄÄÄÄÄÄÄÄÄÄÄÄÄÄÄÄÄÄÄÄÄÄÄÄÄÄÄÄ´
³J/B
³Junction Block ³
ÀÄÄÄÄÄÄÄÄÄÄÄÄÄÄÄÄÄÁÄÄÄÄÄÄÄÄÄÄÄÄÄÄÄÄÄÄÄÄÄÄÄÄÄÄÄÄÄÄÄÄÄÄÄÄÄÄÄÄÄÄÄÄÄÄÄÄÄÄÙ "K" ABBREVIATION TABLE
"K" ABBREVIATION TABLE
ÚÄÄÄÄÄÄÄÄÄÄÄÄÄÄÄÄÄÂÄÄÄÄÄÄÄÄÄÄÄÄÄÄÄÄÄÄÄÄÄÄÄÄÄÄÄÄÄÄÄÄÄÄÄÄÄÄÄÄÄÄÄÄÄÄÄÄÄÄ¿
³ABBREVIATION
³DEFINITION ³
ÃÄÄÄÄÄÄÄÄÄÄÄÄÄÄÄÄÄÅÄÄÄÄÄÄÄÄÄÄÄÄÄÄÄÄÄÄÄÄÄÄÄÄÄÄÄÄÄÄÄÄÄÄÄÄÄÄÄÄÄÄÄÄÄÄÄÄÄÄ´
³k/ohms
³1000 ohms (kilo as in k/ohms) ³
³kg
³Kilograms (weight) ³
³kg/cm
ý ³Kilograms Per Square Centimeter ³
³KAM
³Keep Alive Memory ³
³KAPWR
³Keep Alive Power ³
³KM/H
³Kilometers Per Hour ³
³KOEO
³Key On Engine Off ³
³KOER
³Key On Engine Running ³
³KS
³Knock Sensor ³
ÀÄÄÄÄÄÄÄÄÄÄÄÄÄÄÄÄÄÁÄÄÄÄÄÄÄÄÄÄÄÄÄÄÄÄÄÄÄÄÄÄÄÄÄÄÄÄÄÄÄÄÄÄÄÄÄÄÄÄÄÄÄÄÄÄÄÄÄÄÙ "L" ABBREVIATION TABLE
"L" ABBREVIATION TABLE
ÚÄÄÄÄÄÄÄÄÄÄÄÄÄÄÄÄÄÂÄÄÄÄÄÄÄÄÄÄÄÄÄÄÄÄÄÄÄÄÄÄÄÄÄÄÄÄÄÄÄÄÄÄÄÄÄÄÄÄÄÄÄÄÄÄÄÄÄÄ¿
³ABBREVIATION
³DEFINITION ³
ÃÄÄÄÄÄÄÄÄÄÄÄÄÄÄÄÄÄÅÄÄÄÄÄÄÄÄÄÄÄÄÄÄÄÄÄÄÄÄÄÄÄÄÄÄÄÄÄÄÄÄÄÄÄÄÄÄÄÄÄÄÄÄÄÄÄÄÄÄ´
³L
³Liter(s) ³
³L/D
³Light Duty ³
³LCD
³Liquid Crystal Display ³
³LED
³Light Emitting Diode ³
³LH
³Left Hand ³
³LOS
³Limited Operation Strategy ³
³LT BLU
³Light Blue ³
³LT GRN
³Light Green ³
³LUS
³Lock-Up Solenoid ³
³Lbs.
³Pounds ³
³Lt(s).
³Light(s) ³
³Lugg.
³Luggage ³
ÀÄÄÄÄÄÄÄÄÄÄÄÄÄÄÄÄÄÁÄÄÄÄÄÄÄÄÄÄÄÄÄÄÄÄÄÄÄÄÄÄÄÄÄÄÄÄÄÄÄÄÄÄÄÄÄÄÄÄÄÄÄÄÄÄÄÄÄÄÙ "M" ABBREVIATION TABLE
"M" ABBREVIATION TABLE
Page 396 of 906

ABBREVIATIONS
Article Text (p. 7)
1990 Volkswagen Corrado
For Volkswagen Technical Site: http://vw.belcom.ru
Copyright © 1998 Mitchell Repair Information Company, LLC
Thursday, March 23, 2000 09:42PM³Inj. ³Injector ³
ÀÄÄÄÄÄÄÄÄÄÄÄÄÄÄÄÄÄÁÄÄÄÄÄÄÄÄÄÄÄÄÄÄÄÄÄÄÄÄÄÄÄÄÄÄÄÄÄÄÄÄÄÄÄÄÄÄÄÄÄÄÄÄÄÄÄÄÄÄÙ "J" ABBREVIATION TABLE
"J" ABBREVIATION TABLE
ÚÄÄÄÄÄÄÄÄÄÄÄÄÄÄÄÄÄÂÄÄÄÄÄÄÄÄÄÄÄÄÄÄÄÄÄÄÄÄÄÄÄÄÄÄÄÄÄÄÄÄÄÄÄÄÄÄÄÄÄÄÄÄÄÄÄÄÄÄ¿
³ABBREVIATION
³DEFINITION ³
ÃÄÄÄÄÄÄÄÄÄÄÄÄÄÄÄÄÄÅÄÄÄÄÄÄÄÄÄÄÄÄÄÄÄÄÄÄÄÄÄÄÄÄÄÄÄÄÄÄÄÄÄÄÄÄÄÄÄÄÄÄÄÄÄÄÄÄÄÄ´
³J/B
³Junction Block ³
ÀÄÄÄÄÄÄÄÄÄÄÄÄÄÄÄÄÄÁÄÄÄÄÄÄÄÄÄÄÄÄÄÄÄÄÄÄÄÄÄÄÄÄÄÄÄÄÄÄÄÄÄÄÄÄÄÄÄÄÄÄÄÄÄÄÄÄÄÄÙ "K" ABBREVIATION TABLE
"K" ABBREVIATION TABLE
ÚÄÄÄÄÄÄÄÄÄÄÄÄÄÄÄÄÄÂÄÄÄÄÄÄÄÄÄÄÄÄÄÄÄÄÄÄÄÄÄÄÄÄÄÄÄÄÄÄÄÄÄÄÄÄÄÄÄÄÄÄÄÄÄÄÄÄÄÄ¿
³ABBREVIATION
³DEFINITION ³
ÃÄÄÄÄÄÄÄÄÄÄÄÄÄÄÄÄÄÅÄÄÄÄÄÄÄÄÄÄÄÄÄÄÄÄÄÄÄÄÄÄÄÄÄÄÄÄÄÄÄÄÄÄÄÄÄÄÄÄÄÄÄÄÄÄÄÄÄÄ´
³k/ohms
³1000 ohms (kilo as in k/ohms) ³
³kg
³Kilograms (weight) ³
³kg/cm
ý ³Kilograms Per Square Centimeter ³
³KAM
³Keep Alive Memory ³
³KAPWR
³Keep Alive Power ³
³KM/H
³Kilometers Per Hour ³
³KOEO
³Key On Engine Off ³
³KOER
³Key On Engine Running ³
³KS
³Knock Sensor ³
ÀÄÄÄÄÄÄÄÄÄÄÄÄÄÄÄÄÄÁÄÄÄÄÄÄÄÄÄÄÄÄÄÄÄÄÄÄÄÄÄÄÄÄÄÄÄÄÄÄÄÄÄÄÄÄÄÄÄÄÄÄÄÄÄÄÄÄÄÄÙ "L" ABBREVIATION TABLE
"L" ABBREVIATION TABLE
ÚÄÄÄÄÄÄÄÄÄÄÄÄÄÄÄÄÄÂÄÄÄÄÄÄÄÄÄÄÄÄÄÄÄÄÄÄÄÄÄÄÄÄÄÄÄÄÄÄÄÄÄÄÄÄÄÄÄÄÄÄÄÄÄÄÄÄÄÄ¿
³ABBREVIATION
³DEFINITION ³
ÃÄÄÄÄÄÄÄÄÄÄÄÄÄÄÄÄÄÅÄÄÄÄÄÄÄÄÄÄÄÄÄÄÄÄÄÄÄÄÄÄÄÄÄÄÄÄÄÄÄÄÄÄÄÄÄÄÄÄÄÄÄÄÄÄÄÄÄÄ´
³L
³Liter(s) ³
³L/D
³Light Duty ³
³LCD
³Liquid Crystal Display ³
³LED
³Light Emitting Diode ³
³LH
³Left Hand ³
³LOS
³Limited Operation Strategy ³
³LT BLU
³Light Blue ³
³LT GRN
³Light Green ³
³LUS
³Lock-Up Solenoid ³
³Lbs.
³Pounds ³
³Lt(s).
³Light(s) ³
³Lugg.
³Luggage ³
ÀÄÄÄÄÄÄÄÄÄÄÄÄÄÄÄÄÄÁÄÄÄÄÄÄÄÄÄÄÄÄÄÄÄÄÄÄÄÄÄÄÄÄÄÄÄÄÄÄÄÄÄÄÄÄÄÄÄÄÄÄÄÄÄÄÄÄÄÄÙ "M" ABBREVIATION TABLE
Page 436 of 906

COMPUTER RELEARN PROCEDURES
Article Text
1990 Volkswagen Corrado
For Volkswagen Technical Site: http://vw.belcom.ru
Copyright © 1998 Mitchell Repair Information Company, LLC
Thursday, March 23, 2000 09:43PM
ARTICLE BEGINNING
GENERAL INFORMATION
Computer Relearn Procedures
All Models
* PLEASE READ THIS FIRST *
The following general procedures are to be used if
driveability problems are encountered after power loss or battery has
been disconnected. These procedures may provide an aid in eliminating
these problems.
To reduce the possibility of complaints, after any service
which requires battery power to be disconnected, vehicle should be
road tested.
COMPUTER RELEARN PROCEDURES
Vehicles equipped with engine or transmission computers may
require a relearn procedure after vehicle battery is disconnected.
Many vehicle computers memorize and store vehicle operation patterns
for optimum driveability and performance. When vehicle battery is
disconnected, this memory is lost. The computer will use default data
until new data from each key start is stored. As computer memorizes
vehicle operation for each new key start, driveability is restored.
Vehicle computers may memorize vehicles operation patterns for 40 of
more key starts.
Customers often complain of driveability problems during
relearn stage because vehicle acts differently then before being
serviced. Depending on type and make of vehicle and how it is
equipped, the following complaints (driveability problems) may exist:
* Harsh Or Poor Shift Quality
* Rough Or Unstable Idle
* Hesitation Or Stumble
* Rich Or Lean Running
* Poor Fuel Mileage
These symptoms and complaints should disappear after a number
of drive cycles have been memorized. To reduce the possibility of
complaints, after any service which requires battery power to be
disconnected, vehicle should be road tested. If a specific relearn
procedure is not available, the following procedure may be used:
Automatic Transmission
* Set parking brake, start engine in "P" or "N" position.
Warm-up vehicle to normal operating temperature or until
cooling fan cycles.
* Allow vehicle to idle for one minute in "N" position. Select
Page 565 of 906
FUSES & CIRCUIT BREAKERS
Article Text (p. 3)
1990 Volkswagen Corrado
For Volkswagen Technical Site: http://vw.belcom.ru
Copyright © 1998 Mitchell Repair Information Company, LLC
Thursday, March 23, 2000 09:45PM
start at any time even when the ignition key is in the OFF
position. DO NOT loosen or remove radiator cap when cooling
system is hot.
REPLACING BLOWN FUSES
Before replacing a blown fuse, remove ignition key, turn off
all lights and accessories to avoid damaging the electrical system. Be
sure to use fuse with the correct indicated amperage rating. The use
of an incorrect amperage rating fuse may result in a dangerous
electrical system overload.
BATTERY WARNING
WARNING: When battery is disconnected, vehicles equipped with
computers may lose memory data. When battery power is
restored, driveability problems may exist on some vehicles.
These vehicles may require a relearn procedure. See COMPUTER
RELEARN PROCEDURES article in GENERAL INFORMATION section.
BRAKE PAD WEAR INDICATOR
Indicator will cause a squealing or scraping noise, warning
that brake pads need replacement.
HALOGEN BULBS
Halogen bulbs contain pressurized gas which may explode if
overheated. DO NOT touch glass portion of bulb with bare hands. Eye
protection should be worn when handling or working around halogen
bulbs.
SUPPLEMENTAL RESTRAINT SYSTEM (AIR BAG)
NOTE: See the AIR BAGS article in the ACCESSORIES/SAFETY EQUIPMENT
Section.
Modifications or improper maintenance, including incorrect
removal and installation of the Supplemental Restraint System (SRS),
can adversely affect system performance. DO NOT cover, obstruct or
change the steering wheel horn pad in any way, as such action could
cause improper function of the system. Use only plain water when
cleaning the horn pad. Solvents or cleaners could adversely affect the
air bag cover and cause improper deployment of the system.
WARNING: To avoid injury from accidental air bag deployment, read and
carefully follow all warnings and service precautions. See
appropriate AIR BAGS article in ACCESSORIES/SAFETY EQUIPMENT.
CAUTION: Disconnect negative battery cable before servicing any air
bag system, steering column or passenger side dash
component. After any repair, turn ignition key to the ON
Page 684 of 906
SCHEDULED SERVICES
Article Text
1990 Volkswagen Corrado
For Volkswagen Technical Site: http://vw.belcom.ru
Copyright © 1998 Mitchell Repair Information Company, LLC
Thursday, March 23, 2000 09:49PM
ARTICLE BEGINNING
1990-94 MAINTENANCE
Volkswagen Maintenance & Service Intervals
Corrado G60 (1990-92)
SLC (1992-94 USA)
VR6 (1992-94 Canada)
* PLEASE READ THIS FIRST *
NOTE: All SERVICE SCHEDULES are listed for normal service
vehicles. If vehicle is operated under severe service
conditions, see SEVERE SERVICE REQUIREMENTS (PERFORM
W/SERVICE SCHEDULES) for items requiring additional
maintenance.
NOTE: This article contains scheduled maintenance service
information. Fluid types and capacities listed with each
service in this article are only those necessary to perform
that scheduled service. For specifications pertaining to
fluid capacities for the entire vehicle, fuse and circuit
breaker identification, wheel and tire size, battery type,
warranty information, or model identification refer to the
MAINTENANCE INFORMATION article in this section.
CAUTIONS & WARNINGS
SUPPLEMENTAL RESTRAINT SYSTEM (AIR BAG) - 1995 MODELS
NOTE: See the AIR BAGS article in the ACCESSORIES/SAFETY EQUIPMENT
Section.
Modifications or improper maintenance, including incorrect
removal and installation of the Supplemental Restraint System (SRS),
can adversely affect system performance. DO NOT cover, obstruct or
change the steering wheel horn pad in any way, as such action could
cause improper function of the system. Use only plain water when
cleaning the horn pad. Solvents or cleaners could adversely affect the
air bag cover and cause improper deployment of the system.
WARNING: To avoid injury from accidental air bag deployment, read and
carefully follow all warnings and service precautions. See
appropriate AIR BAGS article in ACCESSORIES/SAFETY EQUIPMENT.
CAUTION: Disconnect negative battery cable before servicing any air
bag system, steering column or passenger side dash
component. After any repair, turn ignition key to the ON
position from passenger's side of vehicle in case of
accidental air bag inflation
Page 686 of 906
SCHEDULED SERVICES
Article Text (p. 3)
1990 Volkswagen Corrado
For Volkswagen Technical Site: http://vw.belcom.ru
Copyright © 1998 Mitchell Repair Information Company, LLC
Thursday, March 23, 2000 09:49PM
restored, driveability problems may exist on some vehicles.
These vehicles may require a relearn procedure. See COMPUTER
RELEARN PROCEDURES article in GENERAL INFORMATION section.
REPLACING BLOWN FUSES
Before replacing a blown fuse, remove ignition key, turn off
all lights and accessories to avoid damaging the electrical system. Be
sure to use fuse with the correct indicated amperage rating. The use
of an incorrect amperage rating fuse may result in a dangerous
electrical system overload.
BRAKE PAD REPLACEMENT
WARNING: Use caution when checking and/or changing brake pads, some
pads may contain asbestos which can irritate eyes and may
cause other health hazards. A water based solution should be
used to clean brake dust from wheel and brake components.
DO NOT use compressed air to blow off brake dust.
BRAKE SYSTEM
CAUTION: If brake warning light comes on while driving it indicates
a low fluid level or failure in one of the braking
circuits. If the brake pedal can be depressed further than
normal it is an indication that one of the brake circuits
is not functioning. Stop vehicle and check brake reservoir
fluid level. If level is below MIN mark, DO NOT drive
vehicle. Have it towed to a repair shop. If level is
between the MIN and MAX marks, proceed cautiously to a
repair shop.
BRAKE PAD WEAR INDICATOR
Indicator will cause a squealing or scraping noise, warning
that brake pads need replacement.
BRAKE PEDAL PRESSURE WITH ENGINE NOT RUNNING
CAUTION: Brake pedal requires extreme pressure to stop the vehicle
when the engine is not running.
CATALYTIC CONVERTER
Continued operation of vehicle with a severe malfunction
could cause converter to overheat, resulting in possible damage to
converter and vehicle.
Any modification to the exhaust system on turbo models, which
reduces exhaust backpressure, will lead to lean fuel mixtures and
excessive spark advance. This could cause serious engine damage.
COOLANT (PROPYLENE-GLYCOL FORMULATIONS)
Page 688 of 906
SCHEDULED SERVICES
Article Text (p. 5)
1990 Volkswagen Corrado
For Volkswagen Technical Site: http://vw.belcom.ru
Copyright © 1998 Mitchell Repair Information Company, LLC
Thursday, March 23, 2000 09:49PM
radiator fan. The fan is temperature controlled and could
start at any time even when the ignition key is in the OFF
position. DO NOT loosen or remove radiator cap when cooling
system is hot.
RADIATOR FAN
WARNING: Keep hands away from radiator fan. Fan is controlled by a
thermostatic switch which may come on or run for up to
15 minutes even after engine is turned off.
WHEELS & TIRES
Only wheels tested and approved by the manufacturer should be
used on models equipped with Air Dam aerodynamic components.
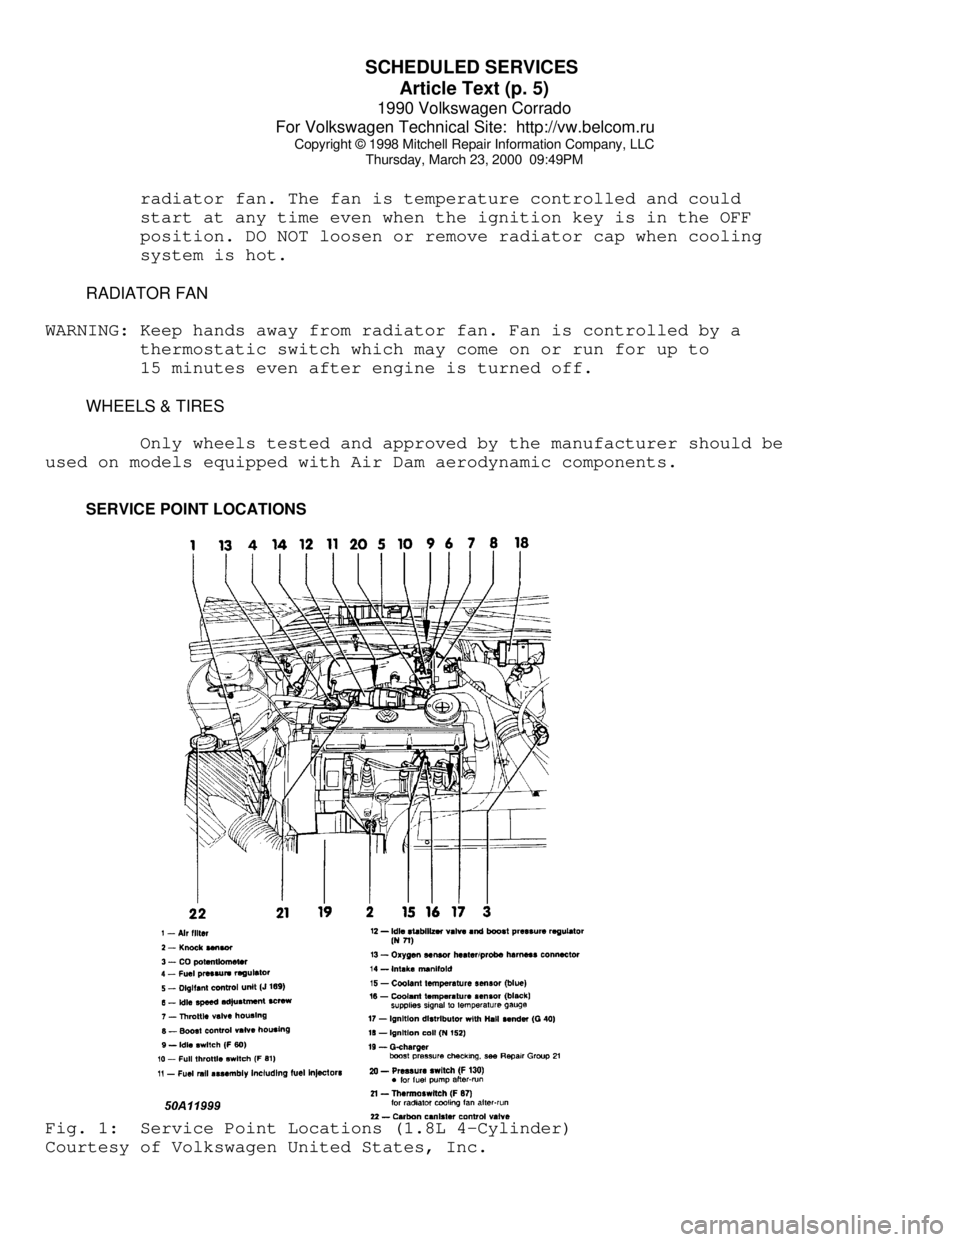
SERVICE POINT LOCATIONSFig. 1: Service Point Locations (1.8L 4-Cylinder)
Courtesy of Volkswagen United States, Inc.