oil temperature VOLKSWAGEN CORRADO 1990 User Guide
[x] Cancel search | Manufacturer: VOLKSWAGEN, Model Year: 1990, Model line: CORRADO, Model: VOLKSWAGEN CORRADO 1990Pages: 906, PDF Size: 6.56 MB
Page 456 of 906

E - THEORY/OPERATION - DIGIFANT
Article Text (p. 6)
1990 Volkswagen Corrado
For Volkswagen Technical Site: http://vw.belcom.ru
Copyright © 1998 Mitchell Repair Information Company, LLC
Thursday, March 23, 2000 09:43PM
element and the power steering pressure switch.
FUEL PRESSURE REGULATOR
The fuel pressure regulator is a sealed, spring loaded
diaphragm with connection for intake manifold vacuum. Fuel pressure is
maintained at about 36 psi (2.5 kg/cmý) pressure.
A connection for intake manifold vacuum provides a constant
pressure differential which ensures that the amount of fuel injected
is solely dependent upon injector open ON time. Excess fuel is
returned to fuel tank. No service of pressure regulator is required.
The pressure regulator is located on or near fuel rail.
FUEL CONTROL
Data on engine temperature, engine speed, intake air volume,
throttle position, exhaust oxygen content and intake air temperature
are used by ECM to determine injection pulse width.
FUEL INJECTORS
A fuel rail links the fuel pressure regulator with the fuel
injectors. Each cylinder is provided with a solenoid-operated injector
which sprays fuel toward backside of each inlet valve. Each injector
is energized through the ignition coil and grounded through the ECU to
complete the circuit
Each injector is linked to a resistor (resistor may be
external or integral with injector or ECU) to reduce operating voltage
to 3 volts and to protect injectors from power surges. The ECU
controls length of time each injector is open. The ON time of the
injector governs the amount of fuel delivered. The injector delivers
1/2 the amount of fuel required for an operating cycle each time they
open (twice per cycle).
FUEL PUMP AFTER-RUN RELAY (CORRADO)
The purpose of the After-Run Fuel Pump relay system is to
reduce the chance of fuel vaporizing in fuel rail. Both transfer pump
and fuel pump are used to recirculate fuel. The after-run relay
switches the pumps on for 2 minutes after ignition is turned off or
when under hood temperature exceeds 194
ø F (90ø C) and fuel pressure
is above 17 psi (1.2 kg/cm
ý). The pumps operate a maximum of 8
minutes.
IDLE SPEED
Engine idle speed is controlled by the ECU and idle speed
control unit depending upon engine operating conditions. The ECU and
Idle speed control unit are fed information on engine operating
conditions and determine the best idle speed.
IDLE AIR STABILIZER VALVE
Page 457 of 906
E - THEORY/OPERATION - DIGIFANT
Article Text (p. 7)
1990 Volkswagen Corrado
For Volkswagen Technical Site: http://vw.belcom.ru
Copyright © 1998 Mitchell Repair Information Company, LLC
Thursday, March 23, 2000 09:43PM
The idle air stabilizer valve is ECU controlled. On Vanagon
idle stabilizer valve is controlled by a separate idle stabilizer
controller. The idle air stabilizer operates to continuously maintains
engine idle at a computed engine idle speed.
IGNITION SYSTEM
The Hall Effect sending unit in the distributor, uses a
shutter window wheel mounted on the distributor shaft. The shutter
blades pass in and out of the air gap of the hall effect sender
resulting in signal pulses (engine speed signal). There is one shutter
window for each engine cylinder. Signals from distributor hall sender
are sent to the ECU.
ELECTRONIC IGNITION SYSTEM
IGNITION COIL CONTROL
Signals from distributor hall sender are sent to the ECU,
which produces a pulsating signal to the ignition coil. This computed
signal from ECU to ignition coil, control ignition timing according to
engine load (airflow sensor signal), engine speed (Hall Effect signal)
and engine coolant temperature.
IGNITION TIMING ADVANCE CONTROL SYSTEM
Timing is ECU controlled.
EMISSION SYSTEMS
EVAPORATIVE EMISSIONS SYSTEM
Fuel vapors are collected in the expansion tank. Any liquid
gasoline collect in expansion tank flows back to the fuel tank through
vent lines. See Fig. 4. Fuel vapors are drawn from tops of the
expansion tanks and flow into the carbon canister where the vapors are
stored. When the engine is not running.
After engine is started, the control valve is opened by
throttle vacuum. Fresh air is drawn into bottom of the canister. Fuel
vapors from the canister are drawn into the intake manifold.
EXHAUST GAS RECIRCULATION
Information is not available. See M - VACUUM DIAGRAMS for
system components and vacuum hose routings.
Page 487 of 906

ELECTRICAL COMPONENT LOCATOR
Article Text (p. 28)
1990 Volkswagen Corrado
For Volkswagen Technical Site: http://vw.belcom.ru
Copyright © 1998 Mitchell Repair Information Company, LLC
Thursday, March 23, 2000 09:44PM
Fuel Gauge Sending Unit Mounted in top of fuel tank.
Hall Speed Sensor Rear of instrument cluster.
Heated Seat Temperature Sensor Below lower cushion of each
seat.Knock Sensor Mounted on cylinder block,
near dipstick.
Manifold Pressure Sensor In Digifant control unit,
below fresh air intake on
firewall.
Multi-Function Indicator
Vacuum Sensor Round sensor mounted on rear
of instrument cluster.
Oil Temperature Sending Unit Small sending unit above oil
filter (Green/Black wire
connector).
Oxygen Sensor In exhaust pipe, near
catalytic converter.
Vehicle Speed Sensor On transaxle.
Page 514 of 906
ENGINE OVERHAUL PROCEDURES - GENERAL INFORMATION
Article Text (p. 5)
1990 Volkswagen Corrado
For Volkswagen Technical Site: http://vw.belcom.ru
Copyright © 1998 Mitchell Repair Information Company, LLC
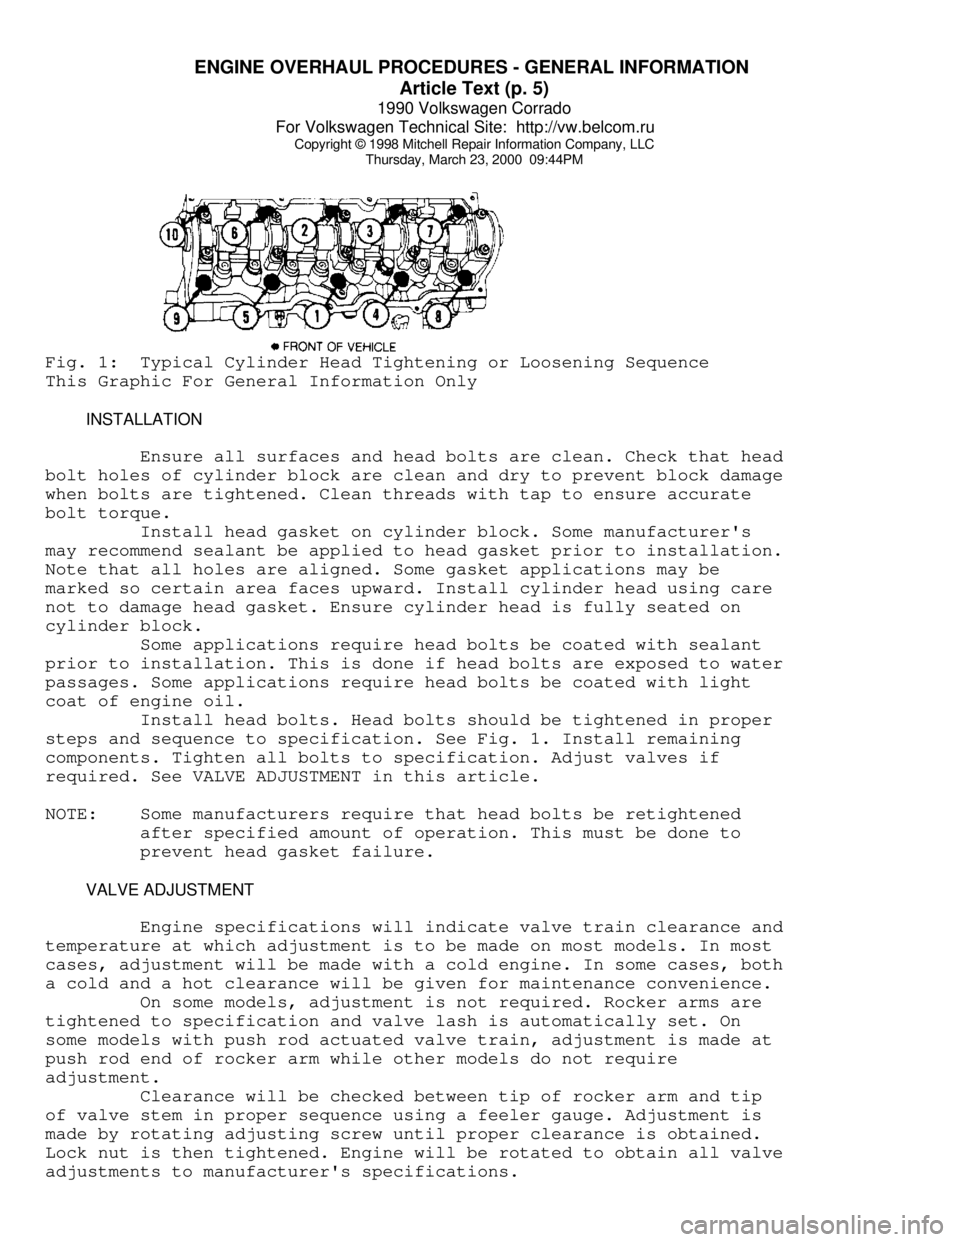
Thursday, March 23, 2000 09:44PMFig. 1: Typical Cylinder Head Tightening or Loosening Sequence
This Graphic For General Information Only
INSTALLATION
Ensure all surfaces and head bolts are clean. Check that head
bolt holes of cylinder block are clean and dry to prevent block damage
when bolts are tightened. Clean threads with tap to ensure accurate
bolt torque.
Install head gasket on cylinder block. Some manufacturer's
may recommend sealant be applied to head gasket prior to installation.
Note that all holes are aligned. Some gasket applications may be
marked so certain area faces upward. Install cylinder head using care
not to damage head gasket. Ensure cylinder head is fully seated on
cylinder block.
Some applications require head bolts be coated with sealant
prior to installation. This is done if head bolts are exposed to water
passages. Some applications require head bolts be coated with light
coat of engine oil.
Install head bolts. Head bolts should be tightened in proper
steps and sequence to specification. See Fig. 1. Install remaining
components. Tighten all bolts to specification. Adjust valves if
required. See VALVE ADJUSTMENT in this article.
NOTE: Some manufacturers require that head bolts be retightened
after specified amount of operation. This must be done to
prevent head gasket failure.
VALVE ADJUSTMENT
Engine specifications will indicate valve train clearance and
temperature at which adjustment is to be made on most models. In most
cases, adjustment will be made with a cold engine. In some cases, both
a cold and a hot clearance will be given for maintenance convenience.
On some models, adjustment is not required. Rocker arms are
tightened to specification and valve lash is automatically set. On
some models with push rod actuated valve train, adjustment is made at
push rod end of rocker arm while other models do not require
adjustment.
Clearance will be checked between tip of rocker arm and tip
of valve stem in proper sequence using a feeler gauge. Adjustment is
made by rotating adjusting screw until proper clearance is obtained.
Lock nut is then tightened. Engine will be rotated to obtain all valve
adjustments to manufacturer's specifications.
Page 545 of 906
ENGINE OVERHAUL PROCEDURES - GENERAL INFORMATION
Article Text (p. 36)
1990 Volkswagen Corrado
For Volkswagen Technical Site: http://vw.belcom.ru
Copyright © 1998 Mitchell Repair Information Company, LLC
Thursday, March 23, 2000 09:44PM
to ensure correct amount of oil has filled crankcase. Check oil level
while pre-oiling.
If pressure oiler is not available, disconnect ignition
system. Remove oil pressure sending unit and replace with oil pressure
test gauge. Using starter motor, rotate engine starter until gauge
shows normal oil pressure for several seconds. DO NOT crank engine
for more than 30 seconds to avoid starter motor damage.
Ensure oil pressure has reached the most distant point from
the oil pump. Reinstall oil pressure sending unit. Reconnect ignition
system.
INITIAL START-UP
Start the engine and operate engine at low speed while
checking for coolant, fuel and oil leaks. Stop engine. Recheck coolant
and oil level. Adjust if necessary.
CAMSHAFT
Break-in procedure is required when a new or reground
camshaft has been installed. Operate and maintain engine speed between
1500-2500 RPM for approximately 30 minutes. Procedure may vary due to
manufacturers recommendations.
PISTON RINGS
Piston rings require a break-in procedure to ensure seating
of rings to cylinder walls. Serious damage may occur to rings if
correct procedures are not followed.
Extremely high piston ring temperatures are produced obtained
during break-in process. If rings are exposed to excessively high RPM
or high cylinder pressures, ring damage can occur. Follow piston ring
manufacturer's recommended break-in procedure.
FINAL ADJUSTMENTS
Check or adjust ignition timing and dwell (if applicable).
Adjust valves (if necessary). Adjust carburetion or injection idle
speed and mixture. Retighten cylinder heads (if required). If
cylinder head or block is aluminum, retighten bolts when engine is
cold. Follow the engine manufacturer's recommended break-in procedure
and maintenance schedule for new engines.
NOTE: Some manufacturer's require that head bolts be retightened
after specified amount of operation. This must be done to
prevent head gasket failure.
END OF ARTICLE
Page 558 of 906
F - BASIC TESTING
Article Text (p. 13)
1990 Volkswagen Corrado
For Volkswagen Technical Site: http://vw.belcom.ru
Copyright © 1998 Mitchell Repair Information Company, LLC
Thursday, March 23, 2000 09:44PM
DISTRIBUTOR
HALL EFFECT SENDER
1) Remove coil secondary and attach to ground. Disconnect
Hall Effect sender wire at the distributor. Using a LED Test Light (US
1115), check for voltage between outer terminals of connector. See
Fig. 5 or 8. With ignition on, light should be on. If not, check
wiring for short or open circuit. If wiring is okay, replace Digifant
control unit.
2) If light came on in step 1), reconnect Hall Effect sender
harness connector. Pull back Hall Effect sender boot to expose contact
terminals. Apply LED Test Light (US 1115) probe to center contact and
battery positive terminal. See Fig. 5. Observe test light while
cranking engine. If test light blinks, Hall Effect sender is okay. If
not, replace Hall Effect-sender.
IDLE SPEED, CO LEVEL & IGNITION TIMING
Ensure idle speed, CO level and base ignition timing are set
to specification. If necessary, see ON-VEHICLE ADJUSTMENTS article.
IDLE SPEED & CO LEVEL TABLEÄÄÄÄÄÄÄÄÄÄÄÄÄÄÄÄÄÄÄÄÄÄÄÄÄÄÄÄÄÄÄÄÄÄÄÄÄÄÄÄÄÄÄÄÄÄÄÄÄÄÄÄÄÄÄÄÄÄÄÄApplication Idle RPM CO Level %
All Models ............ 800-1000 .............. 0.3-1.2%
ÄÄÄÄÄÄÄÄÄÄÄÄÄÄÄÄÄÄÄÄÄÄÄÄÄÄÄÄÄÄÄÄÄÄÄÄÄÄÄÄÄÄÄÄÄÄÄÄÄÄÄÄÄÄÄÄÄÄÄÄIGNITION TIMING TABLE (Degrees BTDC @ RPM)
ÄÄÄÄÄÄÄÄÄÄÄÄÄÄÄÄÄÄÄÄÄÄÄÄÄÄÄÄÄÄÄÄÄÄÄÄÄÄÄÄÄÄÄÄÄÄÄÄÄÄÄÄÄÄÄÄÄÄÄÄApplication Checking Adjusting
1.8L ............... 4-8 @ 2250-2350 . 5-7 @ 2250-2350
2.0L ................ 4-8 @ 770-830 ...... 5-7 @ 770-830
2.1L (1) ........... 4-8 @ 2250-2350 . 5-7 @ 2250-2350
(1) - With coolant temperature sensor disconnected.
ÄÄÄÄÄÄÄÄÄÄÄÄÄÄÄÄÄÄÄÄÄÄÄÄÄÄÄÄÄÄÄÄÄÄÄÄÄÄÄÄÄÄÄÄÄÄÄÄÄÄÄÄÄÄÄÄÄÄÄÄ SUMMARY
If no faults were found while performing F - BASIC TESTING,
proceed to H - TESTS W/CODES article for diagnosis by symptom (i.e.,
ROUGH IDLE, NO START, etc.) or intermittent diagnostic procedures.
END OF ARTICLE
Page 564 of 906
FUSES & CIRCUIT BREAKERS
Article Text (p. 2)
1990 Volkswagen Corrado
For Volkswagen Technical Site: http://vw.belcom.ru
Copyright © 1998 Mitchell Repair Information Company, LLC
Thursday, March 23, 2000 09:45PM
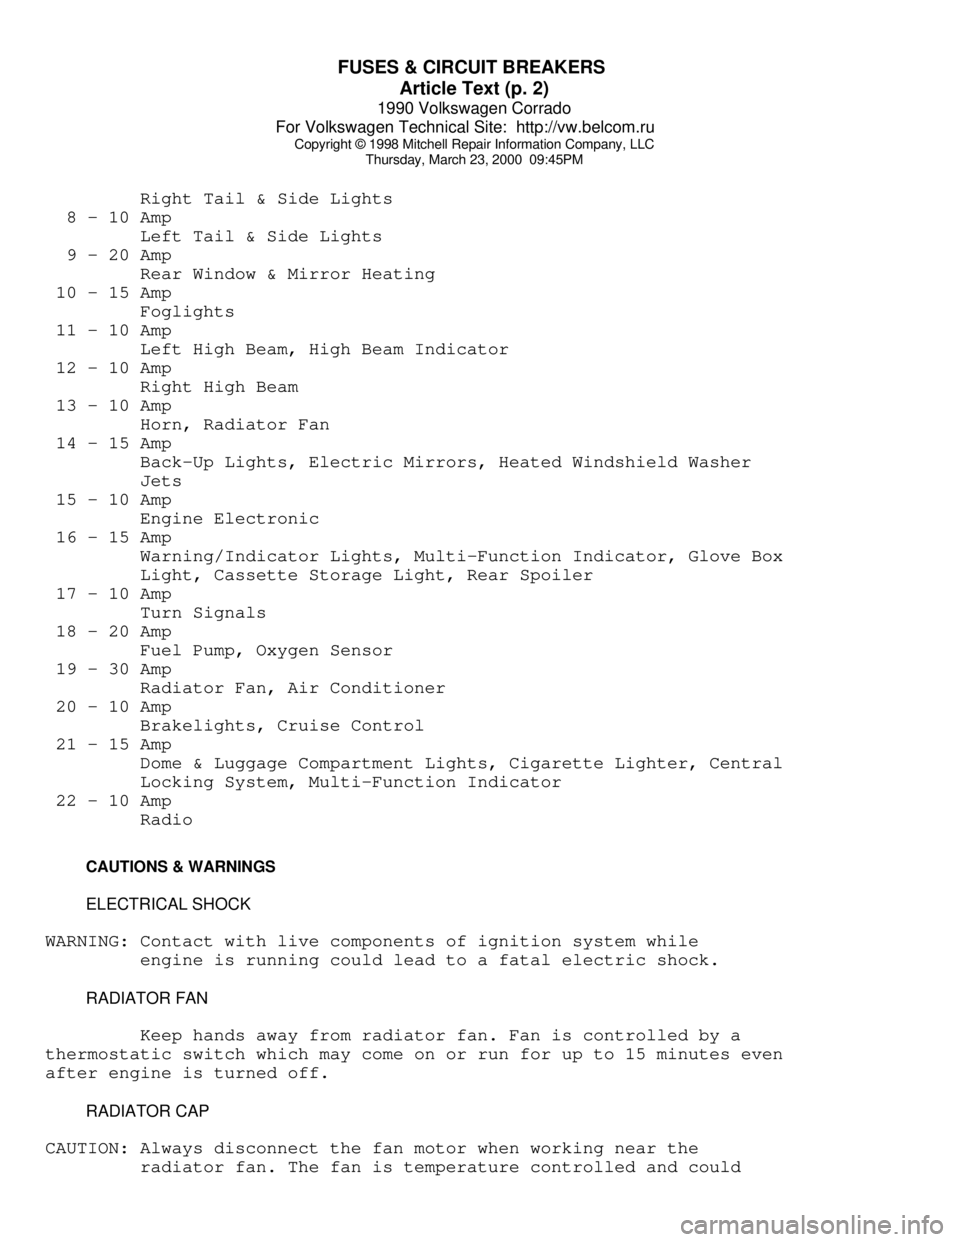
Right Tail & Side Lights
8 - 10 Amp
Left Tail & Side Lights
9 - 20 Amp
Rear Window & Mirror Heating
10 - 15 Amp
Foglights
11 - 10 Amp
Left High Beam, High Beam Indicator
12 - 10 Amp
Right High Beam
13 - 10 Amp
Horn, Radiator Fan
14 - 15 Amp
Back-Up Lights, Electric Mirrors, Heated Windshield Washer
Jets
15 - 10 Amp
Engine Electronic
16 - 15 Amp
Warning/Indicator Lights, Multi-Function Indicator, Glove Box
Light, Cassette Storage Light, Rear Spoiler
17 - 10 Amp
Turn Signals
18 - 20 Amp
Fuel Pump, Oxygen Sensor
19 - 30 Amp
Radiator Fan, Air Conditioner
20 - 10 Amp
Brakelights, Cruise Control
21 - 15 Amp
Dome & Luggage Compartment Lights, Cigarette Lighter, Central
Locking System, Multi-Function Indicator
22 - 10 Amp
Radio
CAUTIONS & WARNINGS
ELECTRICAL SHOCK
WARNING: Contact with live components of ignition system while
engine is running could lead to a fatal electric shock.
RADIATOR FAN
Keep hands away from radiator fan. Fan is controlled by a
thermostatic switch which may come on or run for up to 15 minutes even
after engine is turned off.
RADIATOR CAP
CAUTION: Always disconnect the fan motor when working near the
radiator fan. The fan is temperature controlled and could
Page 575 of 906
H - TESTS W/O CODES
Article Text (p. 2)
1990 Volkswagen Corrado
For Volkswagen Technical Site: http://vw.belcom.ru
Copyright © 1998 Mitchell Repair Information Company, LLC
Thursday, March 23, 2000 09:45PM
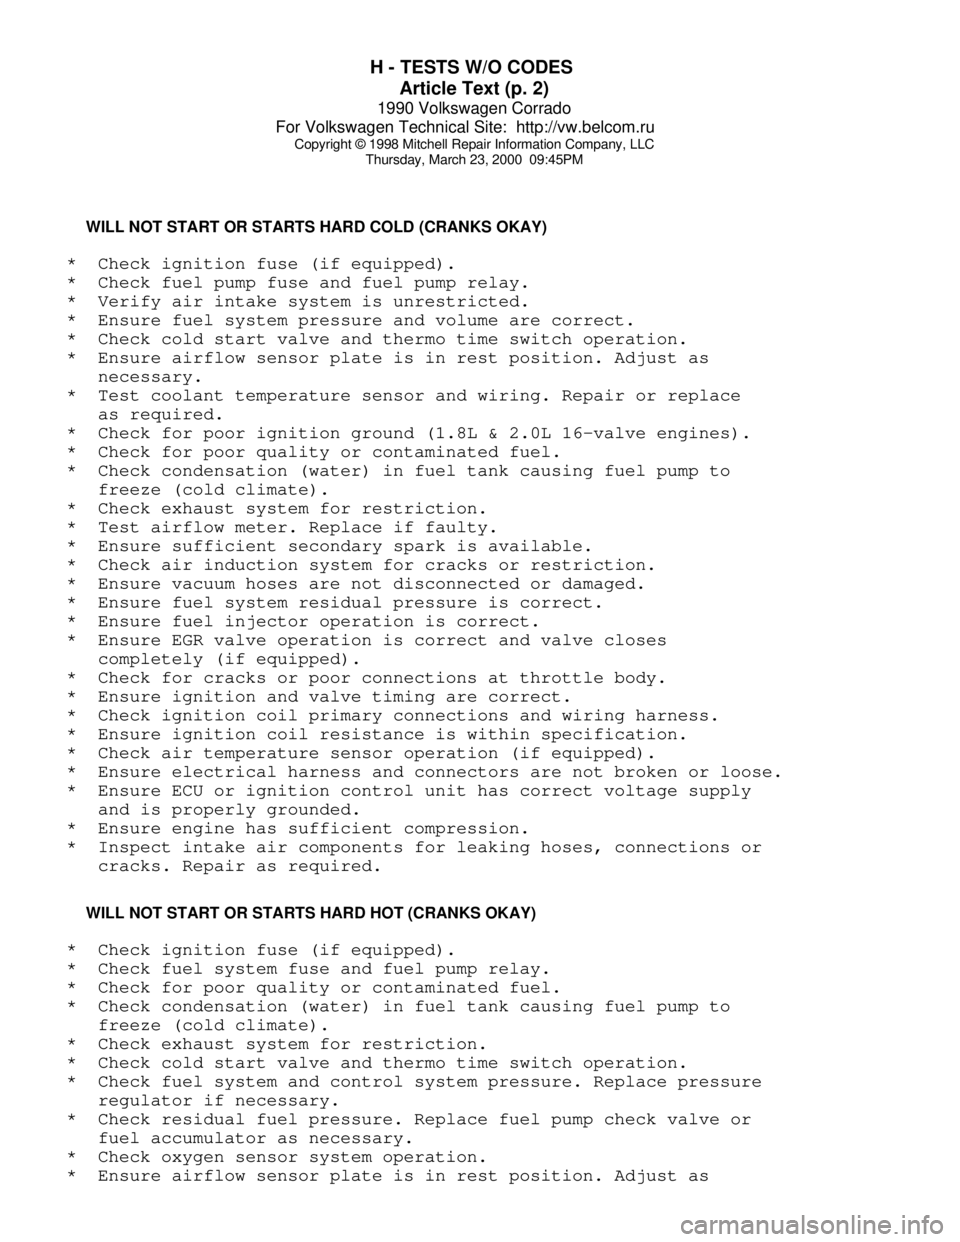
WILL NOT START OR STARTS HARD COLD (CRANKS OKAY)
* Check ignition fuse (if equipped).
* Check fuel pump fuse and fuel pump relay.
* Verify air intake system is unrestricted.
* Ensure fuel system pressure and volume are correct.
* Check cold start valve and thermo time switch operation.
* Ensure airflow sensor plate is in rest position. Adjust as
necessary.
* Test coolant temperature sensor and wiring. Repair or replace
as required.
* Check for poor ignition ground (1.8L & 2.0L 16-valve engines).
* Check for poor quality or contaminated fuel.
* Check condensation (water) in fuel tank causing fuel pump to
freeze (cold climate).
* Check exhaust system for restriction.
* Test airflow meter. Replace if faulty.
* Ensure sufficient secondary spark is available.
* Check air induction system for cracks or restriction.
* Ensure vacuum hoses are not disconnected or damaged.
* Ensure fuel system residual pressure is correct.
* Ensure fuel injector operation is correct.
* Ensure EGR valve operation is correct and valve closes
completely (if equipped).
* Check for cracks or poor connections at throttle body.
* Ensure ignition and valve timing are correct.
* Check ignition coil primary connections and wiring harness.
* Ensure ignition coil resistance is within specification.
* Check air temperature sensor operation (if equipped).
* Ensure electrical harness and connectors are not broken or loose.
* Ensure ECU or ignition control unit has correct voltage supply
and is properly grounded.
* Ensure engine has sufficient compression.
* Inspect intake air components for leaking hoses, connections or
cracks. Repair as required.
WILL NOT START OR STARTS HARD HOT (CRANKS OKAY)
* Check ignition fuse (if equipped).
* Check fuel system fuse and fuel pump relay.
* Check for poor quality or contaminated fuel.
* Check condensation (water) in fuel tank causing fuel pump to
freeze (cold climate).
* Check exhaust system for restriction.
* Check cold start valve and thermo time switch operation.
* Check fuel system and control system pressure. Replace pressure
regulator if necessary.
* Check residual fuel pressure. Replace fuel pump check valve or
fuel accumulator as necessary.
* Check oxygen sensor system operation.
* Ensure airflow sensor plate is in rest position. Adjust as
Page 576 of 906
H - TESTS W/O CODES
Article Text (p. 3)
1990 Volkswagen Corrado
For Volkswagen Technical Site: http://vw.belcom.ru
Copyright © 1998 Mitchell Repair Information Company, LLC
Thursday, March 23, 2000 09:45PM
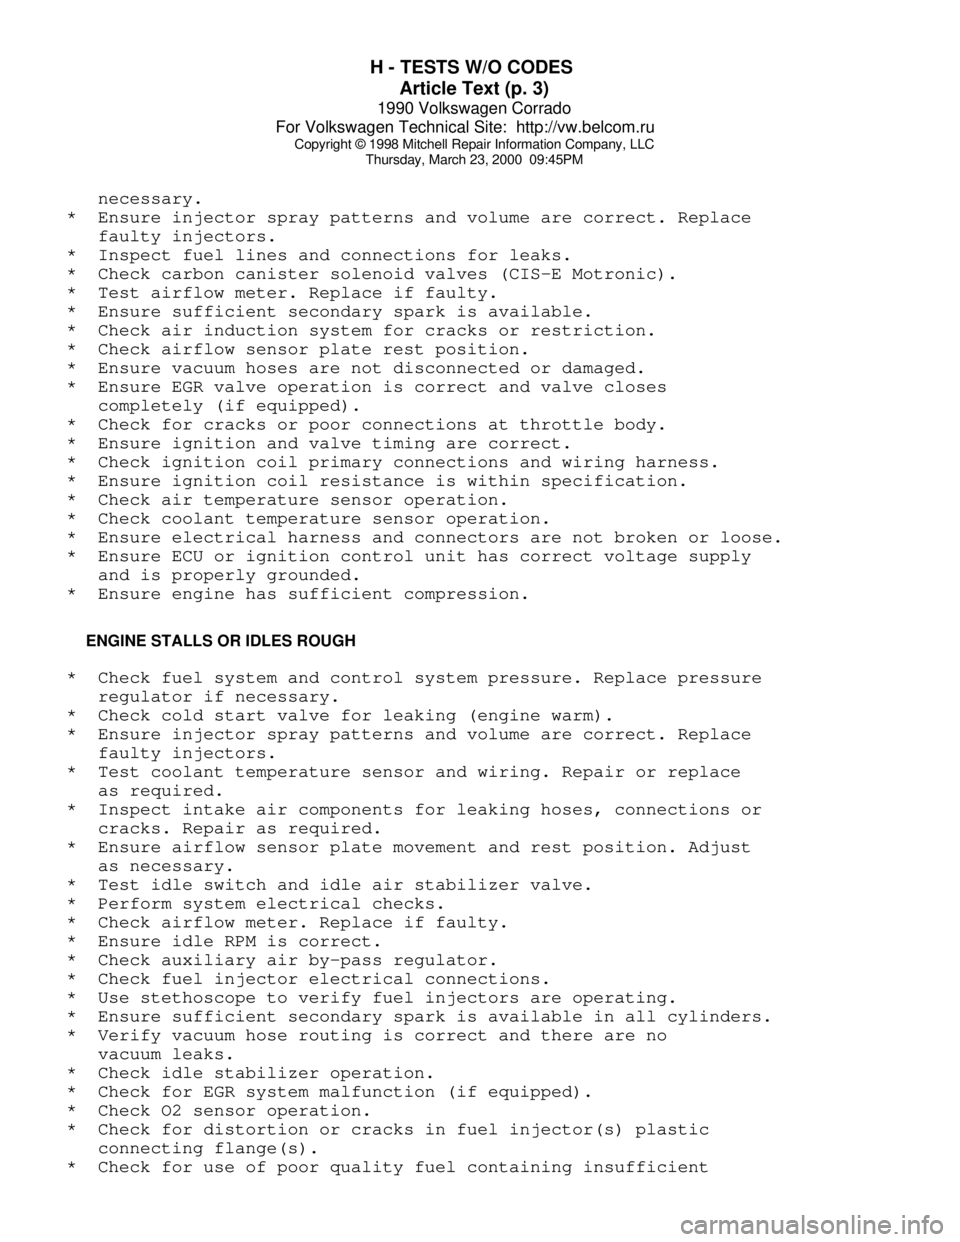
necessary.
* Ensure injector spray patterns and volume are correct. Replace
faulty injectors.
* Inspect fuel lines and connections for leaks.
* Check carbon canister solenoid valves (CIS-E Motronic).
* Test airflow meter. Replace if faulty.
* Ensure sufficient secondary spark is available.
* Check air induction system for cracks or restriction.
* Check airflow sensor plate rest position.
* Ensure vacuum hoses are not disconnected or damaged.
* Ensure EGR valve operation is correct and valve closes
completely (if equipped).
* Check for cracks or poor connections at throttle body.
* Ensure ignition and valve timing are correct.
* Check ignition coil primary connections and wiring harness.
* Ensure ignition coil resistance is within specification.
* Check air temperature sensor operation.
* Check coolant temperature sensor operation.
* Ensure electrical harness and connectors are not broken or loose.
* Ensure ECU or ignition control unit has correct voltage supply
and is properly grounded.
* Ensure engine has sufficient compression.
ENGINE STALLS OR IDLES ROUGH
* Check fuel system and control system pressure. Replace pressure
regulator if necessary.
* Check cold start valve for leaking (engine warm).
* Ensure injector spray patterns and volume are correct. Replace
faulty injectors.
* Test coolant temperature sensor and wiring. Repair or replace
as required.
* Inspect intake air components for leaking hoses, connections or
cracks. Repair as required.
* Ensure airflow sensor plate movement and rest position. Adjust
as necessary.
* Test idle switch and idle air stabilizer valve.
* Perform system electrical checks.
* Check airflow meter. Replace if faulty.
* Ensure idle RPM is correct.
* Check auxiliary air by-pass regulator.
* Check fuel injector electrical connections.
* Use stethoscope to verify fuel injectors are operating.
* Ensure sufficient secondary spark is available in all cylinders.
* Verify vacuum hose routing is correct and there are no
vacuum leaks.
* Check idle stabilizer operation.
* Check for EGR system malfunction (if equipped).
* Check O2 sensor operation.
* Check for distortion or cracks in fuel injector(s) plastic
connecting flange(s).
* Check for use of poor quality fuel containing insufficient
Page 588 of 906
I - SYSTEM/COMPONENT TESTS
Article Text
1990 Volkswagen Corrado
For Volkswagen Technical Site: http://vw.belcom.ru
Copyright © 1998 Mitchell Repair Information Company, LLC
Thursday, March 23, 2000 09:46PM
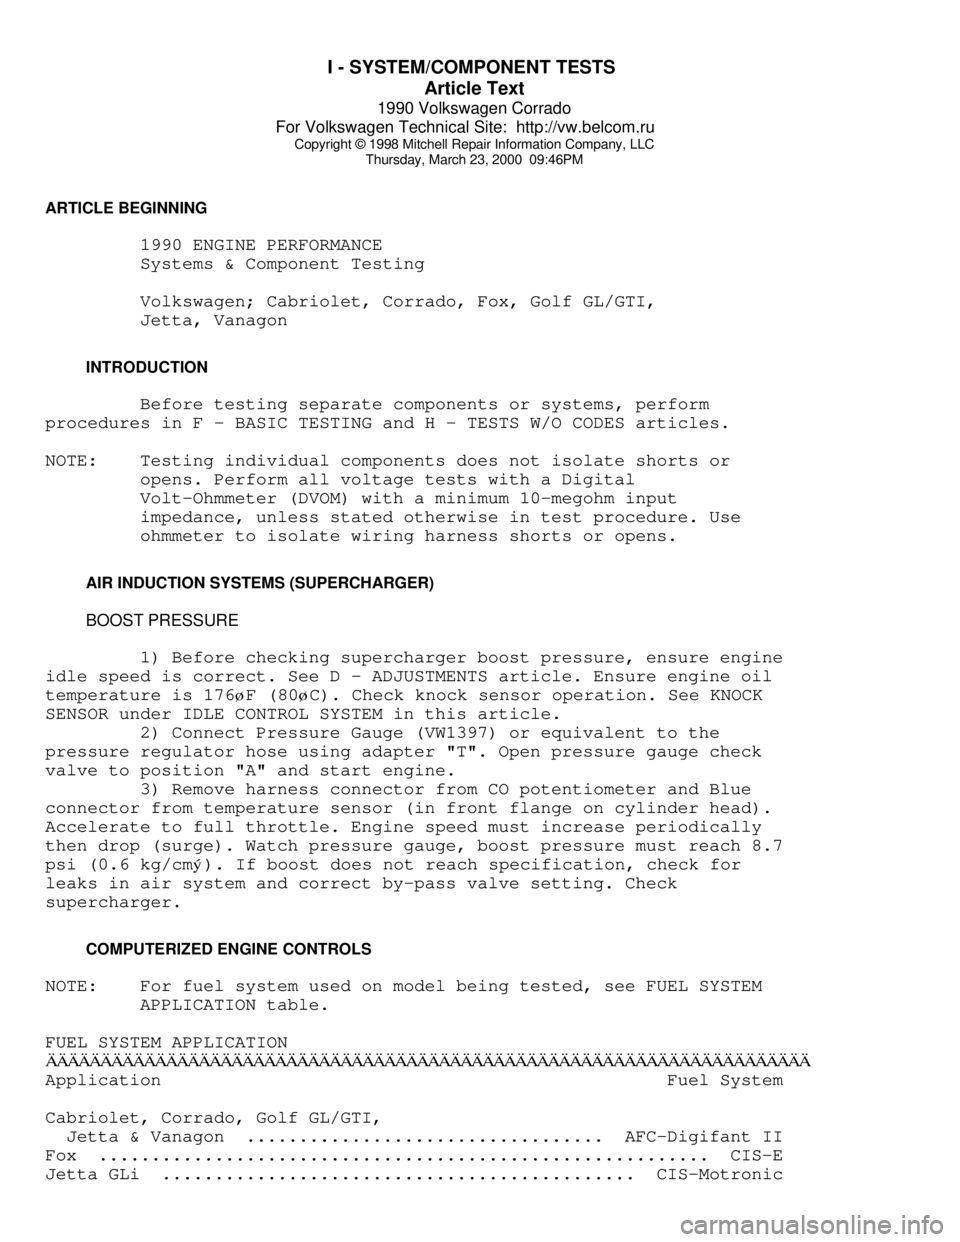
ARTICLE BEGINNING
1990 ENGINE PERFORMANCE
Systems & Component Testing
Volkswagen; Cabriolet, Corrado, Fox, Golf GL/GTI,
Jetta, Vanagon
INTRODUCTION
Before testing separate components or systems, perform
procedures in F - BASIC TESTING and H - TESTS W/O CODES articles.
NOTE: Testing individual components does not isolate shorts or
opens. Perform all voltage tests with a Digital
Volt-Ohmmeter (DVOM) with a minimum 10-megohm input
impedance, unless stated otherwise in test procedure. Use
ohmmeter to isolate wiring harness shorts or opens.
AIR INDUCTION SYSTEMS (SUPERCHARGER)
BOOST PRESSURE
1) Before checking supercharger boost pressure, ensure engine
idle speed is correct. See D - ADJUSTMENTS article. Ensure engine oil
temperature is 176øF (80øC). Check knock sensor operation. See KNOCK
SENSOR under IDLE CONTROL SYSTEM in this article.
2) Connect Pressure Gauge (VW1397) or equivalent to the
pressure regulator hose using adapter "T". Open pressure gauge check
valve to position "A" and start engine.
3) Remove harness connector from CO potentiometer and Blue
connector from temperature sensor (in front flange on cylinder head).
Accelerate to full throttle. Engine speed must increase periodically
then drop (surge). Watch pressure gauge, boost pressure must reach 8.7
psi (0.6 kg/cm
ý). If boost does not reach specification, check for
leaks in air system and correct by-pass valve setting. Check
supercharger.
COMPUTERIZED ENGINE CONTROLS
NOTE: For fuel system used on model being tested, see FUEL SYSTEM
APPLICATION table.
FUEL SYSTEM APPLICATION
ÄÄÄÄÄÄÄÄÄÄÄÄÄÄÄÄÄÄÄÄÄÄÄÄÄÄÄÄÄÄÄÄÄÄÄÄÄÄÄÄÄÄÄÄÄÄÄÄÄÄÄÄÄÄÄÄÄÄÄÄÄÄÄÄÄÄÄÄÄÄApplication Fuel System
Cabriolet, Corrado, Golf GL/GTI,
Jetta & Vanagon .................................. AFC-Digifant II
Fox .......................................................... CIS-E
Jetta GLi ............................................. CIS-Motronic