wheel bolts VOLKSWAGEN GOLF 2004 Owners Manual
[x] Cancel search | Manufacturer: VOLKSWAGEN, Model Year: 2004, Model line: GOLF, Model: VOLKSWAGEN GOLF 2004Pages: 444, PDF Size: 92.7 MB
Page 7 of 444
Anti-theft alarm system 3.1: 34
Linking your trailer 3.2: 18
Switching off 3.1: 34
Anti-theft wheel bolts 3.2: 84
Antifreeze 3.2:47
Arm rest
front
3.1:60
Automatic belt retractor 2.1: 19
Automatic car wash 3.2: 22
Automatic locking 3.1: 32
Automati c
mode
Climatronic 3.1: 79
Automatic transmi ssion
Selec tor lever lock 3.1: 89 Tiptronic 3.1: 88
Automatic transmiss io n with
Tiptron ic 3.1: 91
Automatic wipe/wash function for the rear
w idn ow 3.1: 51
Auto Hotline 2. 1: 12,3.2: 106
Average fuel consumption 3.1: 21
Average sp ee d 3.1:21
8
2.1: 27
Booster seats 2.1: 62
Brake assis t sys tem 3.2: 3
Brake boo
ster 3.2: 2
4 Key words
Brake
Changing 3.2: 54
level?
. 3.2:53
W hat kind of brak e
65 Warning 3.2: 39, 55
Capacities 3.3: 5
Ca rgo area 2.1:
Car wash 3.2: 22
Catalytic converter 3.2: 9
CB radio 3.2: 33
CD changer 3.1: 65
Page 16 of 444
Tank
the tank 3.2: 35
Fuel gauge 3.1:
fuel filler flap 3.2: 35
Technic al modifications 3.2:
32
Tether anchors 2.1:68
Tether strap 2.1:
69
Threaded rim ring 3.2: 57
down hooks 3.1:
Tie-dow ns 2.1: 12
Tire pressure 3.2: 68
Tir e pressure monitorin g disp lay
mode ls) 3.2: 65
Warn ing 3.2: 65
T i
re pres sure monitoring sys tem
3.2: 75
Tires and wheels 3.2: 75
Valves 3.2: 75
Tire pressure monitoring system
models) 3.2 : 62
Tires
Repla cing 3.2:
75
life 3.2:72
rating le tter code 3.2: 74 Tire Identification Number 3.2: 74
Tire manufacturing date 3.2: 74
Tire specifications 3.2: 74
Tread
depth 3.2:72
tire pressure 3.2: 68 tire inflation pressure 3.2: 61 Dimensions 3.2: 73
General notes 3.2: 57
Glossary of tire and loading terminology 3.2: 58
New tires
and wheels 3.2: 73 Replaci ng 3.2: 73
ch ai.ns 3.2: 78
Tir e pressure monitoring system 3.2: 75
Tires and vehic le load lim its 3.2: Whee l bolts 3.2: 79
Winter tires 3.2:77
Tir e serv i
ce life 3.2:72
Tool s 3.2:
Torn or fra yed safe ty belts 2.1: 17
Towing 3.2:
General notes 3.2: 103
When can your vehicle not be
t owed? 3.2:
Towing eye 3.2:
See Tire pre ss ure monitoring system
model s)
Warning
light 3.2: 62
Trail er towing 3.2: 15
Anti-theft alarm system 3.2: 18
Brake s 3.2: 15
instructions 3.2 : 16
3.2:
Transporting long items 3.1: 63
Tread Wear Indi cato r
Trunk lid 3.1: 35
See also Rear lid
Turn signa l and high beam lever 3.1:46
Turn signal s 3.1: 46
Warning light 3
.1: 46
u
Underbody sealant 3.2: 27
Unfast ening belts 2.1: 25
Unidirectional tires 3.2:57, 86
tir e qual ity grading 3.2: 76
Unpleasant odor 3.1: 83
Uphol stery
Key word s 13
Page 334 of 444
changea ble deco rat ive cove rs a re att ached to th e rim with s elf- locking sc rews . lfyou would ro re pla ce damaged wheel covers, contact your authorized Volkswa gen d eale r or
WARNING
New ti res or tires tha t are old, worn or aged cannot provide maximum control and braking ability.
New tires tend to be s lipp ery and must be broken in . To reduce the risk of losing co ntrol,
a co llisio n and serio us personal injuri es, drive with sp ecia l care for the first km).
(cont inued )
Driving with worn or damaged tire s can lead to lo ss of control, sudden tire failur e, cluding a blowou t and sudden deflation ,
c ras hes and seriou s personal injuries. Have wo rn or damaged tires rep laced imme di ate ly.
To redu ce the riskoflosingcontrol, crashes and s erio us personal injuries, never loose n
th e bolts on w heels with bolted rim rings.
more than 6 years old can onl y be used in an em erg en cy and then
w ith specia l care and at low speed.
Neve r m ount u se d tires on your ve hicle if
yo u are not sure of their used tires may have been damaged ev e n
t h oug h the damage cannot be seen th at can
lead to sudden tir e failure and loss of ve hicl e control.
hicl e pull s to one sid e when dri ving, always
s top as soo n as it is safe to do so and ch eck the
whee ls and tires for damage.
Accessory weight
Means the combined we ight ( in excess of those
sta ndard ite m s w hi ch may be repl aced) of mati c tran smission. power steering. po wer
bra kes, power windo ws. p owe r seats , radio, and heater, to th e ex te nt th at th ese item s are
or lowe r indica te
a short s id ewall for improved steering respo nse and better ove rall handling on dry pave ment.
Bead
Mean s the pa rt of the tire t hat is m ad e of stee l
wires , w rap ped or re inforce d by pl y cords and that is shap ed to fit t he rim.
Bead separation
Mean s a breakdow n of th e bond between
Means the strand s forming the in th e tire.
weight
Me ans th e weig ht of motor vehicl e w ith dard equ ipment including the m aximum pacity of fu el, oil. and coolant . a ir conditio nin g
a nd additional weight of opt io n al equipm ent.
E xtra load lire
M ea ns tire desi gn to operate at higher loads and at hi gher inflat ion pressure s th an th e corre -
s ponding sta ndard tire.
Page 355 of 444
3.2 Tips and Advice
Wheel bolts must always be tig hte ned to the correct torque.
The design of w heel bolts is mat ched to th e th e
correct wheel bolts with th e rig ht length and rectly shaped bolt heads mu st be use d. Th is sures th at w heels are securely and the
brake system functio ns correct ly.
In cert a in cir cumstances, y ou ma y not usc wheel
bolts from a differe nt vehicl e- ev en if it is th e
sa me mod el page
serio us personal in jury.
keep the wheel bolts the
th reads in the wheel hubs clean so the whee l
bolt s turn easily en ed.
Neve r grease or oi l th e wh eel bolt s and th e
th reads in the wheel hubs. They ca n become
WARN ING (continued)
loose while driving if grea sed or oile d, eve n if
t ightened to th e s pecifi ed torque.
use wheel bolt s belo ng to the
wheel rim installed .
Never usc diff erent wheel s bolts on your vehicle.
Always maintai n th e correc t tig htening torqu e for the w hee l b olts to reduce the ri sk of a wheel loss. If the tightening torque of the
whee l bolts is too low, they can loosen come out w hen th e vehicl e is m ov ing . If t he
tight en ing torque is too high, the wheel bolts and threads can be damaged the w heel
can become loose .
Note
The specifi ed torqu e for th e w hee l bolts is
88 ft/ lb s Nm). Afte r changi ng a whe el. th e
torqu e must b e ch ec ked as soon as po ss ibl e w ith
a torque wre nch - pref erably by an authori zed Volkswage n dealer or qu alified works hop.
Page 356 of 444
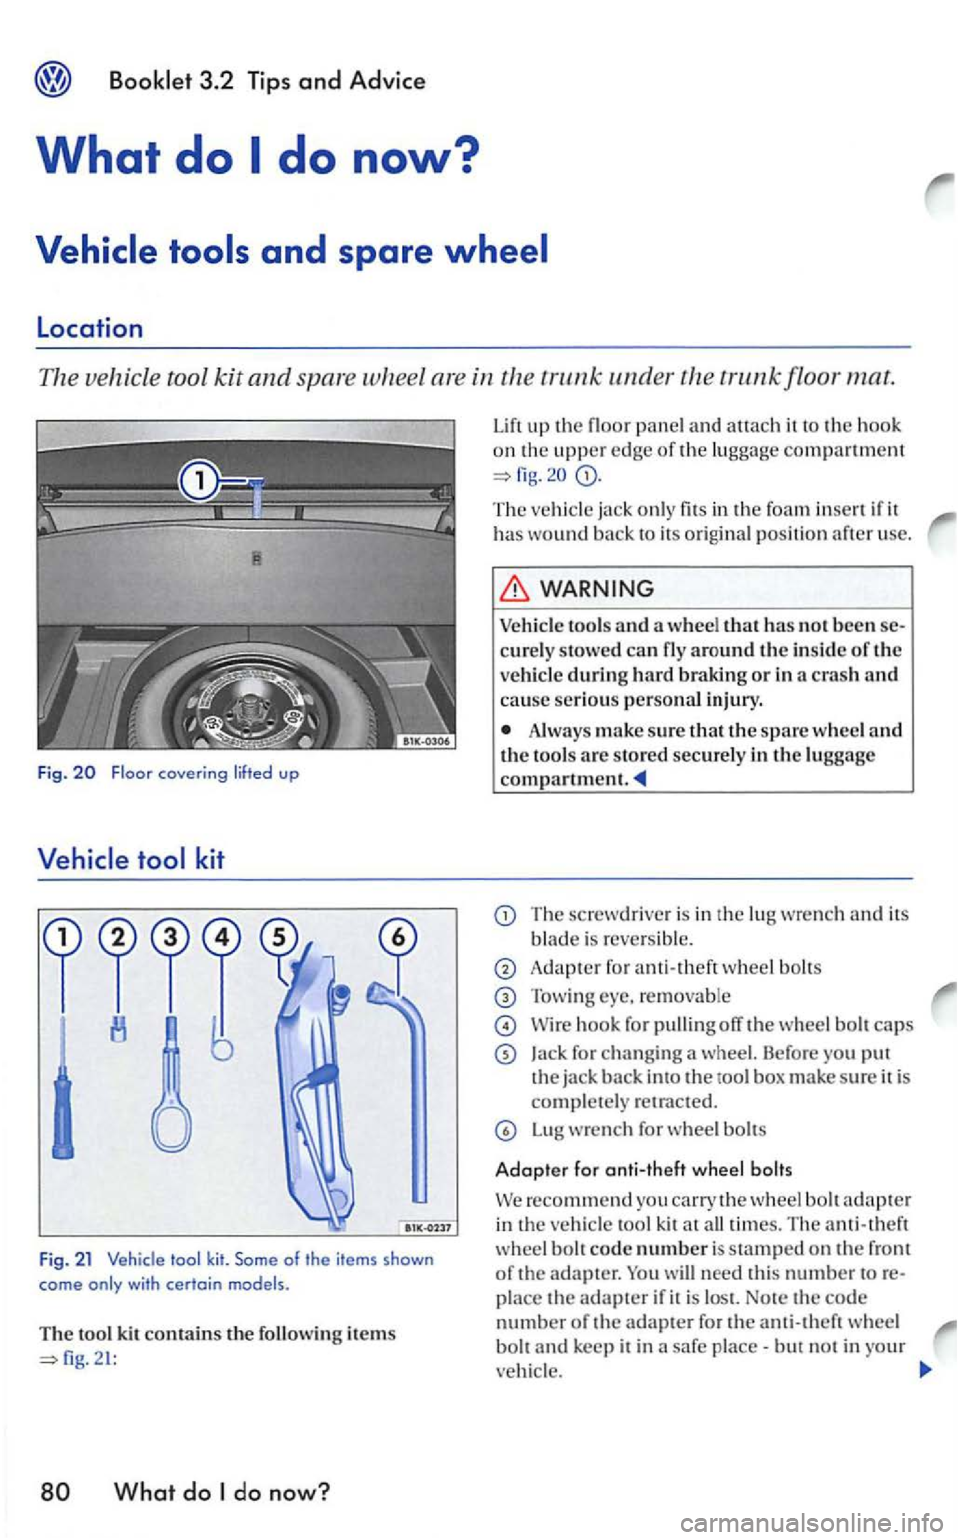
Location
The vehicle tool kit and spar e wheel are in the
What do do now?
Lift up the floor panel and auach it to the hook on the uppe r e dge of the luggage compa rtment
The ja ck only fits in the foam inse rt if it has wound back to its orig inal position after u sc.
Vehicl e too ls and a whee l has not bee n se
cure ly stowed can fly around the ins id e of the during hard braking o r in a crash and cause serious personal in jury.
Always make sure that the spare wheel and the tools arc s tored securely in the luggage compartment.
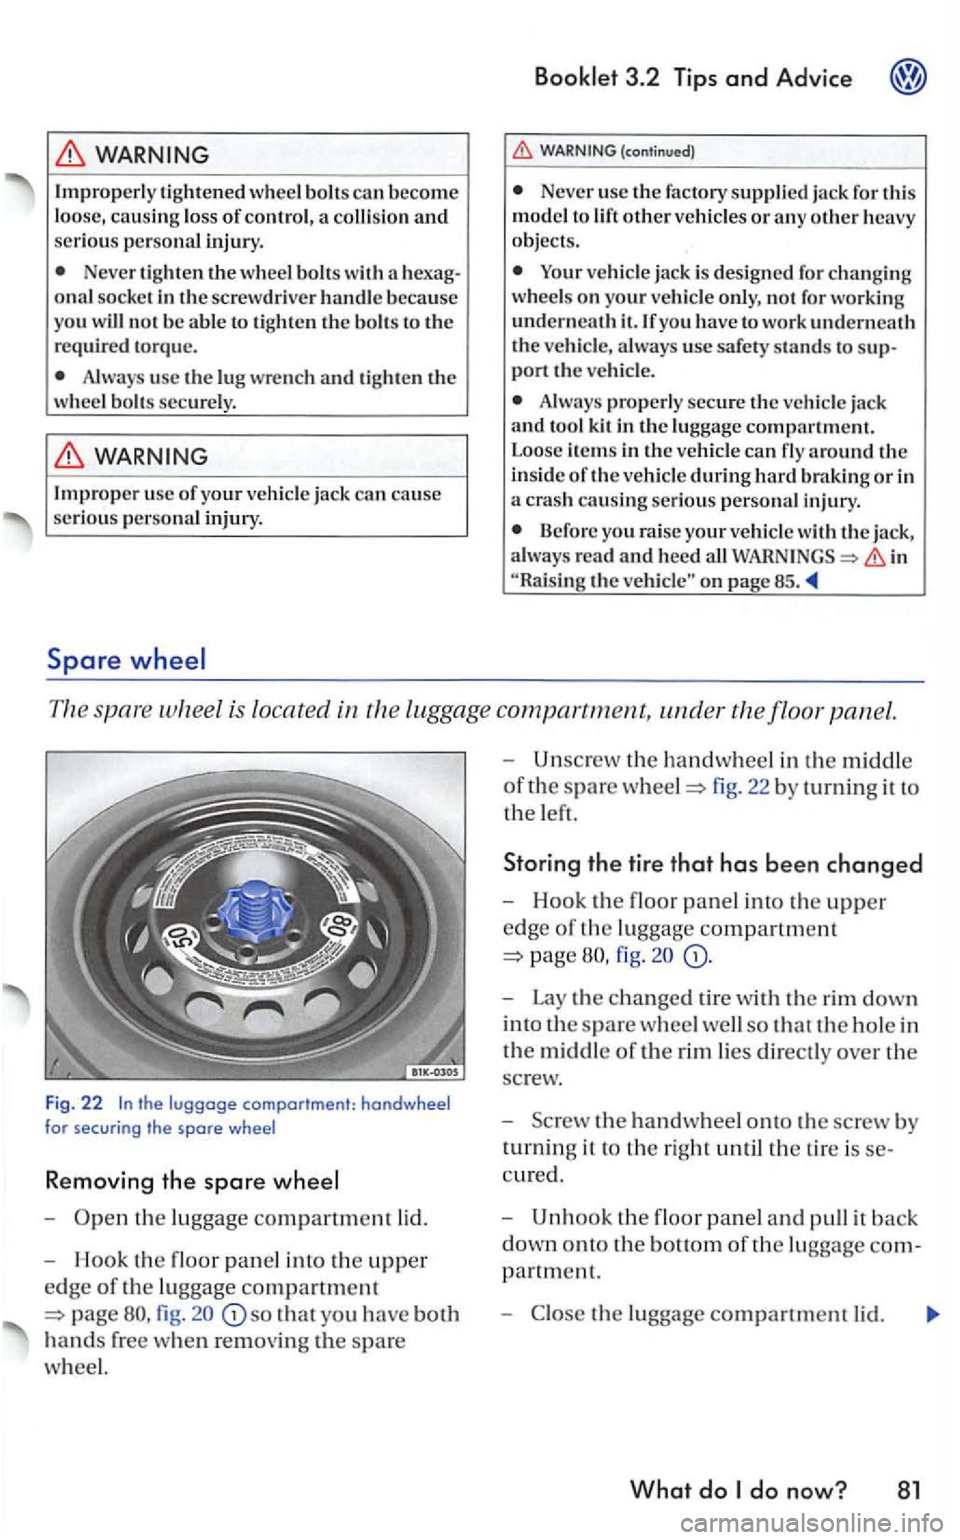
The screwdriver is in the lu g wrenc h and its
b lade is revers ible.
Adapter for anti-theft wheel bolt s
Tow ing eye. remo vable
\Vire hook for pulling off the wheel bo lt caps
Jack for changing a wheel. Before you put the jack back into the tool box make sure it is comple tel y retract ed.
Lug wrench for wheel bolts
Adopter for anti-theft wheel bolts
recommend you carry the wheel bolt adapter in the tool kit at all tim es. The anti-theft wheel bolt code numbe r is stampe d on the front of th e adapter. will need this number toreplace the adapter if it is lost. Note the code number of the adapter for the anti-theft wheel bolt and keep it in a safe place-but no t in your
Page 357 of 444
WARNING
Improperly tighten ed wheel bo lts can become loose, causin g lo ss of cont rol, a colli sio n an d seriou s perso nal injury.
Never tigh ten the wheel bolts with a onal socke t in th e screw driver han dle beca use
yo u will not be abl e to tighte n the bo lts to the
req uired torque .
WARNING
Improper use of your vehicle jack can ca use seriou s perso na l i njury.
Spare
3.2 Tips and Advice
(continued)
Never use the factory su pplied
port th e veh icle .
Alway s properly secure the vehi cle jack and tool k it in th e lu ggage com pa rtm ent .
Loose ite m s in th e ve h icle can fly a round the in side of th e vehicl e during hard braki ng or in a c rash causin g serious pe rso na l inju ry.
in th e ve hicle" on page 85.
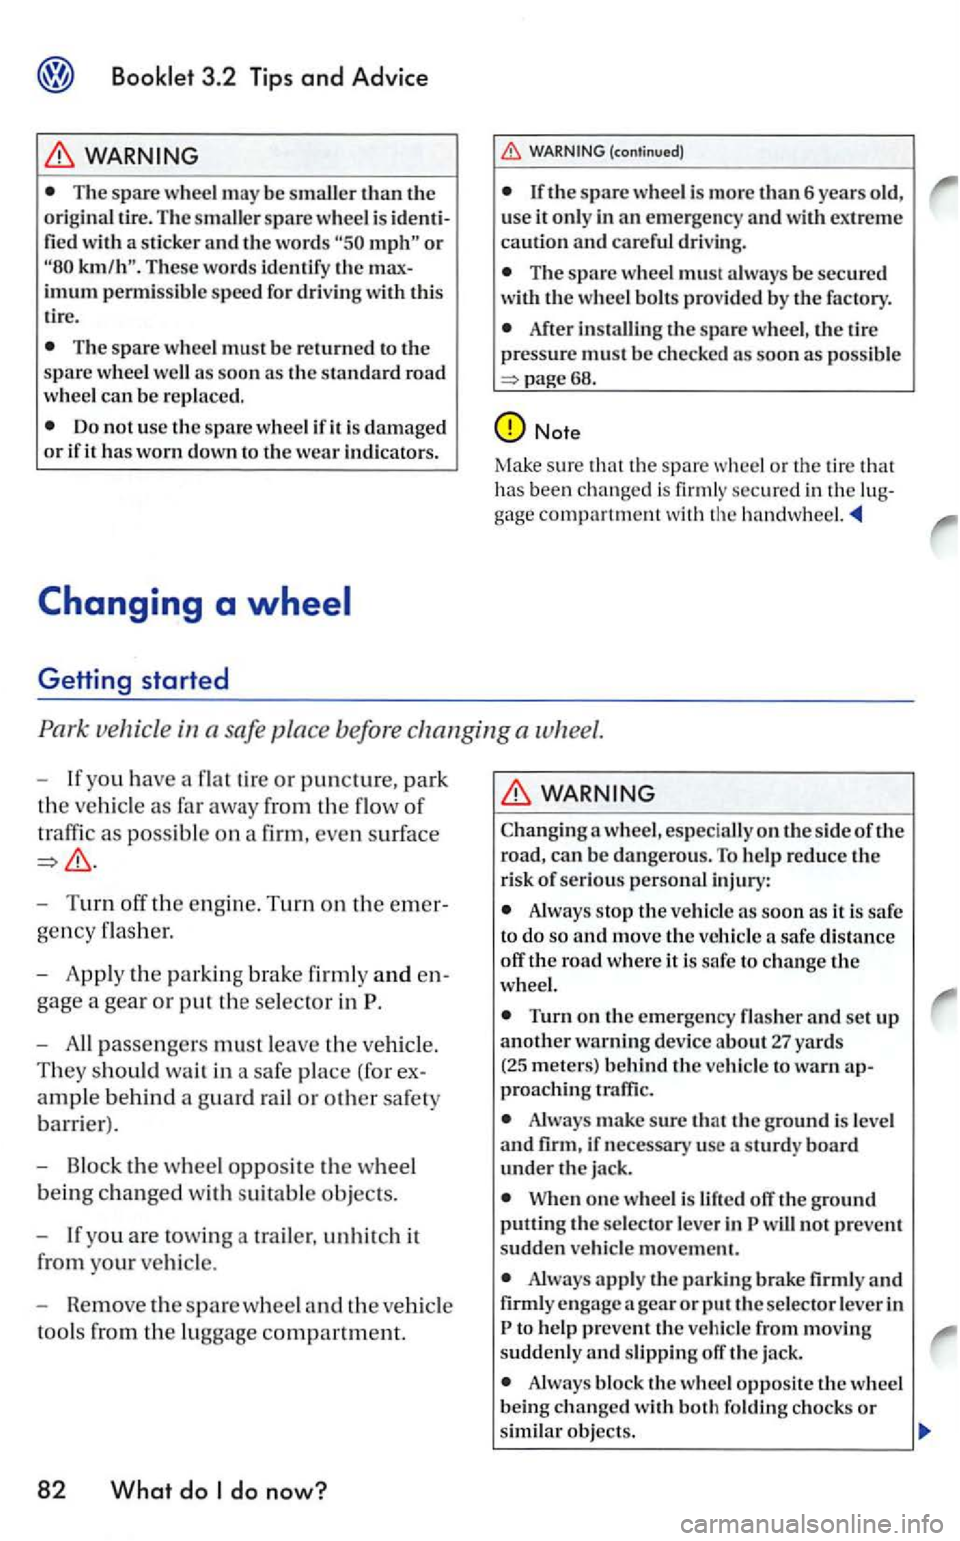
spare is located in t h e luggage compartment, the floor panel.
F ig. 22
-
fig. so that yo u h ave both
hands free when removin g the spare
w h
eel.
-Unscrew th e hanclwhee l in the m iddle
of the spare fig. 22 by turning it to
t h e left.
Storing the tire that has been changed
-Hook the floor panel into th e upper
edge of th e lu ggage compartment
page
-Lay the changed tire with th e rim down
i n to
the spare wheel well so that th e hole in
the middl e of th e rim lies directly over t h e
sc r
ew.
- Scr
ew the hand wheel onto th e screw b y
t
urni ng it to the right until the tire is
partment.
- C lose the luggage compartment lid.
What do do n ow? 81
Page 358 of 444
3.2 Tips and Advice
WARNING
The spare whee l may be smaller than the origina l tir e. The s maller spare wheel is identified with a sticker and the words
The spare whee l m ust be returned to the
spare whee l well so on as the standard road
wheel can be re pla ced.
Getting started
The spare wheel must always be secured
with the w hee l bolts provided by the factory .
After
r
vehicle in a safe place before changing a wheel.
If yo u have a flat tire or puncture, park
the vehicle as far away fro m the of
traffic as possib le on a firm, even surface
Turn off the e ngin e. Turn on the emer
gency flasher.
App ly the parkin g brake firm ly and e n
gage a
gear or put the selector in
If yo u are towin g a trailer, unhitch it
from yo
ur vehicle.
WARNING
Changin g a wheel, especially on
Alw ays stop the ve hicl e
to change the
Turn on th e e merge ncy fla sh er and se t up an o th er warning device ab o ut 27 ya rds (25 meters) beh ind the vehicl e to warn ap
proa ching traffic.
Always sure th at th e ground is leve l and firm, if necessary usc sturdy under the ja ck .
When one wh eel is lift ed off the ground putting the se lec to r l ever in
Always apply tl1e par k in g brake firmly and firmly engage gea r or put th e selec tor lever in
Page 359 of 444
(continued)
you towi ng
use
cops
3.2 Tips and Advice
(cont inued )
Never use o th er jacks, even if they been approve d for use on oth er Volkswage n
mode ls.
To re duce the risk o fl osing contro l, cras hes and serious personal injuries, never loosen
the sc rews on rims wi th threaded rim rings
Removing the caps from the
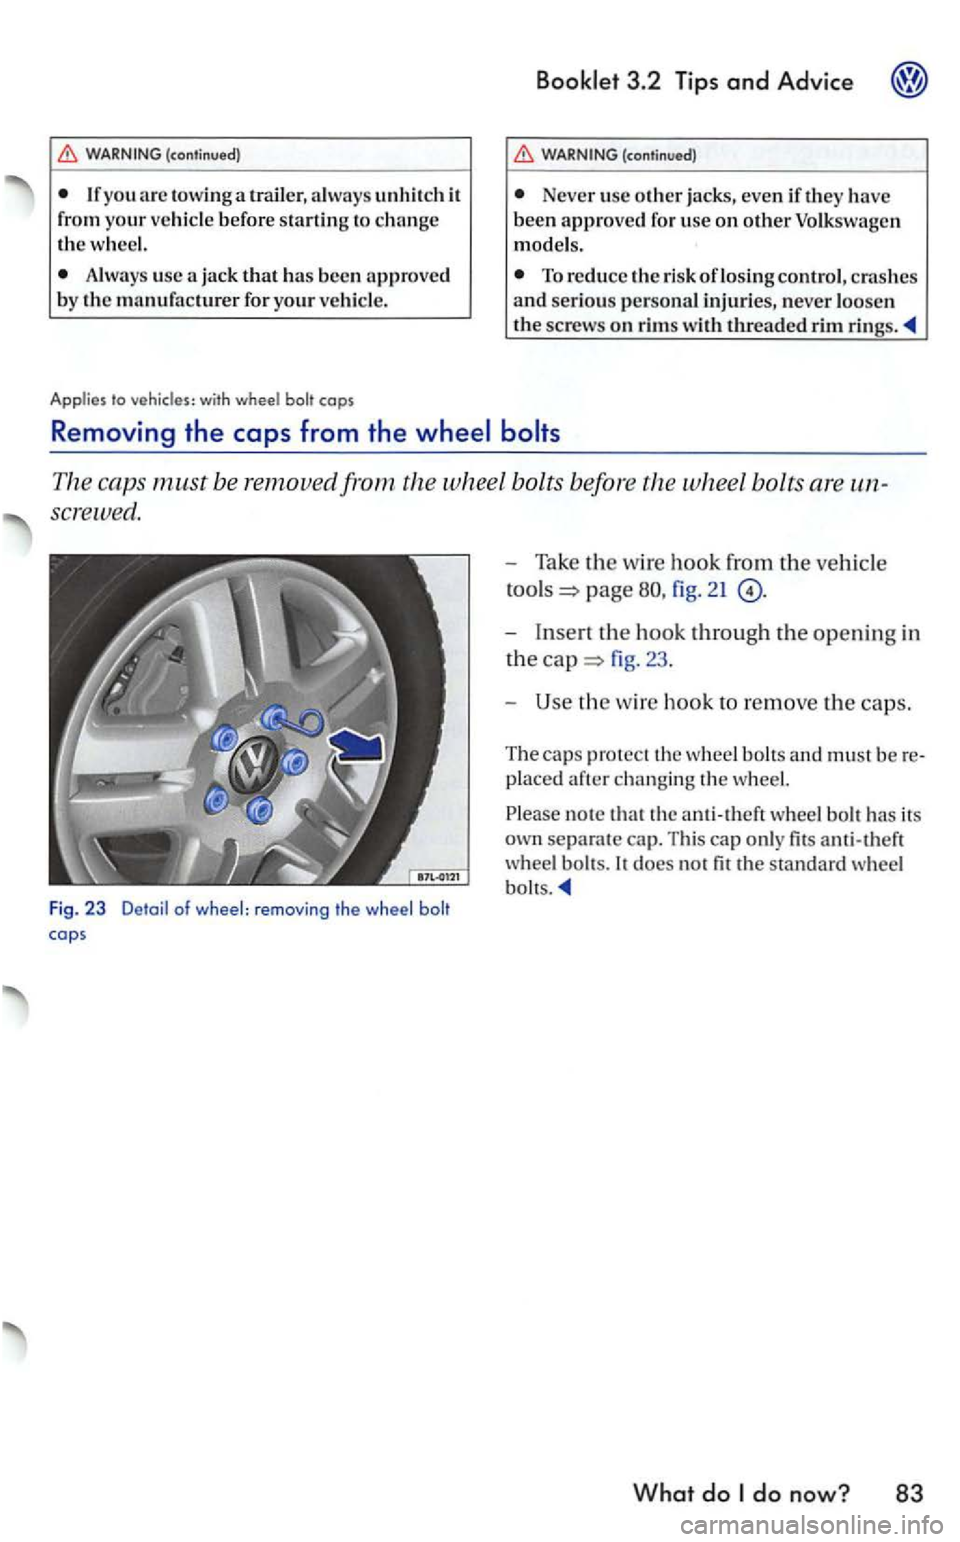
Th e ca ps must be removed from the whee l bo lts before th e wheel bolts are
screwed .
Fig. 23 Detail of wheel: removing the
=> page fig . 2 1
the w ire hook to remove th e caps.
The caps protect th e and must be
n ote that the anti-theft fits
.
What do
Page 360 of 444
Booklet 3.2 Tips and Advice
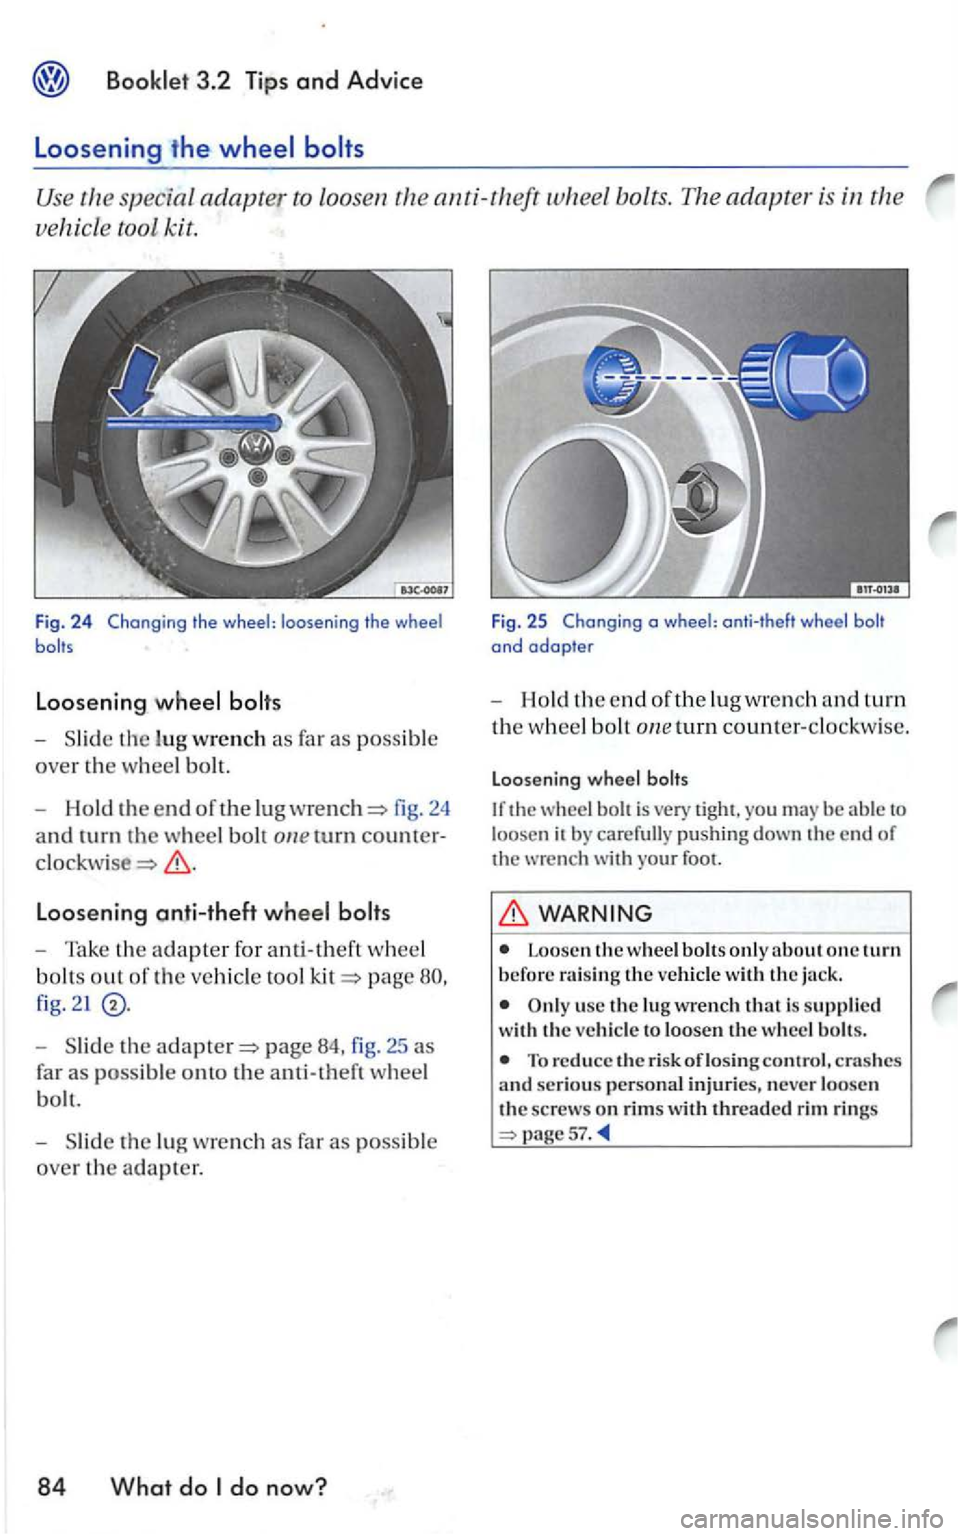
Loosening the
special adapter to loosen th e anti-theft bolts.
Loosening wheel bolts
-th e lug wrench as fa r as possi ble
over the w heel bolt.
- Hold
the end of the lug fig. 24
and turn the w heel bolt on e turn
Loosening anti-theft wheel bolts
-Take the adapter for anti -theft wheel
b olts o
ut of the ve hicl e tool page
fig .2 1
-th e page fig . 25 as
f
ar as possi b le onto the a nti-theft wheel
bol t.
-
the lu g wrench as far as possible
ove r the adapte r.
84 What do
WARNING
Loosen th e w heel boltsonlyabout one turn b efore raisin g th e ve hicle with the ja ck .
usc the lu g wrench that is s uppli ed
with th e ve hicl e to loosen the wh eel
Page 362 of 444
3.2 Tips and Advice
(continued)
knock the vehicle ofT the jack or hid e under a
vehicle.
Never support your body weight on the hicle when it is up on the jack.
Never allow anyone to stay in the vehicle when raising the ve hicle with th e jack or when it is up on the jack.
Never let anyone place any part of their body underneath the ve hicle when supported by th e jack.
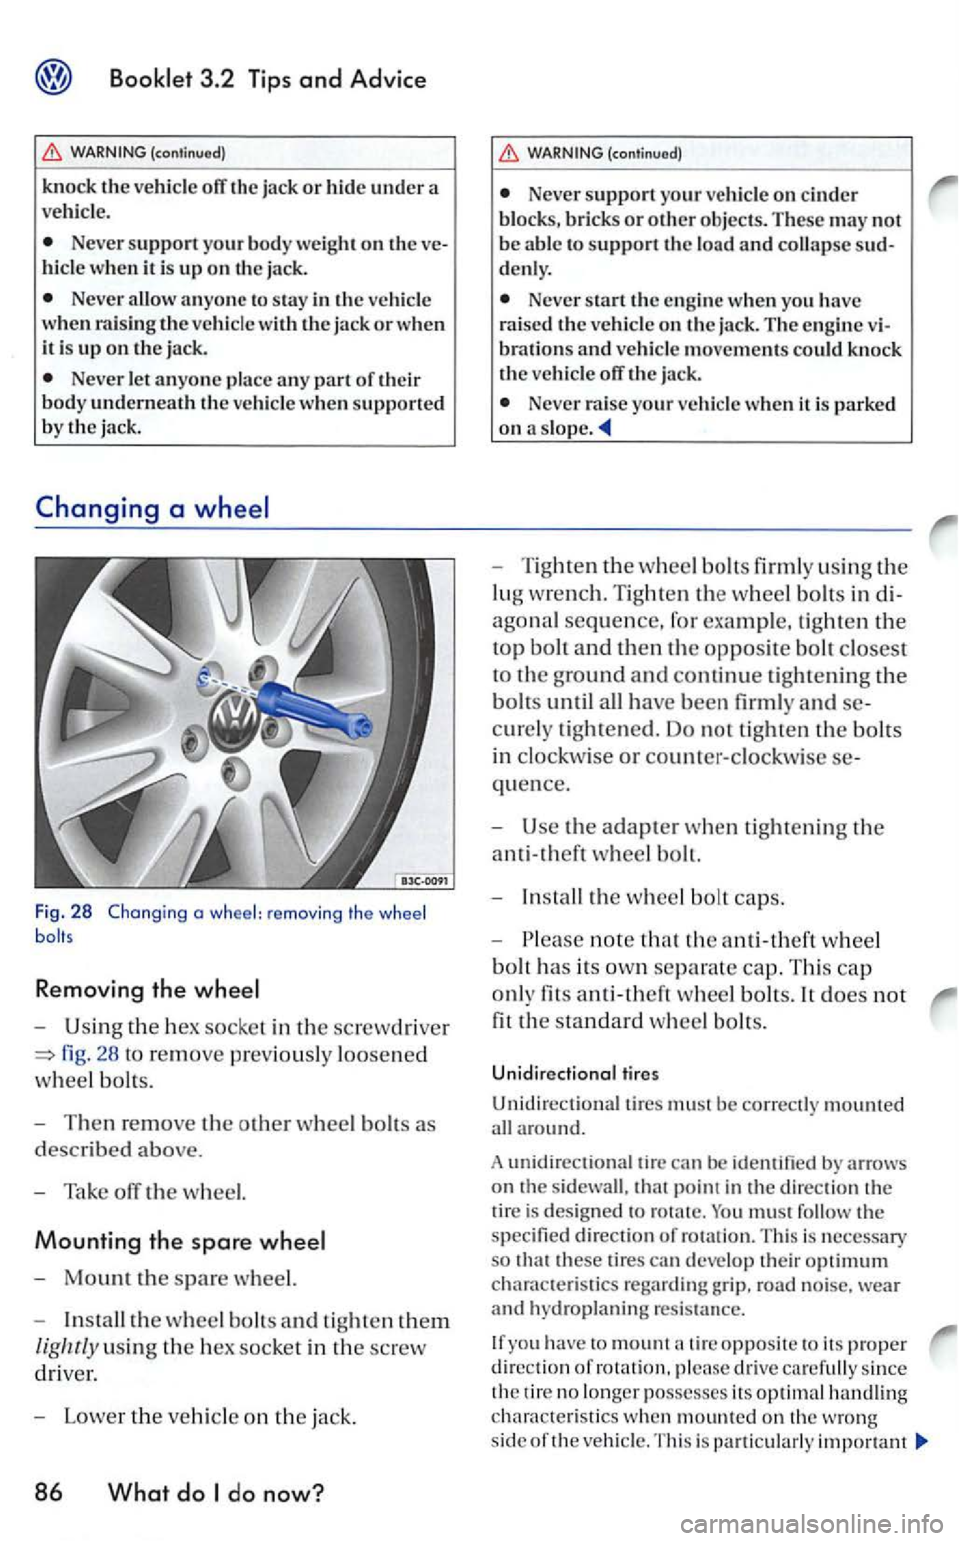
Fig. 28 Changing a wheel: remov ing the wheel
Removing the
U sing the hex socke t in the screwd rive r
fig. 28 to re move pr ev iously loosened
w
hee l bolts.
Then remove th e o ther wheel bolts as
d
escribed above.
Tak e off the w heel.
Mounting the spare
Mount the spare wheel.
In stall the wheel bolts and tight en them
lig hrly using the hex socket in the screw
driv er.
Lower the vehicle on th e jack.
86 What do do now?
(continued)
Ne ver support your vehicle on cinder blo ck s, bricks or ot her objects . These may not
b e abl e to support the load and collapse denl y.
Neve r start th e en gine when you have
rai sed the veh icle on th e jack. The engine brations and ve hicle movements could kno ck
th e ve hicle off the jack.
Neve r raise your ve hicle when it is parked on a s lope .
Tighten the w hee l bolt s firml y using th e
lug wre n ch. Tighten
the w heel bolt s in
agonal sequence, fo r exa mple, tighten the
top bolt and then the opposite bolt closest
to th e ground and continue tight ening the
bolts until all have been firmly and
quence.
Use the adapter w hen tight enin g th e
anti-theft wheel bolt.
In stall the w heel bolt caps.
note that the anti-theft w heel
bolt h
as its ow n separate cap. This ca p
o nl y
fits whee l bolts. It does not
fit the standard wheel bolt s.
Unidirectional tires
Unidirectiona l tires must be correctl y mount ed
all around.
A unidir
ectional tire can
must follow the specifie d direction of ro tatio n. T his is necessary
s o these tire s can deve lop their optimum chara cte ristics regard ing gr ip. road noise. wear and hydroplaning resis ta nce.
you have to mount tir e opposite to its proper d ire ction of rotati on, please drive carefull y since
th e tir e no lo ng er posse sses its optimal ha ndlin g
c h arac te rist i
cs when mounted on th e wro ng
s id e of th e ve hicl e. T hi s is particu larly impo rtant