seats VOLKSWAGEN GOLF 2006 Service Manual
[x] Cancel search | Manufacturer: VOLKSWAGEN, Model Year: 2006, Model line: GOLF, Model: VOLKSWAGEN GOLF 2006Pages: 444, PDF Size: 92.7 MB
Page 232 of 444
and Equipment
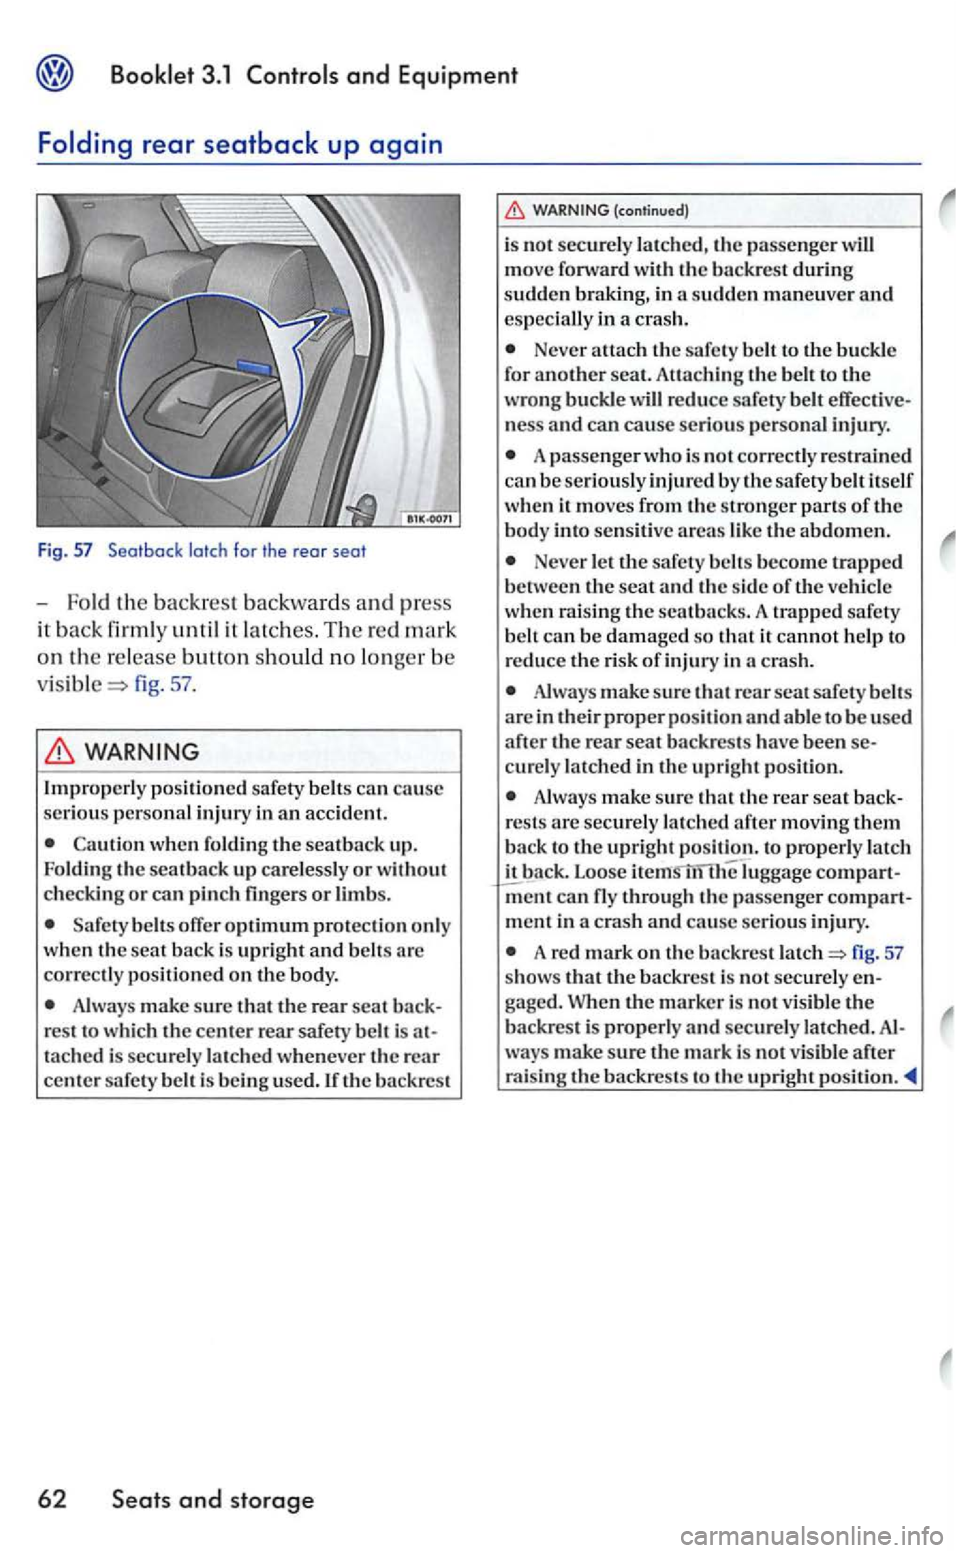
the backrest backwards and press
it back firmly until it latches. The re d mark
o n rhe release button should no lo nge r be
fig. 57 .
when foldin g the seat back up.
Folding the seat back up care lessly or without
c h ecki ng or ca n pin ch fin gers or limbs.
belts offer optimum protection only
w hen the sea t back is upri ght and belts arc
correc tly po sitioned on th e body.
Always make sure that the rear seat res t to whic h th e cente r rear safety belt is t ached is securely la tched whenever the rear center sa fety be lt is use d. If the backrest
62 Seats and storage
(con tinued)
is not secu re ly latched, the passenger move forward with the backrest during
sudde n braking , in a sudden maneuve r and espec ially in a c rash.
Never attach th e safe ty belt to the buckle
for another seat. Attaching the belt to the wro ng buckle ness and can cause serious pe rso nal injury.
A passenger who is not correctly restrain ed
ca n b e se riousl y injured by th e sa fety belt itself
when it move s the strong er parts of the body into sensitiv e areas like the abdomen.
Never le t th e safety belts beco me trapped
between the seat and the side of th e veh icle
when rai s in g the sea t ba cks. A trapped safety
b elt can be damaged so that it cannot help to
r e du ce the risk of injury in a crash.
Always make sure th at rear seat safety belts are in their proper position and able to be used
after the rear seat b ackres ts have been
Always make sure that the rear seat rests are sec urely latched after moving th em
b ack to the upright position. to properly latc h
it bac k. Loose
m ent in a crash and cause se rious injury .
A re d mark on the ba ckrest fig. 57 show s that the ba ckres t is not securely gaged. When the m arker is not visible the backrest is properly and sec urely latch ed. ways m ake sure the mark is not visibl e after raising the backre sts to the upright
Page 233 of 444
vehicle has an the center of the rear backrest, which en ables
to transport long objects, which do not fit the luggage compartment.
F ig. 58
compart
ment
-the rear lid.
-
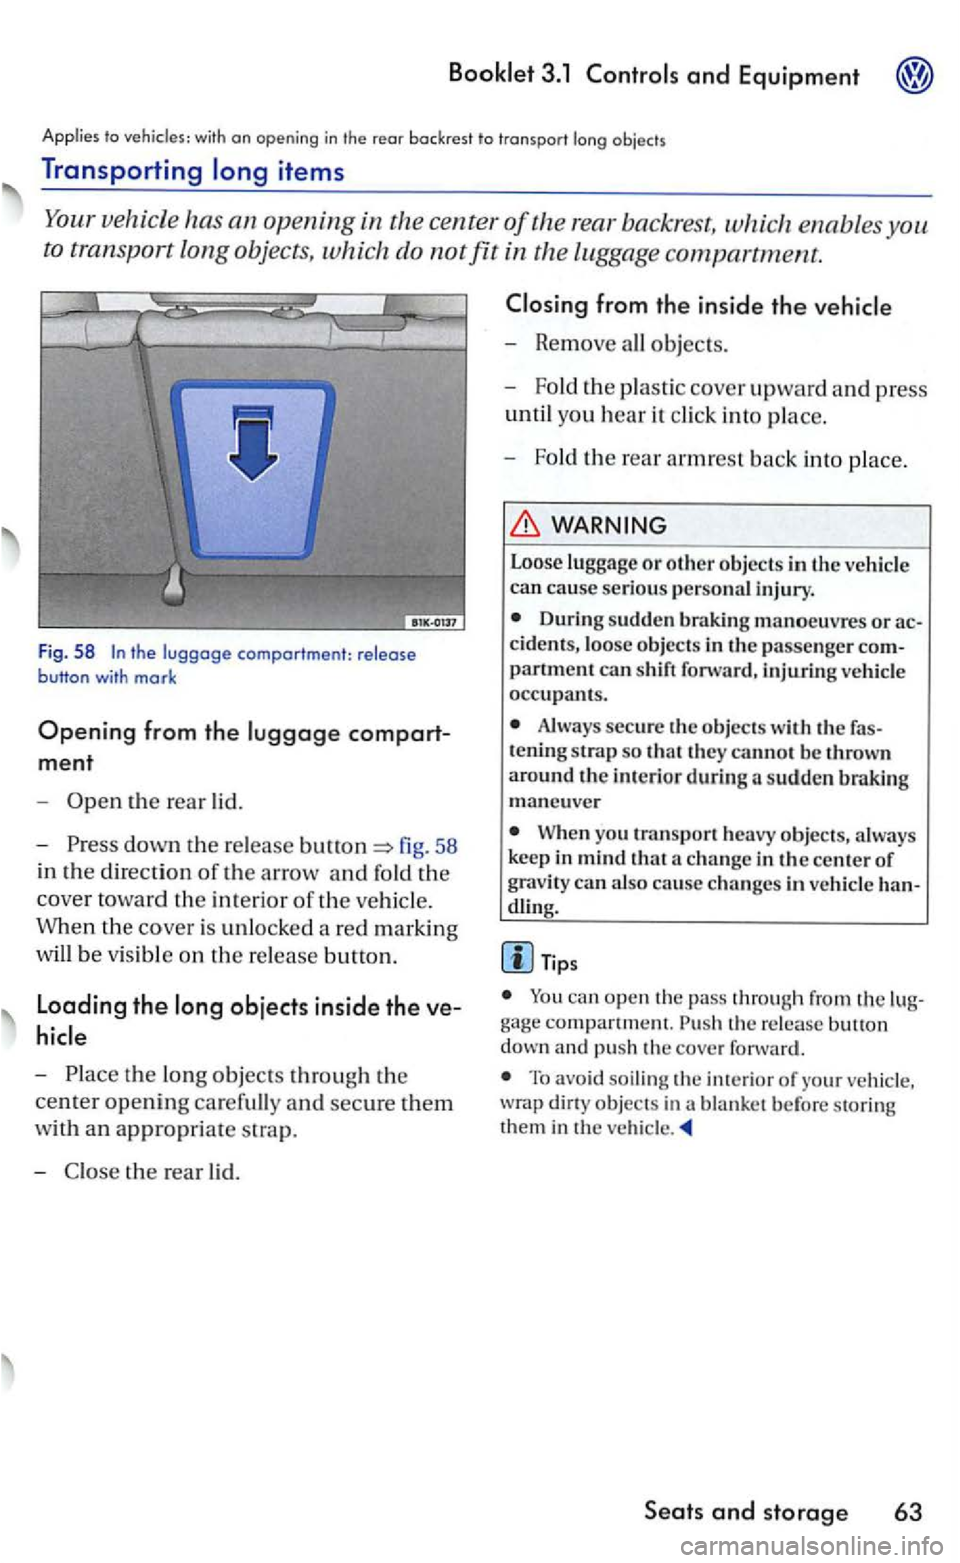
down the r e lease fig. 58
in the
direction of the arrow and fold the
cover toward the interio r of the ve hicl e.
When the cove r is
unlocked a red marking
wi
ll be v is ible on the re lease button.
Loading the
-
- Remove all objects.
- Fold
the plastic cover upward and p ress
until you hear it click into p lace.
-
Fol d th e rear armrest back into place.
WARNING
Loose luggage or other objec ts in the ve hicle can cause serious personal injury.
D uring sudden braking manoeuvres or
partment can shift forward, injtuing vehicl e occupants.
Always secure the objects the tening strap so they cannot be thrown around th e in te ri or during sudden maneu ve r
Whe n yo u transpo rt heavy objects, always
keep in mind that
dl ing.
Tip s
can open the pass through from the compartment. release down and pu sh the cove r forward.
To avoid soiling the of your vehicle , dirty objec ts in a blanket before storing them in the vehicle
Seats and storage 63
Page 234 of 444
3.1
glove
Fig. 59 Front
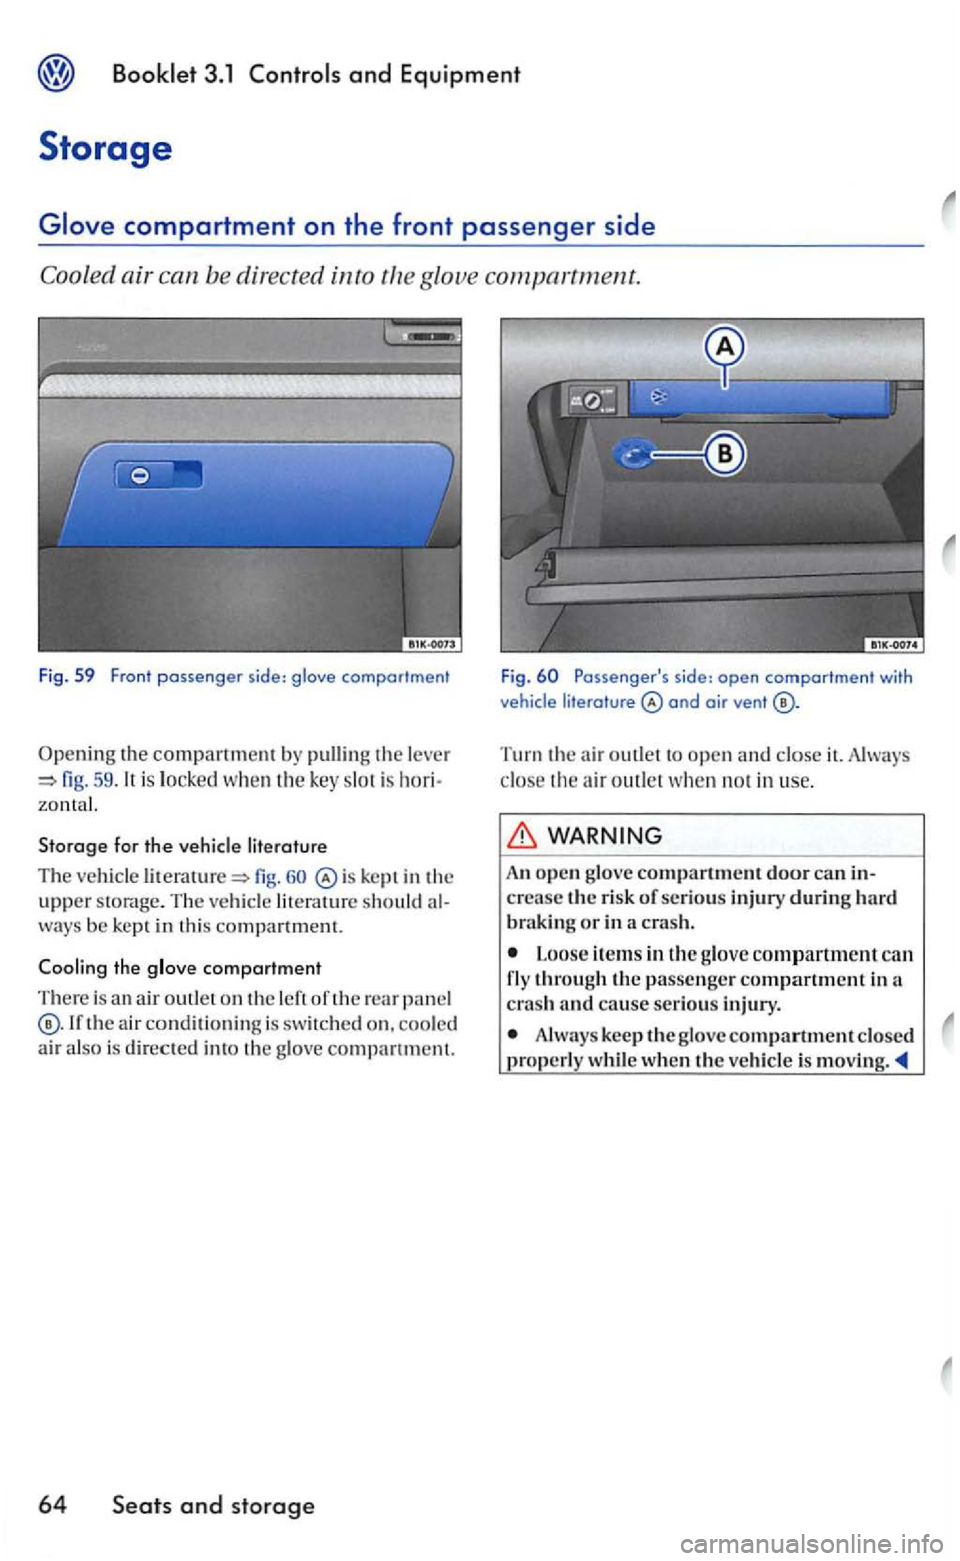
59 .
kept in th e upper sto rage. T he ve hicl e lit erature should ways be kept in thi s compartment.
Cooling the glove comportment
There is an a ir outle t o n the left o f th e rear panel the air conditioning is swit ch ed on, coole d
a ir a lso is dir ected into the glove compartment.
64 Seats and storage
Fig. Passenger 's side: open comportment with
vehicle literature
Turn the air outl et t o open and close it. Always
close the
air outl et w hen not in use.
A n open glove compartment door can cre ase the risk of serious injury during hard brakin g or in a crash.
Loose items in the g love compartment can fly thro ug h the passenge r compartment in a
c rash cause serious injury.
A lway s kee p the glove compartment closed prope rl y whi le whe n the ve hicl e is
Page 235 of 444
and Equipment
to with front center armrest ond one storage compar tmen t
Front center armrest with storage compartment
There is a slOrage compartment in the cente r armrest .
Fig. 61 Front a rmrest with sto rage comportment
Opening and the storage
comportment
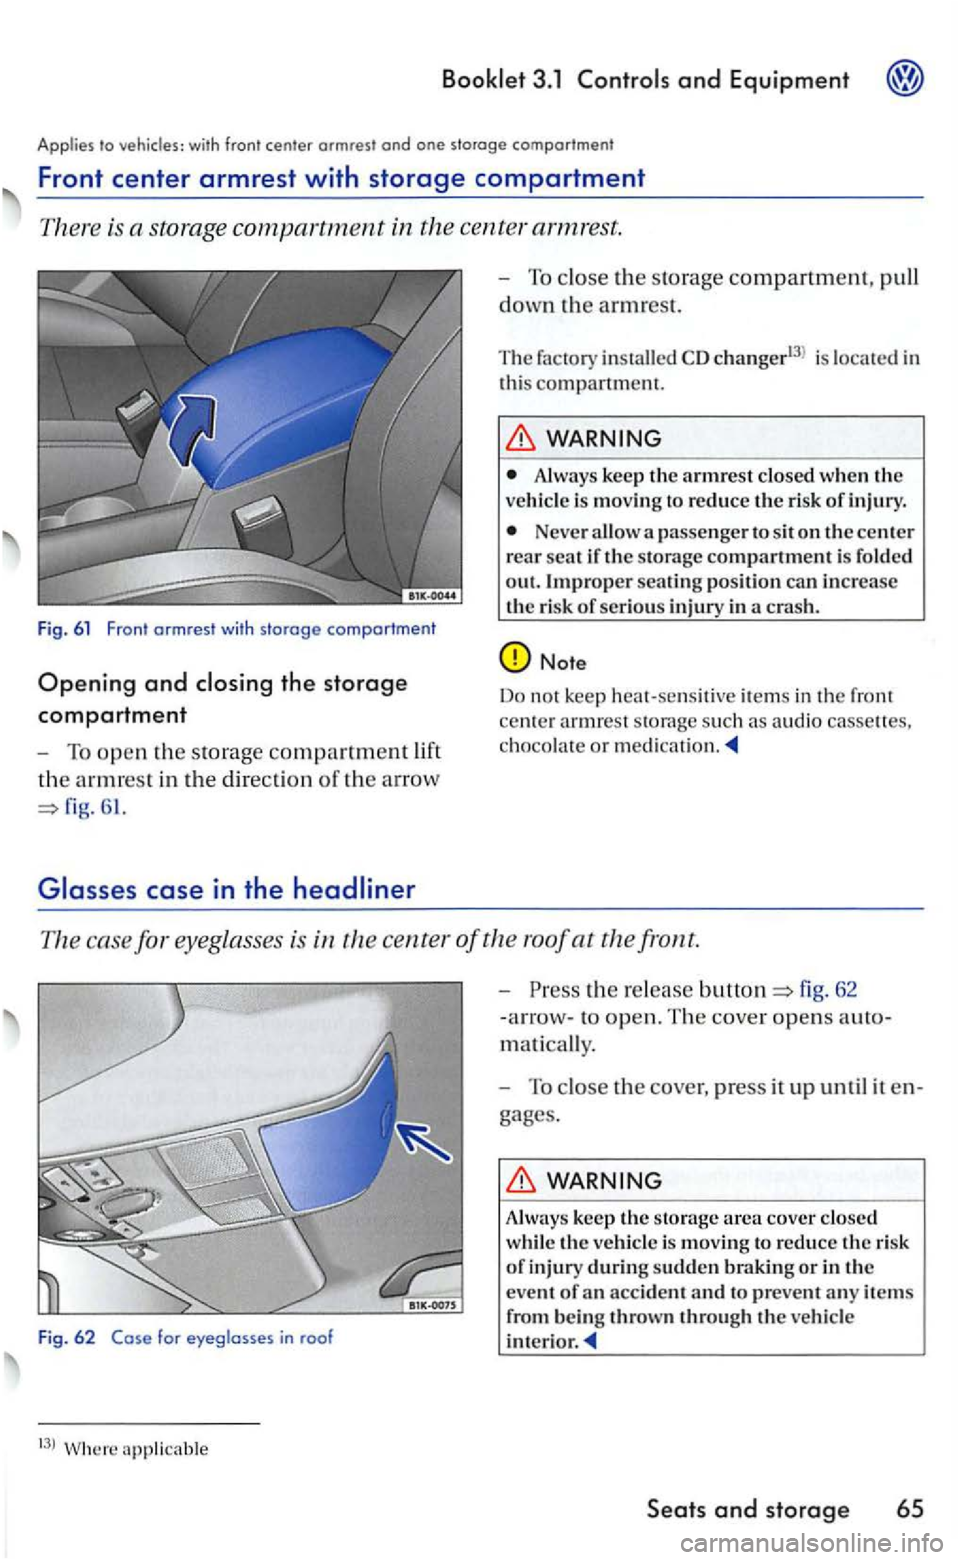
- To ope n th e s tor age compartment lift
th e
armrest in the direction of the arrow
-To clo se the storage compartment, pull
down the armrest.
Th e fac tor y in stalled CD changert3l is loca ted in
thi s compartment.
WARNING
Alwa ys keep the armrest clo sed when the vehicle is movin g to reduce the ri sk of injury.
Neve r allow a passenger to sit on the cente r
r ea r seat if the s torage compartment i s fold ed
o ut . Improper seat ing position can increase th e risk of seriou s inju ry in a cras h.
Note
Do not keep heat-sensitive ite m s in th e front
ce nter armrest storag e such as au dio cassett es.
choco la te or
Th e case for eyeg lasses is
-the re lease fig. 62
-ar row- to open. T he cove r o pen s auto-
mati
cally .
-
To close the cover , press it up until it
gages.
WARNING
A lwa ys keep th e storage area cover closed
whil e th e ve hicle is m ov ing to reduce th e r isk of injury durin g sudden braki ng or in the
eve nt of an acci dent and to preve nt any item s
from be in g throw n through the vehicle
Seats and storage 65
Page 239 of 444
and Equipment
the following points to make sure
the ve hicl e handles well:
- D is tribute
the load as even ly as
heavy objects as far forward in the
lu ggage compartment as possibl e.
-
luggage in the lug gage compart
men t w ith suitable s traps o n the tie-down
hooks.
WARNING
Improperly stored luggage or other item s can become airborne mi ssi les, fly ing through the
ve hicl e ca using seriou s personal inju ry in the even t of hard braking or an acc ident. To help
reduce th e risk of serio us personal injury:
Always put objec ts , for example, lu ggage or other heavy item s in the lugg age compartment.
Always secure objec ts in the luggag e partment usi ng the ti e-down hook s and suit able straps.
WARN ING
Heavy loads will influ ence the way your hicl e handles and heavy loads that arc no t properly s towed or secured serious i njury.
Always keep in mind when transp o rtin g
heav y objec ts, that change in the center of g ravity can also cause ch anges in vehicle
eve nly as possible.
- Sec
ure heavy objects prop erl y ward in the compartment sibl e.
Where applicahlc
(con tinued)
- Alwa ys secure heavy item s securely
u sing the ti e-downs provided w ith suitable
straps.
Neve r exceed the Gro ss Axle Weight Rating or th e G ross Vehi cle Weig ht Rating on the safety compliance sticker on th e
Always read and heed add itional tant information on safe booklet 2.1 chapter driving"
WARNING
To help prevent po isonous exhaus t gas from being drawn into the veh icle, always keep th e rear lid
Never transport objec ts larger than tho se
fittin g co mpletel y into th e luggag e area cause the rear lid cannot be fully closed.
Lfyo u absolu te ly must drive wi th the rear lid open, observe the following notes to reduce the risk or poi soning:
-
the pow er roof14l,
-all a ir o utle ts in th e in strument pane l,
- Switch
the air recirculation ,
-
Set the fr es h air fan to the highe st sp eed.
WARNING
A lwa ys make sure that the doors and rear lid are securel y clo sed and locke d to red uce the
risk of in jury when the vehicl e is not bein g
u sed.
locke d.
Seats and storage 69
Page 242 of 444
2-door vehicles
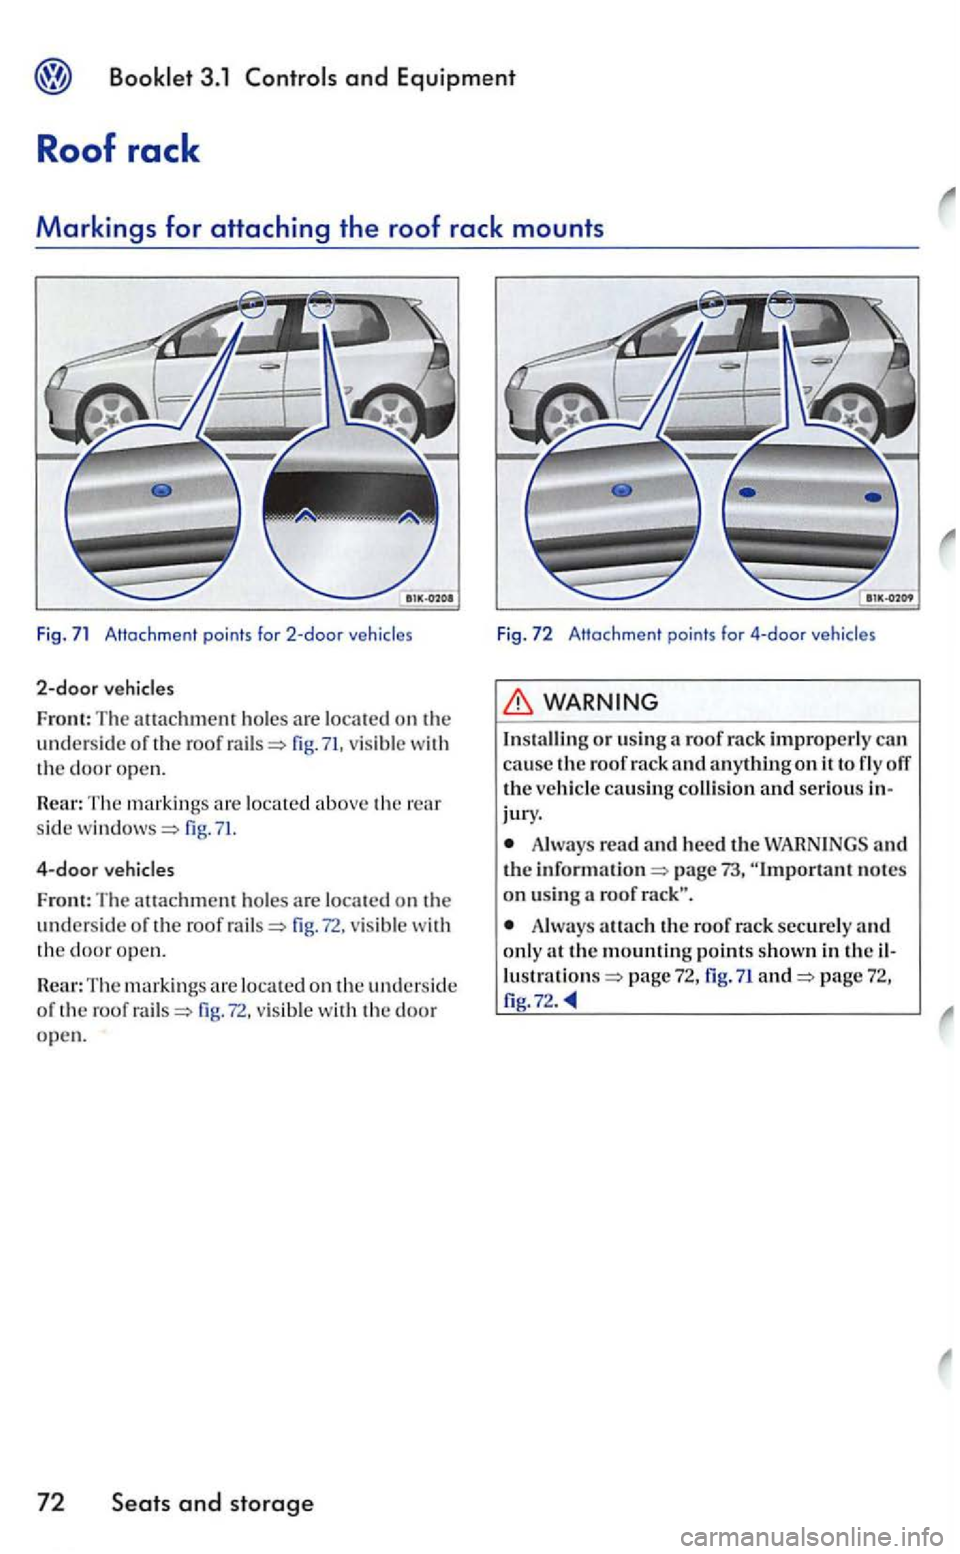
Front: The attachment ho les are locat e d on th e unders id e or the roof fig. 71, vis ible w ith the door open.
Rear: T he markings loca te d above the rear
s id e fig.
4-door vehicles
Front: The atta chment ho les a re locat ed on the underside o f th e roof fig. visib le w ith the door op en .
R
ear: Th e markings are loca te d on the unde rs id e
o r th e fig. vis ibl e w ith the door open.
72 Seats and storage
Fig. 72 Attachment points for 4-door
Installin g or using a roof rack improperly can cause the roof rack and anything on it to fly off the vehicl e causing colli sion and serious jury.
Always read and heed the WARN INGS and page 73 , "Important notes on u sin g a roof
Alwa ys attach the roof rack securely the mounting points shown in the page 72 , fig. 7l and=> page 72,
Page 270 of 444
light 33
Dri v
ing time
Dri vin g wi th an t rans missio n 89
Du st filter 83
E
E le c trical socket 68
E l
ectro n ic immobilizer 85
Emergency fla sh er 45
Emergen cy opening
Doors 34
Env
ironme n tal informatio n
Fuel econom y 9
Environmen tal tip
Fuel economy 74
F
Fog light s 43
Front center armrest 65
Front seats 58
Fuel gauge Display
Fuel level
F u el ta n k
G
Gear se lector lever
See A
utomatic trans m ission wit h Tip tron
ic
illu stration 3
G l
ove compartment Front passenger sid e 64
H
Hand brake
See Parking brake
Hazard lights 45
H
ead restraints
Adjusting 57
R em
oving 57
46
Headlight lens fogging 44
Headlights 43
Fog
lights 43 Switching 43
syste m 52
H
eated f r ont seats 59
H ig h
beam 46
High
beam lever 46
Horn 3
I g niti on key
removal lock 85
I gni ti
on switch 84
Indicator light
control sy stem 96
See also
Indi vid ual unlocking
In formati o n messages
66
In struments
inte rio r front lights
front '1 7
Interio r lights
backg round 48
reading 48
readin g lig ht s 47
imerio r ligh ts 47
In te
rmitt ent wipe 49
K
Key 27
Keys 27
Kick-down functi on 94
Page 334 of 444
changea ble deco rat ive cove rs a re att ached to th e rim with s elf- locking sc rews . lfyou would ro re pla ce damaged wheel covers, contact your authorized Volkswa gen d eale r or
WARNING
New ti res or tires tha t are old, worn or aged cannot provide maximum control and braking ability.
New tires tend to be s lipp ery and must be broken in . To reduce the risk of losing co ntrol,
a co llisio n and serio us personal injuri es, drive with sp ecia l care for the first km).
(cont inued )
Driving with worn or damaged tire s can lead to lo ss of control, sudden tire failur e, cluding a blowou t and sudden deflation ,
c ras hes and seriou s personal injuries. Have wo rn or damaged tires rep laced imme di ate ly.
To redu ce the riskoflosingcontrol, crashes and s erio us personal injuries, never loose n
th e bolts on w heels with bolted rim rings.
more than 6 years old can onl y be used in an em erg en cy and then
w ith specia l care and at low speed.
Neve r m ount u se d tires on your ve hicle if
yo u are not sure of their used tires may have been damaged ev e n
t h oug h the damage cannot be seen th at can
lead to sudden tir e failure and loss of ve hicl e control.
hicl e pull s to one sid e when dri ving, always
s top as soo n as it is safe to do so and ch eck the
whee ls and tires for damage.
Accessory weight
Means the combined we ight ( in excess of those
sta ndard ite m s w hi ch may be repl aced) of mati c tran smission. power steering. po wer
bra kes, power windo ws. p owe r seats , radio, and heater, to th e ex te nt th at th ese item s are
or lowe r indica te
a short s id ewall for improved steering respo nse and better ove rall handling on dry pave ment.
Bead
Mean s the pa rt of the tire t hat is m ad e of stee l
wires , w rap ped or re inforce d by pl y cords and that is shap ed to fit t he rim.
Bead separation
Mean s a breakdow n of th e bond between
Means the strand s forming the in th e tire.
weight
Me ans th e weig ht of motor vehicl e w ith dard equ ipment including the m aximum pacity of fu el, oil. and coolant . a ir conditio nin g
a nd additional weight of opt io n al equipm ent.
E xtra load lire
M ea ns tire desi gn to operate at higher loads and at hi gher inflat ion pressure s th an th e corre -
s ponding sta ndard tire.
Page 369 of 444
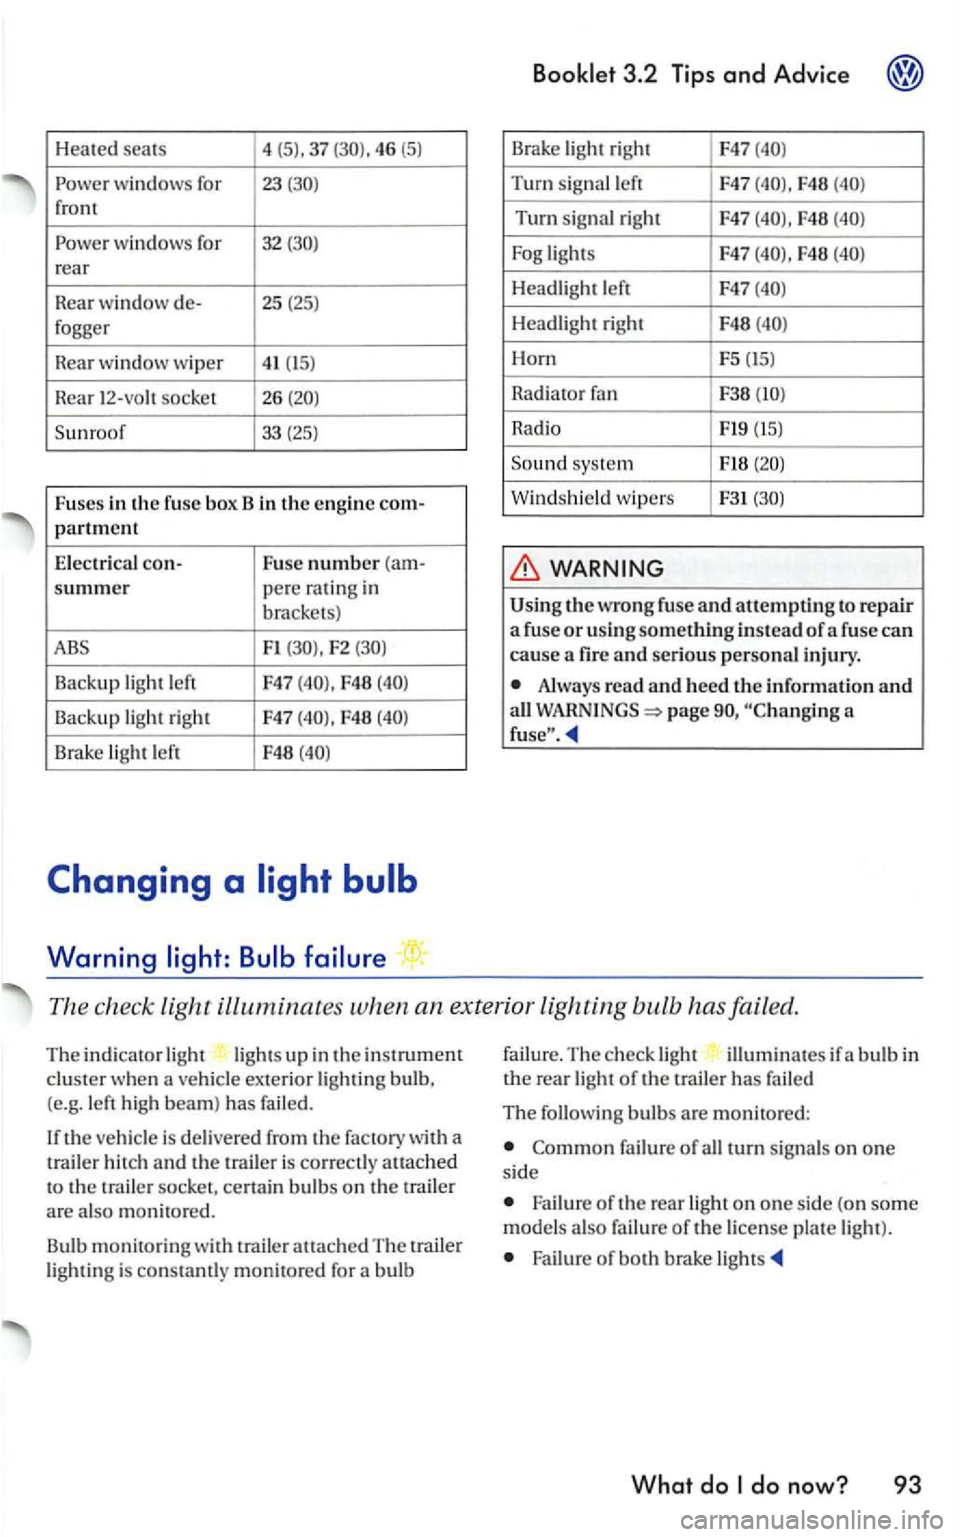
Heated seats 4
(5). 37 46 (5)
windows for 23 front
wind ows for 32 rear
Rea r
window de- 25 (25) fogger
R
ear w indow wiper 41 (15)
R ear 12-vo h socket 26
F1 F2
Backup light left F47 F48
Backup light right F47 F48
Brake light left F48
Warning
Brake light righ t F47
Turn sig na l left F47 F48
Turn signal right F47 F48
F48
Headlight left F47
Headli gh t right F48
Horn F5 (15)
Rad i
ator
Radio Fl9 (15)
Sound syste m
Windshield wipers F31
the wrong fuse and attempti ng to re pair a fuse or usi ng something instead of a fuse can
cause a fir e and serious personal injury.
Alway s read and heed the information and all page a
The check light ill uminates when an ex terior lighting bulb has failed.
The indicato r light lig ht s up in the instrument clus ter when a ve hicle exterior lightin g bulb,
(e.g. le ft high beam) has failed.
th e ve hicle is delivered from the factory with a
t railer h itch and the is correct ly atLached to the trai le r socket, cert ain bulb s on the trail er are also monit ore d .
Bu lb
monitorin g with trailer attach ed The traile r light ing is con stamly monitored for a bulb failu
re.
The ch eck ligh t illumin ates if a b ulb in the rea r light of the trailer has fai led
The following bulbs are mon itored:
failure of all turn signa ls on one si de
Failure o f the rear light on one si de (on som e
model s als o failu re of the license pla te light ).
Failure of both brake li gh ts
What do