headlights VOLKSWAGEN GOLF 2007 Owners Manual
[x] Cancel search | Manufacturer: VOLKSWAGEN, Model Year: 2007, Model line: GOLF, Model: VOLKSWAGEN GOLF 2007Pages: 444, PDF Size: 92.7 MB
Page 35 of 444
km)-All
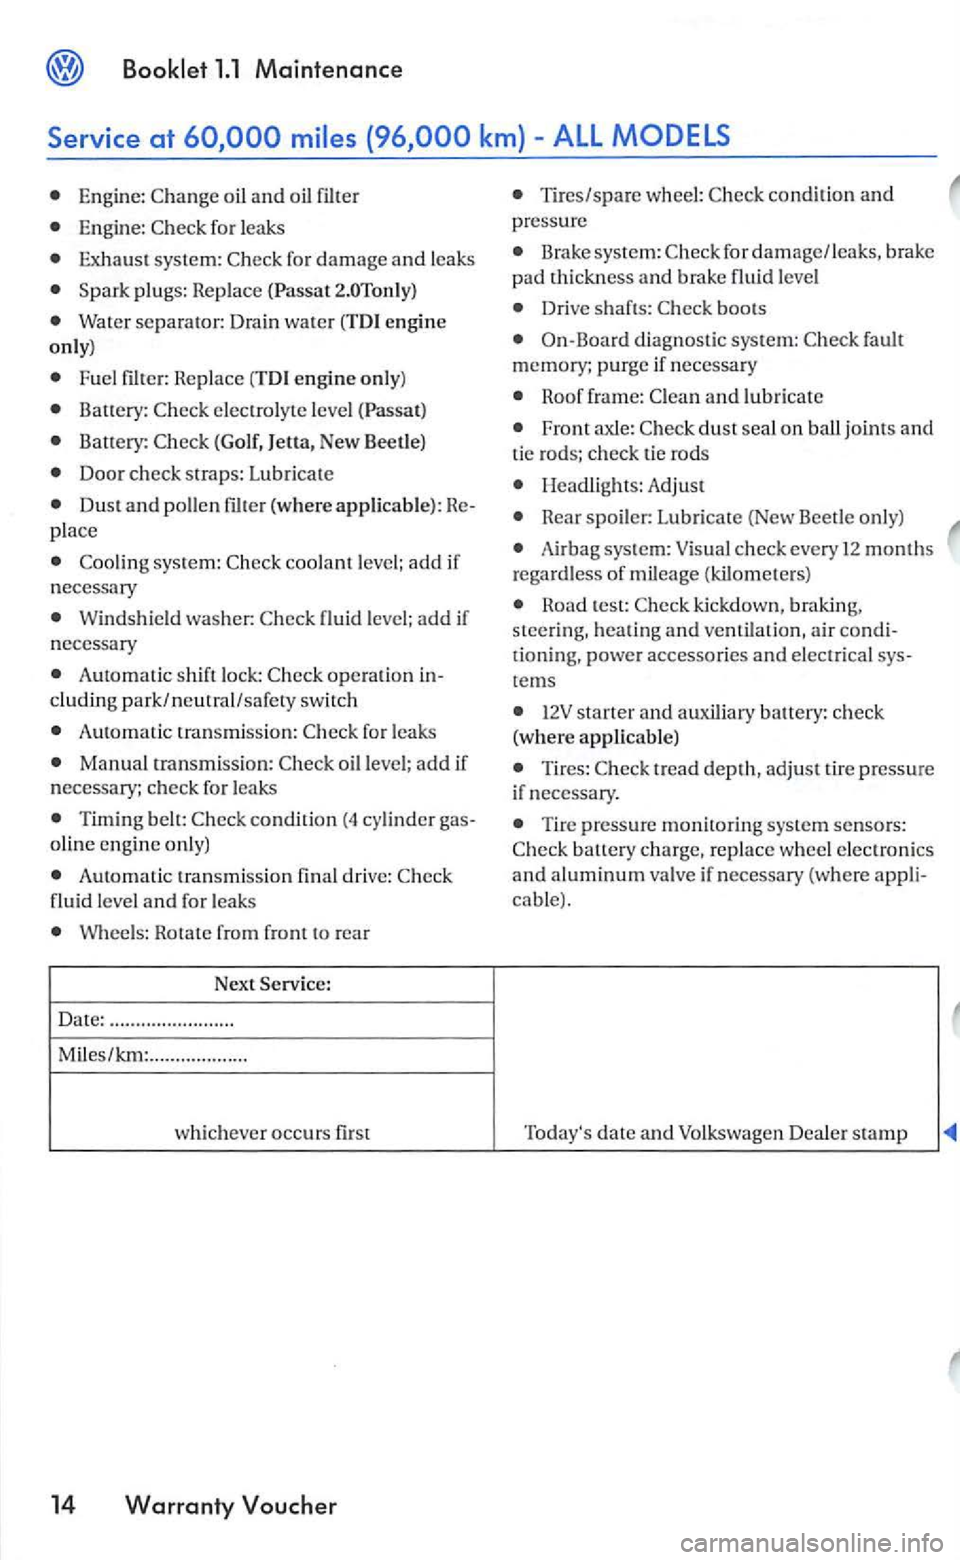
Engine: oil and oil filter
Engine : fo r l eaks
Exhaus t sys te m :
plu gs: Replace
Water separator : Dra in wa te r (TDI engi n e
only)
F uel Repla ce (TDI engine only)
electrolyte le vel
(Golf, }etta, New Beetle)
Door check stra ps: Lubri cate
Dus t and polle n place
Windsh ie ld was her: leve l; add if
n ecessary
A uto m atic shif t lock: operation
A utomatic tra nsmission:
Manua l tran smission: oil level; add if
n ecessary; ch eck for leaks
Timing belt: olin e engin e only)
Automati c transmission final drive: level and for leaks
Wheels: Rotate from Front rear
Next Servic e:
D at
e: ... .... .... ..... ........
M
iles/ km: ...................
w hi ch ever occurs first
14 Warranty Voucher
T ires/spare wheel:
sys tem: for damage/leaks, brake
p ad thickness and brake level
Drive shafts:
O n-Board diagn ost ic sys tem: fault
m em ory; purge if necessary
and lubricate
Front axle: dust seal on ball joints and tic ro ds; ch eck tic rods
Headlights: Adjust
Hear spoiler: Lubricate (New Beetle only)
bag system:
Hoad test: kic kdown, braking, steering, heating and ve ntil ation, air
te ms
starte r and auxiliary bauery: check
(w here applicable)
tread depth, adj ust
Tire pressure monitoring system senso rs: bauery ch arge, re pla ce wheel ele ctron ics and a lu minum va lve if necessary (where cable).
Tod ay's date and Volkswagen Dea le r sta m p
Page 213 of 444
and Equipment
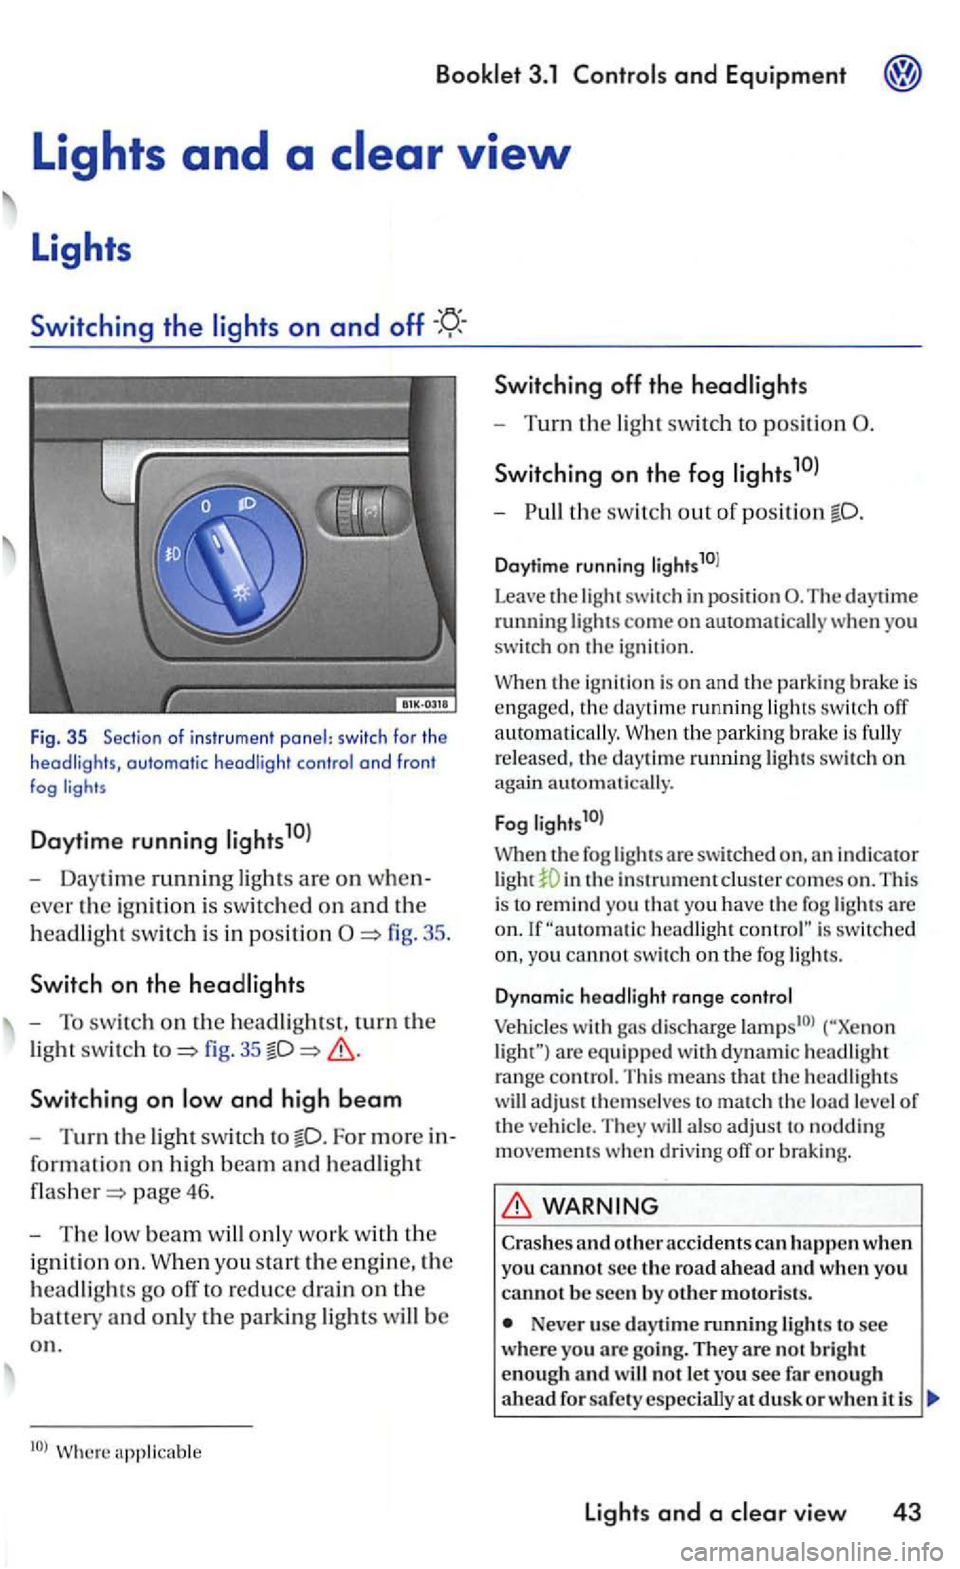
Fig . 35 Sec tio n of i nstr u m ent panel: switc h fo r th e headligh ts, automatic headli ght contro l a nd fron t fog
Daytime running
- Daytime running ligh ts are on when
ever the ig ni tio n i s sw itc hed on an d th e
h
eadlig ht swit c h i s in positi on
fig. 35
Switchin g on
For more in
for ma
tion on hig h beam an d headlight
page 46.
-The low beam w ill only work w it h th e
i g ni
tion o n . W hen you sta rt the e ngin e, the
h
eadlights go off to reduce drain on the
batt ety an d only th e parkin g lights will b e
o n .
Switching off th e headlights
- Turn the light swit ch to position
S wi tch ing on the fog
-th e switch out o f position
Daytime running li g hts10l
Leave
the light switch in posit ion The daytime running lights come on automatically you
switch on the igni tio n.
the ignition is o n and the parking brake is engaged , the daytime running ligh ts switch off
a uto m atically. the park in g bra ke is fully
r e leased , th e daytime ru nning lights swit c h on again automati cally.
F
og l ights1 0l
When th e fog lights a re swit ch ed in th e instrument clus te r comes on . This
i s to remind you t h at yo u have the fog lights are headlight is switc hed
yo u cannot switc h on th e fog ligh ts.
D ynam ic hea d light range co ntrol
Vehicles with gas discharge are eq uip ped w ith d yn am ic headlig h t range contro l. T his means that th e headlig hts
w ill adjust t hemselves to match th e load level of the ve hicl e. They will also ad ju st to noddin g movements when d riving off or braking.
WARNING
Crashes and o ther acc idents can h appen when you cannot s e c the ro a d a head and w hen you canno t b e seen by o th er motoris ts.
Never use day tim e running lights to see wher e you arc goi ng. They are no t b rig h t
enough an d w ill not le t you see fa r en o ug h
a head d usk o r w hen i t is
lights and a vie w 43
Page 214 of 444
Booklet 3.1 Controls and Equipment
Always tu rn on the headlights befo re dus k
a nd in rain or fog s o tha t you can sec a head and so that others can sec yo ur ve hicl e from the back.
yo u r em ove the key fro m the ign it io n lock
w ith th e lig h ts s o und
the orr.
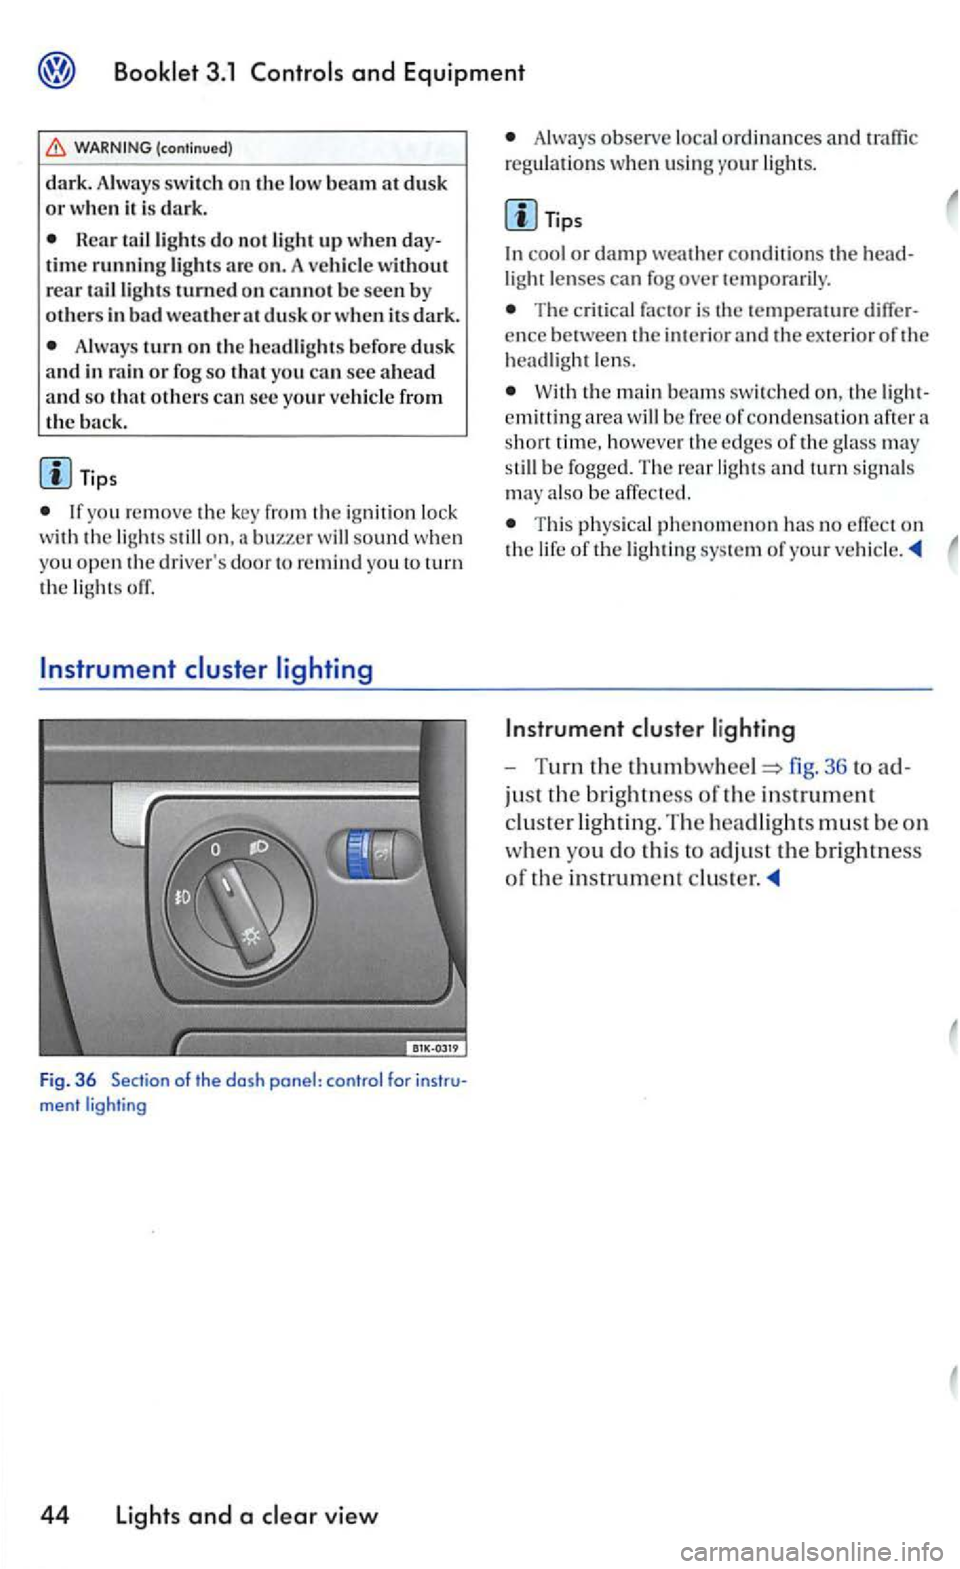
Fig. 36 Se ction of the dosh ponel: control
Always observe loca l o rd in ances and
cool or dam p weather conditions th e light len ses can fog over temporarily .
The c ritical factor is ence between the i nterior and the ex terior of hea dlight le n s.
W ith the main bea ms swit c h ed on, area h oweve r edge s of th e glass may be fogge d. Th e rear lig h ts and turn signa ls
may also be affect e d.
T hi s physical phe nomeno n has no effect on lig htin g sys tem of you r
36 to
jus t the brig htn ess of the in strument
cluster lig h ting. The headligh ts must b e on
w h
en yo u d o this to adjus t the bri gh tness
o f the in strume nt
Page 218 of 444
and Equipment
Background
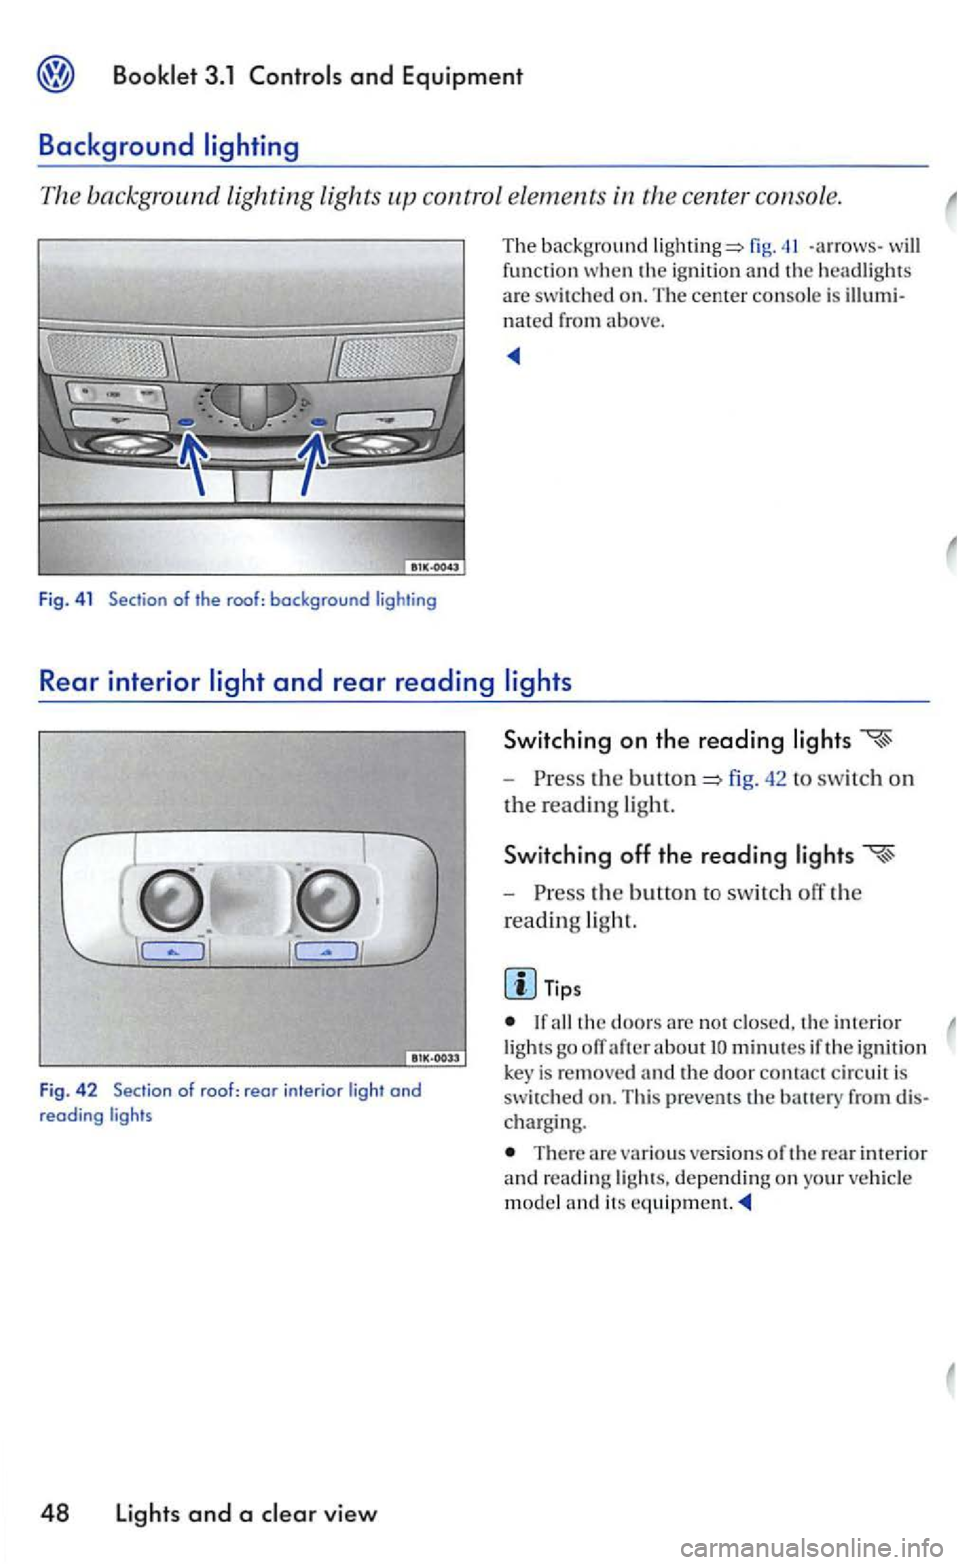
The background lighting lights control elements
fig. -arrows -the ignit io n and headlights
a re swit ch ed on. The cente r console is nated from above.
Rear interior
J
Switching on the reading
-the fig. 42 to swi tc h on
t h e read ing ligh t.
Switching off the reading
-the b utto n to switch off the
read ing
light.
Tips
the doo rs are n o t interio r
Fig . 42 Sec tion of roof : rear in te rior light and reading ligh ts
48 Lights and a view
lig hts go ofT after about minutes if the ig n ition is re m ove d and the door contact c ircuit is switched on. Thi s prevems th e
There are variou s versions of the rear interior reading ligh ts. dependin g on your m odel and its
Page 270 of 444
light 33
Dri v
ing time
Dri vin g wi th an t rans missio n 89
Du st filter 83
E
E le c trical socket 68
E l
ectro n ic immobilizer 85
Emergency fla sh er 45
Emergen cy opening
Doors 34
Env
ironme n tal informatio n
Fuel econom y 9
Environmen tal tip
Fuel economy 74
F
Fog light s 43
Front center armrest 65
Front seats 58
Fuel gauge Display
Fuel level
F u el ta n k
G
Gear se lector lever
See A
utomatic trans m ission wit h Tip tron
ic
illu stration 3
G l
ove compartment Front passenger sid e 64
H
Hand brake
See Parking brake
Hazard lights 45
H
ead restraints
Adjusting 57
R em
oving 57
46
Headlight lens fogging 44
Headlights 43
Fog
lights 43 Switching 43
syste m 52
H
eated f r ont seats 59
H ig h
beam 46
High
beam lever 46
Horn 3
I g niti on key
removal lock 85
I gni ti
on switch 84
Indicator light
control sy stem 96
See also
Indi vid ual unlocking
In formati o n messages
66
In struments
inte rio r front lights
front '1 7
Interio r lights
backg round 48
reading 48
readin g lig ht s 47
imerio r ligh ts 47
In te
rmitt ent wipe 49
K
Key 27
Keys 27
Kick-down functi on 94
Page 316 of 444
WARNING (continued)
Never reach into the area around or tou ch the radiator fan. Contact w ith the blade s can resuh in se riou s personal injury. Always m ember that the radiator fan is controll ed and can turn on
m oved from the ignit ion.
Never unscrew the coolant expa nsio n tank cap when th e engin e is hot. A hot engine will heat the coo la nt and put it under pressure . mov in g a cap that i s under pressure ca n rcsuh in seriou s personal injury and/or burns.
A lway s prote ct face, hand s and arms from hot esca ping coolant or steam b y cove ring the ca p with a large, thick rag.
Turn the cap slow ly a nd very carefully in a
counter- clo ckw ise direction whil e applying
light downward pressure on the top of the cap.
Never spill on hot engine parts o r hot
e xhau st sys te m . S pilled
Neve r short-circuitthc elec trica l sys te m ,
es peciall y w here th e jumper cabl es are tached -th e balleri es could explode!
Neve r leave any objects in the e ngine partment, for exam ple cleaning rag s and too ls. Objects
Neve r work unde r the veh ic le unless you
h ave safely secured th e ve hicl e from movin g.
I f yo u must work under th e ve hicl e wit h th e
w hee ls on th e ground, always make sure the vehicl e is on leve l ground, th e wh eels arc
b locked from movin g and th e key is not in the
ignition.
Always support your ve hicle with safety
s tands if you have to wo rk underneath it. The
ja ck suppli ed with the ve hicle is not s tron g enough for this purpose and can co llap se causin g se riou s personal injury.
If you have to perform a check or r ep a ir
w hen th e e ngine is running, there arc more
ri sks from
the ro tating parts, such as the drive
WARNING (con tinued)
Neve r to uch the e lec tr ica l w ir in g of the ig ni tio n sys tem.
Always make sure that j ewe lry, loose clothing and lo ng hair do not get caught in
rota ting engine pans. Before startin g any work remove jewelry, tie back and cover
hair, and do not wear clothing that can hang down and get caught in mov ing gin e parts.
Always use extre me cauti on if the erator pedal has to be depresse d to perform
a ch eck. The vehicle could move suddenly, eve n if the parking brake is applied.
If wor k on the fu el sys te m or th e electrica l
syste m is necessa ry:
Always discon nect th e balleries. Make
sure th e vehicle is unlo cked when
Neve r sm oke .
Neve r work nea r heaters, wa te r h eaters of other open names .
A lways have an approve d fire ext guis her nearby.
To avo id electrical shock and personal jury w hil e the eng ine is running or being
s tarted :
n ever touch ignition cables,
never to uch othe r component s of the
high vohage electronic ignition syste m,
never touch the gas discharged (Xeno n) headlights wiring.
Note
Whe n chang ing or topp ing orr service fluids. make absolutel y ce rtain that you fill the fluid s
into the corr ect reservoirs. Using incorrec t fluids will resuh in serious malf unct ions and engine
damage!
For the sake of environment
Service fluid leaks are harmful to the environ-
ment. Reg ularl y check the ground undernea th
your vehicle . you find spots of oil or other
fluids. have your vehic le checked by your rized dealer or a qualified
Page 373 of 444
(continued)
swagen dealer or a qualified workshop. rious personal injury m ay resu lt from erl y perfo rmed work.
Booklet 3.2 Tips and Advice
Note
Do not touch glass bulb with bare hands.
A bulb can on ly be rep laced by a bulb of the same type. The model identification is either on the bulb base or on the bulb
turn
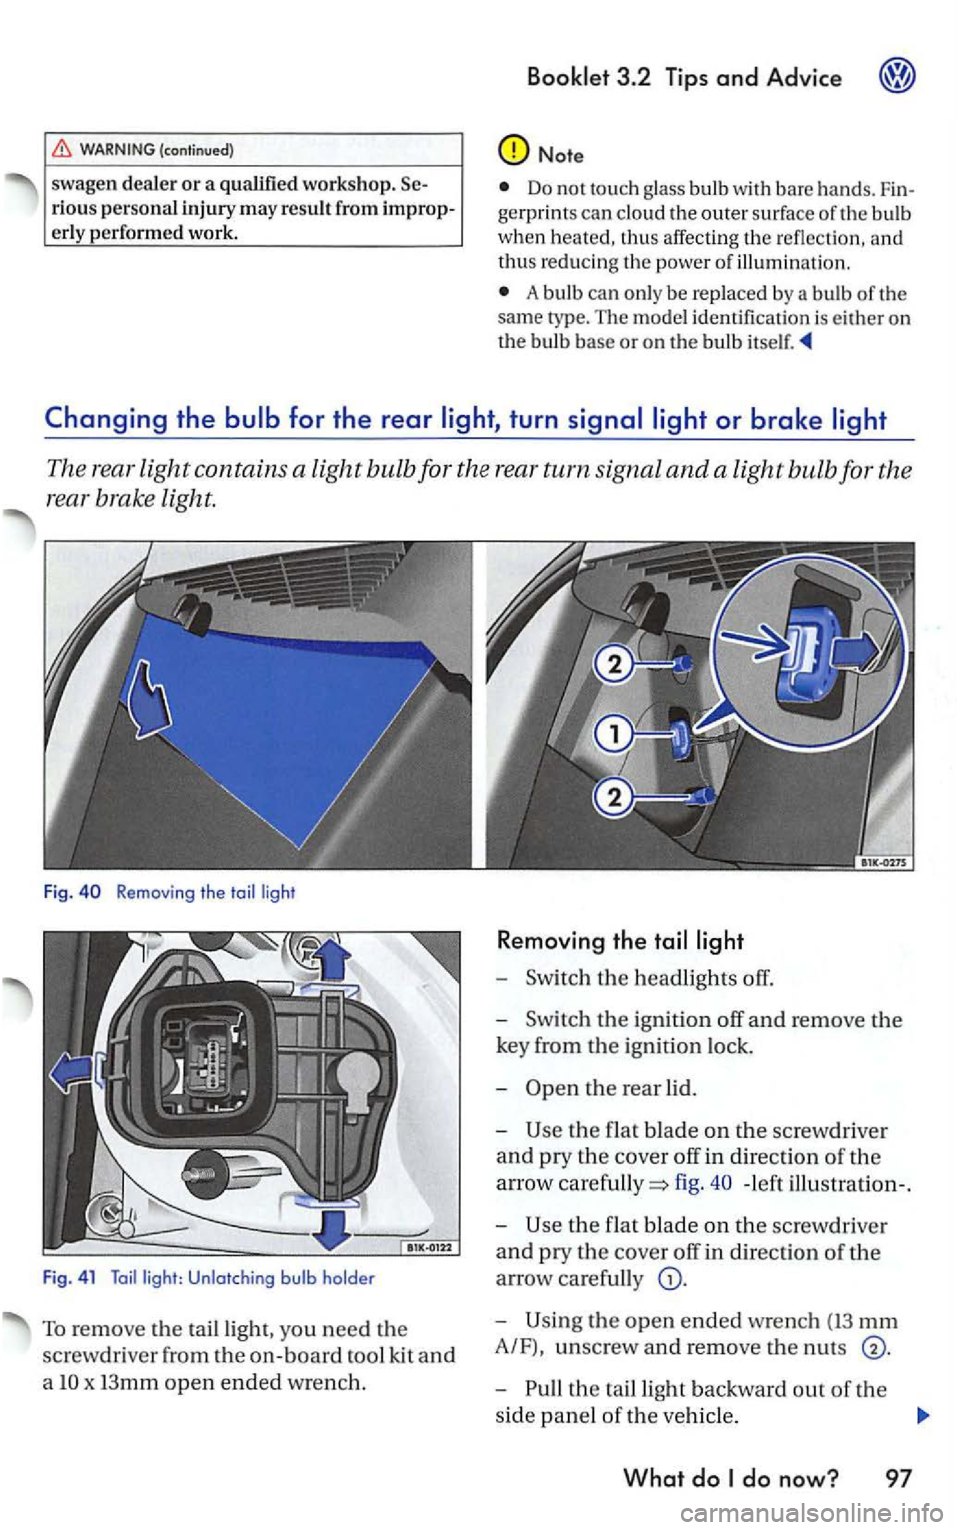
The rear light contains a light bulb fo r the rear turn signal and a light bulb for the
rea r brake light.
Fig . Removing the toi l ligh t
F ig . 4 1
Toil light: Unlotching bulb holde r
To remov e the tailligh t, yo u need the
screwdr iver from th e
on-board tool kit and
a
x I3mm open ended wrench.
R e moving the
-the headlights off.
-the ign ition off and remove the
key from the ignition lock.
-
the flat blade on th e screw driver
and pry the cover off in direction of th e
arrow
fig. - left illu stration-.
-
the f lat b lade on the sc rewdri ver
and pry the cover off in direction of the
arrow carefully
the open ended wrench (13 mm
A/F), unscrew and remo ve the nut s
the ta illight backward out of the
side panel
of th e veh icle .
What do
Page 376 of 444
4.
1.
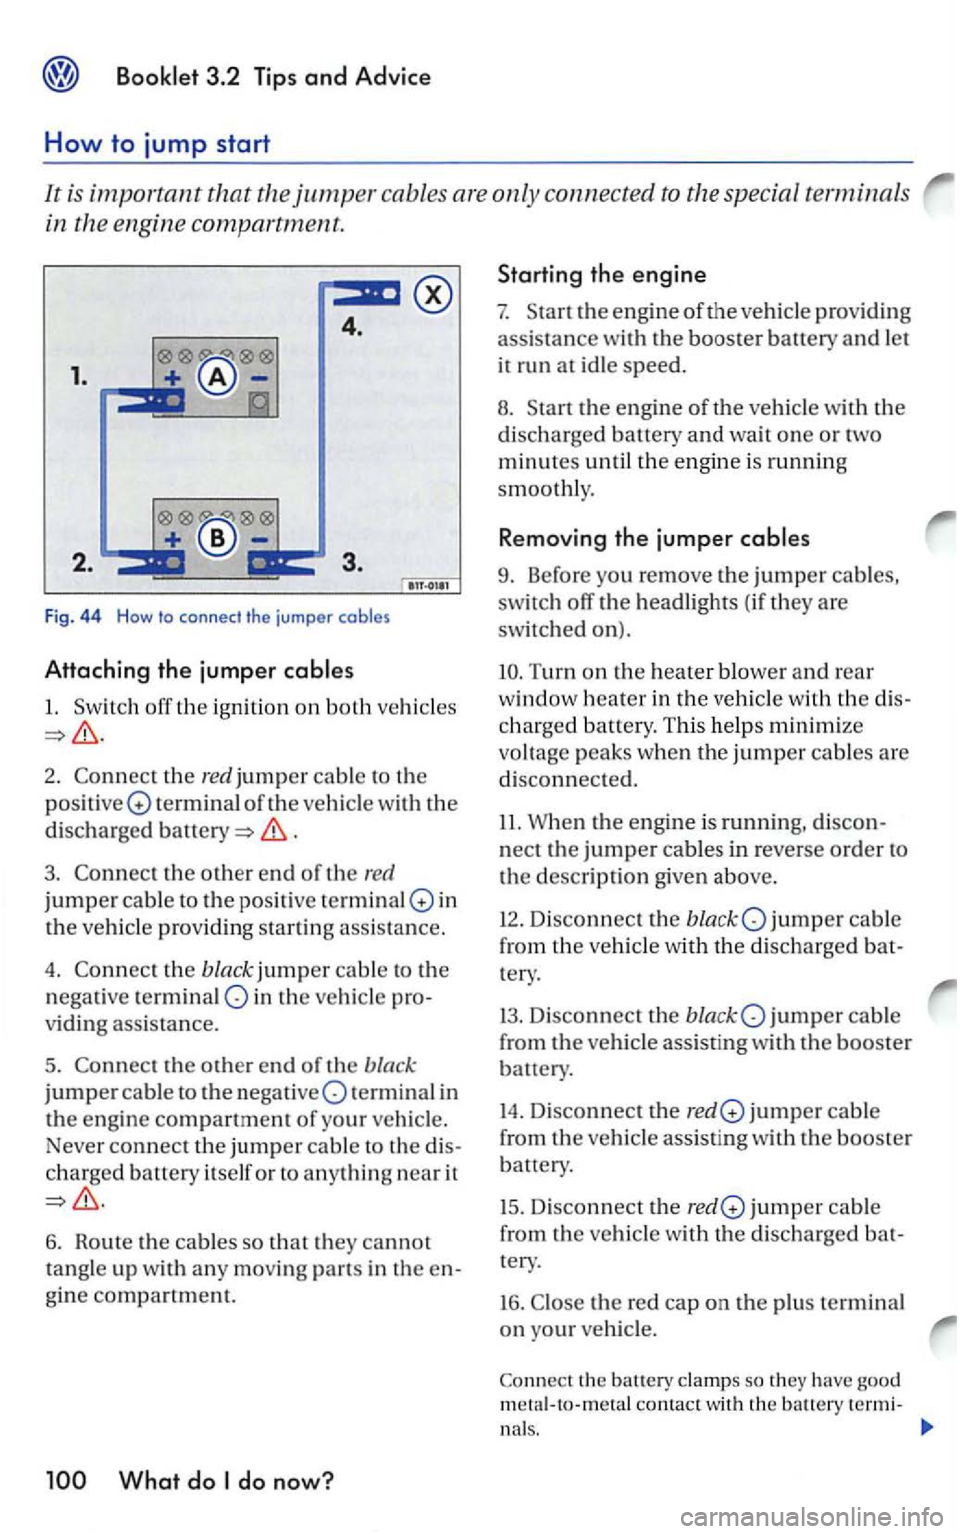
F ig. 44 How to connect the jumper cables
Attaching the jumper
1.
2. the red jumper cable to the
positi ve Q terminal of the vehicle with the
disch arg ed
.
3 . the other end of th e red
jumpe r cable to the posit ive terminal in
the veh icle providing startin g ass is ta n ce.
4. the black jumper ca ble to the
negative terminal in the vehic le
v idin g assistance.
5.
ch arged battery itself or to anything near it
6. Route the cables so that they cannot
tangle up with an y mo vin g parts in the
the engine of the vehicle with the
discharged battery and wait one or two
minutes until the engin e is running
s m
oothly.
Removing the jumper
9. Before you remove th e jumper cables,
switch off the headlights (if they are
switched on).
Turn on the heater blower and rear
window heater in the vehicl e with the
charged battery. This helps minimi ze
voltage peaks wh
en the jumper cables are
di sconnected.
11. Whe n the engine is running,
nect the jumper cables in r everse order to
the description given above.
12. Disconnect the jumper cable
fro m the vehicle with the di
scharged
jumper cable
from
the ve hicle assist ing with the booster
battery.
14. Disconn ect the jumper cabl e
from
the ve hicle assisting w ith the booste r
battery.
15. D isconnect the jumper ca ble
from the
vehicle with the discharged
th e re d cap on th e plu s te rminal
on your vehicle .
contact with the battery