fog light VOLKSWAGEN GOLF 2008 Owners Manual
[x] Cancel search | Manufacturer: VOLKSWAGEN, Model Year: 2008, Model line: GOLF, Model: VOLKSWAGEN GOLF 2008Pages: 444, PDF Size: 92.7 MB
Page 10 of 444
Engine coo lant 3.2:47
Add i
tive s 3.2:47
Ca n I
add plain water to the en gi ne coolant ? 3.2 :
Engine data 3.3: 5
Eng ine
hood 3.2: 41
How do unlock the engin e hood? 3.2: 41 Warn ing light 3.2: 41
Engin e management 3.2: 9
E ngin e oi l 3.2: 42
Adding 3.2: 45
Add itives 3.2: 46
Check ing leve l 3.2: 44
Consumption 3.2: 4 3
Dip s
tick 3.2: 44
How do know how much oil m y e ngine is
consuming ? 3.2: 43 c h an ge 3.2: 46
S p ecifica tion s 3.2: 42
Specificatio ns gaso line engine 3.2: 42
Wha t kind of e ngine oil should put in my ve hicle? 3.2: 42
When should check the e n gi ne oi l
l eve l? 3.2 : 4 3
Where is th e oil dip stick 3.2:
44
E ngin e oil pr essure
Warning light 3.2: 45
Eng ine oil
senso r
Warning light 3.2:
44
Environme nt
Avoidi ng pollution 3.2:23,36
C le
aning th e e ngin e compartment 3.2 : 28 Drive economicall y 3.2:
Warni ng ligh t 3.2: 9 also Elec tronic Co ntrol
3.2:6
B utt on 3.2 : 7
Warning
lig ht 3.2: 7
Even t Data Hecorder 3.2:
34
Examples of improper seating
position s 2.1:
Infant seats 2.1: 59
Sa fe ty belt ex te
nder 2.1: 24
Sa fet y belts 2.1:
F loor mat s 2.1: 9
Fog light s 3.1
:43
F r
ont ai rbags
De
scription 2.1:32
Front air b ag sys tem
2.1: 32
A irb ag deploym ent zone 2.1:38
Th e bas ics 2.1: 32
Fronta l
collisions and the laws of
physics
1 5
Fr
ont center armres t 3.1: 65
Front seats 3.1: 58
F u el
fille r cap
Warni ng light 3.2:35
Fuel ga uge
Displa y 3.1:
F ue l level 3.1:
Fuse box
th e in strume nt panel, left 3.2: 92 the instrument panel, rig ht 3.2: 92
Fu ses 3.2:
Page 213 of 444
and Equipment
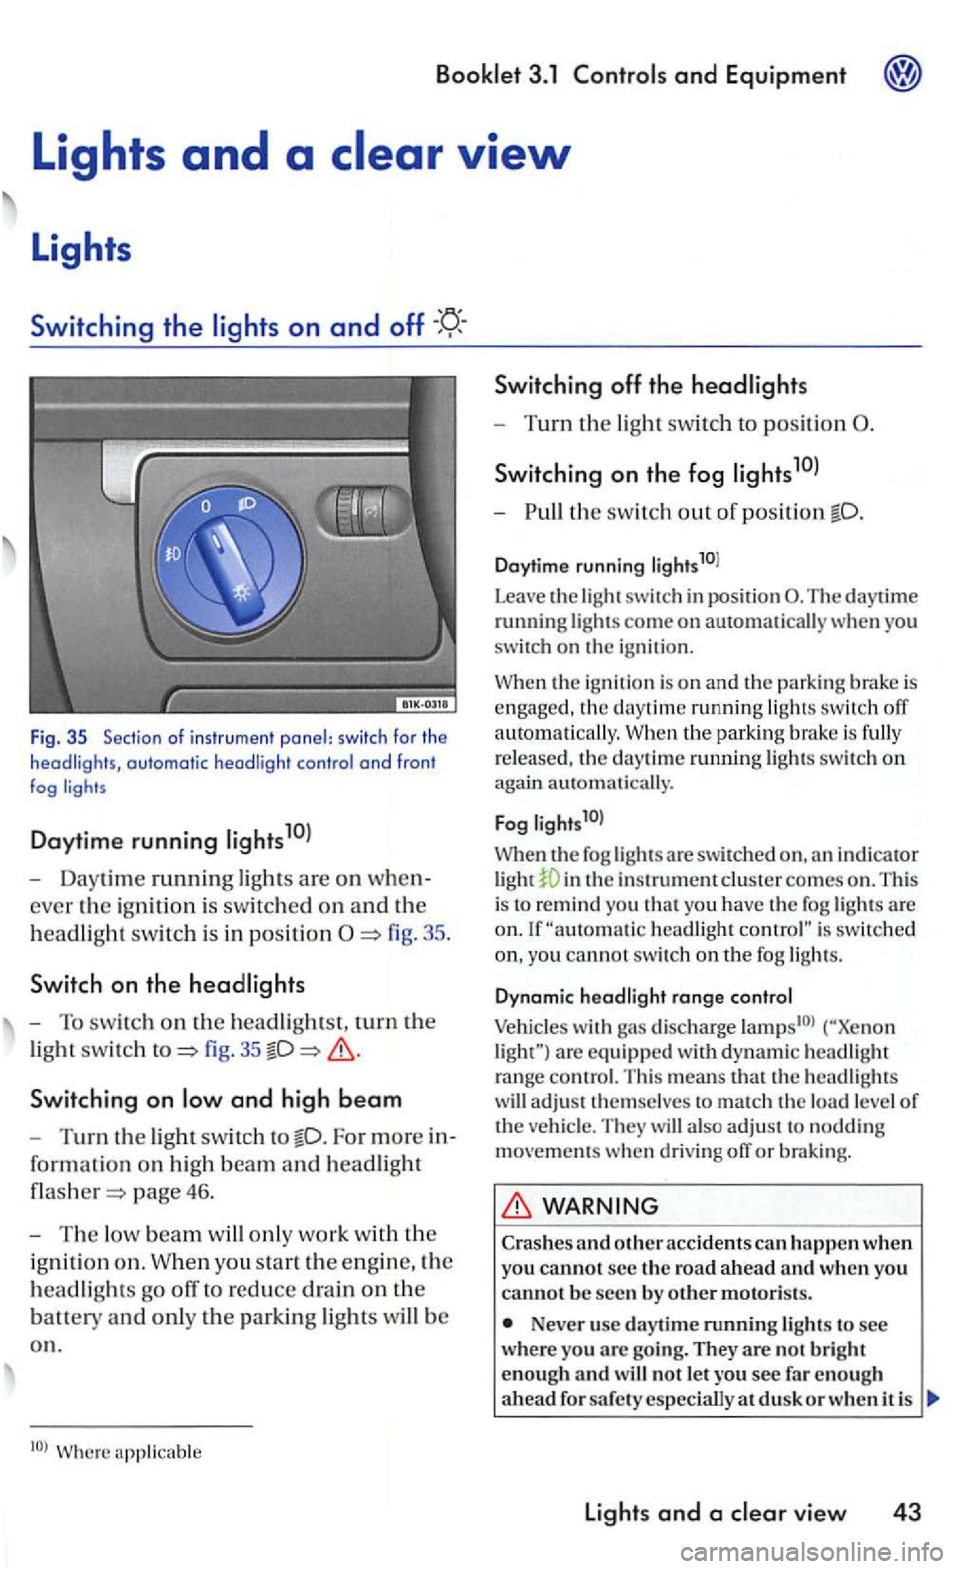
Fig . 35 Sec tio n of i nstr u m ent panel: switc h fo r th e headligh ts, automatic headli ght contro l a nd fron t fog
Daytime running
- Daytime running ligh ts are on when
ever the ig ni tio n i s sw itc hed on an d th e
h
eadlig ht swit c h i s in positi on
fig. 35
Switchin g on
For more in
for ma
tion on hig h beam an d headlight
page 46.
-The low beam w ill only work w it h th e
i g ni
tion o n . W hen you sta rt the e ngin e, the
h
eadlights go off to reduce drain on the
batt ety an d only th e parkin g lights will b e
o n .
Switching off th e headlights
- Turn the light swit ch to position
S wi tch ing on the fog
-th e switch out o f position
Daytime running li g hts10l
Leave
the light switch in posit ion The daytime running lights come on automatically you
switch on the igni tio n.
the ignition is o n and the parking brake is engaged , the daytime running ligh ts switch off
a uto m atically. the park in g bra ke is fully
r e leased , th e daytime ru nning lights swit c h on again automati cally.
F
og l ights1 0l
When th e fog lights a re swit ch ed in th e instrument clus te r comes on . This
i s to remind you t h at yo u have the fog lights are headlight is switc hed
yo u cannot switc h on th e fog ligh ts.
D ynam ic hea d light range co ntrol
Vehicles with gas discharge are eq uip ped w ith d yn am ic headlig h t range contro l. T his means that th e headlig hts
w ill adjust t hemselves to match th e load level of the ve hicl e. They will also ad ju st to noddin g movements when d riving off or braking.
WARNING
Crashes and o ther acc idents can h appen when you cannot s e c the ro a d a head and w hen you canno t b e seen by o th er motoris ts.
Never use day tim e running lights to see wher e you arc goi ng. They are no t b rig h t
enough an d w ill not le t you see fa r en o ug h
a head d usk o r w hen i t is
lights and a vie w 43
Page 214 of 444
Booklet 3.1 Controls and Equipment
Always tu rn on the headlights befo re dus k
a nd in rain or fog s o tha t you can sec a head and so that others can sec yo ur ve hicl e from the back.
yo u r em ove the key fro m the ign it io n lock
w ith th e lig h ts s o und
the orr.
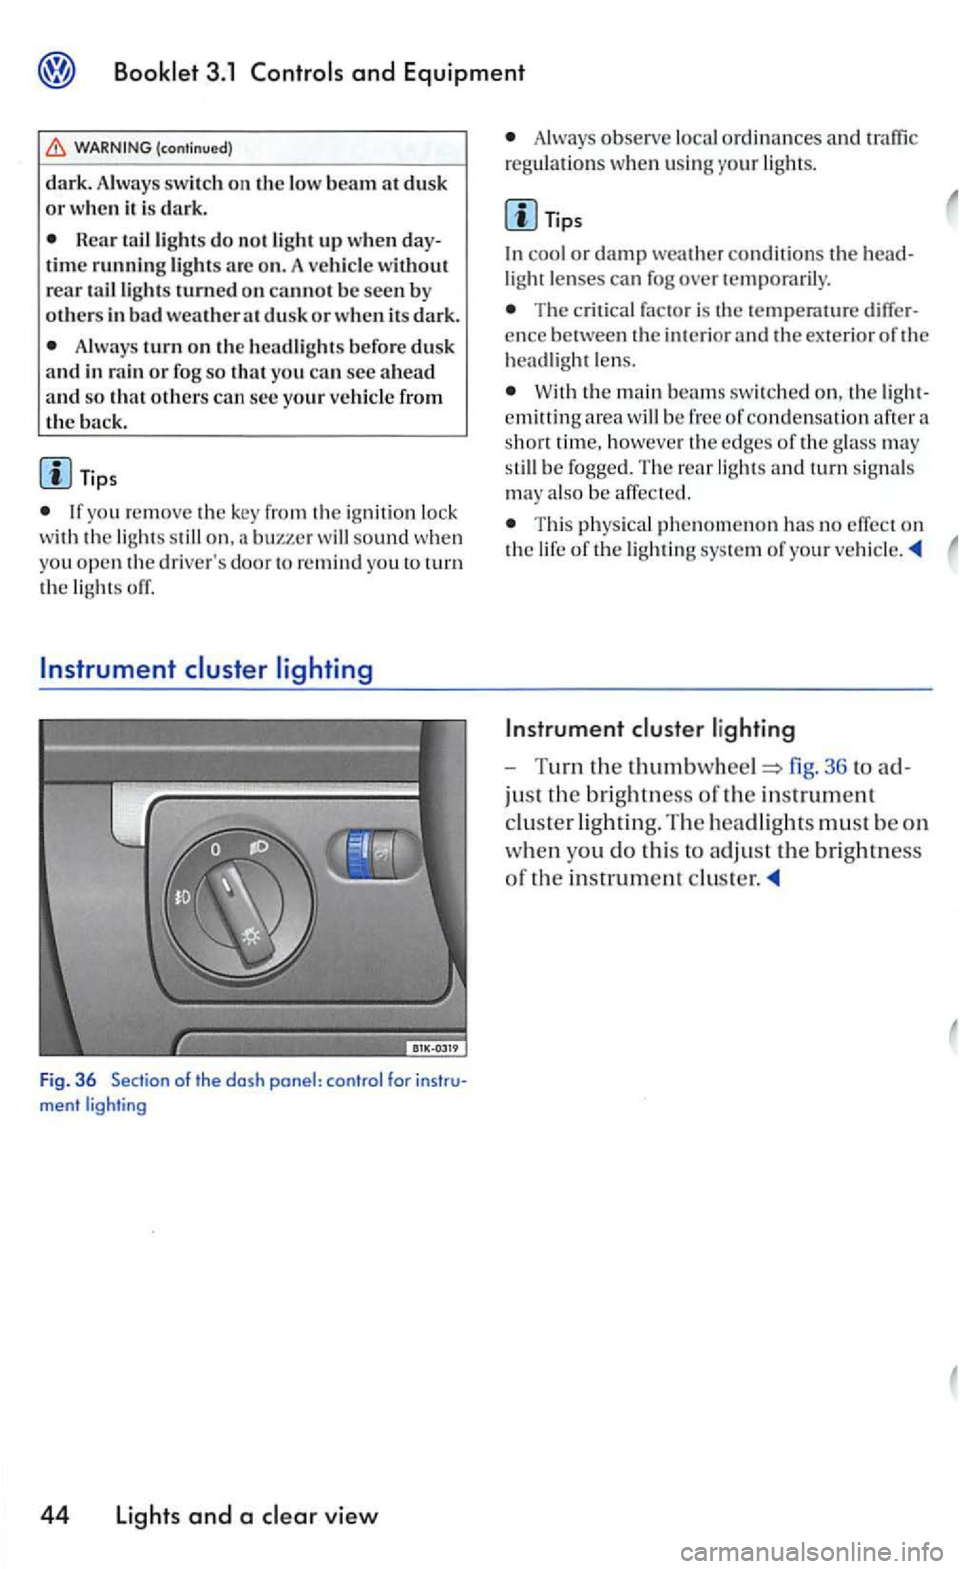
Fig. 36 Se ction of the dosh ponel: control
Always observe loca l o rd in ances and
cool or dam p weather conditions th e light len ses can fog over temporarily .
The c ritical factor is ence between the i nterior and the ex terior of hea dlight le n s.
W ith the main bea ms swit c h ed on, area h oweve r edge s of th e glass may be fogge d. Th e rear lig h ts and turn signa ls
may also be affect e d.
T hi s physical phe nomeno n has no effect on lig htin g sys tem of you r
36 to
jus t the brig htn ess of the in strument
cluster lig h ting. The headligh ts must b e on
w h
en yo u d o this to adjus t the bri gh tness
o f the in strume nt
Page 245 of 444
Applies to with
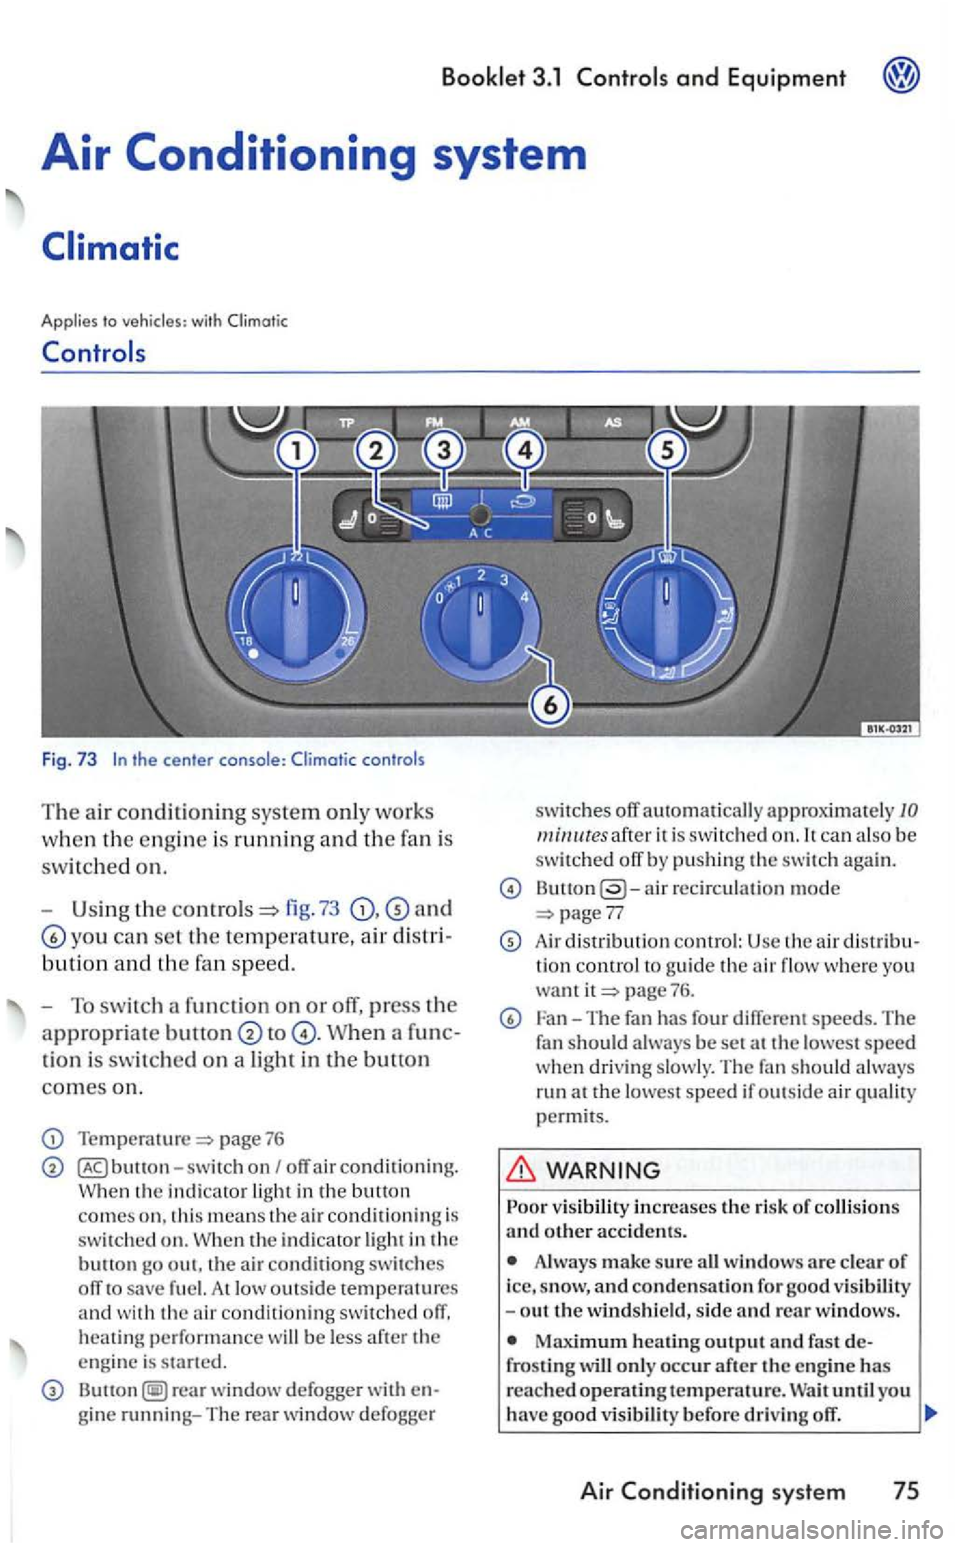
Fig. 73
fig. 73 and
yo u can se t the temperature, air d is t
bution a nd the fa n sp eed.
-
To s wit ch a fun ction on or off, press the
appropriate to
tion is switc hed on a light in the button
comes on.
Temperature=> page 76
switc h on I off air conditioning. the indi cator
the indicator
At low outs id e temperatures and wit h th e air conditioning switched off, heating performan ce will be less
rear window defogge r with
ca n al so b e
s witched off by pushing the s witch again.
air recircu lation mode 77
Air distri bution control: Usc the air d is tribu tion control to guide the air flow whe re yo u want page 76.
Fan-The fan has four different speeds. The
f a n should always be set at the lowest speed w hen dri vin g s lowly. The fan should a lways
run at the l owest speed if out sid e air
Always make sure all windows are clear of icc, sn ow, and conden sation for goo d -out th e winds hield, side and re a r windows .
frosting will onl y occ ur after th e engin e has
rea ch ed operatin g temperature. until yo u
h ave good v is ib ilit y before drivin g off.
Air Conditioning system 75
Page 246 of 444
Thoroughly familiarize yourself with the operation of the heating and ventilation system, including the de fog ! defrost features you
Heating and
(continued)
Always read and heed the informati o n and
all page 83,
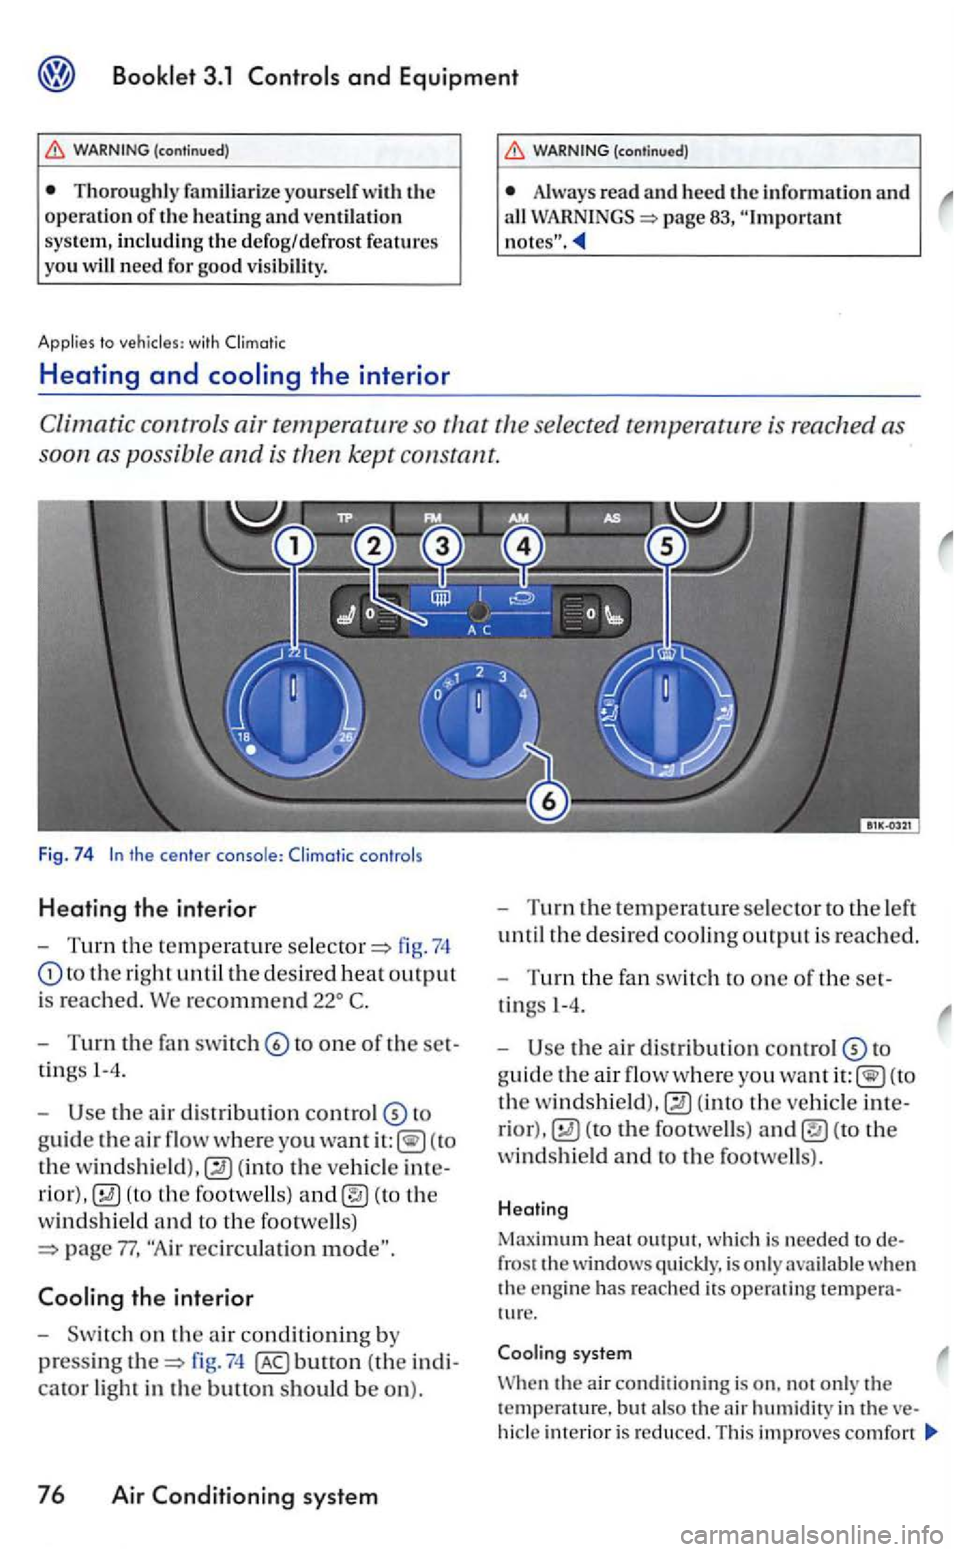
Climatic controls air temperature so that
the center console: Climatic controls
Heating the interior
Tu rn the te mperature g. 74
to the right until th e desired heat output
is reached. We recommend C.
Turn the fa n switch to one of the set
tin gs
l-4.
Use the ai r distribution to
guide the a ir
the
(to the
w
inds hi eld an d to the footwells)
77, recircu lation
fig. 74 (the indi
cato r
light in the button should be on).
76 Air system
Turn the t emperature selector to the left
until
the d esired cooling output is reached.
Turn the fan switch o ne of th e set
tings
l -4.
Use the to
g uid e
the air flow where you want (to
th e
the footwells)
which is needed to defrost the windows qu ickly, is only available when the en g in e has reached its operating temperature.
Coaling system
the air conditionin g is o n. not o nl y th e
Page 248 of 444
and Equipment
Never usc a ir recirc ulation fo r periods of time because no fresh ai r come into the passenger compartment.
The windows can fog up quickly if the system is swit ched off and decrease driver v isibility.
A pplies to vehicles: with Climotronic
(contin ued)
swi tc h the reci rculation mode otT when it is not needed.
Note
Do not sm oke a ir recirculatio n mode is on, as smoke draw n int o the syste m can
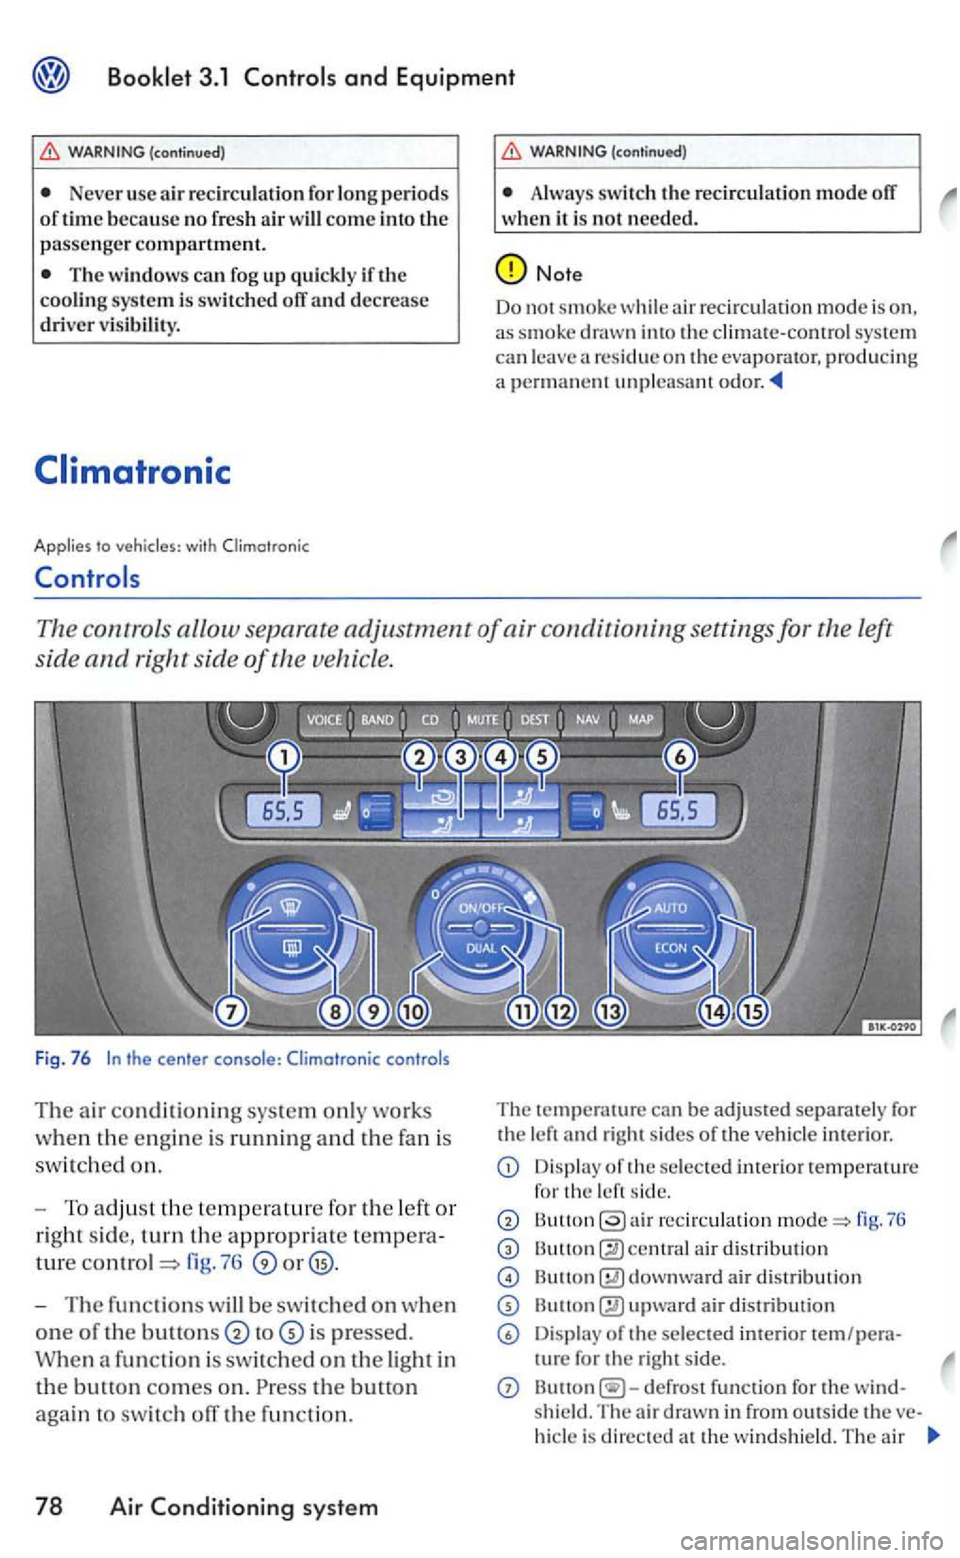
The contro ls allow se parat e adjustment of air conditioning settings for left
side and right side of vehicl e.
F ig . 7 6
ture
-The functio ns will be swit ch ed on whe n
one of th e buuons to is pressed .
Wh en a fun cti on is s wit ch ed
on the light in
the buuo n comes on. the button
a g a in to
swi tc h otT the fun ctio n.
78 Air sys te m
T he temperature can be a dju sted separately for
t h e a nd right s ides of
Displa y o f th e selecte d interior temperatu re
f o r th e si de.
Butt on fig.
central air di str ib ution
dow nward ai r di str ibut ion
upwa rd air distribution
Dis p lay of the selec te d interior tern p era-for th e righ t s ide.
defrost functio n for the shield. The air drawn in fro m outs id e th e
Page 249 of 444
Booklet 3.1 and Equipment
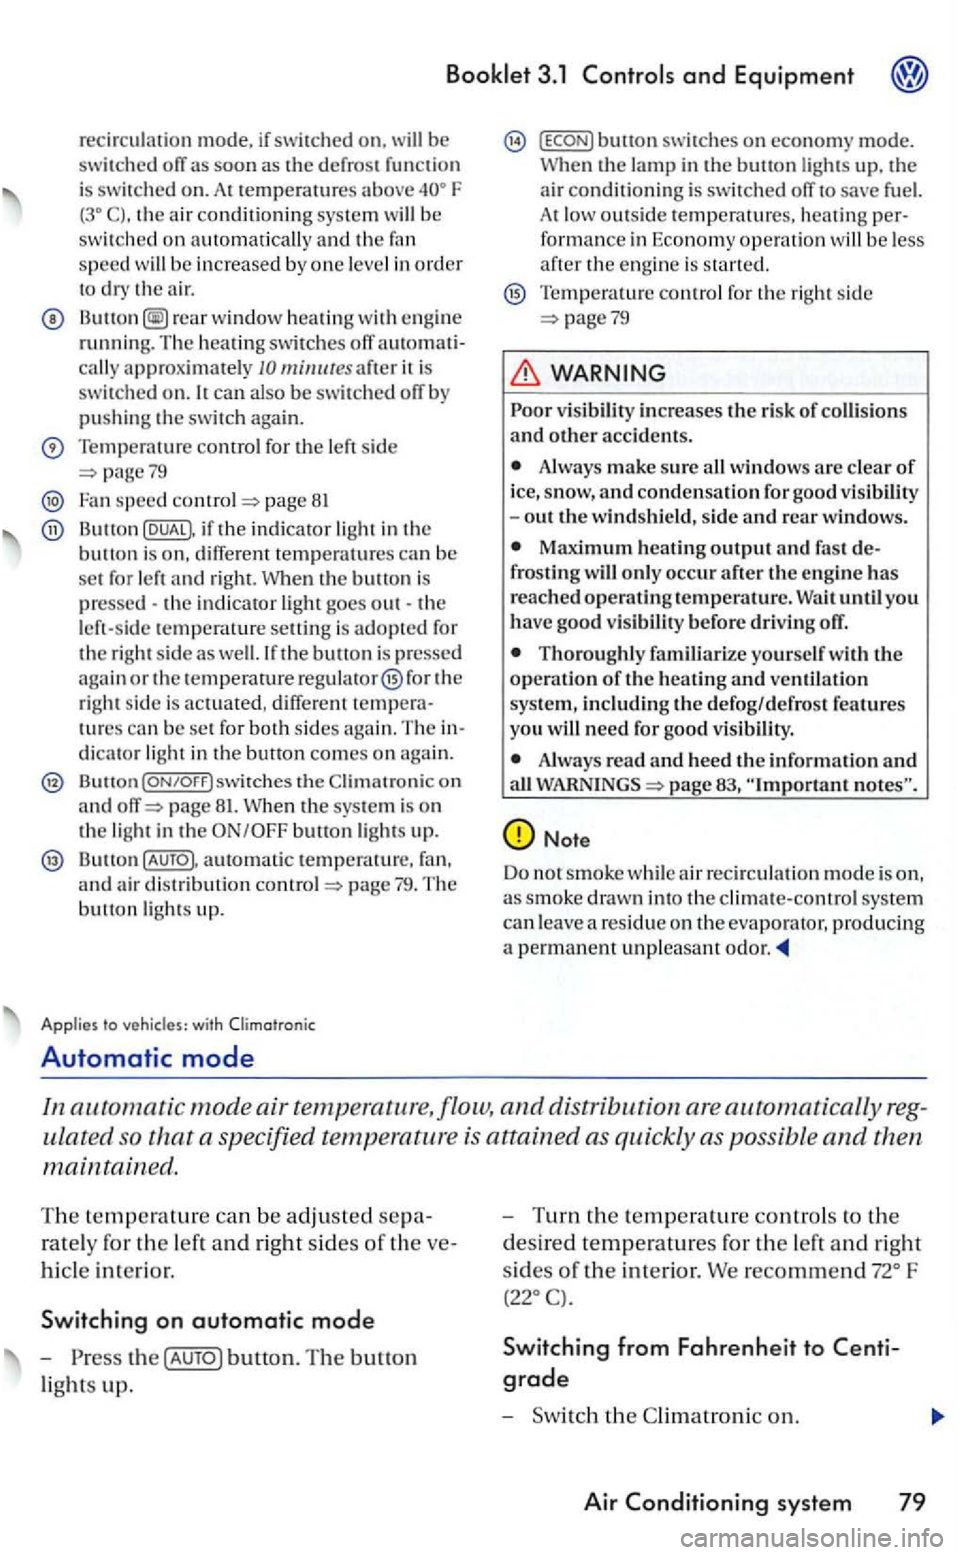
recirculation mode, if swi tched on. be switched ofT a s soon as th e d efrost function is switc h ed on. A t tempera above F th e ai r co ndi tio n ing system be
sw itched on speed be increased by one level in order to the air .
rea r window heatin g with eng in e running. The heating switches ofT automatiit is
swi tc h ed on. can also be swit ch ed ofT by pushi ng the switch a gain.
Temperature comrol for the le ft sid e pagc79
Fan speed co ntro l=> page 81
if the indicator ligh t in the button is on, t empe ratures c a n be set for and right. th e is pressed -the in dicator goes out -the
l eft-s id e tempera ture setting is adopte d fo r
t h e rig ht side as buuon is pressed
aga in or the tempe rature regulator @ fo r the rig ht sid e is actuated, diff ere n t temperatures can be se t for both sides agai n. T he in
dicat o r light in the bunon co mes on again.
Bullon the on and page 81.
Button automatic tempe rat ure, fa n,
and air d is tributio n co mrol
bu11on swi tches on econo m y mode. up, the air condit ioning is sw itch ed ofT to save low outs ide tempera tures, heati n g perfor mance in Economy operat io n
Tempe rawre cont rol for th e rig ht side page79
and othe r acci dents.
windows are clear of ice , s now, and condensation for goo d visibility
-out the windshield , s ide and rear windows.
until you have goo d vis ibilit y before drivin g ofT.
Thoroughly fa miliari ze yourself with the operation of the heating and ventilatio n
sys te m , including the defog /d efrost features
yo u good visibility.
page 83, "Important
Note
Do not smok e w hil e air recir cul atio n m ode is on, a s smoke draw n int o the climate-contro l sys te m can leave a residue on th e evaporator, producing
a permanent unpleasam odor.
I n automatic mode air temperature,flow, and d is tribution are automatica lly reg
ulated so that a specifi ed temp eratur e is attained as qui ckly as po ssibl e and th en
m aintained .
The te m pe rature ca n b e adjusted sepa
r a te ly f
or th e left and right sides or the ve
hi
cle inte rio r.
Switching on automatic mode
- Press the [AUTO) button. The button
ligh ts up.
-Turn th e temperature contro ls to th e
d
esired tempe ratures for the left and right
si des of the inte rior. We recommend F (22.CJ.
Switching from Fahrenheit to
grade
-Switch th e C limatroni c on .
Air sys tem 79
Page 252 of 444
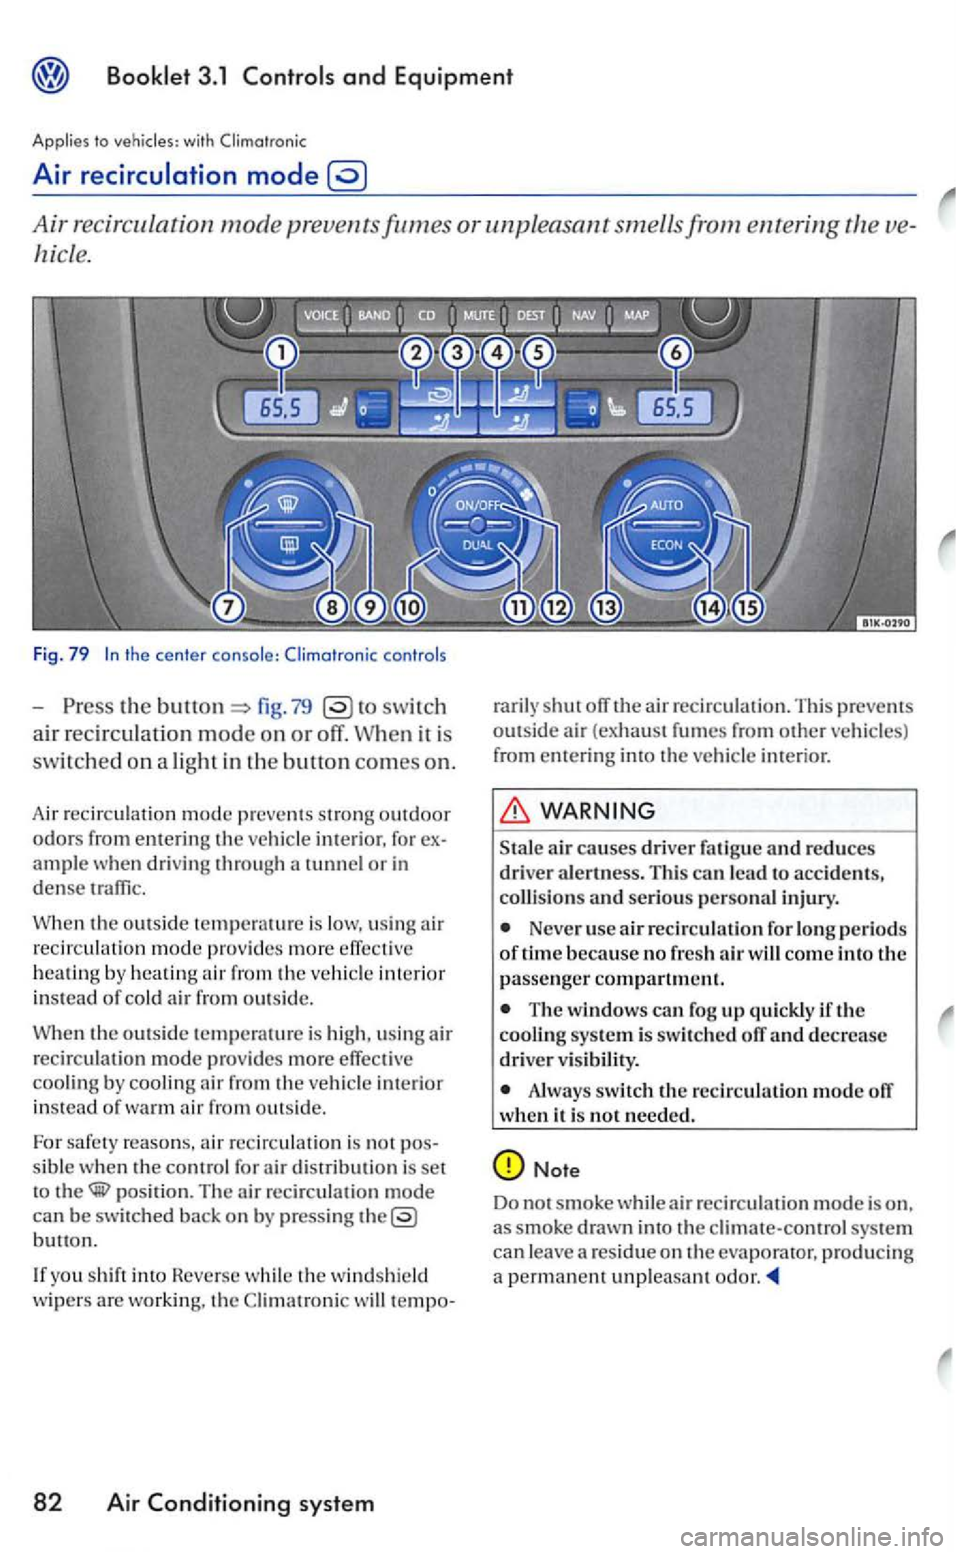
Air recirculation mode prev entsfttmes or unpleasant smells from entering
th e fig. 79 switch
air recirculat ion mode on or off. When it is
sw itch ed on a light in the
button comes on.
Air recircu lat io n mode preven ts s trong outdoor odors from entering th e int erio r. for example when drivin g through a tunnel or in dense traffi c.
the outsid e is low . u sing ai r recir cu latio n m od e prov ides more heating by hea tin g air from the interior in stead o f cold air from
th e outs ide temperature is u sin g air
recirculat ion mod e provides m ore effective b y air from the from outs id e.
For
saf e ty rea sons. air re c ircu latio n i s not pos
s ible when the control for dis tribu tio n is set
to pos ition. The a ir recircu lation mode can b e switched back on by pressi ng button.
you shift into Reve rse the w in dsh ie ld
w iper s are work ing. the t empo-
82 Air Conditioning sy ste m
shut ofT air recir culati on. This prevent s outside air (exhaust fume s from other
WARNING
Sta le ai r causes driver fa ti gu e an d reduces d river ale rtn ess. This to acci dents, and seri ous personal injury.
Neve r use air recirculatio n fo r perio d s of time because no fresh air come into the
p asse nge r compartmen t.
T he window s ca n fogupquickJyifthe syste m is sw itc hed ofT and decrease driver vis ib ili ty.
Always switc h
recircu lation mode is on. a s smoke drawn into the cl imate-control syste m can a resid ue on the evaporator. producing a permanent unpleasant
Page 270 of 444
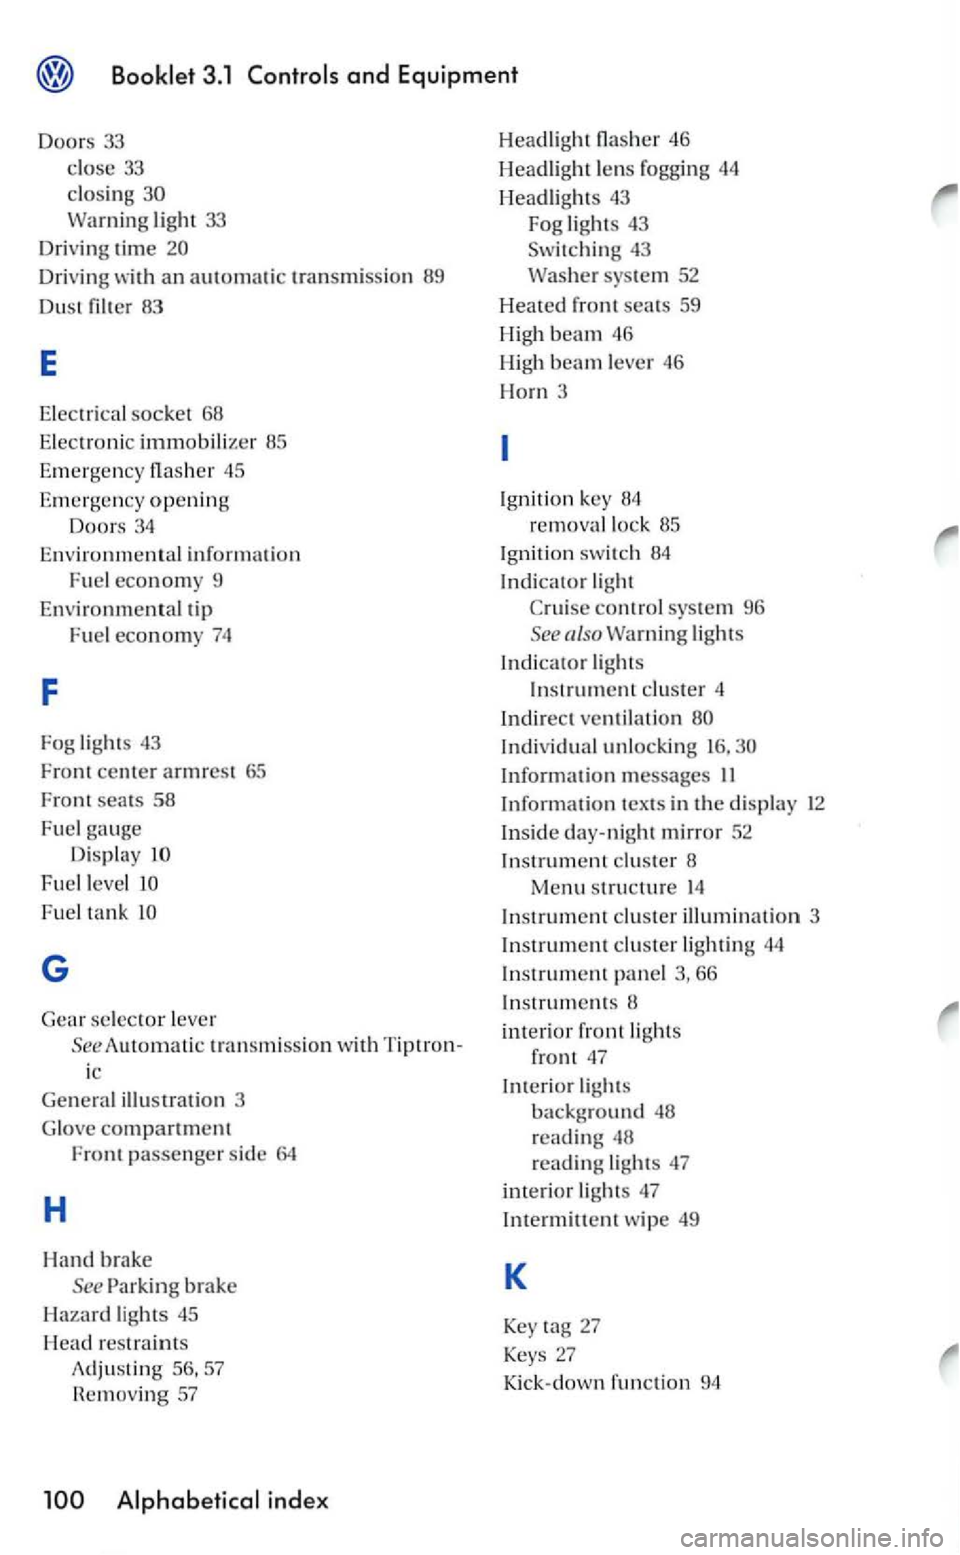
light 33
Dri v
ing time
Dri vin g wi th an t rans missio n 89
Du st filter 83
E
E le c trical socket 68
E l
ectro n ic immobilizer 85
Emergency fla sh er 45
Emergen cy opening
Doors 34
Env
ironme n tal informatio n
Fuel econom y 9
Environmen tal tip
Fuel economy 74
F
Fog light s 43
Front center armrest 65
Front seats 58
Fuel gauge Display
Fuel level
F u el ta n k
G
Gear se lector lever
See A
utomatic trans m ission wit h Tip tron
ic
illu stration 3
G l
ove compartment Front passenger sid e 64
H
Hand brake
See Parking brake
Hazard lights 45
H
ead restraints
Adjusting 57
R em
oving 57
46
Headlight lens fogging 44
Headlights 43
Fog
lights 43 Switching 43
syste m 52
H
eated f r ont seats 59
H ig h
beam 46
High
beam lever 46
Horn 3
I g niti on key
removal lock 85
I gni ti
on switch 84
Indicator light
control sy stem 96
See also
Indi vid ual unlocking
In formati o n messages
66
In struments
inte rio r front lights
front '1 7
Interio r lights
backg round 48
reading 48
readin g lig ht s 47
imerio r ligh ts 47
In te
rmitt ent wipe 49
K
Key 27
Keys 27
Kick-down functi on 94
Page 369 of 444
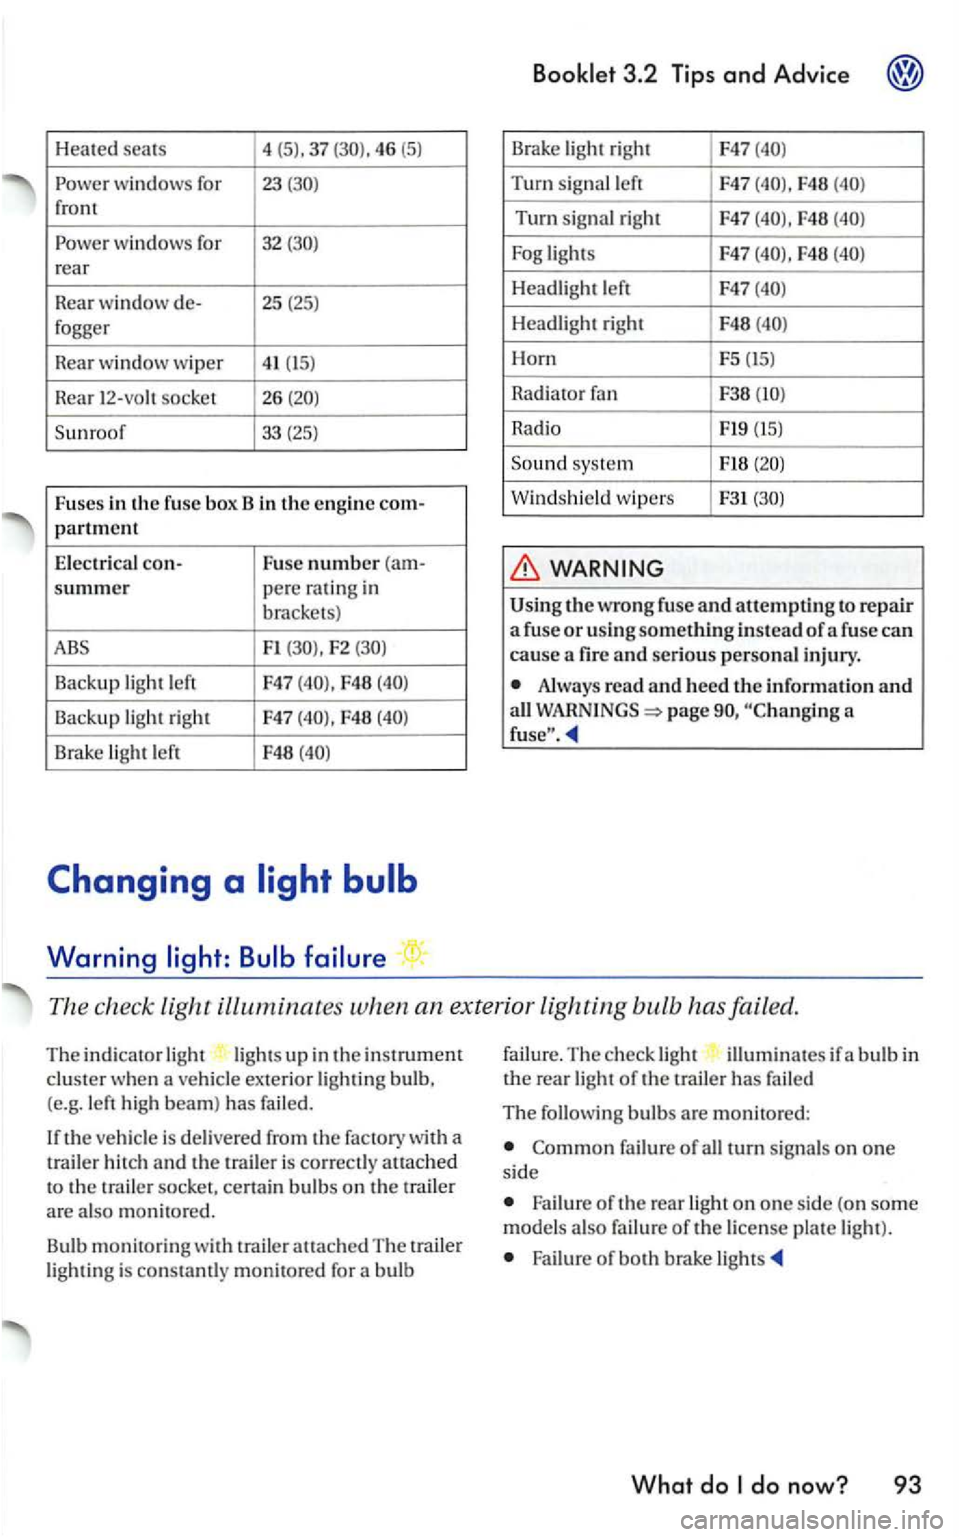
Heated seats 4
(5). 37 46 (5)
windows for 23 front
wind ows for 32 rear
Rea r
window de- 25 (25) fogger
R
ear w indow wiper 41 (15)
R ear 12-vo h socket 26
F1 F2
Backup light left F47 F48
Backup light right F47 F48
Brake light left F48
Warning
Brake light righ t F47
Turn sig na l left F47 F48
Turn signal right F47 F48
F48
Headlight left F47
Headli gh t right F48
Horn F5 (15)
Rad i
ator
Radio Fl9 (15)
Sound syste m
Windshield wipers F31
the wrong fuse and attempti ng to re pair a fuse or usi ng something instead of a fuse can
cause a fir e and serious personal injury.
Alway s read and heed the information and all page a
The check light ill uminates when an ex terior lighting bulb has failed.
The indicato r light lig ht s up in the instrument clus ter when a ve hicle exterior lightin g bulb,
(e.g. le ft high beam) has failed.
th e ve hicle is delivered from the factory with a
t railer h itch and the is correct ly atLached to the trai le r socket, cert ain bulb s on the trail er are also monit ore d .
Bu lb
monitorin g with trailer attach ed The traile r light ing is con stamly monitored for a bulb failu
re.
The ch eck ligh t illumin ates if a b ulb in the rea r light of the trailer has fai led
The following bulbs are mon itored:
failure of all turn signa ls on one si de
Failure o f the rear light on one si de (on som e
model s als o failu re of the license pla te light ).
Failure of both brake li gh ts
What do