Cleaning VOLKSWAGEN GOLF 2011 Owner´s Manual
[x] Cancel search | Manufacturer: VOLKSWAGEN, Model Year: 2011, Model line: GOLF, Model: VOLKSWAGEN GOLF 2011Pages: 138, PDF Size: 49.24 MB
Page 68 of 138
Downloaded from www.Manualslib.com manuals search engine Windscreen wiper lever
@
c©
c@
C@
~®
B5K ~18
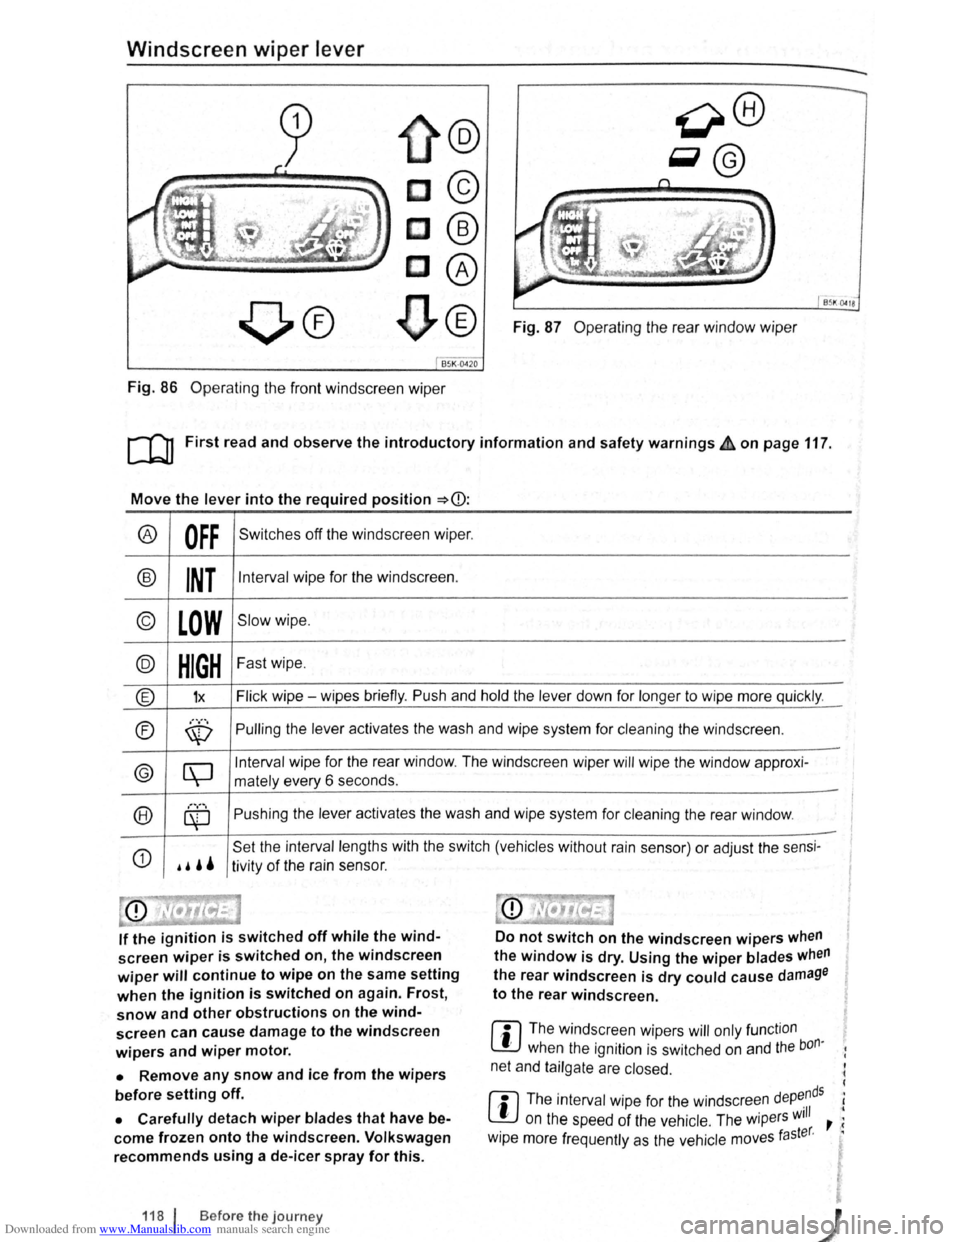
Fig. 87 Operating the rear window wiper
Fig. 86 Operating the front windscreen wiper
[Q] First read and observe the introductory information and safety warnings£ on page 117.
Move the lever into the required position ~CD:
® OFF Switches off the windscreen wiper.
® INT Interval wipe for the windscreen.
© LOW Slow wipe .
@ HIGH Fast wipe.
® 1x Flick wipe - wipes briefly. Push and hold the lever down for longer to wipe more quickly .
®
............. Pulling the lever activates the wash and wipe system for cleaning the windscreen . \V
© [\J
Interval wipe for the rear window. The windscreen wiper will wipe the window approxi-
mately every 6 seconds .
®
............
Pushing the lever activates the wash and wipe system for cleaning the rear window . ~ -
G)
.. ''
Set the interval lengths with the switch (vehicles without rain sensor) or adjust the sensi-
tivity of the rain sensor.
If the ignition is switched off while the wind
screen wiper is switched on, the windscreen
wiper will continue to wipe on the same setting
when the ignition is switched on again. Frost,
snow and other obstructions on the wind
screen can cause damage to the windscreen
wipers and wiper motor.
• Remove any snow and ice from the wipers
before setting off.
• Carefully detach wiper blades that have be
come frozen onto the windscreen. Volkswagen
recommends using a de-icer spray for this.
118 f Before the journey
Do not switch on the windscreen wipers when
the window is dry. Using the wiper blades when
the rear windscreen is dry could cause damage
to the rear windscreen .
r:l The windscreen wipers will only function
lJJ when the ignition is switched on and the bon·
net and tailgate are closed.
r:l The interval wipe for the windscreen depe.nds
l!:J on the speed of the vehicle . The wipers will , ;
· taster. · w1pe more frequently as the vehicle moves
i I
Page 80 of 138
Downloaded from www.Manualslib.com manuals search engine Gear-change indicator
B~K-O~Y8
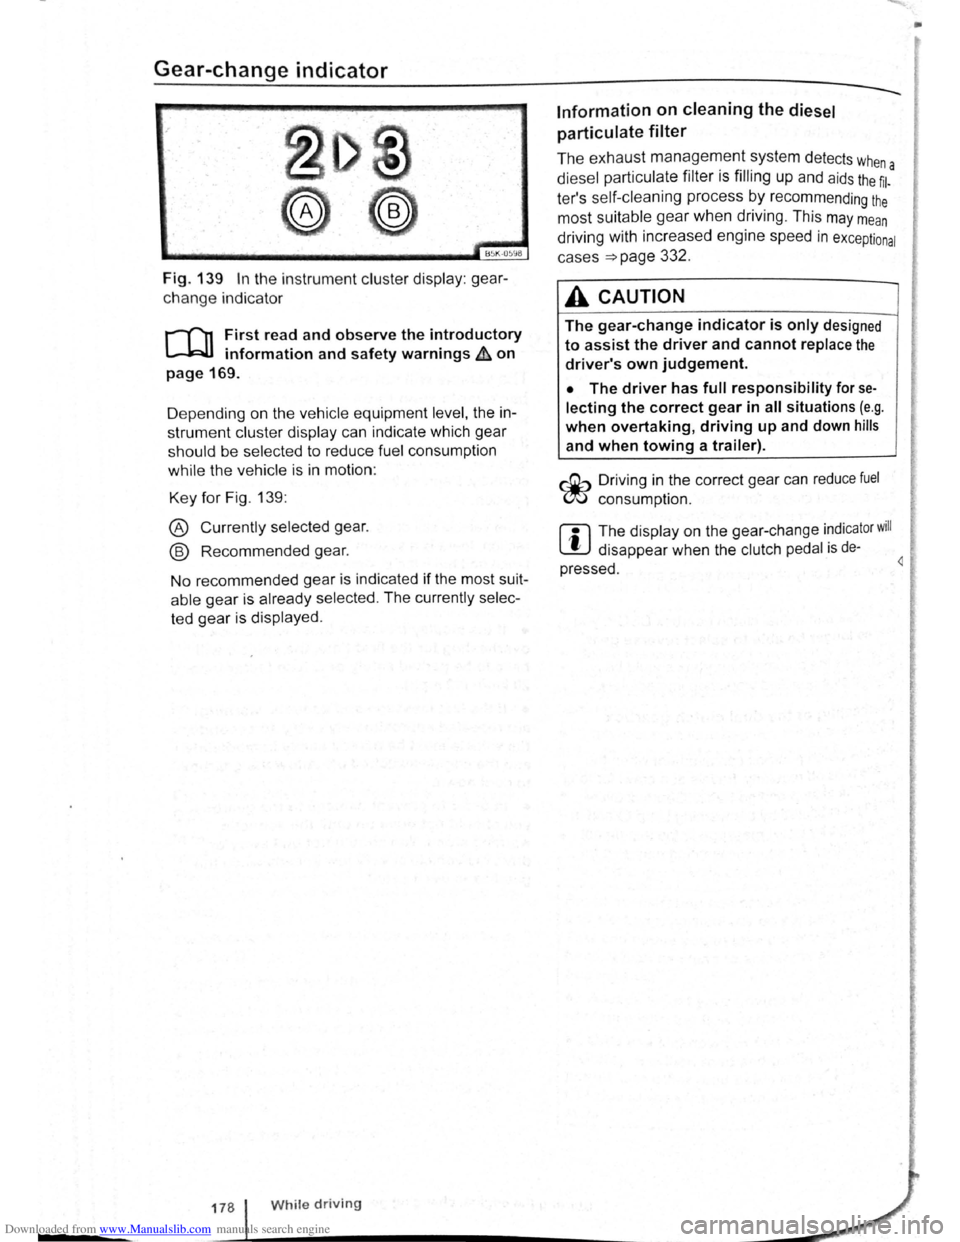
Fig. 139 In the instrument cluster display: gear
change indicator
r-T'n First read and observe the introductory
L-.WI information and safety warnings ~ on
page 169.
D epending on the vehicle equipment
level, the in
strument cluster display can indicate which gear
should be selected to reduce fuel consumption
while the vehicle is in motion :
Key for Fig. 139:
® Currently selected gear.
@ Recommended gear.
No recommended gear is indicated if the most suit
able gear is already selected . The currently selec
ted gear is displayed .
178 While driving
Information on cleaning the diesel
particulate
filter
The exhaust management system detects whe
diesel particulate filter is filling up and aids the ~l-a
ter's self-cleaning process by recommending the
most suitable gear when driving . This may mean
driving with increased engine speed in exceptional
cases
=>page 332 .
A CAUTION
The gear-change indicator is only designed
to assist the driver and cannot replace the
driver's own judgement.
• The driver has full responsibility for se
lecting the correct gear in all situations (e.g .
when overtaking, driving up and down hills
and when towing a trailer).
r::Gb Driv ing in the correct gear can reduce fuel
W consumpt ion.
m The display on the gear-change indicator will
W disappear when the clutch pedal is de·
pressed . 4
•
Page 86 of 138
Downloaded from www.Manualslib.com manuals search engine -•
parkPilot
COl Introduction
This chapter contains information on the following
subjects:
Operating ParkPilot . . . . . . . . . . . . . . . . . . . . . . 202
parkPilot display
. . . . . . . . . . . . . . . . . . . . . . . . 204
ParkPilot menu . . . . . . . . . . . . . . . . . . . . . . . . . 206
Vehicle path display . . . . . . . . . . . . . . . . . . . . . 207
Towing a trailer . . . . . . . . . . . . . . . . . . . . . . . . . . 208
The ParkPilot assists the driver when manoeuvring
and parking . If the vehicle is approaching an obsta
cle located in the range of the ultrasound sensors ,
an intermittent acoustic warning is sounded , de
pending on the distance . The shorter the distance ,
the shorter the intervals . The acoustic warning will
sound continuously if the obstacle is very close .
The ultrasound sensors in the bumpers transmit
and receive ultrasound waves. The system uses
the time difference between the ultrason ic waves
(i.e. between the transmission and reflection from
obstacles and the point of reception) to continu
ously calculate the distance between the bumper
and the obstacle.
Additional information and warnings:
• Exterior views ~page 6
• lnfotainment system ~page 31
• Braking , stopping and parking ~page 179
• Reverse assist system (Rear Assist)
~page 209
• Park
assist system (Park Assist) ~page 213
• Cleaning and caring for the vehicle exterior
~page 294
• Accessories , modificat ions , repairs and renewal
of parts ~page 320
A WARNING
The ParkPilot cannot replace the full concen
tration of the driver.
• Unintentional vehicle movements can
cause serious injury.
• Always adapt your speed and driving style
to suit visibility, weather, road and traffic con
ditions.
• Ultrasound sensors have blind spots in
Which obstacles and people cannot be detec
ted '--.
A WARNING (Continued) ~-
• Always monitor the area around the vehi
cle as the ultrasound sensors will not always
detect infants, animals and objects.
• Certain surfaces of objects and clothes
cannot reflect the signals from the ultrasound
sensors. The system is unable to detect
these objects or people wearing this type of
clothing, or they may be detected incorrectly.
• External sources of sound can affect the
signals of the ultrasound sensors. In certain
circumstances, the system may not recog
nise people or objects.
A WARNING ~-.
Automatic activation of the ParkPilot only oc
curs at very low speeds. An inappropriate
driving style can cause accidents and serious
injuries.
• Always bear in mind the time delay be
tween the signals.
• The ultrasound sensors may not always be
able to detect objects such as trailer drawbars,
thin rails, fences, posts, trees and open or
opening tailgates. This can result in damage to
your vehicle.
• If the ParkPilot has detected an obstacle
and issued a warning, the obstacle may move
out of the detection range of the sensors as the
vehicle approaches it, particularly if the object
is very high or very low. These objects are no
longer registered.
• The vehicle can sustain considerable dam
age if the warning given by the ParkPilot is ig
nored.
• The ultrasound sensors in the bumper can
be displaced or damaged through impacts, e.g.
when parking.
• The ultrasound sensors in the bumpers
must be kept clean and free of ice and snow
and not be covered up by stickers or other
items, as these may prevent the system from
working properly.
Driver assist systems 2o1
Page 87 of 138
Downloaded from www.Manualslib.com manuals search engine CD
• The ultrasound sensors should only be
sprayed briefly when cleaning with pressure
hoses and steam cleaners. A distance
of more
than
10 cm between the ultrasound sensors
and the steam/hose nozzle must
be observed.
• Sources of noise can lead to errors in the
ParkPilot system, e.g. rough asphalt, cobble
stones, induction loops, building equipment,
or
interference from other vehicles.
• Any equipment that has been retrofitted to
the vehicle, e.g . bicycle carriers, can prevent
the ParkPilot from functioning properly.
Operating ParkPilot
If an ultrasound sensor fails, the corrrespond.
ing area of the ultrasound sensor cluster is
switched off and cannot be reactivated until th
fault has been rectified. Consult a qualified
workshop in the event
of a system fault. Volks.
wagen recommends using a Volkswagen deal.
ership for this purpose .
r::l Volkswagen recommends that drivers prac
L!J tise using the ParkPilot in a traffic-calmed
area or car park to allow them to familiarise them
selves with the system and its functions.
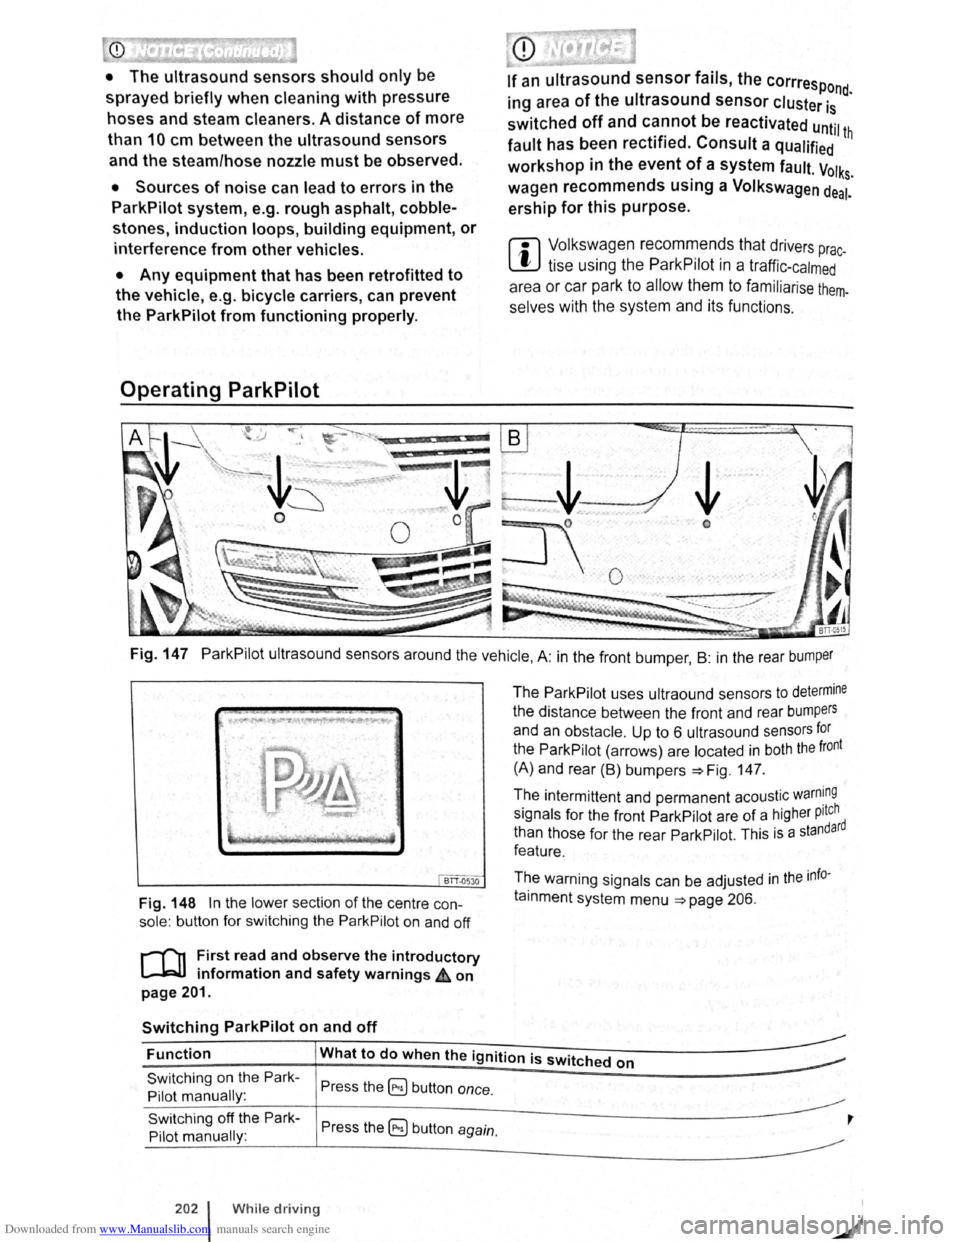
Fig. 147 ParkPilot ultrasound sensors around the vehicle, A: in the front bumper , B : in the rear bumper
BTT.Q530
Fig. 148 In the lower section of the centre con
sole: button for switching the ParkPilot on and off
r-('n First read and observe the introductory
l.-JRlJ information and safety warnings ,£ on
page 201.
Switching ParkPilot on and off
The ParkPilot uses ultraound sensors to determine
the distance between the front and rear bumpers
and an obstacle. Up to 6 ultrasound sensors for
the ParkPilot (arrows) are located in both the front
(A) and rear (B) bumpers :::.Fig. 147.
The intermittent and permanent acoustic
warn~ng
signals for the front ParkPilot are of a higher pitch d
than those for the rear ParkPilot. This
is a standar
feature.
The warning signals can be adjusted
in the info
tainment system menu :::.page 206.
Function What to do when the ignition is switched on
Switching on the Park
Pilot manually :
Switching off the Park
Pilot manually :
202 l While driving
Press the ~ button once.
Press the 5) button again.
,
Page 96 of 138
Downloaded from www.Manualslib.com manuals search engine 1) The Roar A
ss is t s y ste m should not be used in the following situations:
-If the rear of the ve hi cle is heavily loaded.
-If tl'e driv er is no t famili a r with the sy s tem .
-If the pos ition or angl e of the cam era has changed, e.g . following a rear-end collision. The system
sh ould be checked by a qualifi ed workshop.
2) Optica l deception by the camera :
The Rear Ass is t r eve rs ing camera only supplies two-dimen sional image s. Due to the lack of depth of field
on the sc ree n, potho les and dips in the ground , protruding parts on another ve hicle or protruding objects
on the gro und may be difficult or impossible to see on the image .
Objects or other ve hicles m ay appear closer or further away on the screen than they actually are.
-If you d rive from a le ve l surface onto an upward or downward slope.
-If you drive from an upward or downward slope onto a level surface .
-If the rear of th e ve hi cle is hea vily loaded .
-
Whe n app roac hing protruding objects. Su ch obje cts can leave the camera 's field of vision while you are
r e ve rs
ing.
Cleaning the camera lens
Keep the cam era le ns clean and free of ice and
s n o w :
• Switch o n the ignition .
• Switch on the electronic parking brake.
• Selec t re ve rse gea r.
• Moisten the le ns with a commercially available
alcohol- b ase d glass clea ner and clean the le ns
with a dry clot h ~CD.
• Remove snow with a brush .
• Remove ice with a de -ice r spray ~CD.
• Never use an abrasive cleaning product to
clean the lens.
•
Never use warm or hot water to remove
snow and ice from the lens of the camera . The
lens could otherwise be damaged.
m lt is not possible to open the tailgate if the
W V olkswagen badge is folded out.
m Volkswagen reco mmends that you practise
W parking with the rear assist system in a traf
fic-calmed area or car park with good vision and
we ather conditions .
In this way you can become
familiar with the system and the orientation lines in
a safer environment.
m The rear assist system cannot be switched
W on if the tailgate is open . <1
Driver assist systems
Page 99 of 138
Downloaded from www.Manualslib.com manuals search engine • Th sy t n1 ensors in the bumpers must
ept clean and free of ice and snow and not
c er d up by stickers or other items. as
the e n1ay prevent the sy tem from working
property.
• The sen ors in the bumper can be shifted or
damaged through impacts, e .g . hen parking .
• The sensors should only be sprayed briefly
hen cleaning ith pressure hoses and steam
cleaners. A distance of more than 10 cm be-
een the sensors and the s eam ose nozzle
must be observed.
• Sources of sound can lead to erro n he
Pa Ass 1st system or th e Pa P i to e .g . roug
aspha lt , cobblestones, and inte erence r om
other vehic les.
A
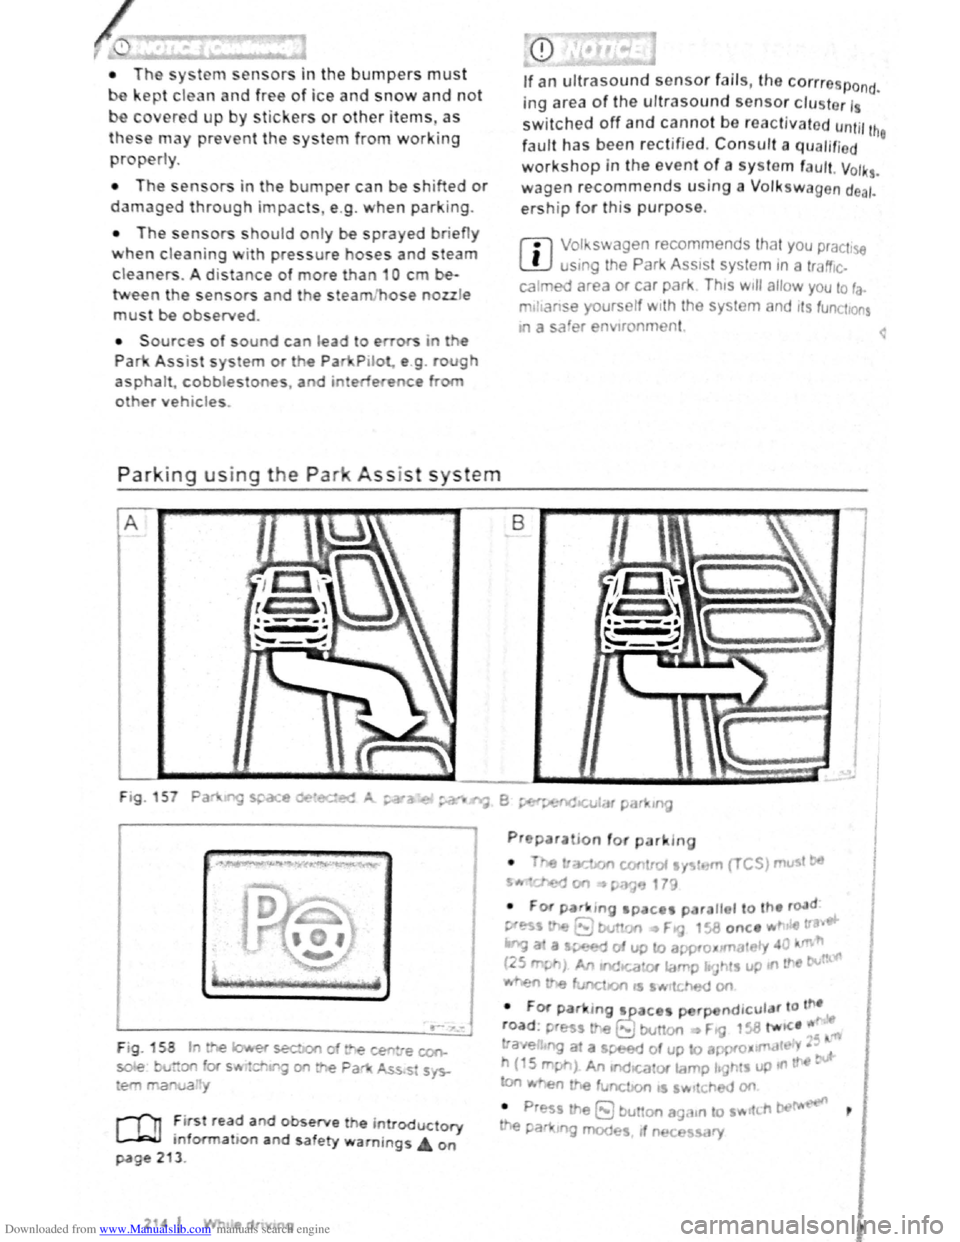
Fig .. 5 Pa
F ig . 158 n re la: rar sect
a· .._ ~on fOf s ·= ... ,ng o
•e man a
of • _ ce tie cc.r
ne Pa . ss' sys...
r-f'n First read and observe the introductory
L-..lcJJ informa ton and safety wa rnJngs on
page 213.
2 I
If an ultrasound sensor fails, the corrro POnd ..
ing area of the ultrasound sensor clu tor 1
switched off and cannot be reactivated until th
fault has been rectified. Consult a qualifi d
workshop in the event of a sy tcm f urt. Volk •
wagen recommends using a Volk swagen dea,.
ership for thi purpose.
m Vof S\ agen recommends that you practise
W usrng the Park Ass 1st system tn a traffrc.
ea, ed area or car par" Thts wtll allo w you to ra.
ffill a'" se ~urs nff tl h the sys tem nd its function
a a sa'er en 1r nn1 nt ~
8
r in
• Press e (S1 u on a
e ar Jng mod~ , n :.c
m CS)mut
WICfl
Page 134 of 138
Downloaded from www.Manualslib.com manuals search engine ~C~Ie~a~n~in~g~a~n~d~c~a~ri~n~g~f~o~r~n~a~tu~r~a~l~le~a~t~h~e~r~c~o~v~e~r~s~---------------------
r-('n First read and observe the introductory
L-..k:JJ information and safety warnings Lt on
page 302 .
Ple a se co nta ct a VolkS\r agen dealership or other
q ua lified workshop if you have any quest ions on
cleaning and car ing for the leather equipment in
y our vehicl e.
Care and use lar
. · d require s regu Natural leather is s ens1t 1ve an ~
care :
Page 135 of 138
Downloaded from www.Manualslib.com manuals search engine L):.C' o-1 jflrtlhrll \'lr, r1111 1!11 llllliulll pri)(IH'I i . n
•
1 •f1•1\llll l ptt~pc,llitl, ( n ;! f llUtll rtf h n, k Ancl 1 filliP < ·~ • <~'' , .,11, ;1 1'1,,, tnln lllr) 1 :1 < ' \Ill n m llln h n t11n
;~iw:IY· 'l ,1111• 11 ''' (l;llllnlll,l rmd ''I'Pit
1 nnd rt)plft~ lr:~lllC'1' "1
'
<'(', I• H I 1\ltll : tulc 11 11: •) l' tnt,;,' l: IIHl 'lllf: H :o .
• l<,: tll\1;1 i l lo tdd l1t1 Gl< d1HHI1 Vt) l I Ill n th
;llld fl<, :lll t\:lltn 1<,1110 tld ,
• lrc,nt tiH ifl\1\II<'F lth, P
• Alv :l y • ttppl l'l t't lll lll t) :111d • 11 fl proch t I
lt\,lll<,l ~p:lllii!JI llttd 1lw:1 • 11~0, dty ottn n or
11 11\111~'' 'klth ll~ttll:i ft 11 ft tn fluff. o n o t npply
ck,;tninu '"'d ':11 pr dut ~t dlt < tly to th le 1tll r .
• ho111 u f,,,,.,, ·tnill', t iGII , Ink , b 11-p o lnt p n
u1k llp$lk'l--, ~11<) "11 111n l" . . qt~lcf..ly po , sl-
bla.
C lonnlng •
l
ook f1 r th p ig m ent. Use a sp ec ia l colo ur ed
ln Alh er er m to re fr es h the colo ur wh ere necess a
ry .
• Wlp it o ff with a soft cloth.
C leaning
V o lk sw oge n reco mmend s that y ou u se a damp
o llo n o r w oo l c loth f o r g ene ra l c lea ning purposes.
Do no t lo t the wate r soa k thro ug h the leathe r or
• ofl k Int o the sea ms.
P lease obsorve the f ollo win g no tes prior to clean
In g th e leathe r uph ols ter y -?page 303, Cleaning
u p ho ls te ry on sea t cu shi ons with out sea t h
eating ,
soRts tlw t are not elec trica lly adju stable, and sea ts
th at d o not co ntain airbag comp on ents.
-
U:.;o w run g-out c loth to app ly a mild so a p so luti on .8l.
-ry w ith fln ab . orbe~t. dry ~l?lh:....
. ---------------
I' ; llut-b :ISt)d SfdiiiS, . C f. - R( m v fr sh tn in s with an absorb ent cloth,
lP . t d . jui' . h i d tc . - If th st in has Alread y dried, use a suitable c leaning age nt ~CD.
011y st~1 1w, . • il, lip tick - R mov fr sl1 sln in s with an absorbe nt cloth.
I . -If 111 stni n hAS no t y et p enetr ate d the surf ace, u se a suitable cleaning
nt
4
C l n wit11 a suit abl e leathe r stain r e mov er.
CD
• Do not u se solvents, w ax polish, shoe
cream, spot removers or similar products on leather . •
Spilt liquids should be cleaned immediately
using an absorbent cloth as the leather surface
and the stitching absorb liquids quickly.
• Stains cannot b
e removed If the y has been
left on the leather for a long time and have pe·
netrated th e surface.
• If the car is left standing outdoors for long
periods, the leather should be protected
against direct sunlight to prevent it from fad
ing.
r:l However, slight colour variations will arise in
L!J norma l use .
COJ First read and observe the introductory
P Information and safety warnings A on age 302
.
Please . in Obse rv e the following notes pnor to clea n-
in~ the leatherette upholstery ~page 303. Cle an
in uphols te ry on sea t cushio ns witllout se at heat
s
ag, seat s tha t are not e lectrica lly adjustable , and
ats tha t do no t cont Ain airbag componen ts.
Only use water and neutral detergents to clean the
leat her ette upholstery .
Do not use solvents, wax polish, shoe cream • spot removers or similar products on the leath-
erette upholstery. These may cause the materi
al to become hard and brittle prematurely.
Vehicle care and maintenance 305