VOLKSWAGEN GOLF 2012 Owners Manual
Manufacturer: VOLKSWAGEN, Model Year: 2012, Model line: GOLF, Model: VOLKSWAGEN GOLF 2012Pages: 516, PDF Size: 105.12 MB
Page 411 of 516
a wheel bolt does not come loose, ca ref ully push
the end of the lug wrench with your foot. Make
sure you are standing firmly on the ground and
hold on
to the vehicle for support .
Loosening the wheel bolts
Push the lug wrench over the wheel bolt all the
way
H oldi ng the lug wrench at the end , loosen the
wheel bolt by turning it countercloc kwise about one comp lete turn
Loosening the anti-theft wheel bolt
Take the adapter for the anti-theft wheel bolt
out of the vehicle tool kit.
Holding the lug wrench at the end , lo osen the wheel bolt by turning it counterclockwise about one comp lete turn
information regarding wheel bolts
The design of rims and whee l bolts is matched to
the factory- in sta lled whee ls . diffe re nt wheels are
ins ta lled , wheel bolts with the right length and bolt
head shape must be used . T
he a ttachment of the
wheels and function of the brake system depend
on this .
may not be possible to use wheel bolts from ferent vehicles of the same model.
a whee l with a w hee l cover , the anti-theft whee l 161 in relation to the position of the tire valve
tight ened bolts for stee l a nd alloy wheel
r im s shou ld have a torque of 88ft lbs
Do
Improperly tightened wheel bolts can come loose while driving and cause you to lose
control over the vehicle, resulting in
and grease .
Loosen the wheel bolts only about one turn before lifting the vehicle with the jack.
Never loosen bolted connections on wheel
rims with bolted rim rings.
the wheel bolts are not tig hten ed to the proper torque, the wheel can come off the
Page 412 of 516
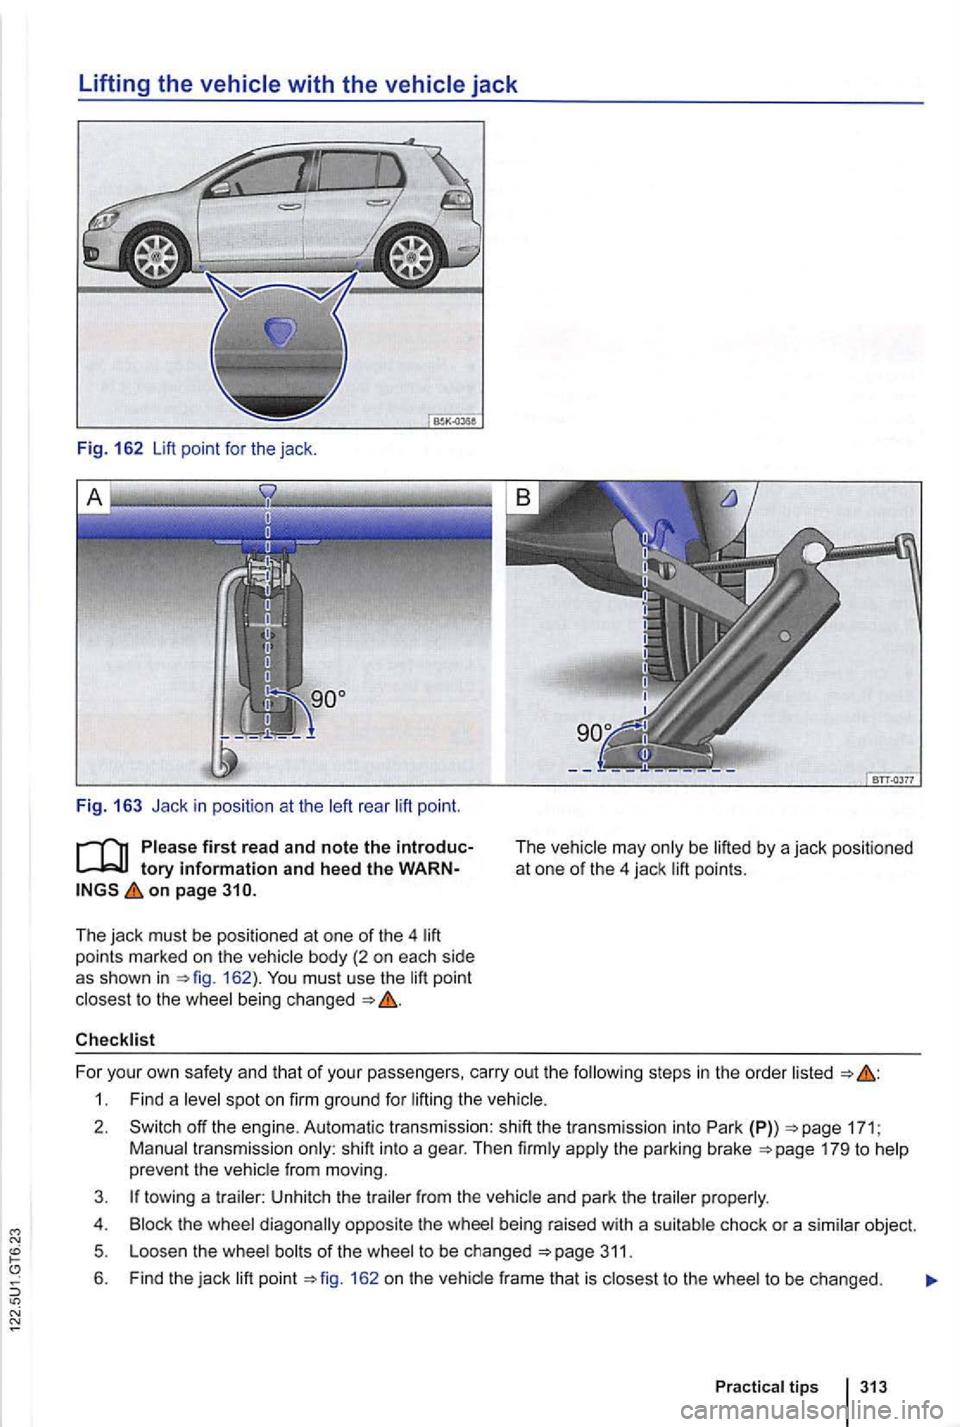
Lifting the vehicle with the vehicle jack
Fig. 162 Lift point for the jack.
Fig. 16 3 Jack in posit io n at the rea r po int .
tory information and heed the WARNon page 310.
The jack must be posi tio ned at one of the 4 points marked on the 162 ). mu st use the to the being change d
may points.
For your own safe ty and that o f your passengers. carry out the steps in the order
1. Find a spot on firm ground for the
2. off the e ngine . Aut om atic transm iss ion: sh ift the transmi ssion into Park (P)) the parking brake 179 to
towing a Unhi tch th e fro m the
the bei ng raised with a chock or a
to be changed
to the to be ch a nged .
tips 313
Page 413 of 516
in side To do so,
up the jack so it just fits underneath the point.
9. Positio n the jack so that its base is directly underneath the 163, making sure that the
en tire base of t he jack rests
the jack and wind up the jack at the same lime, derneath the
cranking up the jack the
to ous personal injury. To
eve n those approved for other Volkswagen
ground. Th e ground.
a hard , slippery surface (such as a use an anti-skid rubber mat or som ething to prevent the jack from
make sure the jack grips the vertical rib unde r the so that the jack does not off when you are ra ising
the 163 .
314 Do it yourself
other per-sons have any part of their body under the
you must work under a raised on a make sure that the vehi-is
the to one side or the engine is running.
is
s upported by a jack. Engine vibrations may
cause the off the jack.
Disregardi ng the safety-related checklist may to acc idents and serious personal inju-ries.
review and accep ted safety practices and use common sense .
Page 414 of 516
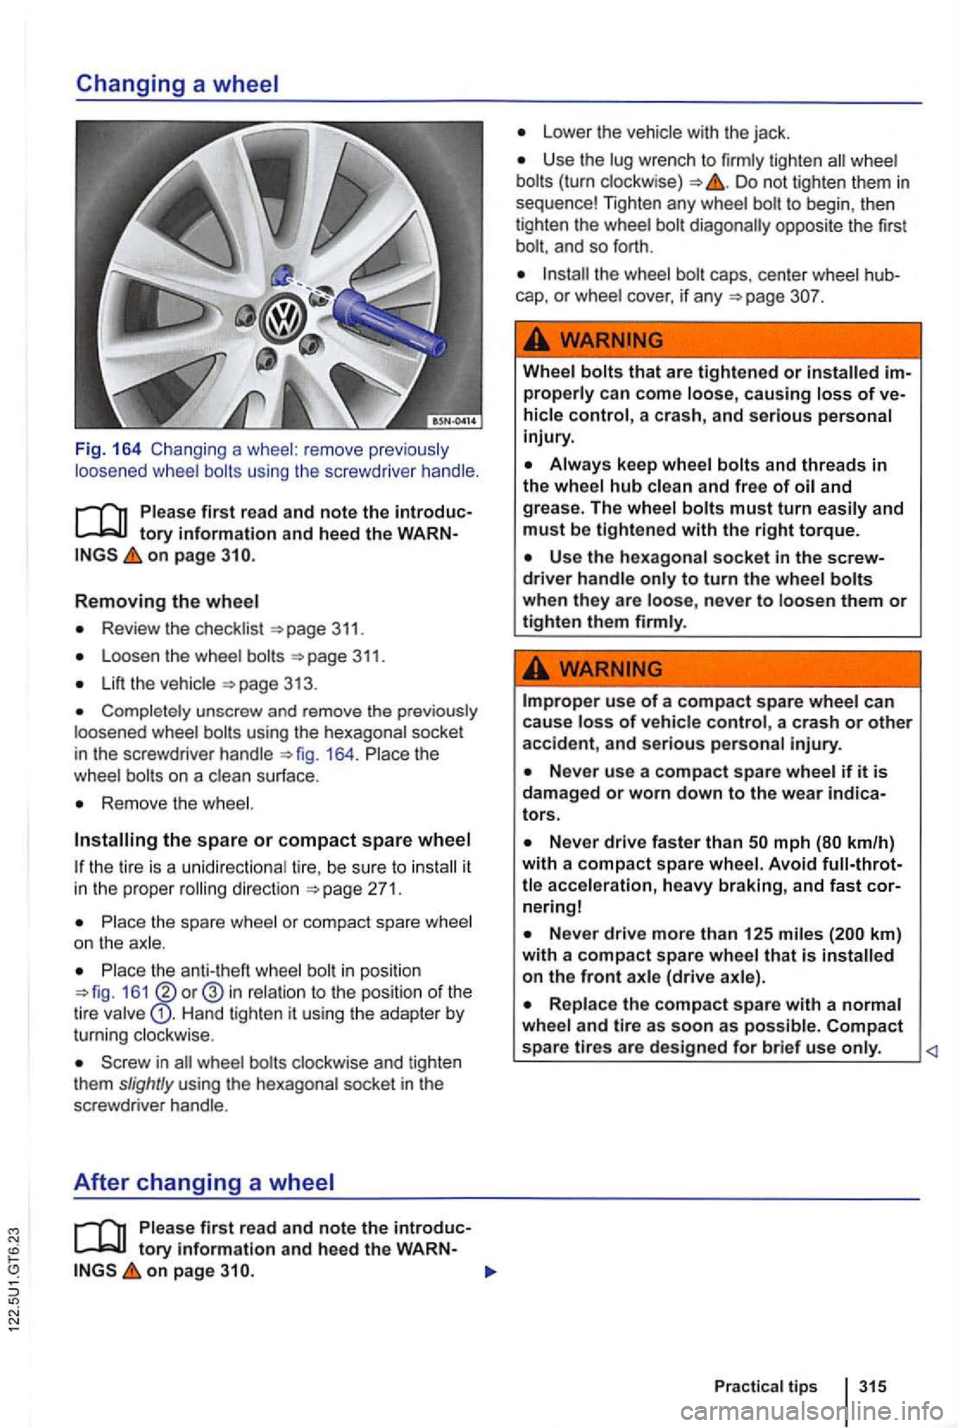
Fig. 164 Chang ing a whee l: remove previous ly
loos ened wheel bolts using the screwdrive r hand le .
on page
Removing the wheel
Review the checklist 311.
Loosen the wheel
Lift the
Completely unscrew and remove the previously
l oosened wheel
164. Place the
wheel
Remove the wheel.
the tire is a unidirectional ti r e , be sure to
Place the spare wheel or compact spare wheel
on the ax le.
in posit ion 161 in relation to the position of the
tire valve Hand tighten it using the adapter by
turning clockwise .
on page
Lower the vehicle with the jack .
Use the lug wrench to firmly tighten wheel Do not tighten them in sequence! Tighten any wheel to begin , then
tighten the wheel
and so forth .
caps , center wheel
Wheel bolts that are tightened or
Always keep wheel bolts and threads in the whee l hub clean and free of
Improper use of a compact s pare wheel can
cause loss o f vehicle control, a crash or other accident , and serious person al injury.
nering!
km ) with a compact spare wheel that is on the front axle (drive axle).
Replace the compact spare with a normal wheel and tire as soon as possible. Compact spa re tires are designed for brief use only.
Practical tip s 3 15
Page 415 of 516
Page 416 of 516
Fuses
Introduction
this sec tion find information about:
Fuses in the vehicle
..................... 318
Repla cing blown
fuses . . . . . . . . . . . . . . . . . . . 319
Due to on go ing deve lopmen t of the vehic le , of fuses and the bin ed fuse protection of multiple loads with one
fuse , an up-to -date overview of the fu se locat ion per load is not possible at the time of print ing . tailed information regarding fuse box layou t is from auth orized Volkswagen dealers and
author ized Vol ksw agen
ge neral , one fuse can protect several loads. load can also be protected by seve ral fuses .
Find out why the fu se blew and correct the
lem before replacing a blown fuse . placed fuse blows again after a s hort time , the
e lec tr ic al system should be chec ked by an auth o r
ized Volkswagen deale r o r an autho rized Volkswa
gen
F acility .
More information:
Prepa ration s for working in the engine compart
ment
High volta g e systems in the engin e
tronic ignition system.
Using the wrong fuse, using a blown fuse
that has been repaired , and using metal ob-jects in plac e of fuses to complete the electri-connection in the circuit can cause fires
and serious p erson al injury.
with a fuse of the same amperage (same or and same imprint) and same
Never replace fuses with a metal strip , a
paper clip, or a similar objec t.
To help preven t damage to the electrical
system , switch off ail lights and accessories ,
switch off the ignition , and remov e the key from the ignition switch before replacing a fuse .
ferent loca tions In the electrical system.
A single load (a sin gle elec trica l com ponent )
fuse may pro tect several loads (seve ral electrical co mp one nts ).
Page 417 of 516
Fuses in the vehicle
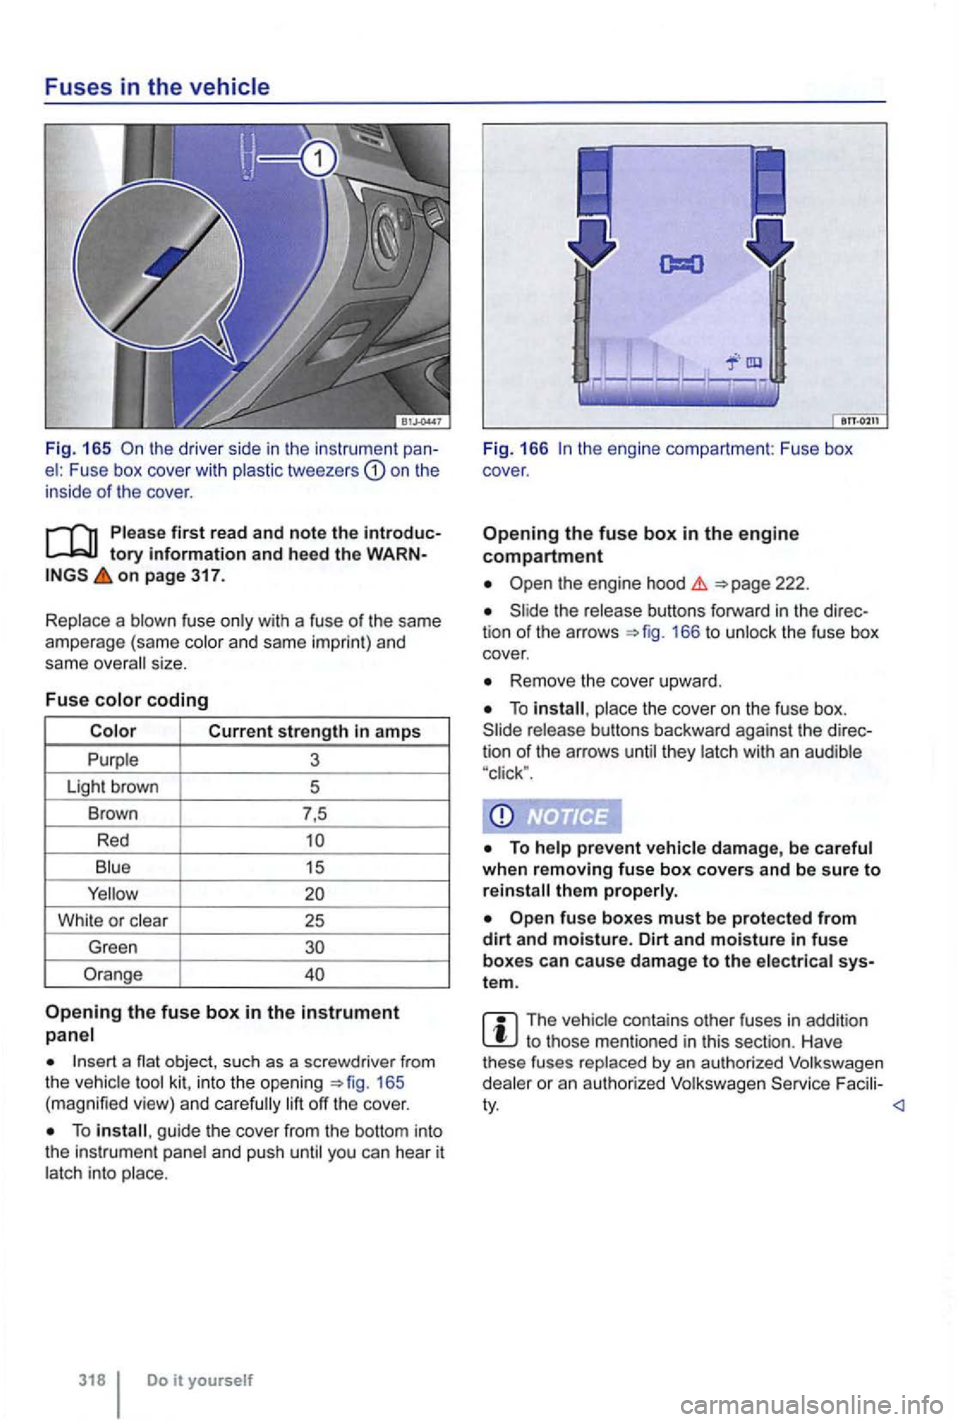
Fig. 165 th e drive r side in the instrument el : Fuse box cove r with plastic tweeze rs on the
inside of t he cover .
on page 317.
Replace a blown fuse only with a fuse
of the same
ampe rage (same color and same impri nt) and
same overa ll size .
Fu
se colo r coding
Blu e
15
Whi te or c lear
25
Green
Orange
Opening the fuse box in t h e instrument
panel
1 65
( m agnified view) and care fully lift off the cover .
To guide the cover from the bottom into
the instrument panel and push until you can hear it
latch int o place .
318 Do it you rself Fi
g. 166
the release buttons forward in the 166 to unlock the fuse box
cover.
Remove the cover upward.
To place the cover on the fuse box.
th em p rope rly.
fuse boxes must be protecte d from dirt an d moisture. Dirt an d moisture in fu se
boxes can cause damage to the elect rica l tem .
The vehic le con tai ns other fu ses in add it ion to those mentioned in this section . H av e
these fuses replaced by an autho rized Volkswage n
dealer or an autho rized Volkswagen Facili -
Page 418 of 516
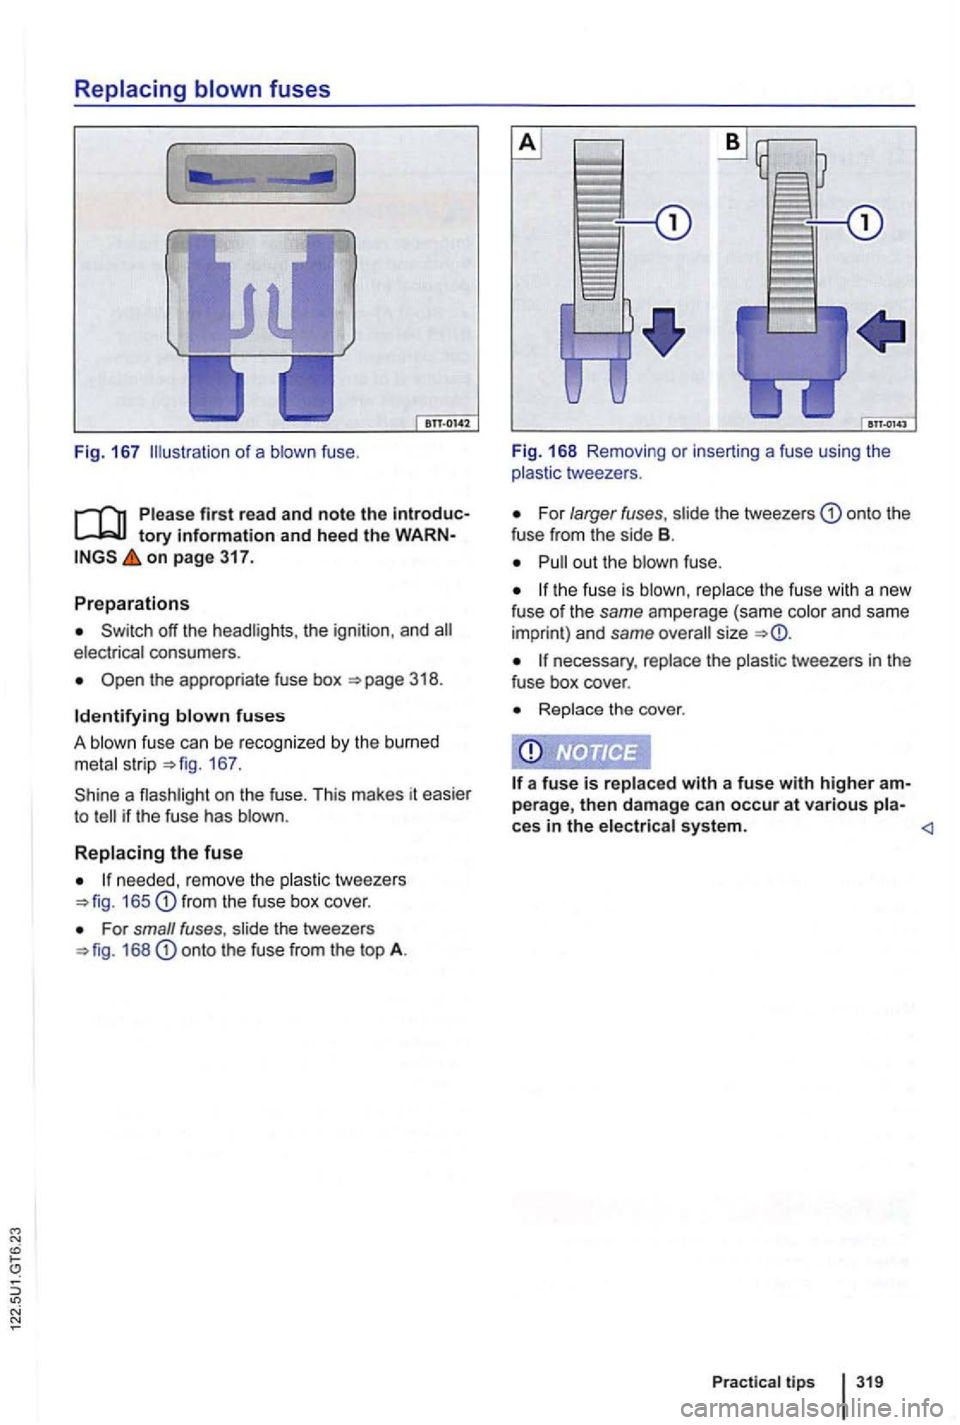
Fig. 167 o f a blown fuse.
tory information and heed the WARNon page 317.
Preparations
off the headlights . the ignition , and electrical consumers .
the appropriate fuse box
167.
a flashlight on th e fuse. This makes it easier
t o
165 fro m the fuse box cover .
For small fuses, slide the tweezers 168 onto the fuse from the top A. Fig
. 168 Removing
or inserting a fuse using the
p lastic tweezers .
For larger fuses, slide the tweezers onto the
f use from the side B.
the fuse is blown , replace the fuse with a new fuse of the same amperage (same color and same
impri nt) and same overall size
necessary, replace the plastic tweezers in the
fuse box cover .
Replace the cove r.
Practica l tips
Page 419 of 516
Changing
Introduction
this sec tion
bulbs in th e body of th e vehic le . . . . . . . . . . . . . . . . . . . . . . . . . . . . . . . . 325
C hangi ng t he lice nse plate
lig ht bulb . . . . . . . . 32 6
C hang ing a light bulb
requ ir es a certa in am ount of
sh ould a lwa ys kee p a box in the ve h icle with th e rep lace ment bulbs require d f or traffic safety .
R ep lacemen t bulbs are ava ilab le from you r autho r
i z ed
Additional
E xte rior views
Lig hts a nd 122
P repa ra tions for workin g in the eng ine compart
m en t
too l kit
F uses
Stop Always read and heed the before doing any work in the engine
c ompartment
Always let a burned out
of the necessary procedures. particular, never remove a headlight unless you know how to carry out the job and have the correct tools and bulbs.
you are uncertain about what to do,
have the work performed by an authorized
Volkswagen dealer, an authorized
and H7 bulbs replaced by a qualified
technic ian .
Page 420 of 516
N
After replacing a headlight bulb or other light bulb, always make sure that the rubber covers or plastic caps have been properly and secure-
Indicator light
to help prevent water from getting into the electrical connections and headlight housing and damaging the electrical system.
on
Lights up Possible cause Proper response
Light bulb of the exterior vehicle lighting not Replace the light bulb that isn't working .
working .
When the ignition is switched on, several warning
and indicator lights come on briefly for a function
check . They go
out after a few seconds.
WARNING
Failure to heed warning lights and instrument cluster text messages can cause the vehicle to break down in traffic and result in a
can result in vehicle damage.
indicated. However, indicator light come on if LEO s fail.
on
Checklist
for replacing a light bulb. Please carry out these steps only in the order listed
1.
179.
3.
4.
5.
6 .
7.
8.
9 .
position
122 .
Automatic transmission :
the transmission into Park (P) 171.
the engine and remove the key from the ignition switch 165.
Manual transmission: Engage a gear
122.
Let the burned
out light cool down.
Check
if the fuse is blown 317 .
Replace the burned
out light according to
Practical tips 321