height VOLKSWAGEN GOLF PLUS 2007 Owners Manual
[x] Cancel search | Manufacturer: VOLKSWAGEN, Model Year: 2007, Model line: GOLF PLUS, Model: VOLKSWAGEN GOLF PLUS 2007Pages: 541, PDF Size: 98.86 MB
Page 34 of 541
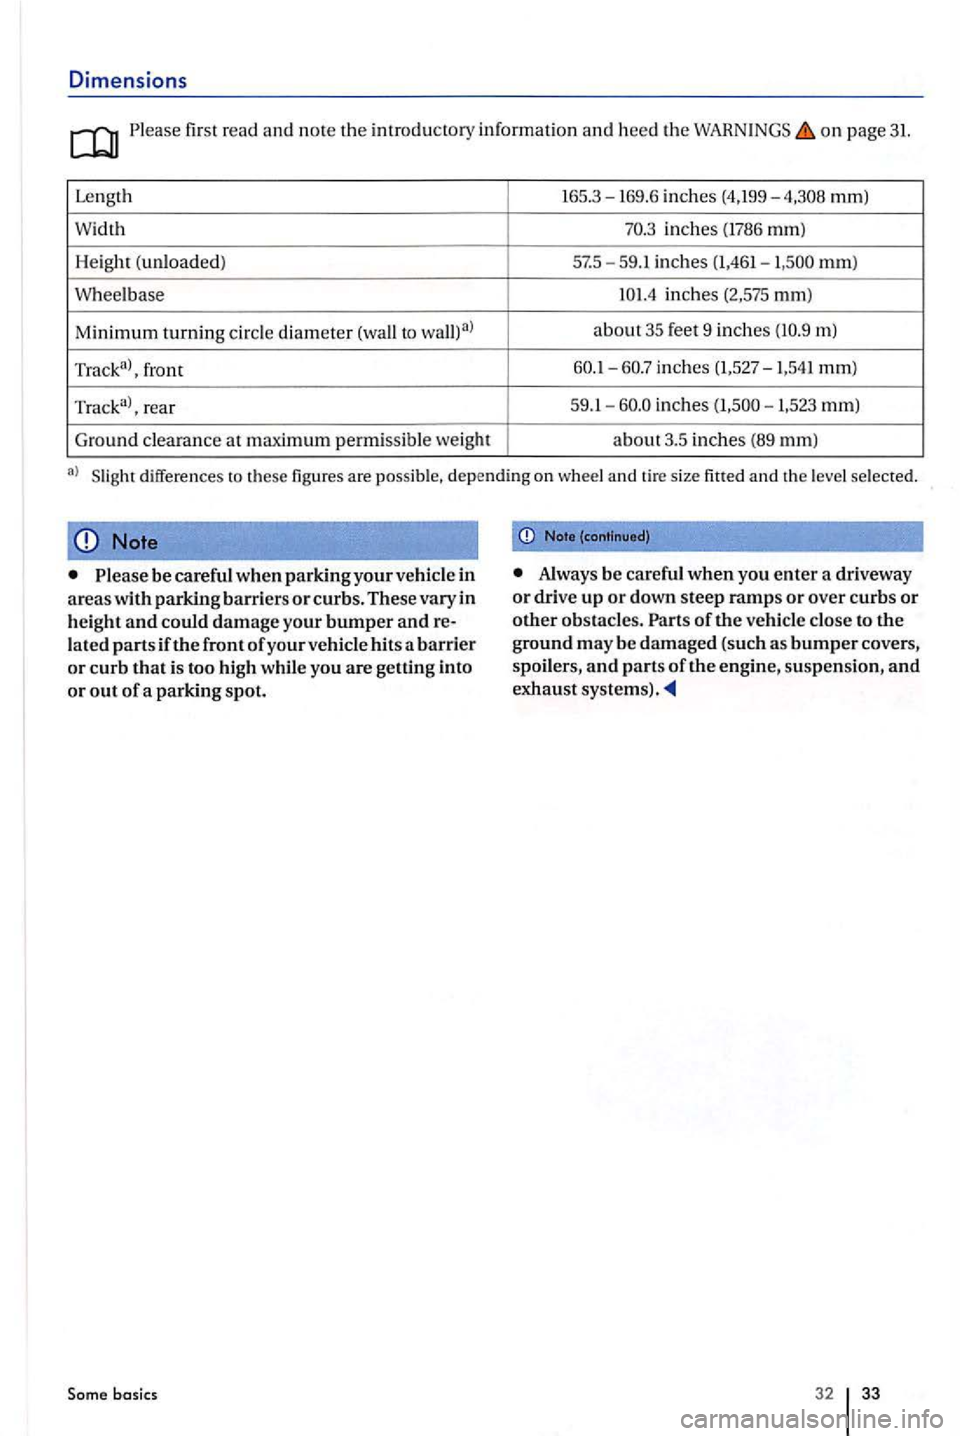
Dimensions
Please first read a nd note th e imrodu ctory informa tion and hee d th e on pa ge 31.
Le ngt h 165.3-
16 9 .6 in ches (4,199-mm)
W id th
inch es (1786 mm)
H eig
ht ( unload ed ) 57.5-59.1 in ch es (1,461-mm)
W h
eelb ase inch es (2,575 mm)
M inimum turning circl e diamet er
(wall to abou t 35 feet 9 inch es m)
inch es 1,523 mm)
G ro
und clearance at maximum p ermi ssibl e we ig ht about3.5 inch es (8 9 mm)
a)
Note
Plea se be careful when parking your vehicle in
areas with parking barriers or curbs. These vary in
height and could dama ge you r bumper and
basic s
Note (continued)
Always be carefu l when you enter a driveway or dri ve up or down steep ramps or over curbs or other obstacles . Part s of the vehicle close to the ground may be damaged (such as bumper covers ,
spoil ers , and parts of the engine, su sp en sion, and exhaust
32 33
Page 58 of 541
Always upright your back agains t the backrest with the front seats properly adjusted.
Never lean agains t or pla ce any part of you r
body too close to the area where the airb ags are
l oca ted.
Rear seat passengers who are not properly
seated and restrained are more lik ely to be seri
ously injured in a crash.
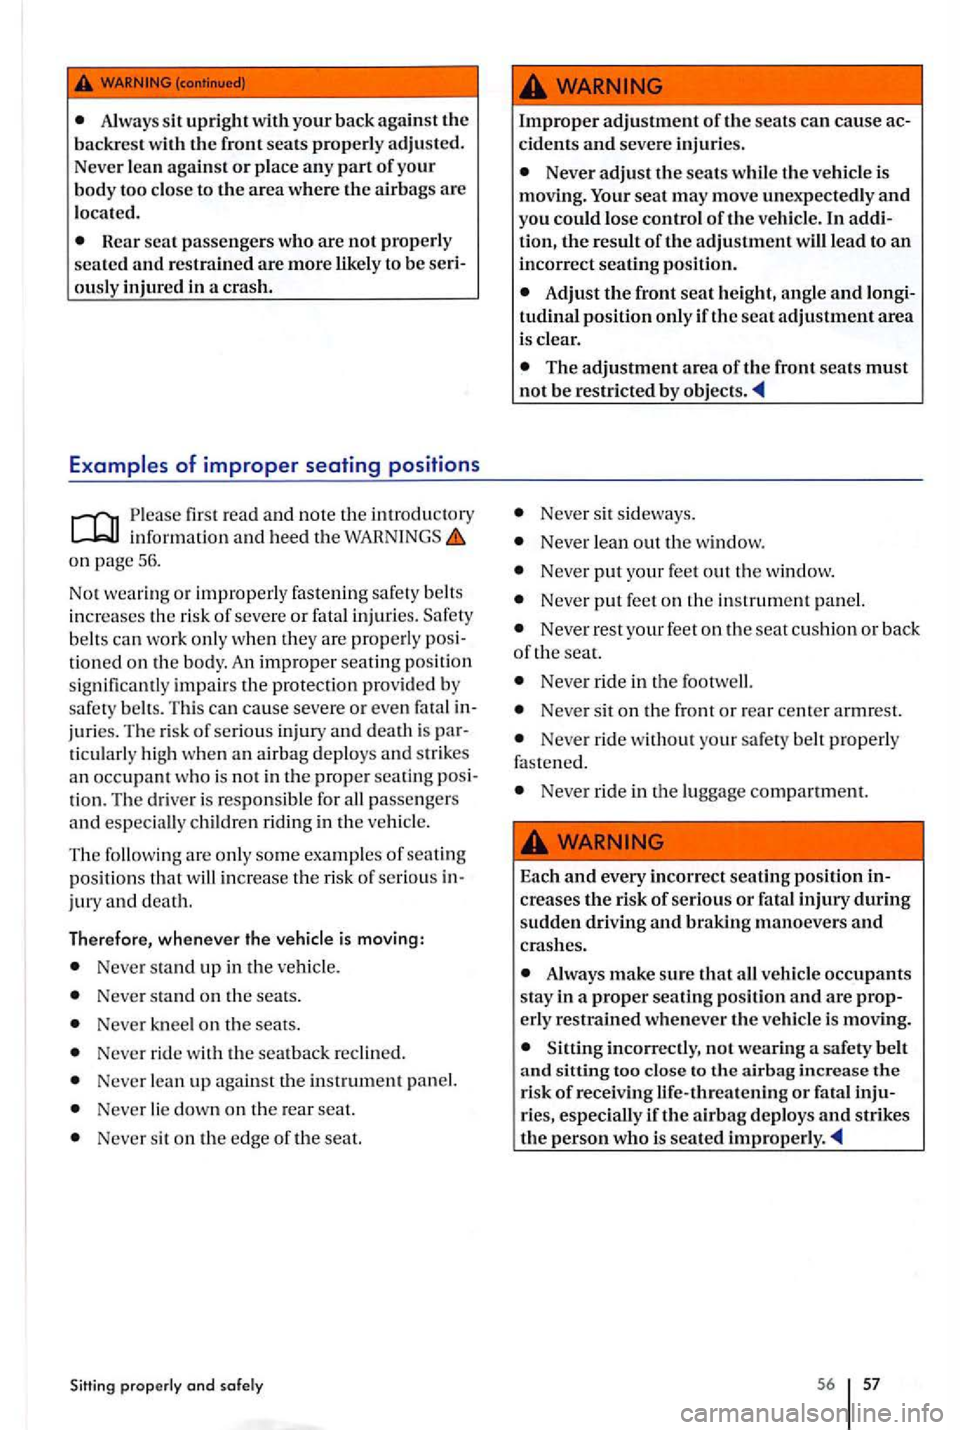
of improper seating positions
first r ead and not e th e introdu ctory inf ormation and hee d th e on pa ge 56.
Not w earin g or improperly fastening safety belts
i n c reases the risk of se ver e or fata l injuri es. Safe ty
b elt s can work onl y when they are prop erly po sitioned on th e bo dy. A n improp er se atin g pos ition
s ig nifi cantly impai rs the protection provided by
safety belt s. Thi s can cause se ve re or ev en fa ta l in
j uries. T he risk of se rious injur y and d eath is pa r
ti cularly hi gh wh en an airbag depl oys and strik es
an occupant who is not in the prop er seatin g pos i
ti o n. Th e driver is respons ibl e fo r pa ssen ge rs
a nd especi ally childr en riding th e vehicl e.
Th e
and dea th.
Therefore, whenever the vehicle
is moving :
Never stand up in the v ehicle .
Never stand on the seats.
Never kneel o n th e se ats.
Neve r rid e w ith the seat back re clin ed .
Neve r lea n up again st t he in strum ent pa nel.
Neve r lie dow n on the rear seat.
Neve r sit on th e edge of th e se at.
Sitting properly and safely
Improper adjustment of the seats can cause ac
cidents and severe injuries.
Never adjust the seats while the veh icle is
moving. seat may move unexpec tedly and
yo u could lose contro l of the vehicle. In addi
tion, the result of the adjustment will lead to an incorrect seating position.
Adjust the front seat height, angle and longi
tudinal position only if the seat adjustment area is clear.
The adjustment area of the front seats must not be restricted by ob jects
Nev er sit side ways.
N ever lean out the w indow.
Neve r put your feet o ut the window.
Never put feet on th e instrum ent panel.
Neve r rest your feet on the s eat cushion or b ac k of the seat.
Never rid e in the foo t well.
Neve r sit on th e front o r rea r ce nter armrest.
Neve r rid e withou t your belt prop erl y faste ned.
N ev er ride in th e lu gg age compartment.
Each
and incorrec t seating position in
creases the risk of seri o us or fatal during sudden driving and brakin g manoevers and cras hes.
Always make sure that all vehicle occupants
stay in a proper seat ing position and are prop
erly restrained whenever the vehicle is moving.
incorrec tly, not wearing a safety belt and sittin g too close to the airbag increas e the risk of receiving life-threatening or fatal inju
r ies, especially if the airbag deploys and strikes the person who is seated improperly
56 57
Page 61 of 541
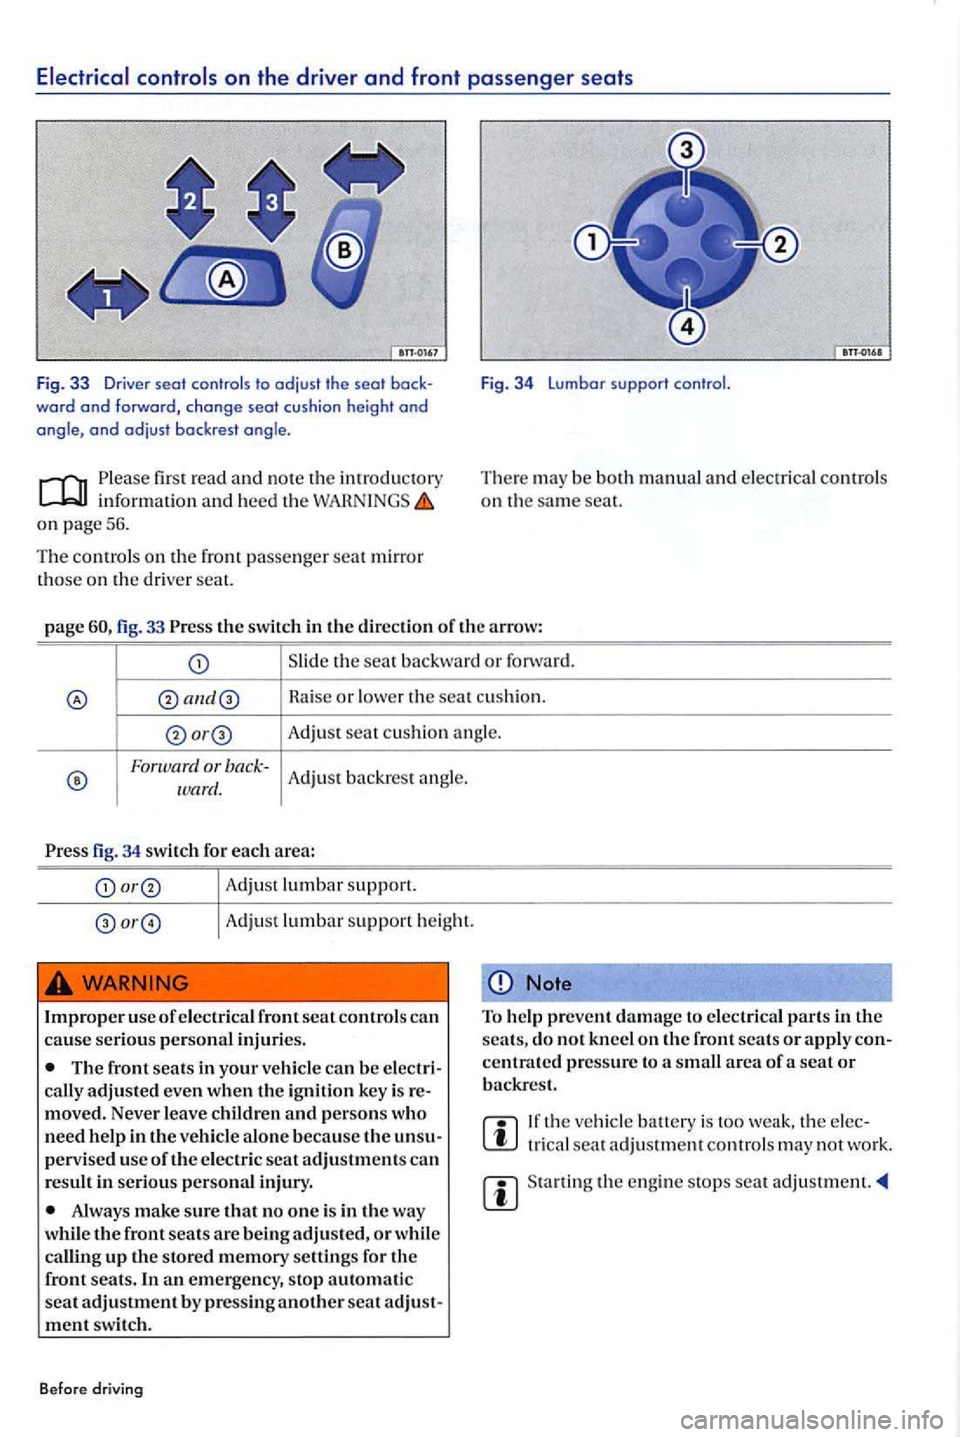
word and forward , change seat cushion height and angle, and adjust backrest angle.
first r ead and note the inf orm atio n and hee d t he WAH N INGS on pag e 56.
T he co ntrols
on f ront passe nge r seat mi rro r on th e driver se at.
F ig. 34 Lumbar su pport control.
T he re m ay be bo th manual and e lectri ca l controls
o n th e sa me seat.
page fig. 33 th e sw itch i n th e d irec tion of th e a rrow:
Slid e th e seat b ackwa rd or forw ard .
Haise or l owe r th e seat cu sh io n .
Adjust sea t c u shi on an gle .
Forw ard or bac k-Adju st b ack res t an gle. ward.
fig. 34 switch f or each area:
Adju st lumbar s upport .
Adjust l umb ar suppo rt heig ht.
WARNING
Im prope r use of e lec tr ica l front sea t control s ca n cause serio us pe rso nal inju ries.
T he front sea ts in your vehicl e ca n b e
moved. Neve r leave children and p erso ns w ho
need h elp in the ve hicl e alo ne beca use the p erv ise d u se oftheelec tric sea t adjustments can
re sult in seriou s personal inju ry.
way
w hil e the front seats are bein g adju ste d, o r w hil e
ca llin g up sto re d m em ory settings for the
fr ont seats . In an em erge ncy, sto p aut om atic
seal adjustment b y pre ss ing a nother seat
N ote
T o help prev ent damage t o e lec trical p arts in the
s ea ts , do no t kn eel o n the front seals o r a ppl y
tr ica l seat adju stm ent contro ls m ay not w ork.
th e e ng in e s to p s se at
Page 75 of 541
Safety belt position
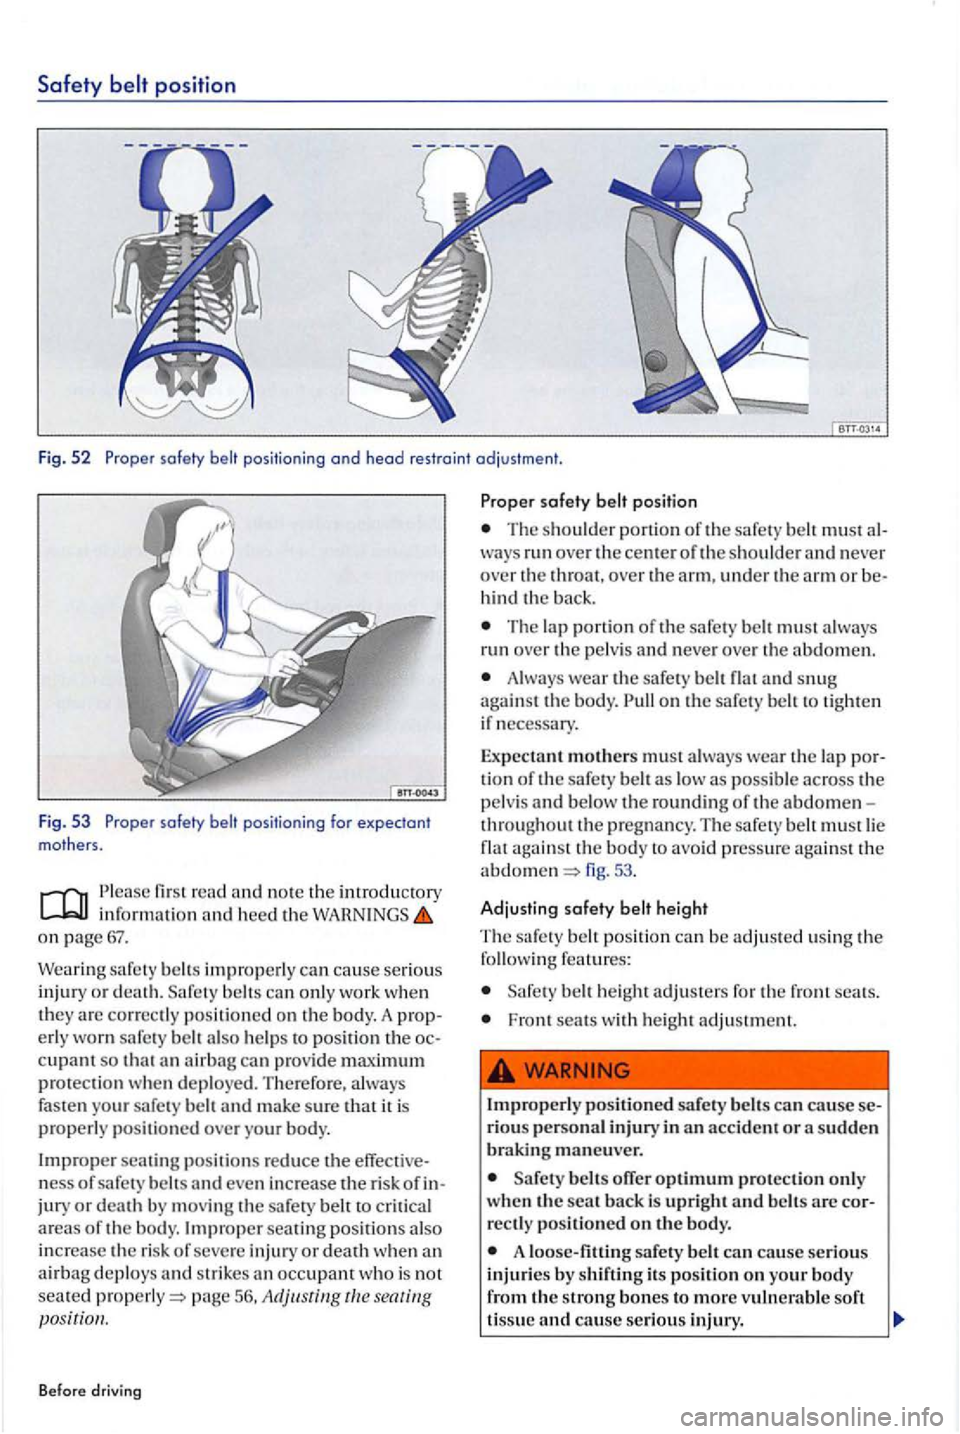
Fig . 52 Proper
informatio n on
Wea ring safe ty improperly ca n ca use serious
in jury or death. belt s ca n onl y work when they are corr ectly positioned on the body. A worn safe ty be lt also he lp s to position the cupant so that an airb ag can prov ide m aximum protection when deployed. Therefore, always
fasten your safe ty mak e sure that it is properly positioned over your body.
seati ng positi ons reduce the ness of safety jury or death by moving the sa fe ty to critica l
a re as of the body.
Before driving
safety belt position
The sho uld er portio n of the safe ty belt mu st ways run over the cen te r of the shoulder and neve r
ove r the th roat. ove r the arm. under the arm or hin d th e back.
The lap po rtion of the safety mus t ru n ove r th e pelv is a nd neve r over the abdomen.
Always wear th e safe ty a nd snug on the safe ty belt to tight en
if necessary .
Expectant mothers must a lways wear th e lap as low as possible across the pelv is an d below the rounding of the abdomen
throu ghout the pregnancy. The safe ty must lie aga inst th e bod y to avoid pressure against th e abdomen 53.
Adjusting safety belt height
Th e safety posit ion can be adjuste d u sin g the features:
belt he ig ht adju ster s for the front seats.
Fro nt seats with height adjustment.
rio us personal injury in an accident or a sudden braking maneuver.
belt s offer optimum protection onl y when th e seat bac k i s upright and belt s arc rectl y positioned on the body.
A safety belt can cause serious injuries by s hiftjn g its position on your body from the strong bones to more vulnerable s oft
tissu e and cause se riou s injury.
Page 76 of 541
The sh o ulder belt portion of tJ1e safety must be positioned over the middle of the
T he sa fety belt must lie flat and snug on the
occupant's upper body.
T he la p portion of the safe ty belt must be sitioned as low as possible across the pelvis and n eve r over the abdomen. Make sure tJ1e belt lies
flat and snug against th e pelvis. Pull on the safety belt to tighten if necessary.
Expectant mothers mus t always wear the lap portion of the safety be lt as low as poss ibl e
a cross the pelvi s and below tJ1e rounding of the abdomen.
Safety
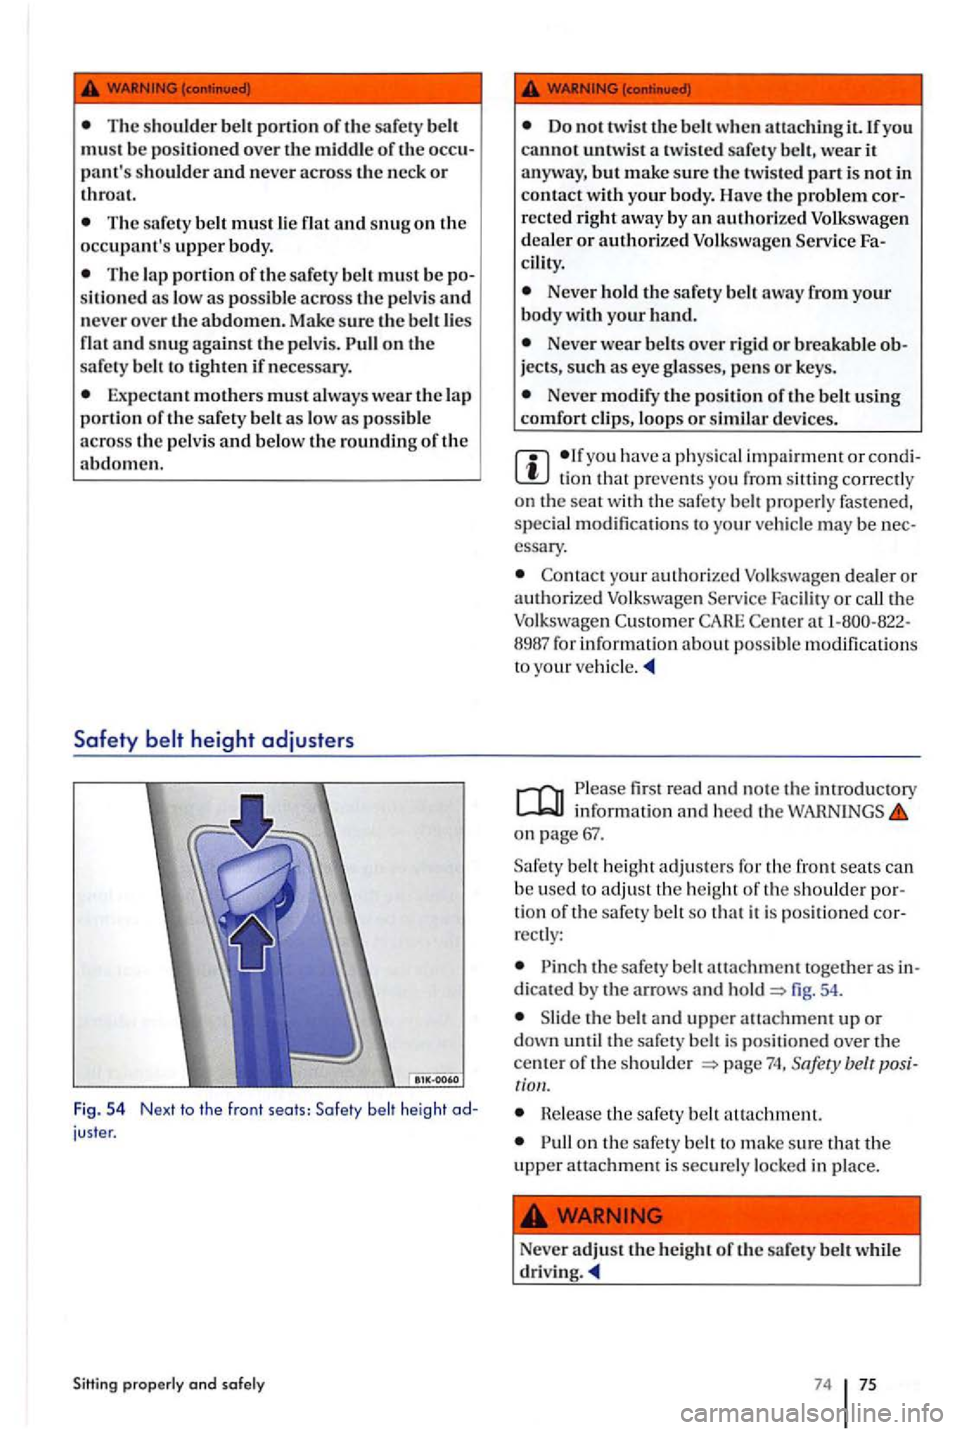
juster.
Sittin g ond safely
Do no t tw ist the belt wh en auaching it. If yo u cannot untwi st a twis te d sa fe ty belt , w ear it
anyway , but make sure the tw is te d p art is not in contact with your body. Have th e problem
cility .
Neve r hold the safet y belt away from your body your hand.
Never wear belt s over rigid or breakable
Neve r modify the po sition of the b elt usi ng
co mfort clips, loops or similar d evices .
tion that p reve nts yo u f rom siltin g correctly on th e seat w ith the safe ty belt p ro perly fastened,
spec ia l modifica tions to yo ur vehicle may be essary.
Contact your authorized Volkswage n dealer or
auth orized Volkswage n Facility or call th e Volksw agen CARE 8987 for informatio n abo ut po ssibl e modifications to you r vehicle .
Please fir st rea d and note the introduc tory informatio n and heed the on page
belt h eig ht adju ste rs for the front seats can
b e used to adj us t th e he ig ht of th e sh o uld er tio n of th e sa fety belt so th at it is po sit ioned
th e safe ty belt auachm emtogethe r as dica ted by the arro ws an d fig. 54.
th e belt and upper auachm ent up or d own th e safe ty belt is positioned over the
ce nter of th e should er tio n.
th e safe ty belt a uach mc nt.
on th e sa fe ty belt to mak e sur e th at th e
up pe r atta chment is sec ure ly loc ke d in place.
adjust the height of the safe ty belt while
Page 113 of 541
Booster seat s and safety belts
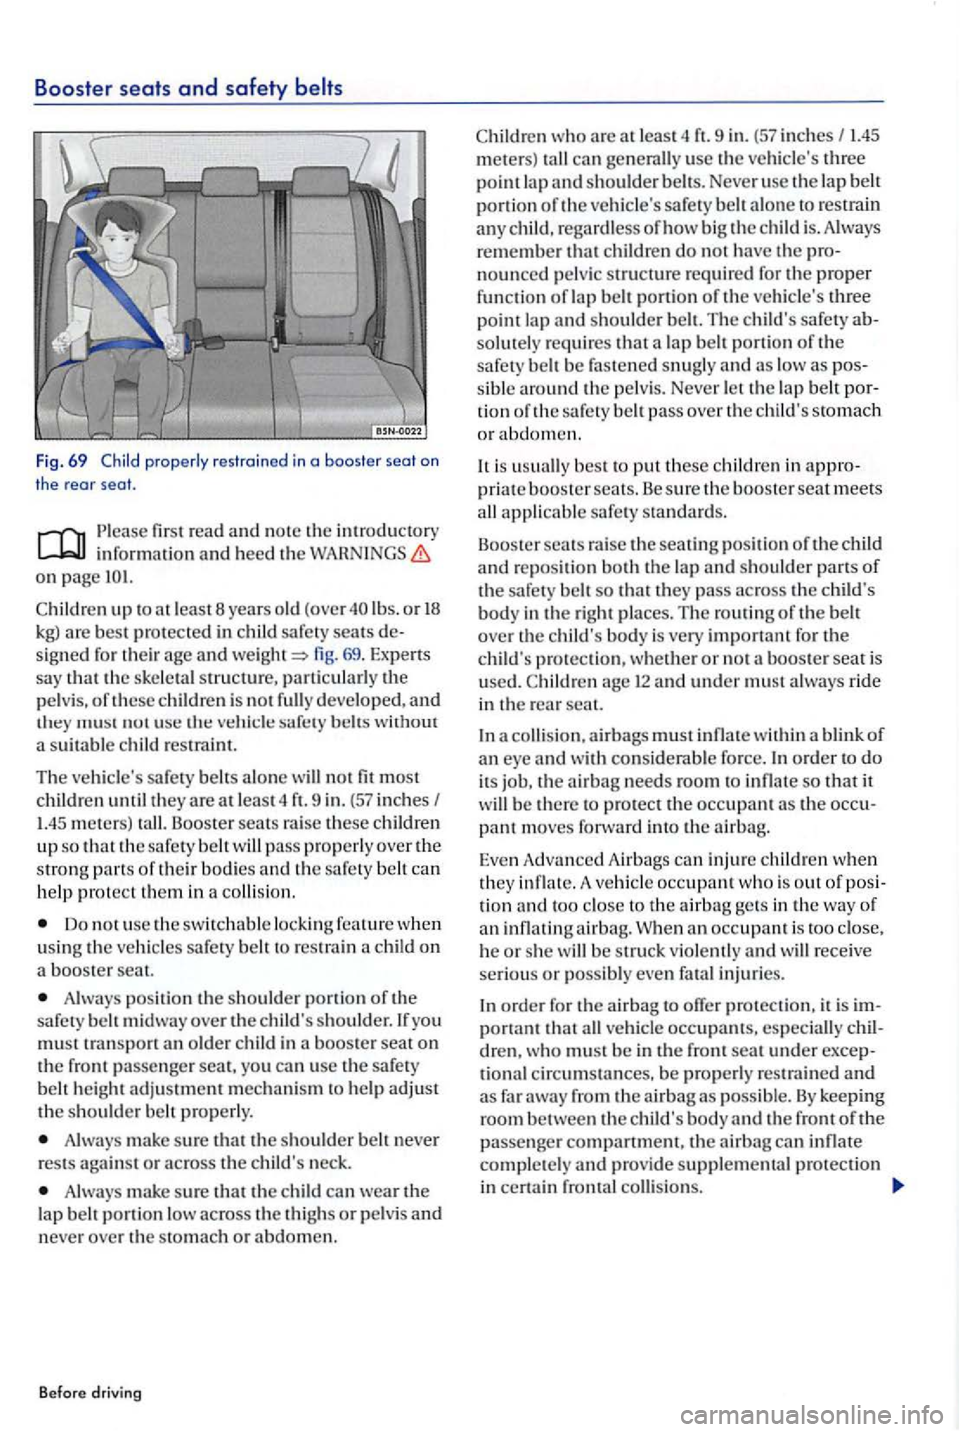
Fig . 69 properly res train ed in a booster se a l on the rear seal.
fir st r ead and note the introductory info rmati on and heed th e on page
sign ed th eir age and fig. 69. E xp ert s
s a y that the sk e le ta l s tructure, parti cu larl y the
p e lv is,
b elt s w ithout a suitabl e child restra int.
Th e ve hicl
e's safety be lts al one will not fit most
children until th ey are atleast4
or their bodi es and the safety be lt can h elp protect them in a c ollision.
Do no t use the switchable lo cking feature wh en
u sin g the ve hicle s s afet y belt to res train a child on a booste r se at.
Alw ays pos ition the should er p o rt ion belt midway over the c hild's sh oulder. you mus t tra n sp o rt an old e r child in a b ooster seat on the front passe nge r seat. yo u can use th e safety
b elt height adjustment mechanis m t o help adjust the s ho uld er b elt properly.
A lw ays make sure tha t the s ho uld er b elt never res ts against o r across the c hild's neck.
A lways
w ho are at least4 ft. 9 in. (57 in ches I 1.45
m ete rs) tall can ge nerall y use th e ve hicle's three
p o int lap and sh ould er b elt s. Neve r use the lap belt portion of the ve hicl e's s afet y belt alo ne to restrain any c hild, regardless of how bi g the c hild is . Alw ays remembe r that childr en do n o t h ave the nounced pe lv ic s tru ctur e re quired fo r the proper fun ctio n of lap belt po rti on of th e ve hicle's three po int la p and s houlder b elt. The c hild's safet y solutely requires that a la p b elt po rti on of th e
safe ty belt be faste n ed snugly and a s low as
tion the safety belt pa ss ove r th e child's stomach
or abdomen.
la p and sh o ulder parts of th e safe ty belt so that they pass across the c hild's body in the right places. The routin g of the be lt
o ve r the c hild's bo dy is very important fo r the child's protectio n, w hether or not booste r seat is
u se d. age 12 and under must ride
in the rear seat.
In a co
llisio n, airbags must infl ate w ithin a blink of an eye and w ith considerabl e fo rce. ord er to do its job, the airbag needs room t o inflat e so that it
w ill be there to protect the occupant as the
tio n and too close to the airba g gets in the wa y of an inflatin gairbag. Wh en an occupant is to o close ,
h e or sh e will b e s tru ck viol entl y and will recei ve seri ous o r possibly eve n fatal injurie s.
orde r
tional c ir cumstances , be pro pe rly restrained and as far aw ay from the a irbag as possib le. B y keepin g
ro om b etwee n the child's bo d y and th e front o f the passenge r compartm ent, the air b ag can infl ate compl ete ly and provide s u ppl em ental protectio n
in certain frontal collis io ns.
Page 150 of 541
Roof rack
this section you'll find informatio n on th e lowin g:
Mounting the roof rock bose carrier and roof rock
mize aerod ynamics and does not have tradit io nal
rain gutters used to attach many kinds of roof
ra cks.
the rain gutte rs are m old ed into the roof to prov ide efficient ae rody nami cs, only approved base carrie r mounts and roof racks can be u se d.
When should the roof rack be removed?
it is no lo nge r need ed.
Befo re dri vin g throug h an automatic car wash.
th e ve hicl e would otherw ise be too high to achieve minimum clearance to enter, for ample, a ga rage.
More information:
page
Tran sp o rtin g=> page 137
Sav ing f uel and h e lping the en vironment 198
Tires and page 276
Parts, a ccesso ries, repa irs and modifica tio ns
Transporting heavy or bulky loads o n the roof rack will change the way the ve hicl e handles by shifting the ve hicl e's cente r of gravity and creasing the wind drag area.
Always secu re the load properly wit h suitable and undamaged straps so that the load wiH not s hift.
Cargo that is larg e, heavy, bulky, long or flat
will have a negativ e effect on the vehicle's
dling.
Always avoid sudden maneuvers and hard braking.
Always adapt your speed and driving to the heavier load and the we ight distribution in the ve hicle. Take road, weather, and vis ibili ty
conditions into account as we ll.
Note
Always remove the roof rack before driving through an automatic car wash.
vehicle is higher when the roof rack i s stalled, especially when it is loaded. Compare the ve hicl e height with ex isting clearance heights,
s u ch as underpasses and garage doors.
Always make sure that the roof rack system and anything being carried on it docs not
Make sure that the rear h atc h does not touch items on the roof rack when open ed.
a roof rack is installe d, fue l co nsumption inc reases due to in creased air resis tance.
148 149
Page 158 of 541
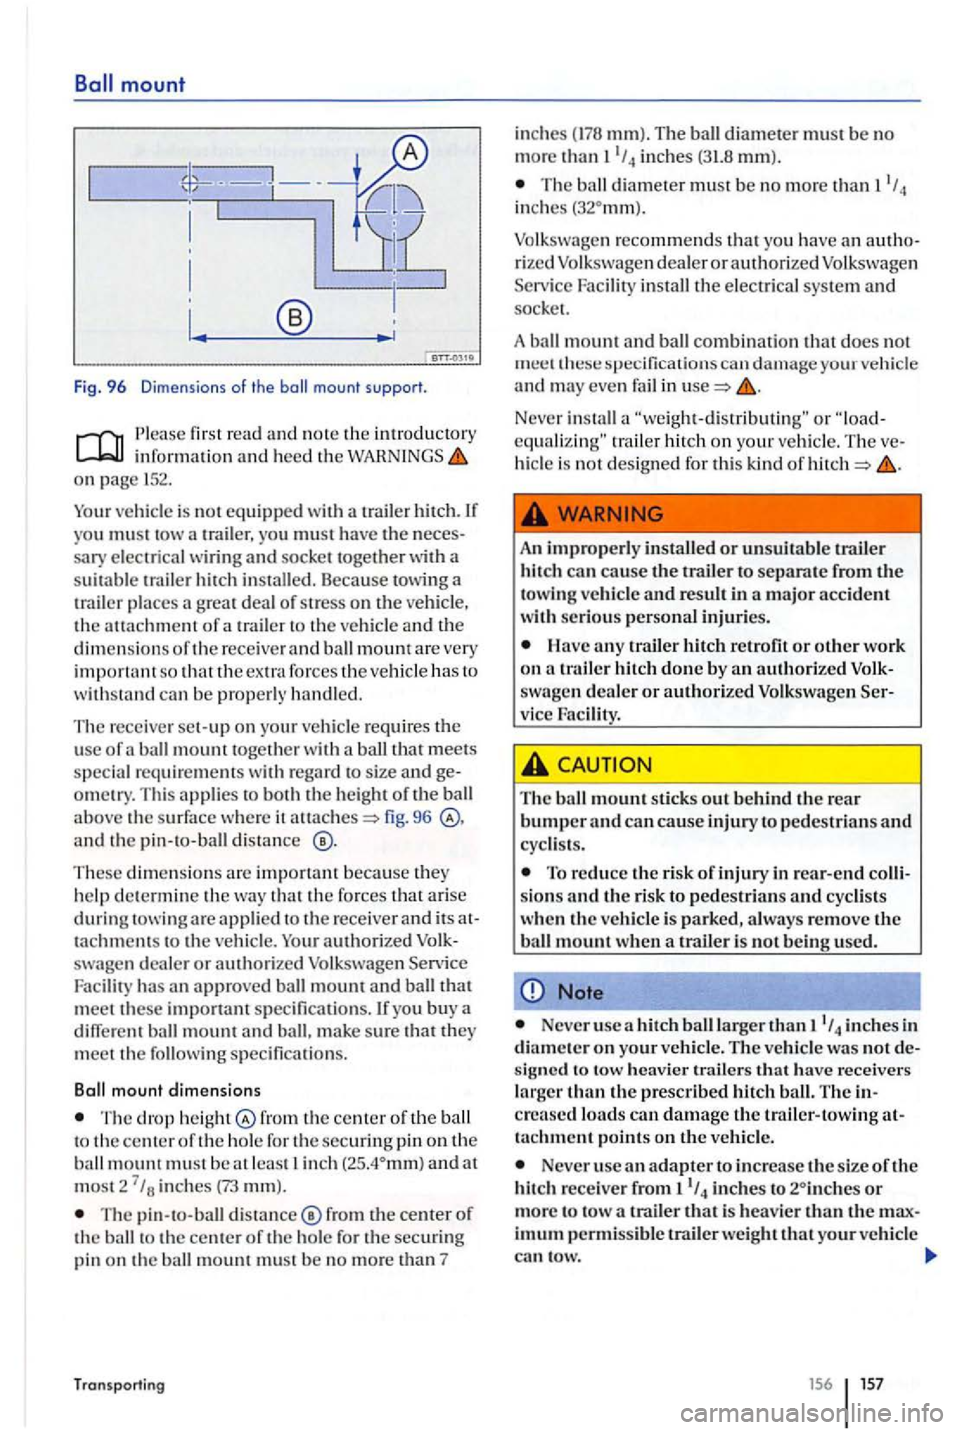
Fig. 96 Dimensions of the mount support.
first read an d note the int rod uctory inform ati o n an d heed th e on 152.
Your vehicle is not equipped with a trailer h itch. you must tow a trailer, yo u must h ave the
ca n be pro perly ha nd le d.
The rec eive r set-up on yo ur ve hicle requ ires the use of ball mount togeth e r a ball that meet s
s pecia l re quire ments with regard to size and om etry. Th is app lie s to bot h th e height of th e ball above the surface where it fig. 96 and th e pin -to-ball distance
These dimen sion s are im po rtant because they h elp dete rmi ne th e th a t the forces that a rise during a re applie d to t he receiver and its tachments to th e ve hicle. Your authori zed dealer or authori zed Volksw agen Service
Faci lit y has approved ball mount an d ball th a t
meet these importa nt specifica tion s. you buy a
diff ere nt ball mount and ball, make s ure that th ey
meet t he following specifica tion s.
Ball
mount dimensions
T he drop heig ht fro m th e ce nter of th e ball to th e cente r of th e ho le fo r th e sec uring pin on th e ball mount mus t b e a t least in ch
T he pin-to -ball dista n ce ® from th e center of th e ball to th e ce nter o f th e hole fo r t he sec uring
pin on th e ball mount must b e no mo re th an 7
Transporti ng
inches mm). The ball diamete r must be no
m ore thanl1
/ 4 in ches (31.8 mm).
T he ball d iamete r must b e no more th a n in ch es
rize d Volkswagen dealer o r a u th o rized Volkswag en
S ervice Facility in stall tl1e electri c a l sys te m and socket.
A ba
ll mount and ball combin ation that does not specifi cat io ns can d amag e your ve hicle and may ev en fail in
o r tr ailer hi tch on you r veh icle . The h icle is not desig ned for this kind of
A n impro pe rl y instal led or unsuit abl e trailer
hi tch can cause the tra iler t o separa te from towing ve hicle and result in a m ajo r ac cident
with seri o us personal inju ries.
H ave any trail er hitch retro fit or
dealer or authorize d Volkswagen vice Faci lity.
Th e ball m ount sti ck s out b ehind th e rear bumper an d can cause injury to pedestria ns a nd
cyclis ts.
T o reduce the risk of inju ry in rea r-end
Note
Neve r usc a hit ch b all larger th an inches in
d ia m ete r o n your vehi cle. The ve hicl e was no t sig ne d t o tow he avier trailers h ave receivers
l a rger than th e pres c rib ed hit ch ball. The cre ased loads ca n d amage the trailer- towin g tachment points on the ve hi cle.
Neve r use adapter to inc rease the size of th e
hit ch r eceive r fr om inches to is heav ie r
Page 159 of 541
Note
can use one of these adapte rs if required for the proper in stallation of bi cycle rack or
m ent s are m el. Wh en u sin g bicycle rack s or carri ers make sure that th e tailli ghts are n o t
bl ocke d.
Retrofitting a
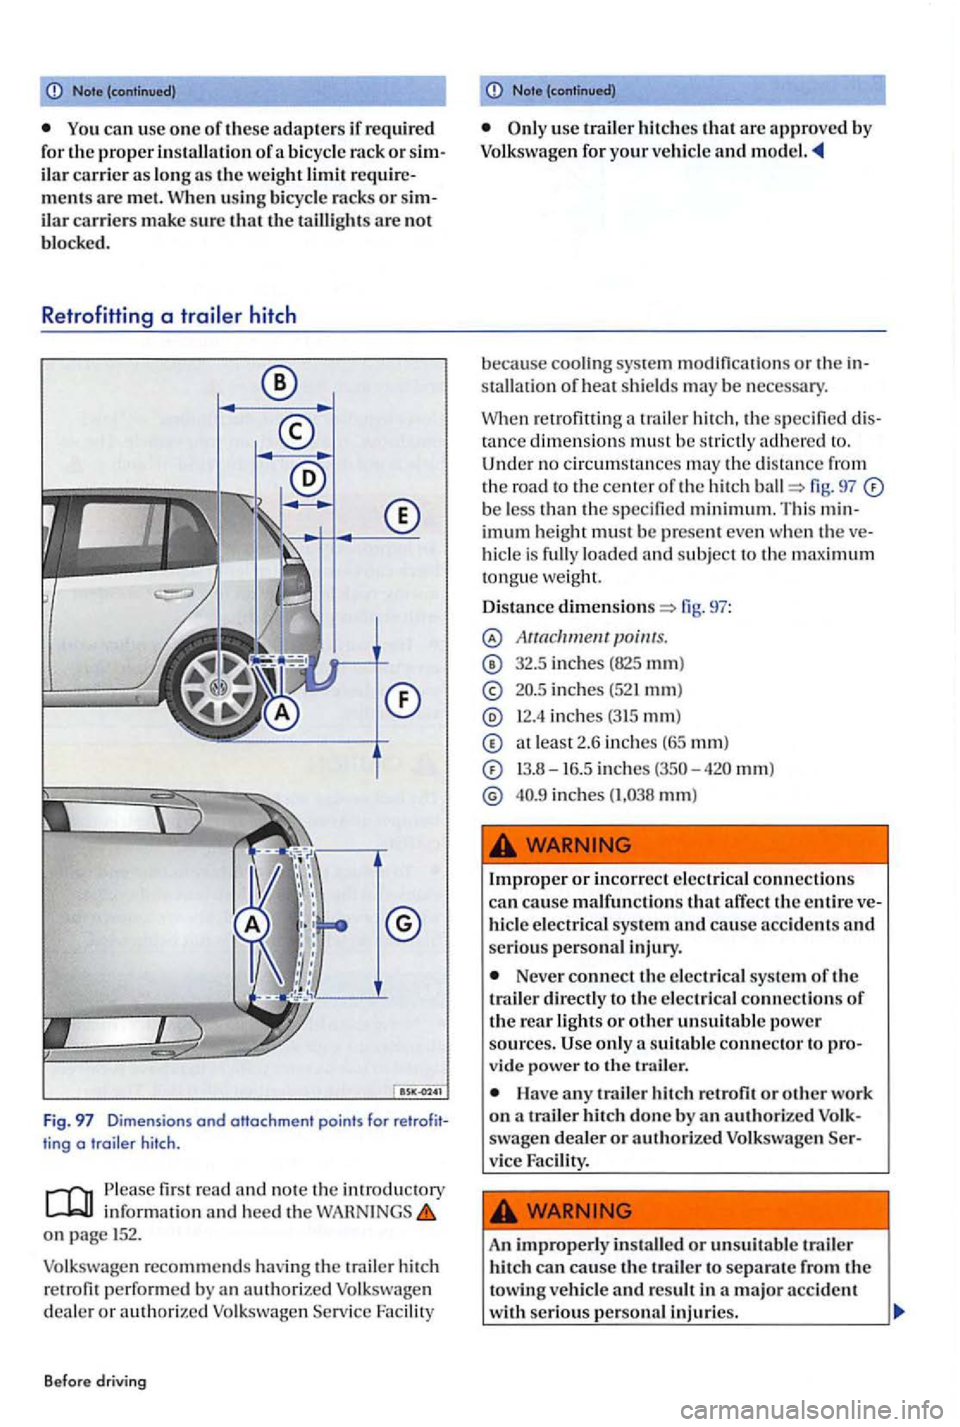
Fig. 97 Dimensions ond ottochment points for ting o hitch.
first re ad and not e th e intr oductory information and h eed th e on page 152 .
V o lk sw age n rec
ommends hav in g the trai le r hit ch
r e trofit perf o rm ed b y an Volk swag en deale r o r authorized Volk s wa gen Servic e Facility
B efore driving
Note (continued)
use hitches that a re approved by for your vehicl e and
because cooli ng sys te m m od ification s or th e sta llation of heat shield s may be necessary.
Wh en re trofi tting
traile r hi tch, th e specified ta nce dimensions must be stri ctly adhered to. Under no circums ta nces m ay the distance f ro m
th e road to the center o f the hitch fig. 97 be le ss than th e s pecifi ed min im um. Thi s imum height must be present ev e n whe n the hi cle is full y load ed and subje ct to the maximum tongue weigh
D istance fig. 97:
32.5 inch es (825 mm)
in ches ( 52 1 mm)
inc hes (315 mm )
atleast2 .6 in ches (6 5 mm)
13.8-16.5 inches mm)
in ches
Imprope r or incorrect elec tri cal connection s
ca n cause malfunction s that affect th e e ntire hicl e elec tri cal sys te m and cau se acc id e nt s and serio us perso na l injury.
Neve r connect th e e lectrical syste m of the
trailer directly to the e lec trical connectio ns of the rear light s or oth er unsuitabl e power sources . U se only v ide po w er t o th e trailer.
H ave a ny trailer hit ch r etrofit or other work on a trailer hit ch don e by an authorized swage n deal er or authorize d Volkswage n
An improperly in stalled or uns uitable trailer hitcl1 can cause th e trai le r to separate fro m the
towing vehicl e and result in major accident with serious perso nal injuries.
Page 260 of 541
Washing the
fir st read and note th e in formatio n and heed th e on page 262.
The lo nge r insect splaue r, b ird droppings. tree sap,
road din, indu strial depo sits, road and o ther aggressive materials sta y on your ve
hicle , more damage they do sunlight ) crease the corros ive effects. The vehicle underbody sh o uld als o be was hed regularl y and thor
o ughly.
to the information by the car wash operator. Before going through a
ca r wash , b e s ure
you have installed addition al accessorie s on the vehicle, su ch as a spoiler, a roof rack, or an ant enna, alway s
a sk th e car was h opera tor if thi s po se s problem
The paint finish is
dep end s a la rge exte nt on th e rype of ca r
was h. Volk swagen recommend s using brush le ss
ca r w as h faciliti es.
' l b
rem ove wax res idu e from th e windows and
avoi d jerky wind shi eld wip er move m ent , heed the
f ollow ing page 265, outsi de
w ith
on the roof and work down. Usc sp ec ia l shampoo only on hard-to -remove or grim e.
Hinsc
different sponge or wash mill.
edges under the vehicle
Always protect your hands
Alway s dry the brakes and clean off any icc
coatings with a few caref ul appli cations oftlte brake. Make sure not to endanger other motoris ts or cyclists or disob ey lega l requirement s.
Note
The water temperature mus t not be more than
To help prevent damage to the paint, do not wash the vehicle in direct sunlight .
Do not use insect sponges, abrasive kitchen
s ponges or similar things to clean the ve hicle .
These can damage the paint finish.
Neve r clean headlight s with a dry cloth or sponge. Always use a
When washin g or rinsing the vehicle in cold
weather, do not let water get into the lock cylin ders or point the hose The water could freeze on the locks and seals and make it difficult to open the vehicle!
Note
To help prevent vehicle damage in a car wash:
the vehicle track width with the di
men sion s of the guide rail s in the car wash to help prevent damage to wheel rims tires!
off the rain sensor before driving
through a wash .
Mak e sure there is enough clearan ce for the height and width of the ve hicle.
Fold the outside mirrors toward the vehicle
body. Do not fold power mirrors manually!
262 263