Anti theft VOLKSWAGEN JETTA 2007 Owners Manual
[x] Cancel search | Manufacturer: VOLKSWAGEN, Model Year: 2007, Model line: JETTA, Model: VOLKSWAGEN JETTA 2007Pages: 477, PDF Size: 77.6 MB
Page 239 of 477
Booklet 3.1 Controls and Equipment
lock ca n be switch ed on and off using a key in th e
opened door.
Anti-theft alarm system
Applies to vehicles: with anti-theft alarm
Description of anti-theft alarm system
The anti-theft alarm triggers an alarm unauthorized movements are detected
around the vehicle.
Activating the anti-theft alarm system
- Lock the vehi cle.
Switching the alarm off
-Un lock the vehicle using the unlo ck
button in the remote control key or unlock
the veh icle by inserting the vehicle key into
the driver's door lock.
The anti-th eft alarm make s it more difficult break into the vehicle or steal You will hea r
and see the alarms if someone tri es break inlO
th e ve hicle.
Whe n yo u lock the ve hicle, the an ti-t heft alarm
syste m is aulOmat ica lly sw itched on.
Close all windows a nd doors compl etely befo re
locking the vehicle so that the ant i-t hef t system
does no t tr igger alarms unnecessar ily.
What triggers th e alarm?
With the vehicle locked, th e alarm will go
under th e fo llowing circ umstances:
• Man ually open ing of the rear lid u sing the ve
hi cle key,
36 Opening and closing Keys
• Opening a doo r,
• Ope ning th e en gine ho od,
• Opening the rea r lid.
Wh en th e alarm is triggered, th e horn
will sound
for about 30 seco nds and the turn signals wi ll
fla sh for about 4 minutes.
Ho w c an I switch off the ala rm system?
You ca n sw itch th e anti- theft alarm sys te m ei
ther by unlock ing th e veh icle using the unl ock
the remote contro l or by unlocking
the vehicle in se rting th e key into the driv er's
d oor lock.
Tips
• When the alarm stops sound ing and you
op en anothe r door or the rear lid or any other
part
th e vehicle that is monito red by the anti
th eft alarm system, the alar m will be triggered
aga in.
• The anti-t heft ala rm syste m works even if t he
battery is disconnected or not wo rking
prop erl y.
Page 240 of 477
Booklet 3.1 Controls and Equipment
Rear lid
Opening the rear lid
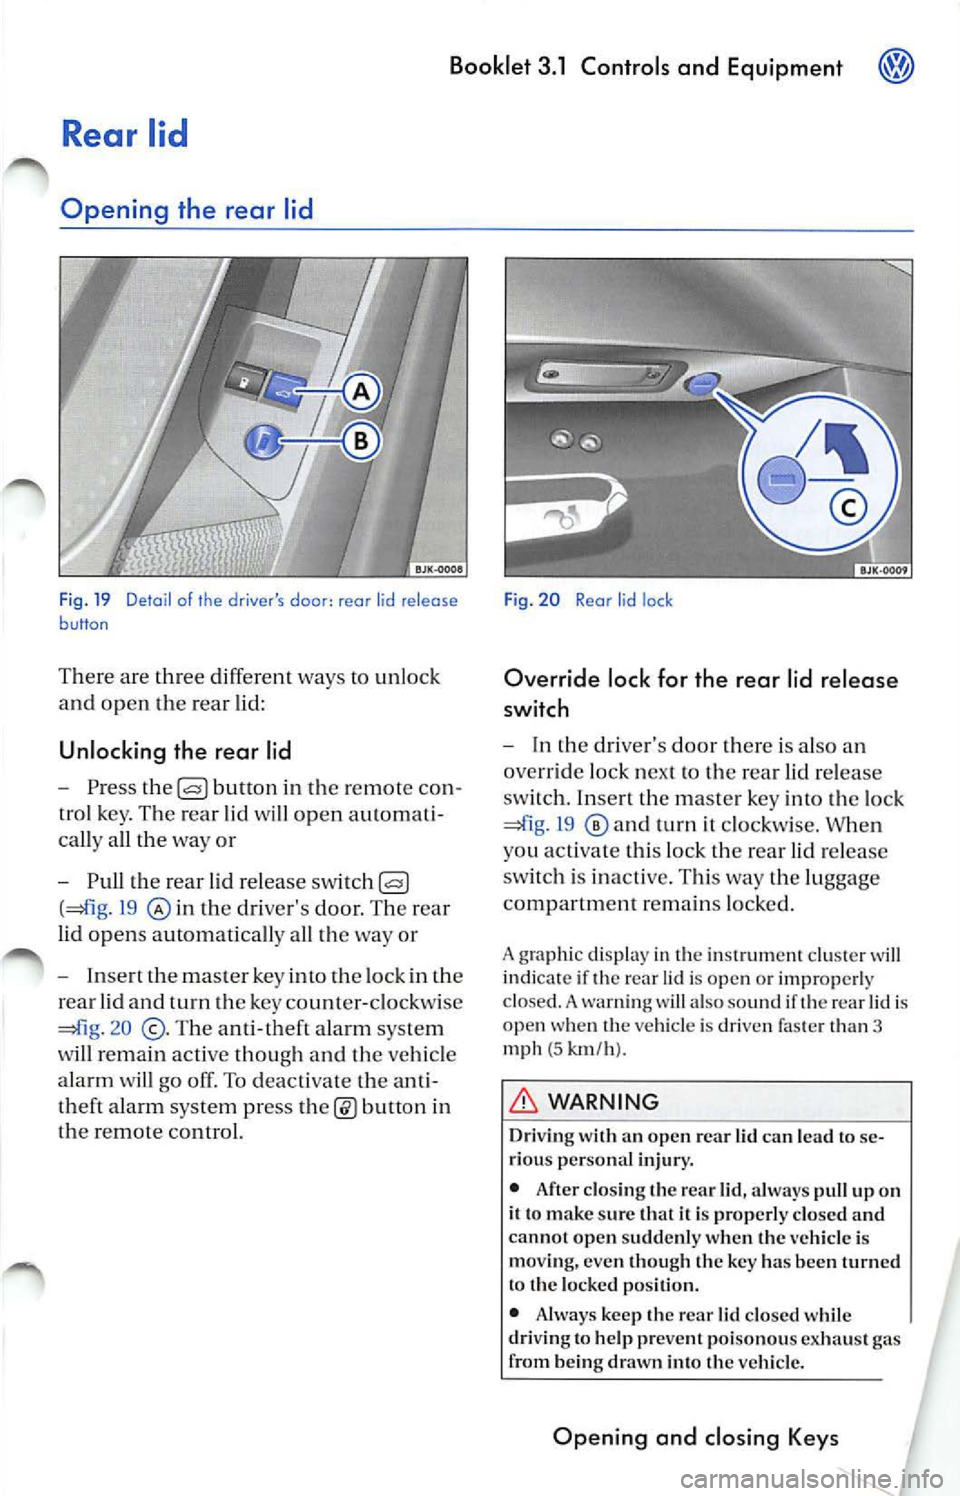
F ig. 19 Detail of the driver's door : rear lid release button
There are th ree differe nt ways to unlock
and open the rear lid:
Unlocking the rear lid
- Press the button in the remo te c on
tro l key. The rear lid wi ll open auto mat i
ca lly all the way or
-
th e rear lid r elea se sw itc h
(41 g. 19 th e driver 's do or. Th e rea r
lid op en s automaticall y all the way o r
- Insert the maste r key into th e lock in the
rear lid and
the ke y co unt er-clo ckwis e
=m g. 2 0
T he a nti-theft alarm syste m
w ill r ema in active thoug h and the veh icle
alarm
go off. To deacti vate the anti
theft a larm syste m pr ess
in
the remote control.
Fig. 20 Rear lid lock
Override lock for the rear lid release
switch
-In the d river's door there is a lso an
override loc k next to the rea r lid r elease
sw itch. Inser t th e m aste r key into the lock
19 a nd turn it clockwi se. W hen
you ac tivate thi s lock th e rear lid re lease
sw itch is inact ive. Thi s way the lu ggage
compa rtment r emain s locke d.
A grap hic di spla y in th e in strum ent clu ste r w ill
indi cate if th e re ar lid is op en or im prop erl y
clo sed. A wa rnin g will al so sound if th e r ear lid i s
open w hen th e veh icl e is dri ven fa ste r than 3
mph
( 5 km /h ).
WARNING
Dri vin g with an open re ar lid can lea d to se
ri ous personal injury.
• After closing th e rear lid, always pull up on
it t o mak e sure that it i s properl y clo sed and
ca nn ot open sudd enl y w hen the vehicl e is
mo vin g, eve n th oug h th e ke y ha s bee n turn ed
t o the locke d po siti on.
• Always keep the rea r lid closed wh ile
dri ving to h elp pre vent poiso nou s ex hau st gas
fr om b eing dr awn into the vehicle.
Opening and closing Keys
Page 241 of 477
Booklet 3.1 Controls and Equipment
WARNING (continued)
• Never transport objects larger than those
fitting completely into the luggage area be
cause the rear
cannot be fully closed.
• If you absolu te ly must drive with the rear
lid open, observe the following notes to reduce
the risk of carbon monoxide poisoning:
Close all windows ,
Close the power roof,
Open all outlets in the in strument
panel,
Swi tch off the air recirculation,
Set the fresh air fan to the highest speed.
• Never leave yo ur veh icle unattended or let
ch ildr en play around your vehicle , esp ecially
with th e rear lid left open. A child could craw l
into the vehicle through the luggage com part-
Closing the rear lid
Place you r hand into one of the hand le
rece sses in the in sid e trim of th e re ar lid
and pull the rea r Lid do wn.
If the vehicl e is loc ke d (anti-theft alarm syste m
act ivate d ) and the r em ote co ntrol k ey is use d t o
o p en
rea r lid onl y, th e rea r li d is loc ke d im
m ediat ely w hen it is cl ose d. A ll turn sig n als flas h
bri efl y as co nfirmati on.
A di spl ay ap p ea rs in the in strum en t clu ster if th e
r e ar lid i s not properl y close d.
WARNING
Always close the rear lid properl y to help avoid
ser iou s personal injury.
• Never let anyone
in the way of the of the rear lid or its hin ges when the rear lid is
closing.
• Always make sure that the rear lid closes
properly when you close it so that
it cannot
open s udden ly while the vehicle is moving.
38 Opening and closing Keys
WARNING (cont inued)
ment and pull the lid shut becoming trapped
and unable to get out. Being trapped in ave
hicle can l ead to ser iou s persona l injury.
• Heat build-up in the passenger compart
ment and luggage compar tmen t or a parked
vehicle can result in temperature s in the ve
hicle that are much high er than the outside
temperatures, particularly in summer. Tem
pera tures can quickly reach leve ls that can
cau se unconsciou sn ess and death, particu
larly to sma ll ch ildr en.
Tips
At t emp era tur es below O • th e re ar lid will not
o pe n aut om atic all y a ll th e w ay afte r unl ockig it.
I t wil l b e necess ary to lift it by hand
WARNING (continued )
• Never leave your vehicle unattended or let
ch ildr en p lay around your vehicle, especially
w ith the r ear
op en. A child could craw l
into th e vehicle through the luggage compart
ment and pull the lid shut becom ing tra pped
and unable to get out. Being trapped in ave
hicl e can lead to serio us per sona l injury, esp e
cially when it is very hot or co ld.
• Nev er le ave c hildren, disabled per son s or
anyone who ca nnot help themsel ve s in the ve
hicle . The doors ca n be locked using the re
mot e co ntrol key or the central lo cki ng button.
Th is cou ld result in peop le being trapped in
the veh icle.
• Hea t b uil d-up in the passenger compart
ment and luggage compartm ent of a parked
vehicle ca n result in temperatures in the ve
hicle that are much higher than the outside
t e mperat ures , particularly in summer. Tem
peratures can quick ly reac h leve ls that can
cau se unconsciousness and death, particu
larl y to small children
Page 388 of 477
Booklet 3.2 Tips and Advice
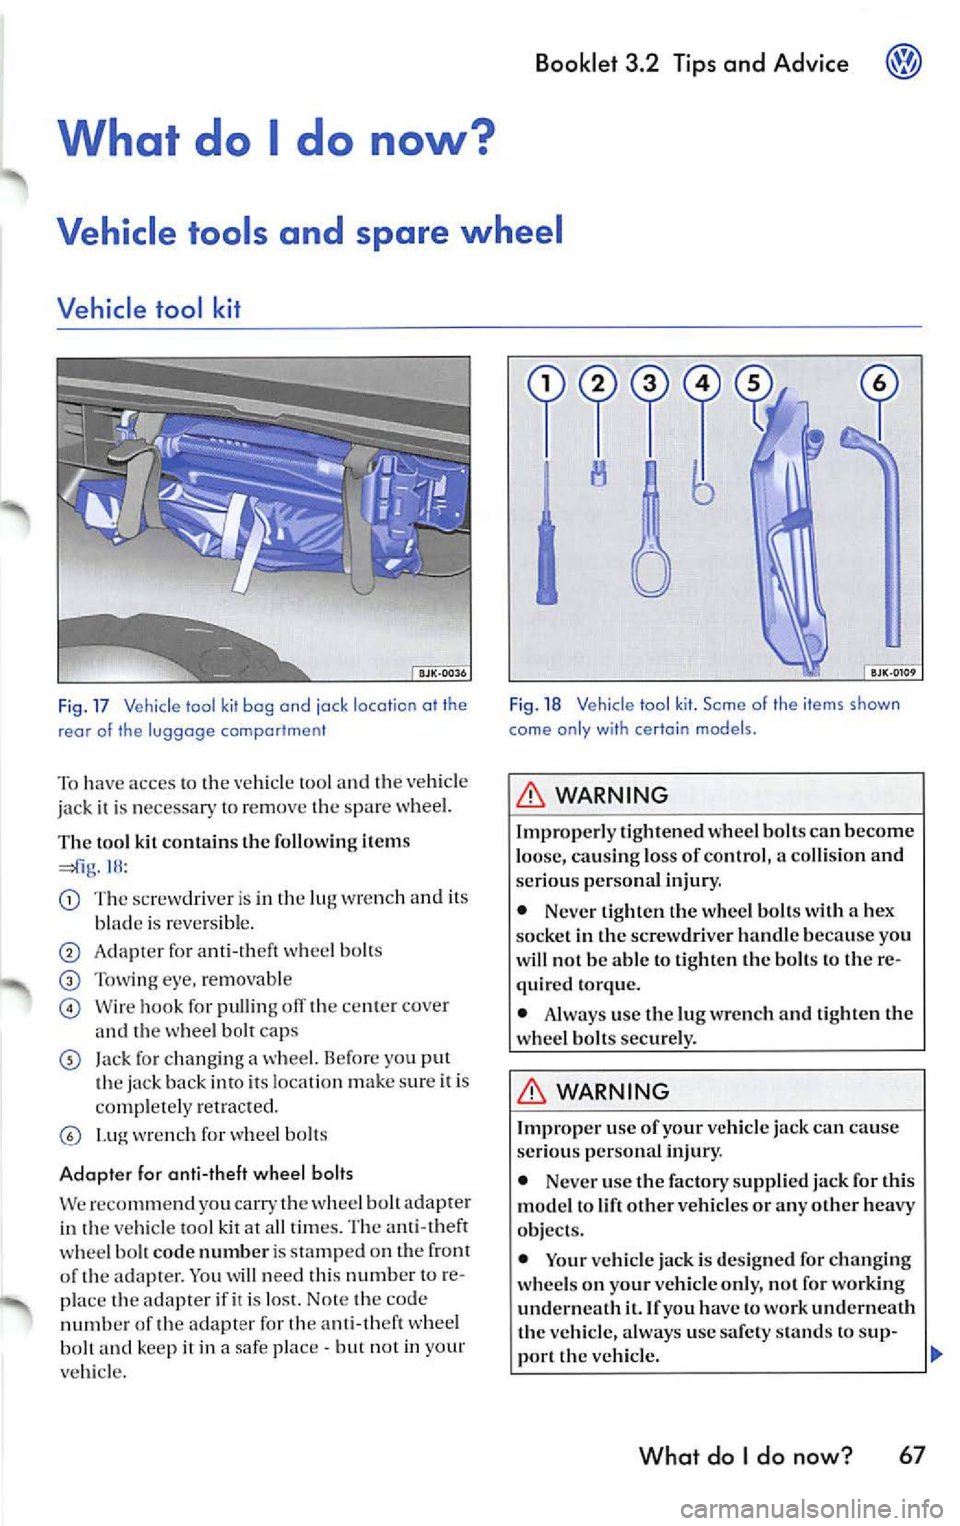
tool and th e vehicl e
jack
con tains th e follow ing items 18 :
Th e sc rew driv er is in th e lu g w re nch and its
b lad e is re ve rs ib le .
A dap ter for ant i-th eft wh eel bo lts
Tow ing eye, re movab le
W ire hook for pulling off the ce nte r co ve r
a nd th e w he el b olt cap s
Jack f or changing a wheel. B efor e yo u put
th e jack back in to i ts loca tion make sur e it is
co mp le te ly re tr a cted.
wr en ch for wheel bolts
Ad opter for anti-th eft w hee l baits
We reco mmend yo u carry t he wh eel bolt adap te r
in th e ve hicle tool kit at all times. The a nti-theft
w hee l bo lt code numbe r is sta mp ed on th e front
of th e ada pter. Yo u will need this numb er to re
p lace t he ada pter if it is lo st. No te th e c ode
numb er o f th e adapt er fo r th e an ti- th ef t whee l
b olt and kee p it in a safe pla ce
but not in your
veh icle.
Fig . 18 Vehicle too l kit. Some of th e it e m s sh own
come o nly w it h certa in models .
WARNING
Improper ly t ighte ned whee l bo lts can become
l oose, ca usi ng loss of contro l, a co llisio n an d
ser ious perso nal i nju ry.
• Neve r tig h te n th e w hee l bo lts wit h a hex
socke t in th e sc rew driver h and le because yo u
w ill n ot be ab le to tig hte n th e bo lts to t he re
qu ired torque.
• Always use t he lug wrench and tig ht en th e
wh eel bolts secure ly.
WARNING
Imp roper use of your ve hicle jack can ca use
ser io u s pe rso nal in jury .
• Never use the fac tory sup plied jac k for t his
mod el to lift othe r ve hicles o r any other heavy
ob jec ts.
• Your vehicle jac k i s des igned for ch ang in g
w hee ls on your vehicle on ly, not fo r working
un dernea th
it. If you have to wo rk un derneat h
t h e ve hicle , a lways use safe ty s ta nds to s up-
p or t th e veh icle.
What do I do now ? 67
Page 392 of 477
Booklet 3.2 Tips and Advice
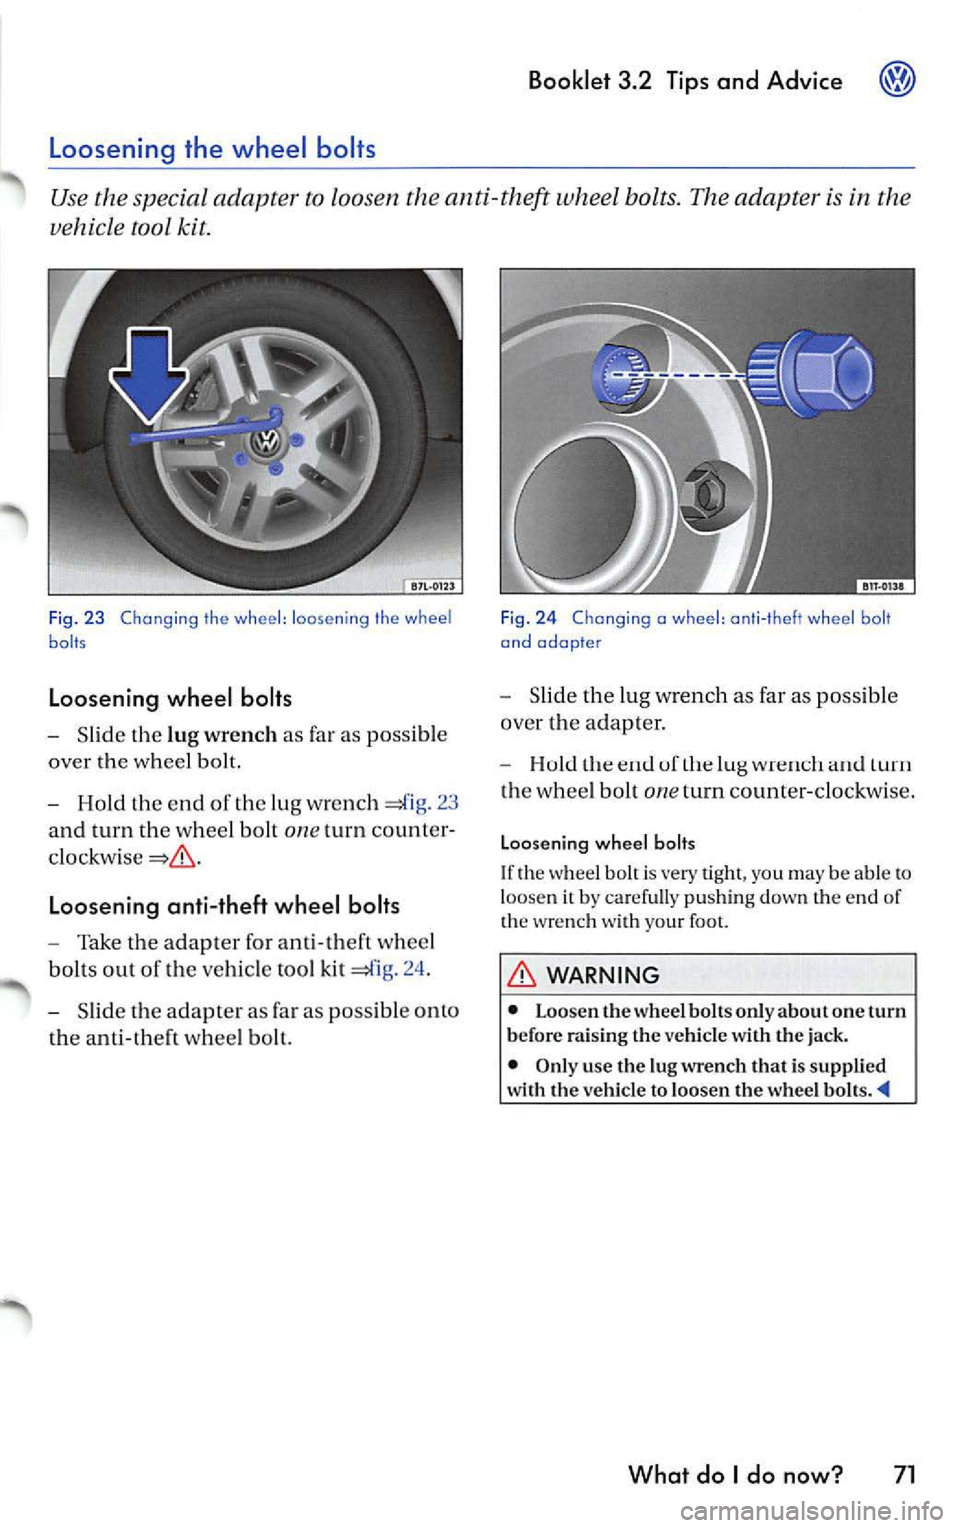
Slid e th e lu g wrench as far as possib le
over the whee l bolt.
Hold the end of the lug wre n ch 23
and turn the whee l bolt
one turn count er
Loosening anti-theft wheel bolts
Take the adapter for ant i- th eft w hee l
bol ts out of the ve hicle tool kit =£lg. 24 .
Slid e the adap ter as far as pos sib le o nto
th e a nti -theft w hee l b olt.
Fig . 2 4 Chang ing a wheel : ant i- t h eft whe el b olt
and adopte r
Slid e the lug w rench as far as possib le
ove r the adapter.
uf turn
th e whee l bolt one turn counter-clockwi se.
Loosen ing wheel bolts
If th e w hee l b olt is very tigh t, yo u may be able t o loose n it by carefu lly pu shin g down the end of
th e wre nch with your foo t.
WARNING
• Loo sen th e whee l bolt s onl y about one turn
b efor e rai sing th e vehicle w ith the jack.
• Only use the lu g wrench that is suppli ed
w ith th e ve hicl e to loosen the wheel
What do I do now? 71
Page 469 of 477
Booklet 3.4 Premium Sound System
Anti-Theft Coding
Convenience radio coding
For techni cal reason s, the convenience radio
coding is not a vailable for all vehicle models .
In the past , it u sed to be that you h ad to manu
ally reco de th e rad io whe neve r the unit was re
moved from the veh icle (fo r examp le, if the unit
wa s removed to be repa ired), or whenever the
vehicle battery was disconnected (for example ,
if you brought yo ur vehicle in to the dealership
for service and it was necessary to disconnect
the banery ). In either case , th e power supply to
t he unit was cut off.
That ha s all ch anged with th e new conve nien ce
radio coding function: Once the code number
has been inplll in the rad io, i t w ill then synchro
nise itself wi th "it s" veh icle!
I f th e curr ent supply has been interrupted the
radio will automaticall y ch eck to see if it is still in
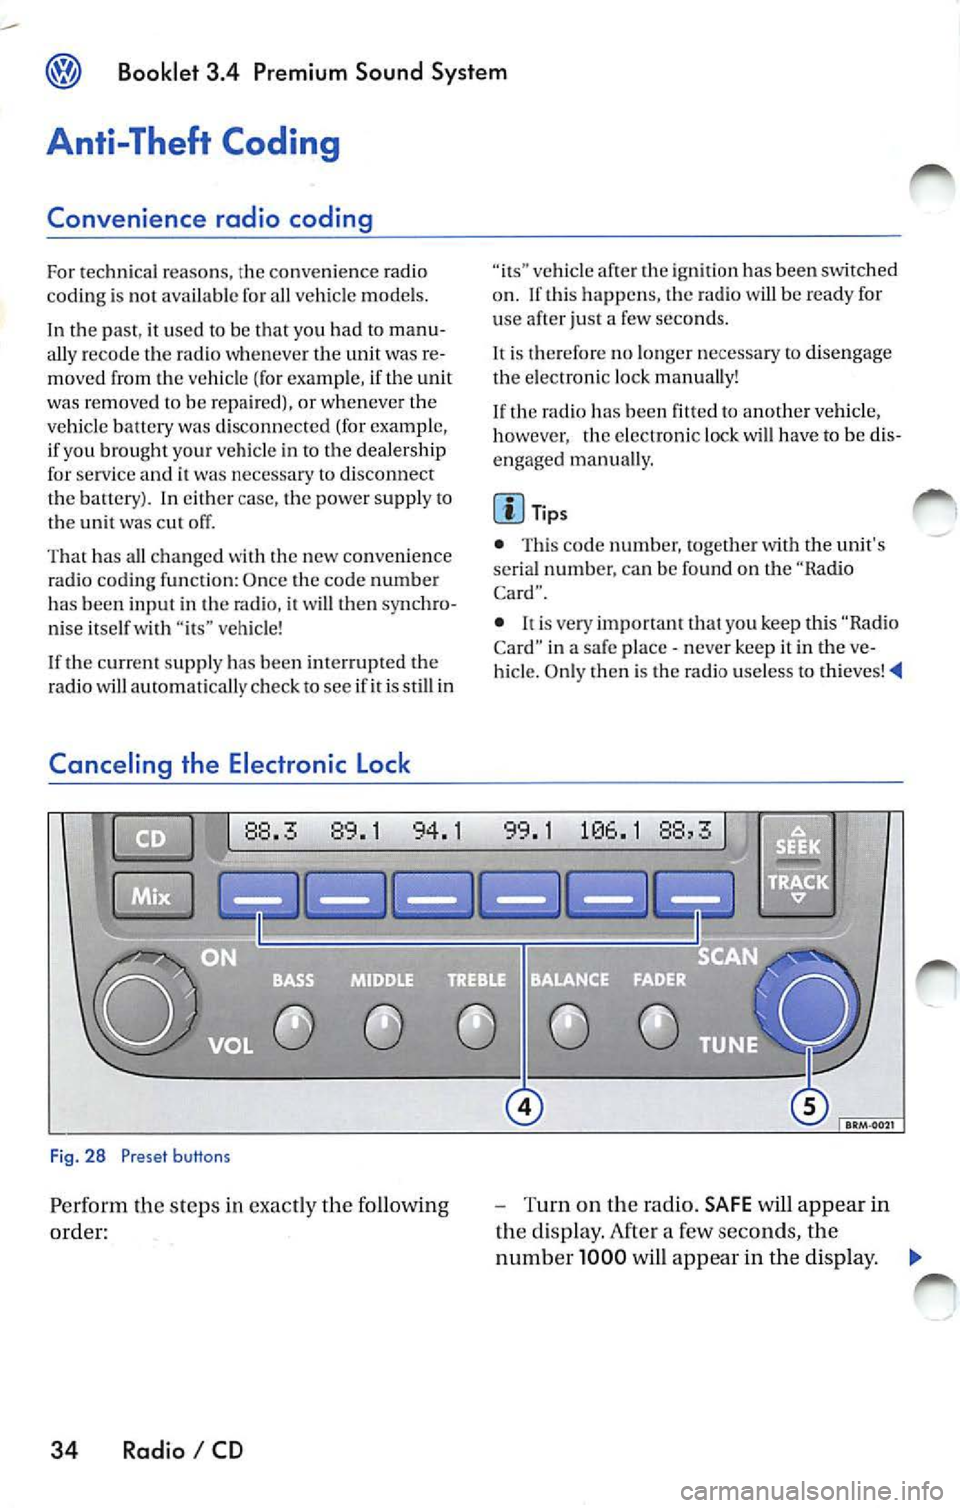
Canceling the Electronic Lock
Fig. 28 Preset buttons
Pe rform th e steps in exact ly the fo llowing
order:
34 Radio I CD
vehicle af te r th e ig niti on has been switched
o n . If thi s happ ens, the radio will be read y for
u se after just a few seco nds.
It is therefore no longe r n ecess ary to disengag e
the e lectro nic lock manua lly!
If the radio has been
to another vehicle,
however , the electronic lock will have to be dis
engaged manua lly.
Tip s
• This code number, togeth er w ith the unit's
se rial numb er. ca n be found on the "Ra dio
Card".
• never keep it in the ve
hicle. Only then is th e radio use less to thieves!
-Turn on the radio. SAFE will appear in
the disp lay. After a few seconds, the
numb er 1000 will appear in the display. ._
Page 471 of 477
Booklet 3.4 Premium Sound System
Technical description
Anti-theft protection
T he unit is e lectro nica lly locked whenever the
power source is inte rrupted.
It can on ly be re
turned to working condition by enteri ng th e cor
rec t cod e number.
Frequ ency rang es
F M and AM.
Band selection
Mome ntary-co ntact butto ns
Displays
Fre quenc y, band, b ass, bala n ce, treb le, middle
freq ue ncies, preset button, CD functions ,
functions.
Illumination
The control s and d isp lay are illum inated glar e
fr ee from the interior (nig ht dri vin g des ign)
maximum brightn ess when drivi ng lig h ts a re off.
When the dr ivi ng lig hts are on, the intensity is
co ntr olled toget11er with th e in strument panel
i nte nsit y.
Station selectio n
In th e rad io m ode, t he unit automa tica lly plays
th e la st sta tion selecte d whe n the unit was
turn ed off (las t sta tion memo ry).
Soft Clipping• I f th e volu me is se t to maximum, you m ay notice
that the rad io outp ut
will be come distorted . The
So ft Clippin g fun ction detec ts t his di stort ion
and will au tomat ica lly adj ust
vo lum e to pro
v id e th e m ost dist orti on free output.
36 Radio I CD
Radio
A utom atic and manu al !linin g. Six sta tion
p rese t buttons each for FM !, FM2, FM AUTO.
AMI, AM A UTO, SAT!, SAT2 and SAT3 . Ma nual
t unin g is poss ible in
directions. Micropro
cesor-controlled stabiliza tion of sta tion fr e
quencies (PLL quartz tuning) .
E xternal CD changer•
Remote contro lled via radio sou nd sys te m uni t.
C han ge r ma gaz ine for 6 CDs w ith moto r-dri ven
eje ction, 6 CD selec tion button s. Mix mod e, au
t omat ic track scan
I seek.
Sound reproduction
S te reo ( rad io, sate llite radio,
ad justa ble
t r eble control, ba ss co ntrol, middl e frequ en cies,
fader control and ba la n ce co ntrol integra te d in
th e ra dio, multipl e spe ake r sys te m .
Max. power output
4 x 20 Watt (maximum).
Options
Externa l CD ch ange r. Add itiona l informa tion o n
th ese options is ava ilab le from auth ori zed
VOLKSWAGEN dealers.
Int erference suppression
Th e automatic interference supp ressio n cir
cu itry integ rated in th e unit eliminates mos t
outside interfere nce in th e FM band .
Specia lly tun ed interferenc e suppressors e lim i
n ate nea rly a ll int erf erence puls es from t he en
g ine and other part s of th e elect rical system su ch
as the heater blower, w in dshie ld wipers and ra
d ia tor fan .
Page 472 of 477
Alphabetical index
A
About MP3 30
Activate your Satell ite Radio Serv ice 14
Adjusting Speed volume contro l 8
AM presets 9
Antenna Care 35
Anti-Theft coding 5, 34
Anti-Thef t pro tec tion 36
AS (Autostore ) 9
Au dio CD 19
Automatic seek 11
Automatic tuning
11
Autostore 9
B
Balanc e contro l 13
Band setting 9
Bands received 36
Bass control 12
Broadcasting mode 7
Button
C
CD 21
CD Eject 22
Mix Mode 21, 26
SEEK 23, 28
Track selection (when playing a CD) 23
CAT Button 25
CD 19
Taking care 19
CD ca re 19
CD changer 5
Booklet 3 .4 Premium Sound Sy stem
CD player
Automat ic sc an to the next track
(SCAN) 17, 23, 27
Au tomatic track scanning 17 , 23, 27
C D button 21
Display 24, 29
E jecting a CD 22
Fa st forward to next track 23
reverse to previous track 23
How to se lect an individual CD in the
maga zin e 23
Loading CDs 20, 22
Malfunction display 24
Random Play 21, 26
SCAN (a utomatic track selection ) 17, 23,
27
Se lect ing a CD 23
Se lect ing a CD track 23
Skipping backward to the previous CD track
23
Ski pping forw ard to the next CD track 23
Tips w hen usin g 33
Track select ion
23
What does it mean when CD EHH appears
in the disp lay? 24
What does it mean when HARDWARE ER
ROH appear s in the display? 24
What does it mean when NO DISC ap
pears in the display? 21, 24
What does it mean when NO EXTERNAL
CD appear s in the disp lay? 24
What does it mean when HOM appears in
the display? 24
What i s the correct way to insert a CD into
the slot? 20, 22
Cod ing 34
Contro lled see k LL
Con trols 2
D
Digital disp lays 12, 24, 29
Disp lays 12, 24, 29, 36
E
Electronic lock 34
Alphabetical ind ex 37