sensor VOLKSWAGEN JETTA 2007 Owners Manual
[x] Cancel search | Manufacturer: VOLKSWAGEN, Model Year: 2007, Model line: JETTA, Model: VOLKSWAGEN JETTA 2007Pages: 477, PDF Size: 77.6 MB
Page 12 of 477
Parking 3.1: 10 8
Drive r 2.1: 4
Front pa ssenge r 2.1: 5
Occ upant s 2. 1: 4
R ear passe nge rs 2.1 : 6
Park ing aid 3.1: 106
Parki ng Ass is tance
C lea ning senso rs 3 .2: 18
Parking brake 3. 1: 10 4
Warn ing light 3 .1: 28, 104 l
Parki ng di sta nce warnin g sys te m 3.1: 106
Parts 3.2: 27
P ASS EN GER AIR BAG OFF light 2.l: 39
Pe dal s 2.l: 9
Phys ica l p rinci ple s o f a fr ontal colli sion 2.l:
1 5
P in ch prot ection
Power roof 3.l: 43
Window s 3.l: 4 1
Plastic parts 3.2: 1 9
C le aning 3.2: 23
Po lle n filter 3.1: 88
Pollution filter 3.1: 88
Powe r
Roo f3.l:4 2
Power outlet 3.l: 73
Pow er roof 3.1 : 42
Po we r ste ering
Wa rnin g light 3.1 : 29
Power steering 3.2: 6
Pow er was her 3.2: 18
Power windows 3.l : 39
Pr egna nt women
Spec ia l co nsideration s when wea ring a
safety belt 2. 1: 2 1
Premium Gasoline 3.2: 32
Pre ssure mark s 2.l: 67
Prop er adju stm ent of head rest raint s 2.l : 7
Proper occupa nt sea ting pos itions 2.1: 4
Proper safety belt p os iti on 2.l : 2 0
R
Rain sensor 3.l : 54
Raising the vehicl e with th e ja ck 3.2: 72
R eading light s
Fro nt 3.1: 51
Rear armr est 3. 1: 70
Booklet 0 .1 General Index
Rear interior light 3.1: 52
R ea r lid 3.l: 37
Clo sing 3.l: 38
Esc ape handl e 3.2: 76
W arnin g light 3.l : 26
R ea r sea t b ackres t
Fo lding forward 3.1: 66
Rai sing in to place 3.l: 67
R ea r seat ben ch 3.1 : 66
R ea r v entilation 3.l: 86
R ear view mirro r 3. 1: 55
R ea r wi ndo w 3.1: 3 7
Re ar window heat ing
H ea ting ele m en t w ires 3 .2: 2 0
R ea r window heat ing 3.1: 80, 81
R ea r wi per 3.l: 53
R ef uelin g 3.2 : 30
R eg ular Gasoline 3.2: 32
R emote control
Ve hicl e3.1:32
R em ote contro l key
Button s 3. 1: 32
Repl acing th e b attery 3 .l: 32
S yn chroni zin g 3.1 : 33
R emo vin g t he ignition key 3.l : 94
R epa irs
sy stem 2.1: 42
Repair s 3.2: 28
R eplac em ent keys 3.1: 31
R eplacing th e batt ery
Remote co ntrol key 3.1: 32
Re porti ng safety defects 2.1: 12
C an ada 3.2: 90
Uni ted Sta tes 3 .2: 90
Re tracto r 2.1: 19
R eve rse
A utoma tic tran sm iss ion 3.1: 102
Roof carrier mounts 3.1: 7 6
Roof load 3.l: 77
Roo f rack 3.1 : 76, 77
Rubber gaskets 3. 2: 20
s
Sa fe drivin g 2.1: 2
Sa fety belt exte nder 2. 1: 22
Sa fety belt h eight adjustm ent 2.1: 24
Alphabetical index 9
Page 31 of 477
Booklet 1.1 Maintenance
Service at 20,000 miles (32,000 km) -ALL MODELS
• En gin e: C hange o il and oil filter
• En gin e: C hec k for leaks
• Exhau st system: Chec k for dam age and le ak s
• Water separat or: Drain water (TOI engin e
o nl y)
• Fuel filt er: Replace (T OI engine only)
• Batte ry: C heck
• Door ch eck stra p s: Lubri cate
• Dust and polle n fi lter (w here applicable) :
R epl ace
• Coo ling sys te m : C heck coolant leve l; ad d if
n ecessa ry
• Windshi eld was he r: Chec k fluid l evel; add if
n ecessary
• Automa tic sh ift l oc k: Check operation in
cludin g park /n eut ral/safe ty sw itch
• Auto mati c tran smi ssi on: Chec k for leak s
• Manual tran smi ssion : Chec k oil leve l; acid if
n ecessa ry; check fo r leak s
• Whee ls: Ro ta te from front to rear
• Tires/s pare w hee l: Chec k condition and
pr ess ure
Next Service :
D at e: .. .... ......... .........
M iles/ km: ...................
w hi ch eve r occurs first •
Brake syste m : C hec k fo r dam age /leak s, brak e
p ad thi ckne ss an d br ake flu id l eve l
• Drive s haf ts : C he ck boots
• On-Board diagno sti c sys te m: Check faul t
m em ory ; p urg e if necessa ry
• Hoof fr am e: C lea n
lubri cate
• Front axle : C hec k dust seals on ba ll joint s and
t ie rod end s; c hec k tie rod s
• Head lig ht s: A djust
• Rear spoil er: Lubri cate (Ne w Beet le only)
• 12 V start er and auxili ary batt ery: c h eck
(w here app licable )
• Airbag system: Visua l c h eck eve1y
12 month s
r e ga rdless of mileage ( kil om ete rs)
• Roa d te st: Check kickclo wn, brakin g,
s tee ring, heatin g and ve ntil ation, air co nd i
ti oni ng, po we r acc esso ries and elec trica l sys
t e m s
• Tires: Check trea d dep th , ad just tir e press ure
i f n ecessary.
• Tire pr ess ure m onit oring sys te m sensors:
C hec k batt ery char ge. re pl ace w hee l ele ctron ics
and aluminum valve if necess ary (where appli
cab le).
T oda y·s date a nd Volk sw agen Dea ler sta mp
Se rvic e at 25,000 mil es (40,000 km) -Model s with a 1.8T engin e
ONLY
• En g in e: Chan ge oil and oil filter
Next Service:
Date : ........... ..... ... .... .
M iles/ km: .. ..... ........... .
10 Warranty Voucher
Page 157 of 477
Booklet 2.1 Safety first
WARN ING (cont inued)
justm ent ran ge, as far away from th e a irbag as
po ssi ble before insta llin g th e fo rwar d-facin g
c hild re straint. The backr est mu st be adju sted
t o a n u prig ht po sition .
• Alway s make sure that nothing pr events
the front p assenger's sea t from being moved
to the rea rm ost positi on in it s fo re and aft ad
ju stm ent range .
• Neve r pl ace add itional it em s on th e s eat
that can in crease the tota l we ight regis tered b y
WARN ING (cont inu ed)
the weig ht-se nsi ng m at and can cause injury
in a cras h.
• Make sure that the PASS ENGER AIR BAG
OFF light come s on and stays on all th e time
w henever the ig niti on i s sw itched on.
• l fthe PASSENGER AIR BAG OFF light docs
not come on an d stay o n, imm edia tely insta ll
th e fo rwa rd-faci ng child seat in a rea r sea ting
position and have the a irb ag sys te m inspec ted
by your Volk swage n dealer. •
Advanced Airbag System components
The front passe nger seat in you r ve hicle has lot
of ve ry im por tant parts of th e Adva nce d Airbag
Syste m in it. The se parts includ e 1he weight
se nsing mat , senso rs, wir in g, bracke ts, a nd
more. The functio n of the sys te m in th e front
passenger seat is chec ked by th e e lectron ic con
t rol unit when th e ig niti on i s on. The contro l uni1
monitor s th e A dva nce d Airbag Syste m and turn s
th e a irbag indicator lig h t on when a malfun ction
in th e syste m co mp on ent s is det ected. The func
t ion o f th e airb ag indica tor lig ht i s desc ribed in
g reater detail below. Beca use the front pas
se nge r sea t co ntain s imp ort ant parts of the Ad
va nc ed Airbag System, you must t ake care to
p reve nt it from being damaged. Damage to 1h c
sea t ma y pre vent th e A dva nce d Airb ag for
fron t passenge r se at f rom doing it s job in a
c ras h.
Th e front Advanced A irbag Syste m consis ts of
the following:
• Cras h se nsors in th e front o f 1h e ve hicle 1hat
m eas ure vehicle acce lera tion/d ecelera tio n to prov ide inform arion to the Advanced Airbag
Sys te m abou t th e seve rity of t he crash.
• An electro nic co ntrol unit, wit h in tegra te d
cras h se nsor s for fron t an d side impacts. The
co ntro l uni t "'decides ·· w hether to
just o ne or
bot h stages of the fron t airbags based on th e
form atio n receive d from the crash sensors . T he
contro l unit also "decides·· whether the safe ry
belt pretens io ners s ho uld b e act ivated .
• A dual -stage Advanced Airbag
g en
era tor for th e dr ive r in sid e the stee ring whe el
h ub.
34 Airbag system
• A dua l-stage Advanced A irbag and gas ge nerin side t he instrument panel fo r the fro nt
pass enger .
•
we ig ht-sens ing m at und er the upholster y
padding of the front passenge r sc at cushion that
m easures th e tot al we igh t o n the scat. The info r
mation registe red is se nt cont inuousl y to the
e lectro nic contro l unit to re g ul ate deployment
of t he front Advance d Airbag on the passenger
si de.
•
airbag monitoring system and indicator
li ght in the in stru ment clus te r 39 .
• The PASSENGER AIR BAG OFF light in the
cente r of the instrument pa nel
39 , 25) that te lls yo u when th e fro nt Adva nced
A irb ag on the passe nger si de ha s been turned
off.
• A se nso r below the safety be lt lat ch for the
fro nt sca t pa ssenger to m eas ure the tens io n on
t h e safe ty belt. The
on t he safe ty be lt and
the weig ht reg is te re d by 1h e we igh t-se nsi ng m at
h elp t he control unit "'d ec ide" whe th er the fr ont
airbag fo r th e fro nt p assenger seat sh ould be
t urned off or no t
29, "Ch ild restra int s on
t h e fr o nt sea t - so me impo rtan t thin gs to kn ow··.
• A se nso r in the sa fety belt la tc h for the driver
an d for the front sca t passenger that senses
whe th er that safety belt is latc hed or
and
t ransm its thi s in form ation to t he e lectroni c con
tro l unit.
Lr!, WARNING
Damage to the fron t pa sse nger se a t ca n pre
ve nt the airba g from worki ng pr oper ly.
Page 167 of 477

Booklet 2.1 Safety first
i s poss ible an airba g not d epl oy a
se ating p osition where th e s afely belt is being
u se d
will inflat e at the pos ition where b elt is noc be ing use d. It i s thal
nothin g im erfer e belt bu ck les so
th al th e se nsors can se nd corr ect in forma ab oul safe ty be lt use th e e lec troni c co n
t ro l
WARN ING
Chan gin g th e ve hicle's suspension including
use of unapproved tire-rim combinations can
c hange Advan ced Airbag performanc e and in
creas e th e risk of serious persona l inju ry in a
c ra sh.
• Never install sus pens ion co mpon ents that
do not have the same performance characte r
i st ics as the components originally installed
on yo ur vehicle.
• Never u se tire -rim combination s that h ave
not been approved by VOLKSWAGEN.
Side airbags
Applies to vehicles: with side airbags
Description of side airbags
WARNING
Leaving the optiona l safety belt extender at
t ached to the safety belt latch on the front pas
senger seat when the safety belt is not bein g
u sed w ill prevent the Advanced Airbag System
fr om funct ion ing proper ly and can increa se
th e r isk of se rious perso nal injur y in a co lli
sio n.
• Alway s remove the sa fety belt exte nder
when it is 1101 n ee ded a11d stu w i I safe ly it is not bein g used with the safet y belt.
• Nev er use th e safe ty belt extender to sec ure
a chi ld restraint at any seating positi on.
WARN ING
Item s stored between the safe ty be lt buckle
and the center co nso le can ca use th e sensor s
in the buckle to send the wro ng information to
elec troni c control module and preven t the
Advanced A irbag system from working prop
er ly.
• Always make s ure that nothing can inter
fere with th e safety belt buckl es a nd that they
a re not obstructed.
Th e sid e airba g system ca n provide supplem ental prot ection to prop erl y re
s train ed fron t seat o ccupan ts.
Fi g. 26 Side airbag in driver seot
44 Airbag system
The sid e airba gs are in paddin g in fro nt seats 26 . Yo ur vehicl e m ay a lso be
eq uipped with optional sid e airb ags for th e re ar
p os itions. Th e gen eral l ocatio n is
id entifi ed b y th e wo rd in th e uppe r re
g io n of the b ackres ts
The side airb ag sys tem basica lly co nsis ts of:
• The elec troni c control m odul e and ext ernal
s id e imp act se nso rs
• The two sid e airba gs loc ated in the sid es o f
ch e fro nt b ackre sts
• Th e airba g warning
in cluste r
Page 168 of 477
The airbag system is monitored electronically 10 make cenain i t is functio ning properly all
t ime s. Each time you turn o n th e ig ni tion,
airbag system indica to r lig ht w ill co me on for a
few seco nds (self diagnost ics).
T he side airbag syste m sup pleme nts rhe safety
be lts and can help to reduce the risk of inj ur y
the dr iv er's a nd front passe nger's upper torso on sid e of th e vehicle that is stru ck in a sid e co l
li sion. The airbag inflate s on ly in sid e impa cts
and onl y when the veh icle acce leration reg is
t e red b y the control unit is high en ough. If
rate is below reference value programm ed
i n to co ntr ol u ni t, t he side airbag s not be
trigg ere d , eve n though the ca r ma y be badly
damag ed as a r esult of the co llision. It is
pos
s ible d efin e an airbag trigger ing rang e th at
w ill cover eve ry possible ang le of impact, sin ce
t h e ci rc u ms ta n ces will vary co nsiderably be
twee n one collision and anot her. lrnpona nl fac
include, for example, the na tu re (har d or
s oft ) of th e impacting objec t, a ngle of im
pact, vehicle speed, etc. 46, "Impo rta nt
s afet y in structio ns for the side a irbag system ".
As ide from th eir normal safety function, saf ety
belts
to h elp k eep the dri ver or front pas
senger in posit io n in a side colli sio n so th e
s id e airb ags can prov ide prot ection whe n
inflate. Safe ty belt s also help to keep rear seat
pas seng ers in po sition so that optional rear seat
s id e airbag s can prov ide protection in a sid e co l
li sio n i n w hic h th e side air b ag inflates.
T he a irbag syste m is not a subst itute for your
safety belt. Rather, it is part of t he overa ll occu
pant re straint syste m in your vehicle. A lways re
memb er
the airbag syste m can only help to
pro tec t yo u if you are wearing your safe ty b elt
and wearing
properly. This is an other rea son
why you sho uld alwa ys wear your safe ty belt s,
n o t ju st b ecau se th e
re quir es you do so 13 , bel ts" .
It is im portant 10 re mem be r that wh ile th e su p
p lemen tal side airbag system is designed to help
Booklet 2.1 Safety first
reduce the likelih ood of seriou s injuri es, other
injuries, for example, swelling, bruising, and
mi nor abra sions can a lso be associated w it h
th ese airbags. Remember t oo , side airbags w ill
dep loy o nly once an d on ly in certai n kinds of ac
ciden ts - your safety belt s are always th ere to
offer protec tion.
Ve hicle dam age, repa ir cost s or even
lack of
ve hicle da mag e is no t necessa rily a n indicatio n
of prope r airbag operation. In some collis ions,
both front and side airbag s may inflate. Re
mem ber too, tha t airbag s w ill dep loy only once
a n d only in certain kind s of collis io ns - your
safety belt s ar e always there to offer protection in
t h ose acciden ts in whic h ai rb ags a re not sup
po sed to deploy or whe n
have al ready de
p loye d.
Th e side airbag sy stem
will not b e trigg ere d
• if th e igni tion is sw itc hed off,
• in side collisions when
accelerat ion mea
s ured by th e sensor is too low ,
• in front-en d co llisio ns,
• in rear -end collisions,
• in rollove rs.
In some types of accidents
Sid e Cur
tain Pro tection and sid e airbag s may be tr ig
gered together.
WARNING
• Safety belt s a nd lh e a irb ag sys te m will onl y
p rov ide prot ectio n when occ upant s a re in the
co rrec t se atin g po sition
13, "Safety
b elt s" .
• If the air b ag in dicator light comes o n when
the vehicl e is bein g use d, h ave the sys te m in
spec te d imm edi ate ly by yo ur Vol kswage n
d eal er. Th e side a irb ag sys te m m ay not wor k
prop erl y eve n wh en th e vehicle acce le ratio n
in a side colli sion i s high en ough
10 ac tiva te
th e a irbag
Airbag system 45
Page 250 of 477
Booklet 3.1 Controls and Equipment @
WARNING
Cras hes a nd oth er acci dcn t s ca n hap pen w hen
yo u cann ot sec the road a head a nd when yo u
ca nn ot b e see n by other m otor is ts.
• Never use day time runn ing ligh ts to sec
w here yo u are goi ng. Th ey a rc no t b right
eno ugh an d w ill n ot let y ou sec fa r eno ugh
a h ea d for safety especia lly a l dusk or w hen it i s
dark. Always sw itch on the low bea m at du sk
or w hen it is dark .
•
t a il li ght s do not ligh t u p w hen da y
tim e runnin g lig ht s arc o n. A ve hicle w ithout
r ear ta il li gh ts turne d on ca nn ot b e see n by
ot hers in b ad wea the r at dusk o r w hen it s d ark .
Applies to ve hicles: with Highline instrument clus ter
WARN ING (continued)
• If aut oma tic head light cont rol is sw itch ed
o n, th e low bea m and w ill n ot be
switc hed on in fog or heavy You have to
sw itc h on t he low bea m using t he light sw itch .
• J\lways tu rn on th e he adli ght s befo re d usk
a n d in ra in or fo g so th at yo u ca n see a head
and so that oth ers can see your vehicl e from
t h e bac k.
Tip s
I f yo u re m ove the key from t he ig n ition lock w ith
t he ligh ls s till on, a b uzze r w iU sou nd when you
o pen
dri ver's door re mi nd yo u turn light s off .
• Always observe loca l o rdin an ces a nd traffi c
regu la tion s w hen using yo ur lights. •
Coming /leaving home function (orientation lighting)
T he comi ng hom e/ leav ing home functio n is ro lled by ligh t sensor.
Coming h om e function
If th e hea dlight s sw itc h
46, is in th e
"Au to ma tic headligh t co ntrol" (AUTO or po
sition whe n the ig n it ion is sw itc hed off an d th e
driver's door is opened and closed,
co ming
h o m e fun ction (sw itc h-off delay) switch es on
th e orientat ion ligh ti n g. The le ngth of
sw itch-o ff delay ca n be adju sted, o r sw itch ed off
co mple te ly, in Lights a nd vis io n 17.
L e a vi ng h om e fu ncl ion
th e ve hicl e is un locked, the leav ing hom e
func tion switch es on orie nt atio n li gh tin g. The lig
htin g is switched off as soo n as t he ign i
t ion is s witched on.
Tips
I f th e co min g home or le aving hom e fu nct ion is
sw itched on, the head ligh ts, s ide mar ke r ligh t,
t ai lli g h t a nd lice nse pla te ligh ts w ill come on.
• If yo u r em ove t he ignitio n key and open t he
dr iver door while the vehicle ligh ts are on , you
w ill not h ear an acoust ic warning if the comi ng
home funct io n is sw itched on.
• You can set th e com ing hom e fu ncti on
s wit ch off delay in th e Lights and vis io n
menu , provid ed yo ur ve hicl e has th is m en u in t he
di spla y.•
Lights and a clear view 47
Page 257 of 477
Bookle t 3 .1 Controls and Equipment
WARN ING (continued)
• Always rep lace w iper b lades that a re worn,
damaged o r do not keep the wind shi eld clear.
th e wind shi eld. T o pr eve nt damag e the wipe r blad es and the wipe r always
l oose n blad es frozen to the windshi eld befor e
operati ng th e w iper s.
Tips
• The w ind shi eld wipers will only funct io n
when the igniti on is sw itch ed on and the en gin e
hood i s clo sed.
App lies lo vehicles: ro in sensor
Rain sensor
• The previou s wiping spe ed will be ca lly se lec ted when the veh icle stops. reg arding
w ipin g spee d 53, fig. 33 or is lected. The s elected speed will be resumed when
th e ve hicle dri ves off aga in.
• The windshi eld will b e wip ed again after
a bout five seconds once the wind shi eld w iper
and washer syste m ha s been operat ed if th e
hicle is in mo tion.
• If th e "inter mittent w iping" function has
b een selec ted, the intervals ar e lin ked to the
s p ee d of th e ve hicle i.e. the int erva ls will be
s horter when th e vehicle is trave lling fas te r.
• The w iper will
wipe away any obstacle s
that are on th e wi nd shi eld. Th e wiper w ill stop
moving if the ob stacl e blocks it s path.
th e ob stacle and switch the wipe r back on
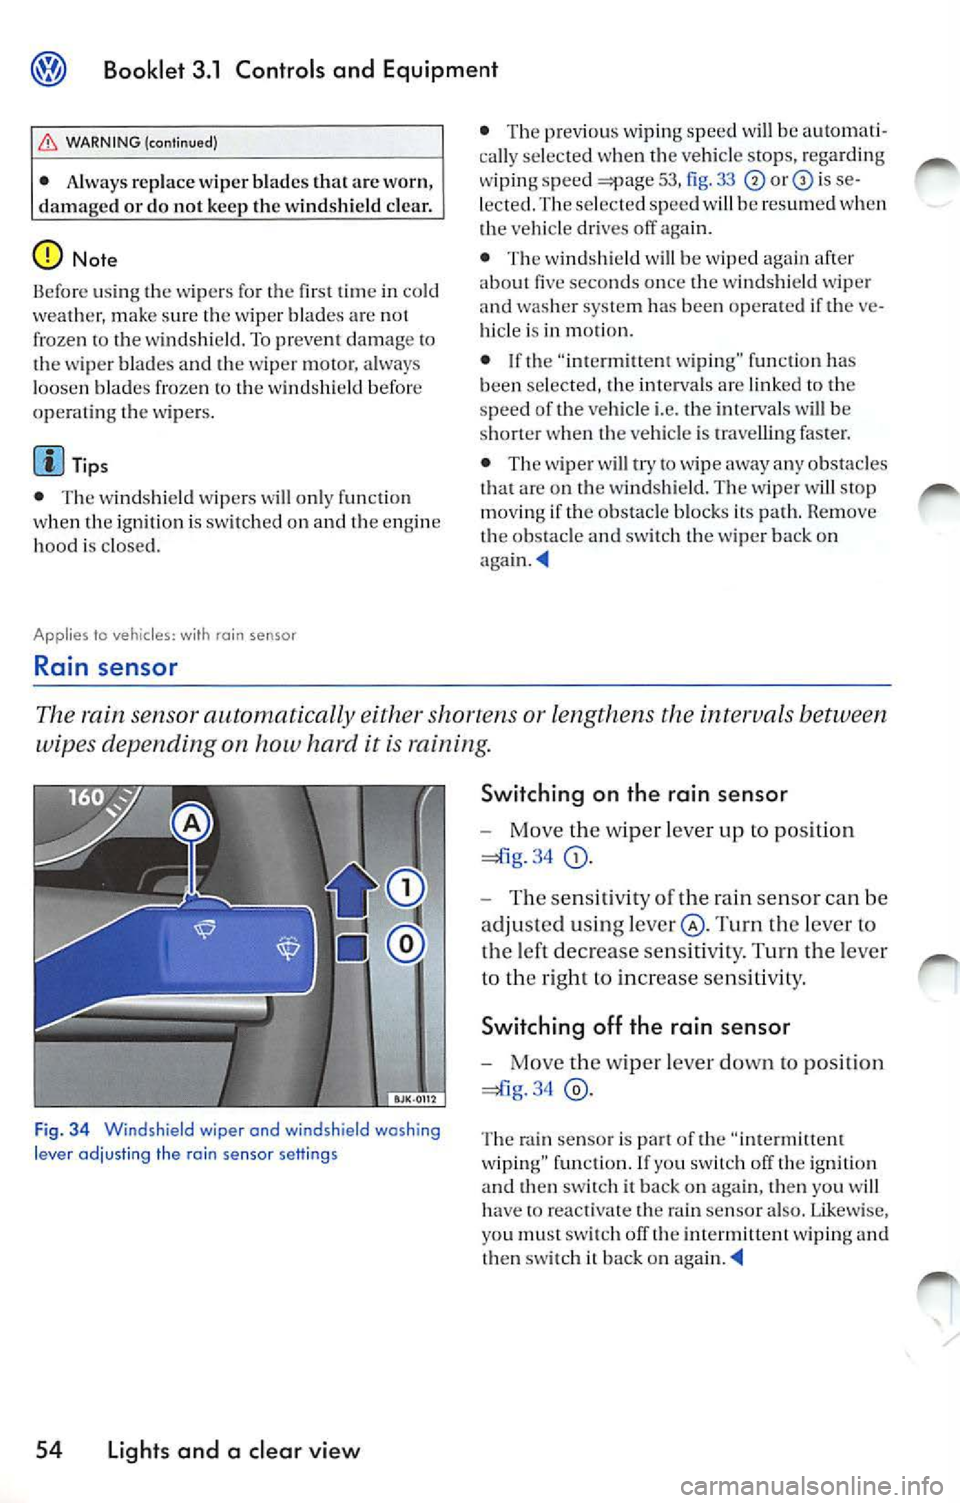
The rain sensor automatically either or lengthens the intervals between
wipes depending on how hard it is raining.
Fig . 3 4 Windshield wiper and windshield washing
l e ve r ad jus ting the rai n se nsor sett in g s
54 Light s and a clear view S
wi tching on th e rain sensor
- Move the wiper lever up to position
34
Turn the leve r to
the left decrease sensit ivity. Turn the lever
to th e right to in crease sensitivit y.
Sw itch ing off th e rain sensor
- Move the wip er lever down to position
34
Th e rain senso r is part of th e "intermitt ent
w iping" function . If yo u sw itc h off the igni tion
an d th en sw itch it ba ck on aga in, then you w ill
h ave
re activate th e rain senso r also . Lik ewis e,
yo u must swit ch off th e int ermittent wiping and
th en sw itch it back on
Page 258 of 477
Booklet 3.1 Controls and Equipment
Appl ies to vehicles: wi th headlight washer sys tem
Headlight washer system
The headlight washer system cleans the headlights.
The head lig h t was he rs are activated automati
cally when th e sw itch for the headlig hts is in an y
o th er posit io n th an O and th e windshie ld wip er
l eve r
53, fig. is pull ed toward the
s tee ring whee l for a t le as t 1. 5 sec onds. H oweve r,
yo u sh ou ld reg ularl y remove any hard or drie d
o n dirt or in sec ts from
hea dli ght s, for ex
ample when ever yo u are refu eling your vehicl e.
Mirrors
Tips
Mak e sure th at t he hea dlight washers wo rk
p ro perl y in wint er, keep the nozz le in th e
bump er fre e of sn ow and re m ove any ice with a
d e- ice r spra y
Self-dimming inside day-night mirror
It is important for safe driving that you have good vision to the rear .
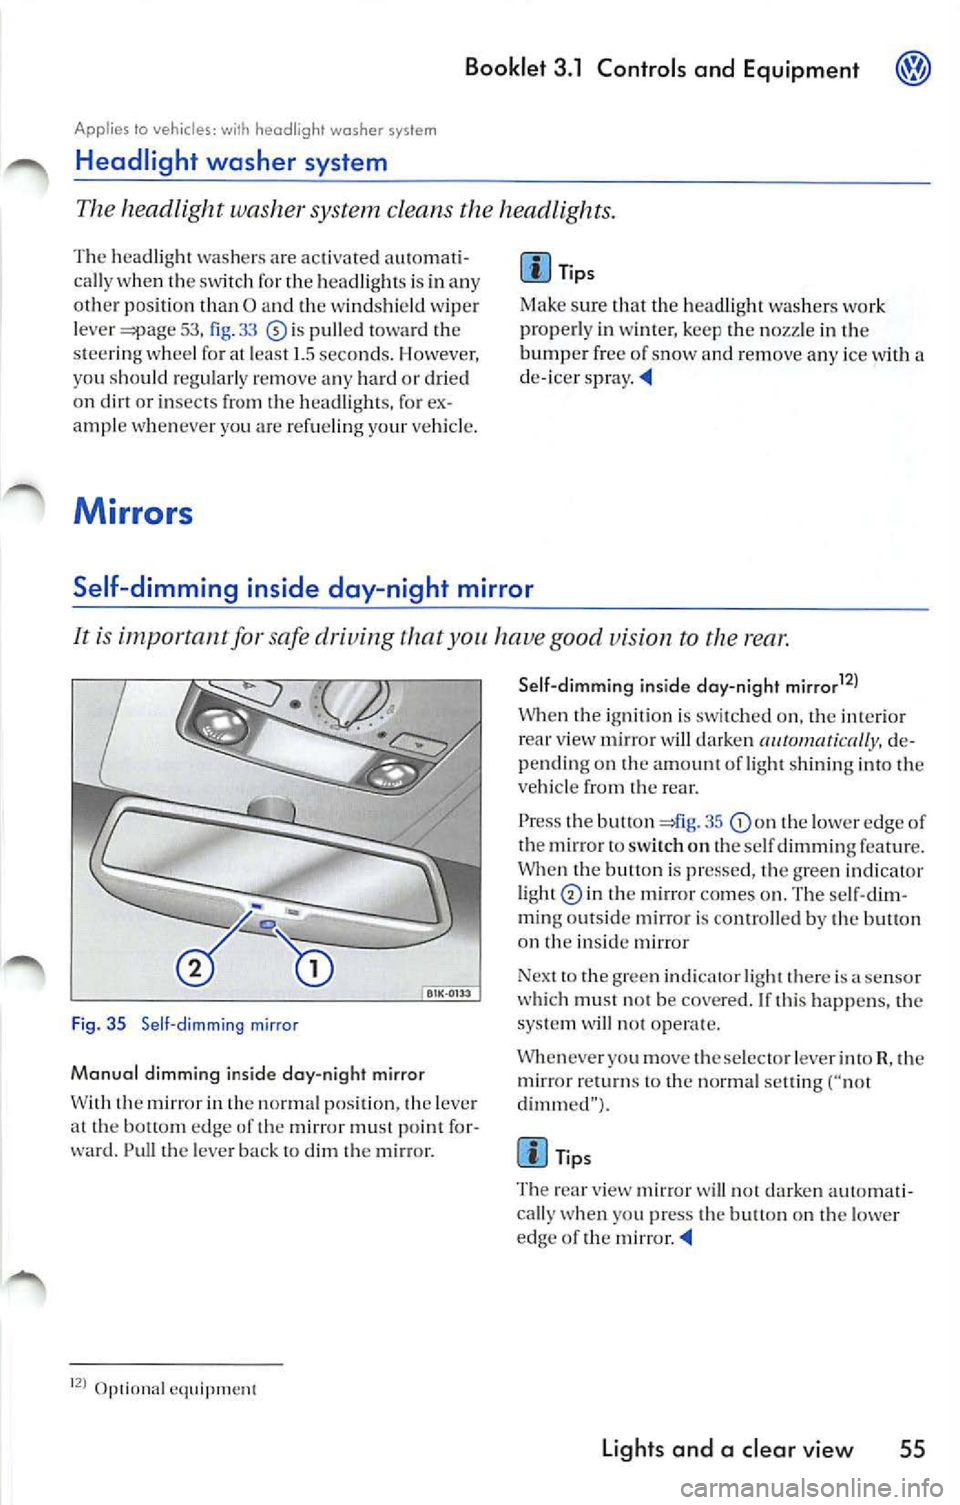
Fig. 35 Se ll-dimming mirror
Manual dimming inside day-night mirror
W ith th e mir ror in th e normal p ositi on, the leve r
a t th e bottom edge of th e mirror must point fo r
ward. Pull th e leve r ba ck t o dim
m ir ro r.
Op1ional eq uipment Sell-dimmi
ng inside day-night mirrar
12
)
W hen igni tion is swi tched o n, the int eri or view mirror w ill darken de
pending on amount of light shinin g into veh icle from rear.
P ress the butt on 41g . 35
th e lower edge of
th e mirror to sw itch o n th e se lf dimming featur e.
Whe n the butt on is pr esse d, th e gree n indicat or
li ght
in the m ir ro r co mes on . The se lf-dim
m in g ou ts id e mirror i s conrro lled by th e butl on
on
in side m irror
Nex t to th e g ree n indi cator light there is
sensor
w hi ch mu st not be cove red. If thi s happe ns, the
sys te m will not oper ate.
Whenever you move th e se lec to r le ver into R, th e
mirror
to the normal settin g ("not
dimm ed" ).
Tips
T he rea r view mirror
will not da rken aut oma ti
cally w hen you press the bu tton on t he lowe r
edge of the mirror
Lights and a clear vie w 55
Page 309 of 477
Booklet 3.1 Controls and Equipment
Electronic Parking Assistance
Applies to wit h E le ctro nic Perk ing Assis tance
Description of Electronic Parking Assistance
The Electronic Parking Assistance is a parking aid, which draws to
obstacles.
The electro nic parking a ssistanc e he lps th e
dr iver when parking the ve hicle. Th e driv er is
fo rm ed or warned by audibl e signals that hide is approac hing behind ve·
hide. The clo ser yo ur vehicle approach es
obstacle, quicker aud ible sig nal s w ill
so und. Th e audib le s ig nal will sound continu ·
o usly if lh e obs tacle i s very near.
It uses ultrasonic senso rs in rea r bumpers to
measure distanc e lo obstacle s.
Th e se nso rs ar e
lrans miller s and rece ive rs
o f ult rasoun d waves. The e lec tronic syste m s
uses ultra sou nd waves (i.e. transm iss ion, r e·
fl ec lion from th e obstacle a nd rece ption) to
th e di stance th e vehicle and obstacle .
O nc e yo ur vehicl e is very close lo
obstacle, will no longer be det.ec tccl and you
co uld cau se damage lo vehicl e. Always pay
close attention lo audibl e signals lo help you
park your vehicl e.
Switching on the electronic parking assistance
The parking distan ce warni ng
is
s witched on when reverse gea r is selected
and when i g niti on i s on. An audible sig nal is
g iv en. I f yo u do not h ear th is acoustic sig nal.
parking di stan ce wa rning sy stem is n ot on. Hav e sys tem insp ec ted b y yo ur au rized Vo lk swagen deal er.
106 Driving
Switching off the electronic parking assistanc e
Th e parki ng ass istanc e is
off when th e
r e ver se gear is desele cted.
WARNING
The elec troni c parking cannot re
p lace the driver's assessmelll of situation.
T he dri ver is per sonally respons ible for safe
parking and other maneuver s.
• The sensor s ha ve blind spot s in which ob
s tacles an d people are not registered.
•
p arti cul arly aware o f sm all children or
animals when backing up. The sens ors may
not always be abl e to det ect them.
may not way s be abl e dete ct object s such a s draw bar s, thin rails, fences, po sts e tc .
T hi s co uld resu lt in da mag e lo your car.
• The electroni c pa rking as sis tance work s on ly
al sp eeds of und er about 9 mph (15 km/h ).
• The elec troni c park ing senso rs in th e
bump ers mu st be k epl clea n and free of i ce.
When cleanin g wi th pre ssure hoses and
cleaner s, lhe sensors sh ould b e spra yed on ly
b riefly. A distan ce of a t least 0.3 ft. (0. 1 m ete rs)
betwee n th e se nso rs and I hose
nozz le must b e ob se rved.
Page 349 of 477
Booklet 3.2 Tips and Advice
Repairs and technical modifications
Repairs and modifications must always be carried out according to the manufac
turer's specifications
Unauthorized modifications to th e e lectronic
component s or software in the vehicle may
cause
E lectro nic comp o
nents are linked toget her in networks and other
sys tems may be nega tive ly affected by improper
m odificat ions or improperly installed accesso
ries. Thi s can se riously impair safety and lead to
excessive wear o f components.
Changing the vehicle's sus pens io n system can
change the way that the Advanced
Sys tem performs in a crash. For example, usin g
t ir e-rim combinations not approved by Volk
swagen, lower ing the vehicle, changi ng the stiff
ness of the suspension, including the spring s,
suspension struts, shock absorbers can chan ge
the forces that are measured by the airbag sen
so rs and sent to the con trol unit. Some su spen
s ion changes can, for exa mpl e, incr ease the force
levels measured by the sensors and make the
airbag system dep loy in crashes in which it
wou ld not deploy if the changes had not been
made. Other kinds of changes may reduce the
force levels measured by the sensors and pre
vent the airbag from deploying when it sho uld.
We recommend that all necessary work be per
formed by an authorized Volkswagen deale r
using genuine Volkswagen parts ®.
WARNING
Imp roperly performed modifications or other
work that is not properly performed on your
ve hicle can cause malfunctions leading to ac
cidents and serious pe rsonal injury.
• Never install suspension components that
d o not have the same performance character
i stics as the components originally installed
on your vehicle. Never use tire-r im comb ina
tions th at have not been approved by Volk
swage n.
WARNING
Improper care, servicing and repa ir proce
dures can increase the risk of personal injury
a nd death by preventing an a irbag from de
p lo ying w hen needed or deploying an airbag
unexpected ly.
• Chang ing th e vehicle's su spens ion in
cluding use of unapproved t ire- rim combina
tions can change Advanced Ai rbag perfor
mance and increase the risk of serious per
sona l inju ry in a crash.
• Be sure to read and heed the info rmatio n
a n d all WARN INGS
2. 1 "Safety
fir st", c hapte r "Airbag
28 Acc essories, new part s, repairs and modification s