Com VOLKSWAGEN JETTA 2008 Owners Manual
[x] Cancel search | Manufacturer: VOLKSWAGEN, Model Year: 2008, Model line: JETTA, Model: VOLKSWAGEN JETTA 2008Pages: 477, PDF Size: 77.6 MB
Page 391 of 477

Booklet 3.2 Tips and Advice
Applies lo vehicles: wi th spore whee l
Removing the spare wheel
The spar e wheel is located und ern eath the floor covering in the luggag e compart
Fig. 21 Under th e floor ponel: spore wheel secured
wi th o p las tic nut.
Removing the spare wheel
-Lift floor panel and hang on
rubb er sea l aro und the luggage compart
ment openin g.
- Unscrew the black plastic nut securin g
th e s par e whee l by turning it in
direc
tion of th e arrow
21and remo ve
-Press dow n on pla stic screw 22
in the ce nter of the spare wheel and
turn it co unt erclo ckw ise in th e direction of
the arro w
22 and remove.
- Tak e out the s pare whee l. Stowing the
flat tir e.
- Lift the fl oor pan el a nd h ang i t on the
rubb er sea l around the luggage compart
m en t open ing.
- Pla ce the flat tir e in the spar e whee l we ll
in the lu ggage co mpartment.
- Take the pla stic scr ew, place it in the
c ente r of th e flat tire pre ss
dow n and
t urn
clockw ise.
70 What do I do now?
Fi g. 2 2 Under th e floor pone!: plo stic screw for se
cur ing the plostic n ut.
- Secu re the flat tire w ith bla ck pl astic
nut.
WARNING
• Do not use the spar e tir e ifit i s damaged or
if it ha s worn down to the wear indicators.
• If th e s pare lire i s more than 6 years old,
u se
it only in an em ergen cy and with extreme
cau tion and careful dri vin g.
• The spare tire mu st alwa ys be se cur ed w ith
the wheel bolt s provided b y the factory.
• After installin g the spare tire, the tire pr es
s ur e must be c hecked as soon as p ossible
56.
• On some ve hicles, the spare tire ma y be
sma ller th an th e original tire. The smaller
spar e tir e is identified with a sticker and th e
word s
"50 mph" or "80 km/h". These words
identify the max imum permissible sp ee d for
driving with this tire.
Not e
Mak e sure that the spare w heel. or
re mo ved ar e stored safe ly i n luggag e
Page 394 of 477

WARNING {continu ed)
• Never let anyone place any part of their
body underneath the vehicle when support ed
by the jack.
• Never support your vehicl e on cinder
blocks, bricks or other obje cts . These may not
Changing a wheel
F ig . 27 Chang ing a wheel : removing the wheel
baits
Removing the wheel
-Usin g the h ex socket in th e sc rew dri ver
27, un screw t he w heel bo lts pre vi
o usly loo sen ed about on e turn and put it
o n a cl ean su rface .
- Then re mo ve the oth er whee l bolt s as
d esc ribed abo ve.
- Tak e off th e w he el.
- Place the flat ti re in the lu gg ag e co m-
p artmen t.
Mounting the spare wheel
-Mount the sp a re wh eel.
- Insta ll th e w hee l bolt s and tight en th em
lig htly u sin g th e hex so cke t in th e sc rew
dri ver.
- L ower th e ve hicle on the jack .
Booklet 3.2 Tips and Advice
WARNING {cont inu ed )
be able to support the load and collap se sud
denl y.
• Nev er start the engine when you have
raised the vehicl e on the jack. The engine vi
bration s and v ehicle movements could knock
the v ehicl e off the
- T ig ht en the wheel bolts firml y using the
lu g w re n ch. Ti gh te n th e whee l b olts in di
a gonal s equ ence , for e xampl e, tig h te n th e
top bolt and then th e oppo sit e bolt clo se st
to th e ground and continu e tight enin g the
bolt s until all have bee n firml y and se
c ur ely tight en ed. Do not tight en th e bolts
in clock wise or c ounter-cl oc kw ise se
quen ce.
Unidirectional tires
Unidir ectional tir es mu st be co rrec tly m ount ed
a ll arou nd.
A un idir ection al tir e ca n b e id en tified b y arrows
o n th e s idewa ll, w hi ch p oin t in the di rec tion of
t h e ro tation . Yo u mu st fo llow the speci fied dir ec
ti on of ro ta ti on. Thi s is necessary in orde r for
the se tires to deve lop t heir optim al cha racte ris
ti cs regar ding grip, road noise, wea r and hydro
p la ni ng .
I f y ou have
to moun t a tire opp osite to i ts pro per
dir ection of rot atio n. p lease drive caref ull y sin ce
th e tir e no lo nge r poss esses its o ptimal chara c
t e ri stic s in thi s s itu atio n. Thi s is parti cul arl y im
po rta nt in we t con ditions. In orde r to f ully ex
pl oi t th e benefi ts of unidir ectio nal tire s ag ain ,
yo u sh ou ld imm edi ate ly re place or change the
tir e in or der to resto re th e co rrect d irec tion of ro
t a ti on .
WARNING
Improp erl y tight en ed or maintain ed wheel
b olt s can b ecome loose cau sin g lo ss of control ,
a colli sio n and seriou s per son al inju ry:
• Alw ay s keep th e wheel bolt s and th e
thread s in the wh eel hub s clean so the whee l
bolt s can turn easily and be p roperl y tight-
en ed .
What do I do now? 73
Page 395 of 477

Booklet 3.2 Tips and Advice
WARNING (continued)
• Never grease or oil the wheel bolts and the
threads in the whee l hubs. They can become
loo se wh ile driving if greased or oiled, even if
tightened to the specified torque.
• Always read and heed all WARNINGS and
other important information
66.
73 .
74 What do I do now?
soo n as possible with a torque wr enc h -pr efe r
ably by an au thorized Vo lksw agen dea le r or
qualified worksh op.
• If yo u n otice tha t th e wh eel b o lts are cor
rod ed and difficult to turn, th ey mu st be re
pl aced before you hav e th e to rqu e chec ked or
h ave the bo lts tigh te ned to the prop er t orqu e.
• Have the damag ed tire re pla ced with a tire of
the same brand, specificatio ns and trea d
- Have the damaged tire re pla ced wit h a
tir e of the same brand, sp eci fica tion s and
tread patt ern.
Page 396 of 477

Booklet 3.2 Tips and Advice
or th e centra l locking malfunctions, th e doors can be locked o r
unlocked manually.
Fig. 28 Emergen cy lock (covered by weatherstrip)
in the edge o f the left rea r doo r
Locking the passenger's door and the
rear doors
Open the door.
Pull back the wea thers trip on th e edg e
of the door th a t is id en tifi ed by a lock
2 8 us ing th e ma ster key .
Inse rt the m aster key into th e ve rtical
s lot and pus h it forward
29 -arrow-
Rea ttach t he weat hers trip.
C lose the door comp le te ly.
C hec k w hethe r the door is lock ed.
Repea t the proced ure at the other
doors.
H ave the ve hicle in sp ec ted immedi
ate ly by your auth orize d Vo lkswage n
d ea le r wo rks ho p.
Fig . 29 Using the emergency key to lock the vehicle
WARNING
• Always sto p the vehicl e as soo n as it is to do so and move the ve hicle a sa fe d is tance
olT the road w here it is sa fe to lock a ll doors in
a n eme rge ncy. Turn on the emerge ncy fla sher
t o warn a pproac hing traffic.
• Never close a door wit hout first makin g
s u re th at it is sa fe to do
so. You ca n injure your
se lf or other people. Always make certain that
n o o ne is in t he way of the door that is bein g
clo sed.
• Neve r leave c hildren, di sabled perso ns or
anyo ne who cannot help th em se lves in th e ve
hicle when lock ing th e doors. This could r esult
in p eople being trapp ed in th e vehicle in an
e mergenc y. For example, depending on the
tim e of year, peop le trapped in the vehicl e ca n
be expo sed to very high or low temperat ures.
Tips
Yo u can unlock the passenger's door and th e
rear doo rs from th e insid e aga in if you pu ll the
door opening leve r o nce. Pulling on th e openi ng
l ever a secon d time op en s th e
What do I do now? 75
Page 397 of 477

Booklet 3.2 Tips and Advice
Applies to vehicles, with power roof
Emergency closing of power roof
The power sunroof can be closed manually if there is a defect.
Fig. 30 In the removing cover
-Remo ve th e cove r from the front edge
in th e dire cti on of the a rrow
30 .
- Insert a standa rd 4-mm Allen w re n ch
into th e s ocket head screw
31
- Turn the w re n ch to cl ose the power
s unro of.
Fig. 31 Bolt for closing the power sunroof
-Insta ll the cover.
WARNING
Always stop th e vehicle as soon as it is safe to
do so and move the ve hicle a safe distance off
th e road where it is safe to close the pow er roof
manuall y. T urn on the em ergency flasher to
wa rn appro achin g
can b e op en ed from insid e the luggage compart
ment.
- Fold the rea r seatbac k forwa rd
3.1 "Rear seat".
- Pull the release han dle to open the re ar
lid from the inside of the luggage co mpart
m ent.
- R eturn the handl e to its ori gina l po si
ti o n af te r op enin g the rear lid.
To help pr eve nt ch ildre n and oth ers from being
trapped in the lu ggag e compartment, y our ve
hi cle has an em erg e ncy opening le ve r in sid e th e
lu gg age co m pa rtm ent th at g low s in the dark
76 What do I do now?
WARNING
A c hild or other perso n trapped in the luggage
compartment of a vehicle can be serio usly in
ju red and even die
• Never leave yo ur vehicl e un att end ed or let
c hildr en play a round your vehicl e, es pecia lly
w ith th e tru nk lid lef t open. A chil d could cra wl
into the vehicl e throu gh th e luggage compart
ment and pu ll the lid shut becomin g trap ped
and un able lo get out. Being trapped in ave
hicl e ca n lead to serio us pers onal injury , espe
ci ally wh en it is very ho t or cold.
• Never leave child ren, disabled p erso ns or
a n yone who ca nnot help themselv es in th e ve-
Page 398 of 477

WARNING (continued )
hide. The doors can be lock ed using the re
mote control key or the powe r lock button.
Th is co uld res ult in peop le bein g trapped in
th e ve hicl e.
•
build -up in th e passenger com part
ment an d lu ggage compartmen t o f a parked
Fuses
Changing a fu se
Fig. 32 Dosh panel, le fl: cover of fuse box A
Fuse bo x A locat ed in th e side of the
da sh pan el on th e driver' s side
In se rt a suit abl e obj ect (e .g. a sc rew
dr iver) into th e
32 and car efull y
pry the cove r oil
Fu se box B in the engine compartment
Open the en gin e hood .
Press the release tabs 33 (arrow s)
to re lease the fuse box cove r.
R e mo ve the cover .
To re mount the cover, place it ove r th e
fu se box
press the sid e tab s in the op
po sit e direct ion until they latch sec ure ly.
Bookl et 3.2 Tip s and Advice
WARNING (continu ed)
vehicle can re sult in tem peratur es in the ve
hicle that arc much higher than the out sid e
tem peratu res, p arti cularl y in su mmer. Tem
p era tures ca n quickl y reac h levels that can
cause unco nscio usne ss and death, particu
l ar ly to sma ll childre n. _.
Fig . 33 In the engine compa rtment: caver of fuse
box B
The indiv idu al el ec trica l ci rcu its are prot ecte d
b y fu se s. We reco mm end y ou sev eral spar e
fu ses at all tim es. T hese are availab le from a u
th ori ze d Vo lk sw agen dea le rs.
A ut omob ile te chnol ogy chan ges co ntinuously.
Your a uthori ze d Volkswage n deal er h as the mo st
curr ent t echn ica l in format io n for your Vo lk
sw agen.
I f yo u ar e
sur e w hich fu se to use or to ch an ge ,
co ntact your authori zed Vol kswage n Se rv ice
viso r.
Co lar cod ing o f fu ses
C olor
rating
li ght
5
brow n t 7.5
reel I 10
What do I do now? 77
Page 400 of 477

Booklet 3.2 Tip s and Adv ice
Fuse tables
Fi g. 34 Fuses in the fuse box A in the dash panel
Fi g. 35 F use box Bin the engine comportment: Left vehicles w ith a 54 fuse box , right vehic les with a 30 fuse
box
What do I do now ? 79
Page 401 of 477
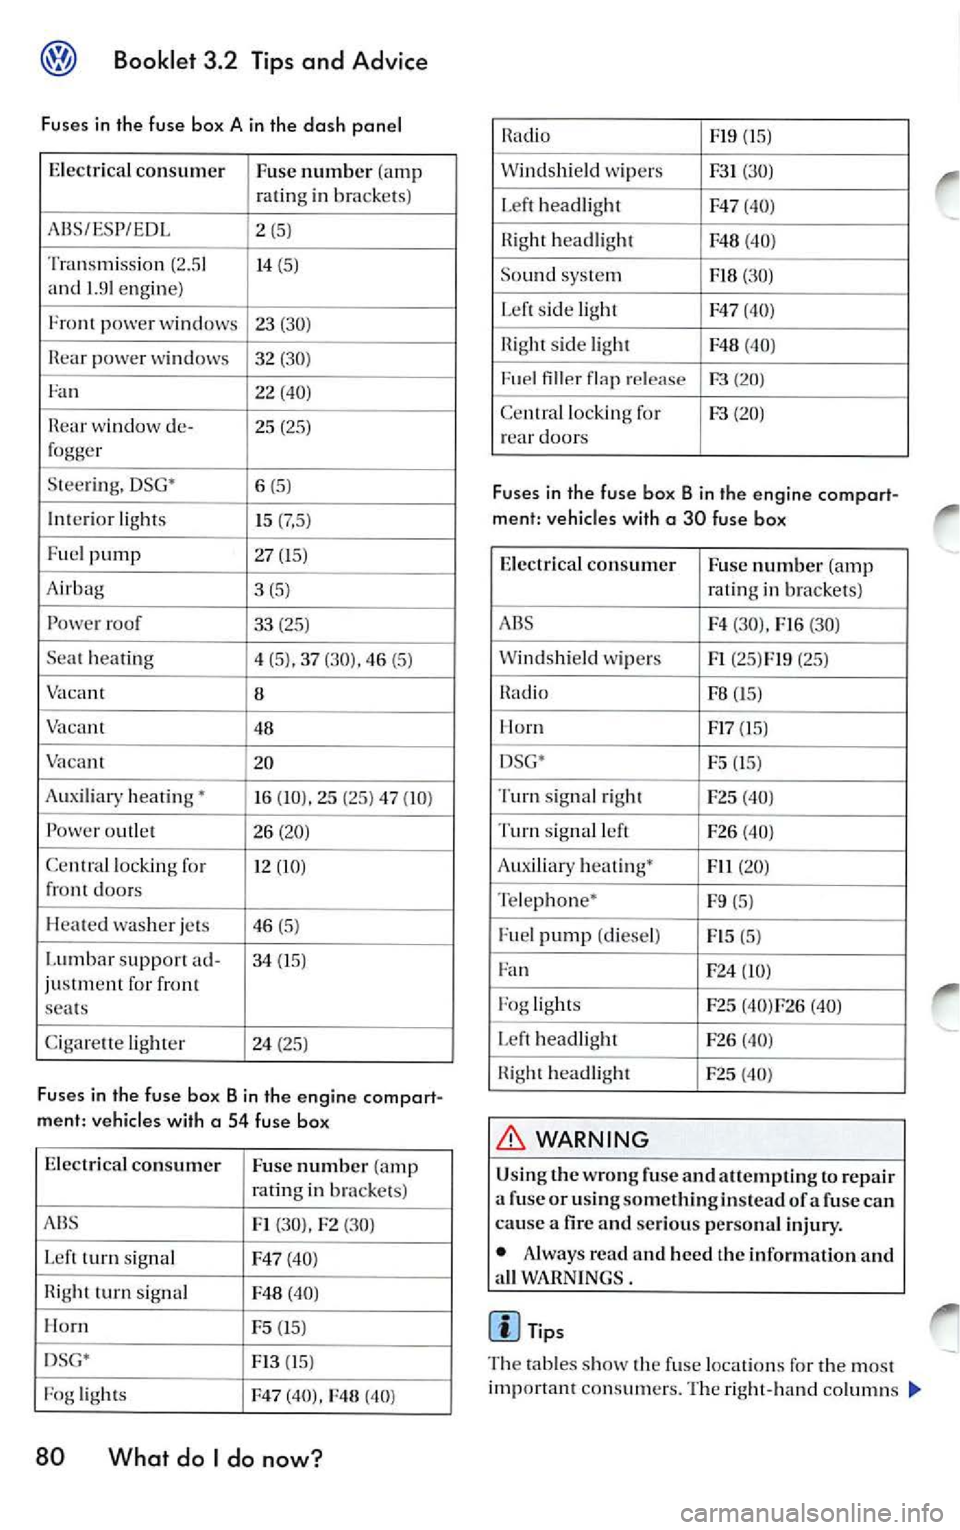
Booklet 3.2 Tips and Advice
Fuses in the fuse box A in the dash panel
Electrical consumer
Fuse number (amp
ratin g in bra cke ts )
ABS /ESP/E DL 2
(5)
Tran sm iss ion (2.5 1 14 (5)
and 1.91 engine)
Front pow er wi nd ows 23 (30)
powe r 32 (30)
Fan 22 (40)
wi ndow de- 25 (25)
fogger
S tee rin g. DSG • 6 (5)
Int erior light s
15 (7,5 )
Fuel pump 27 (15)
A irbag 3 (5)
roof
33 (25 )
Se at hea ting
4 (5), 37 (30). 46 (5 )
8
48
V aca nt
20
Auxiliary hea tin g'
16 (10), 25 (25) 47 (10)
Pow er outl et 26 (20)
Cc n
lock ing for 12 (IO}
fr ont doo rs
H eat ed was her je ts 46 (5)
Lumb ar support ad- 34 (15)
ju stment for front
sea ts
C igare tte light er
24 (25)
Fuses in the fuse box Bin the engine compart
ment: vehicles with a
54 fuse box
Electrical consumer
Fuse numb er (amp
rating in bra cke ts)
Fl (30). F2 (30)
L eft turn signa l F47 (40 )
turn s ignal (40 )
I-lorn F5 (15)
D SG' FI3 (15 )
light s
F47 (40), (40)
80 What do I do now?
F19
v\l ind shi eld wip ers (3 0)
Lef t headlight F47
(40)
headlight F48 (40 )
So und system
(30)
L ef t sid e lig ht F47 (40 )
sid e light F48 (40 )
release
Ce ntral lock ing for (2 0) rea r door s
Fuses in the fuse box B in the engine compart
ment: vehicles with
a 30 fuse box
Electrical co nsum er
Fuse number (amp
rat ing in bra ckets )
A BS F4 (30),
(30)
W ind shi eld wip ers Fl (25 )FJ9 (25)
F8 (15 )
H orn FI7 (15 )
DSG' F5
(15)
Turn sig nal ri ght
F25 (40 )
Turn signal left F26 (40 )
Aux iliary heat ing •
Fil (20)
T e le phon e•
F9 (5)
Fu el pump (di esel)
(5)
Fan F24 (IO )
F og lig ht s F25 (40 )F26 (40)
h ea dli ght
F26 (40 )
headlight F25 (40 )
WARNING
Using the wrong fuse and attempting to repair
a fu se or u singsomethingin stead of a fuse can
cause a fire and serious per sonal inju ry.
• Always read and hee d the information and
a ll WARN INGS.
Tips
T he tabl es show the fu se loca tion s for the mo st
important consumers. The right -hand column s
Page 402 of 477

contain the in se rt loca tio n, the figur es in
bra cket s indi ca te th e a mp ere rating for th e fuse.
O ne c on sum er mi ght re quir e seve ral fu ses (also
in separat e fu se boxes) .
• Seve ral con su m ers cou ld
over on e sin gle
fu se .
Changing a light bulb
Changing light bulbs
Booklet 3.2 Tips and Advice
• T he fuse b ox in the dash pan el h as spa ce fo r
r ep lace ment fuses .
• There a re o th er fu se s in th e vehicle. Th ese
s h ould be chan ged by a qua lified d ealer ship .
Light bulbs should be changed by a qualified t echnician only.
Light bulb s should b e chan ged onl y by qu alifie d
t ec hni cian s. In man y cases c han ging a light bulb
in vo lves re m ov ing oth er
of th e vehicl e to
ge t to the burnt- out ligh t bulb, pa rticularl y tho se
i n th e front of the v ehicl e th at can on ly be
r eac hed th rough th e eng in e co mp artm ent.
We reco mm end that light bulb s o nly be c ha nge d
b y an auth ori ze d Vo lksw agen deale r or qua lified
w ork sh op.
Before ch an ging a light bulb , you mu st s wi tc h off
th e light (light switch in Op osition ). and th e turn
s igna l lev er must b e in the neutra l p os iti on.
A lw ays rep la ce burnt- out light bulb s with id en
ti cal light bul bs w ith same spe cificatio ns. Th e
spe cifica tio ns are printed on th e light bul b, ei
th er on th e g lass bu lb or on th e m etal base. /\!
wa ys mak e sure th at th e c olo r of th e new bulb s is
th e sa me as th e re p lac ed ones.
It is ad visa ble to always carry a box o f rep lace
m ent light bulb s in yo ur ve hicl e at all tim es. The
box s hould co nt ain at l eas t th ose light bulb s th at
ar e import ant fo r traffi c
See your V olk
sw age n deale r f or rec omm end ed light bulb s.
WARNING
Slop ! Before working in th e e ngi ne comp art
ment, alway s read a nd heed all WARNINGS
34. The engine compartmen t of any
motor vehicl e is a potentially dangerous area
and c an cau se ser ious personal injury.
WARN ING (continu ed )
• Gas discharge lam ps (Xeno n) get pow er
from a high voltage so urce that can cause se
ri ous personal injury and even death
ways have a qualified tec hni cian replace
burnt-out ligh t bulbs, especia lly gas discharg e
l amps (Xenon) a nd 1-17 light bulbs.
WARNING
Neve r remove the hea dlight unless yo u know
exact ly ho w to carry out the job and have the
co rrec t tool and light bulb s.
• If you a re un cer ta in about what t o do , h ave
th e work performed by a n auth ori zed Volk
swage n dealer or a qualified worksho p. Se
rious per sonal injury may result from improp
e rl y perfor med work.
• Do not tou ch glass bul b w ith b are hand s. Fin
ge rprint s can cloud the out er surfa ce of th e bulb
w hen hea ted, thu s aff ec tin g th e refl ectio n, and
th us re duci ng th e powe r of illumin ati on.
•
b ulb can on ly be repl aced by a bulb of the
s am e ty pe. T he m odel i dent ifi cat io n is e ith er on
t h e bulb base o r on t he bul b itse lf.
What do I do now? 81
Page 404 of 477
-Place the bulb holder insert back in the
h ead light. Make sure the hold er is prop erl y
i n se rted.
- Push the
82, fig. 36
th e headlight.
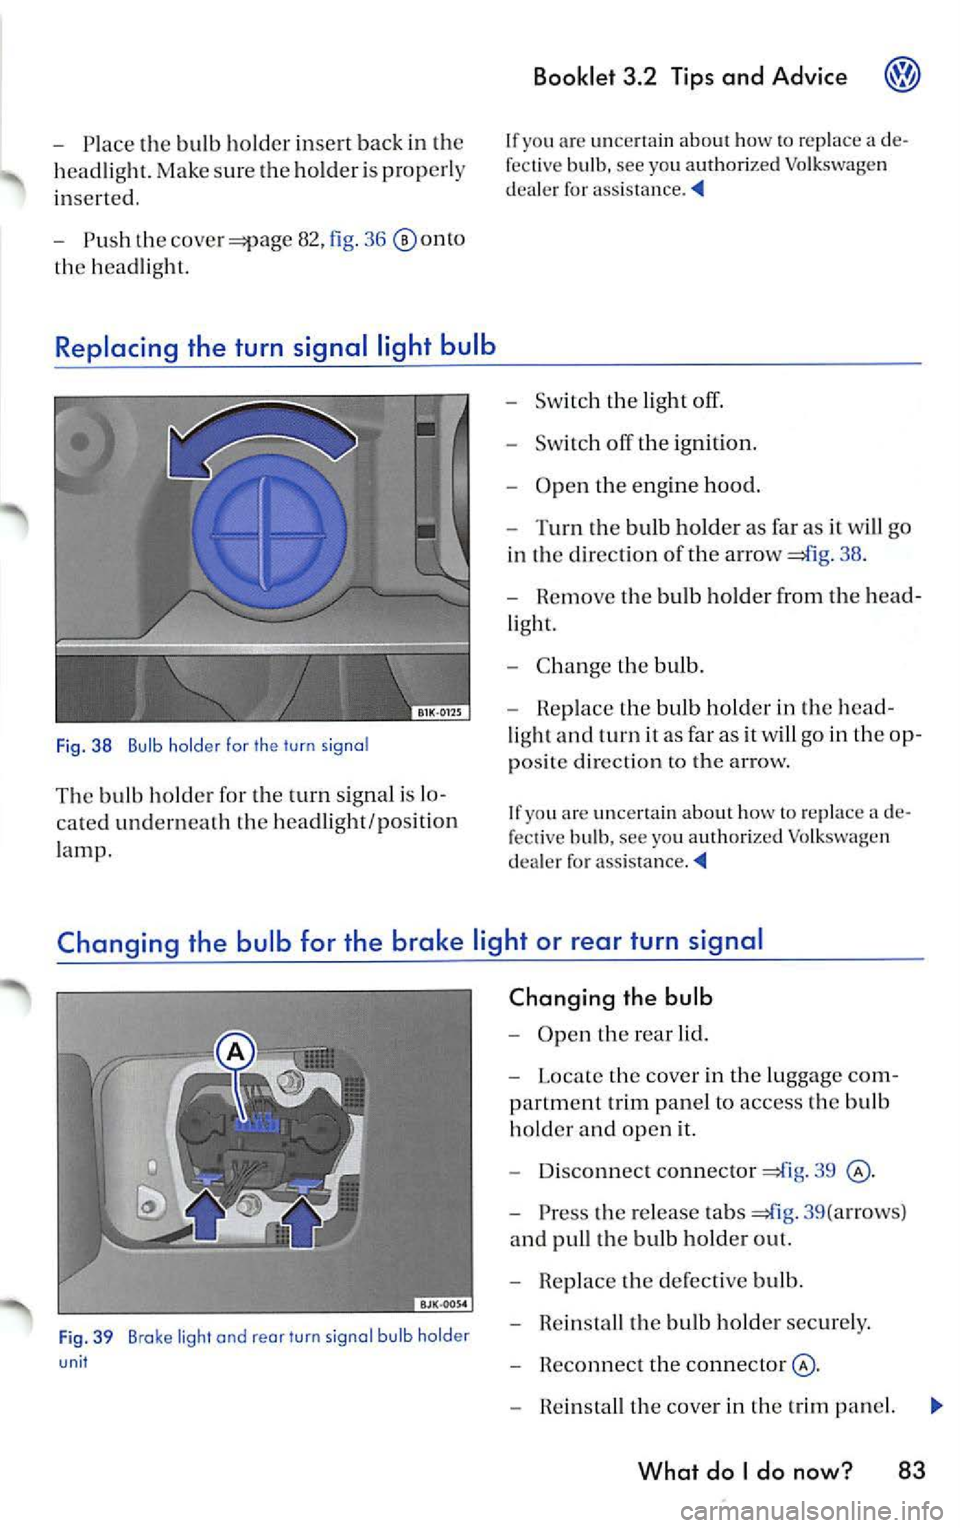
Replacing the turn signal light bulb
Fig . 3 8 Bulb ho ld er for the tu rn signo l
The bulb ho lde r for the turn signal is lo
ca ted undern eath the headlight /po sition
l amp.
Booklet 3.2 Tips and Advice
If yo u ar e unc ert ain ho w rep lace a de
fective bulb, see yo u authorized Volk swage n
de aler for assis tance.
- Swi tc h the light off.
- Switch off the ig nition .
- Open the eng ine hood.
- Turn the bulb holder as far as it wi ll go
in the direc tion of the a rrow
38 .
- Remove the bulb holder from the hea d
light.
- Cha nge the bulb.
- Rep lace the bul b holder in th e head-
li ght and turn it as far as it will go in the op
po site direction to the arrow.
If you are un certain abo ut how re pla ce a d e
f ec tive bulb , see you authorized
dea le r fo r ass is tance.
Changing the bulb for the brak e light or rear turn signal
Fig . 3 9 Broke light and rear turn signa l bu lb holder unit
Changing the bulb
- Open the rea r lid.
- Loca te th e cover in the luggage com-
partm ent trim panel to access the bulb
hold er and open it.
- Disco nn ect co nn ector
39
- Press the release ta b s =£l g. 39 (a rrow s}
and pull the bulb h older ou t.
- Repla ce the defe ctiv e bulb.
- Rein sta ll th e bu lb hold er secur ely.
- Reconnec t the connecto r@ .
- Rein stall the cove r in th e trim panel.
What do I do now ? 83