Power VOLKSWAGEN PASSAT 1996 B3, B4 / 3.G Service Workshop Manual
[x] Cancel search | Manufacturer: VOLKSWAGEN, Model Year: 1996, Model line: PASSAT, Model: VOLKSWAGEN PASSAT 1996 B3, B4 / 3.GPages: 369, PDF Size: 12.33 MB
Page 6 of 369

Downloaded from www.Manualslib.com manuals search engine 48 - Steering
Steering
Assembly overview: steering column, column tube, steering wheel and airbag
steering wheel
Airbag unit, removing and installing
Airbag steering wheel, removing and installing
Airbag Spiral Spring, removing and installing
Column tube for height adjustable steering wheel, removing and installing
Pump delivery pressure, checking
Power steering gear, removing and installing
Assembly overview: power assisted steering box (TRW)
Power steering gear, adjusting (TRW)
Power steering gear, disassembling and reassembling (TRW)
Power steering gear, disassembling
Inner sealing ring for toothed rod, pulling out
Checking toothed rod for scoring
Sealing ring on toothed rod, replacing
Sealing rings, installing on toothed rod piston
Power steering gear, assembling
Inner sealing ring for toothed rod, installing
Toothed rod, installing in housing
Adhesive tape, applying
Power steering gear, adjusting with new toothed rod
Assembly overview: power steering gear (ZF)
Power steering gear, adjusting (ZF)
Power steering gear, disassembling and reassembling (ZF)
Power steering gear, disassembling
Checking toothed rod for scoring
Sealing ring on toothed rod, replacing
Power steering gear, assembling
Tie rods, removing and installing (power steering gear - TRW and ZF)
Left-hand tie rod length, checking and adjusting
Assembly overview: vane pump, reservoir and hydraulic lines (vehicles with 4-
Cyl. engines)
Assembly overview: Hydraulic lines, reservoir (vehicles with 4-Cyl. engines)
Power steering vane pump, removing and installing (vehicles with 4-Cyl. engines)
V-belts, tensioning (4-Cyl. engines)
Assembly overview: Pressure and cooling lines (vehicles with VR6 engine)
Power steering vane pump, removing and installing (vehicles with VR6 engine]
Page 8 of 369
Downloaded from www.Manualslib.com manuals search engine 00-2
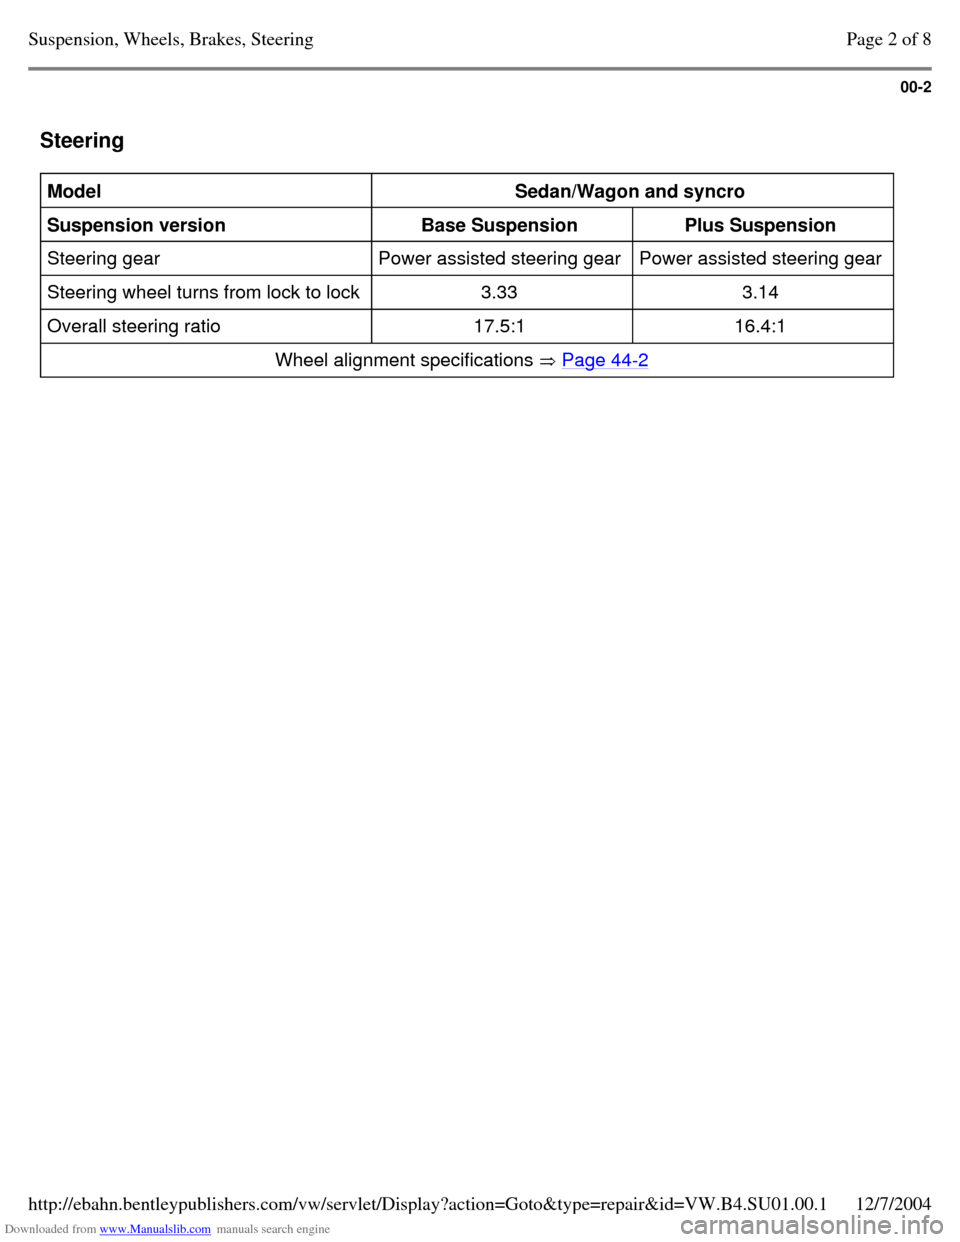
Steering Model
Sedan/Wagon and syncro
Suspension version
Base Suspension
Plus Suspension
Steering gear Power assisted steering gear Power assisted steering gear
Steering wheel turns from lock to lock 3.33 3.14
Overall steering ratio 17.5:1 16.4:1
Wheel alignment specifications Page 44-2 Page 2 of 8Suspension, Wheels, Brakes, Steering12/7/2004http://ebahn.bentleypublishers.com/vw/servlet/Display?action=Goto&type=repair&id=VW.B4.SU01.00.1
Page 285 of 369
Downloaded from www.Manualslib.com manuals search engine 48-15
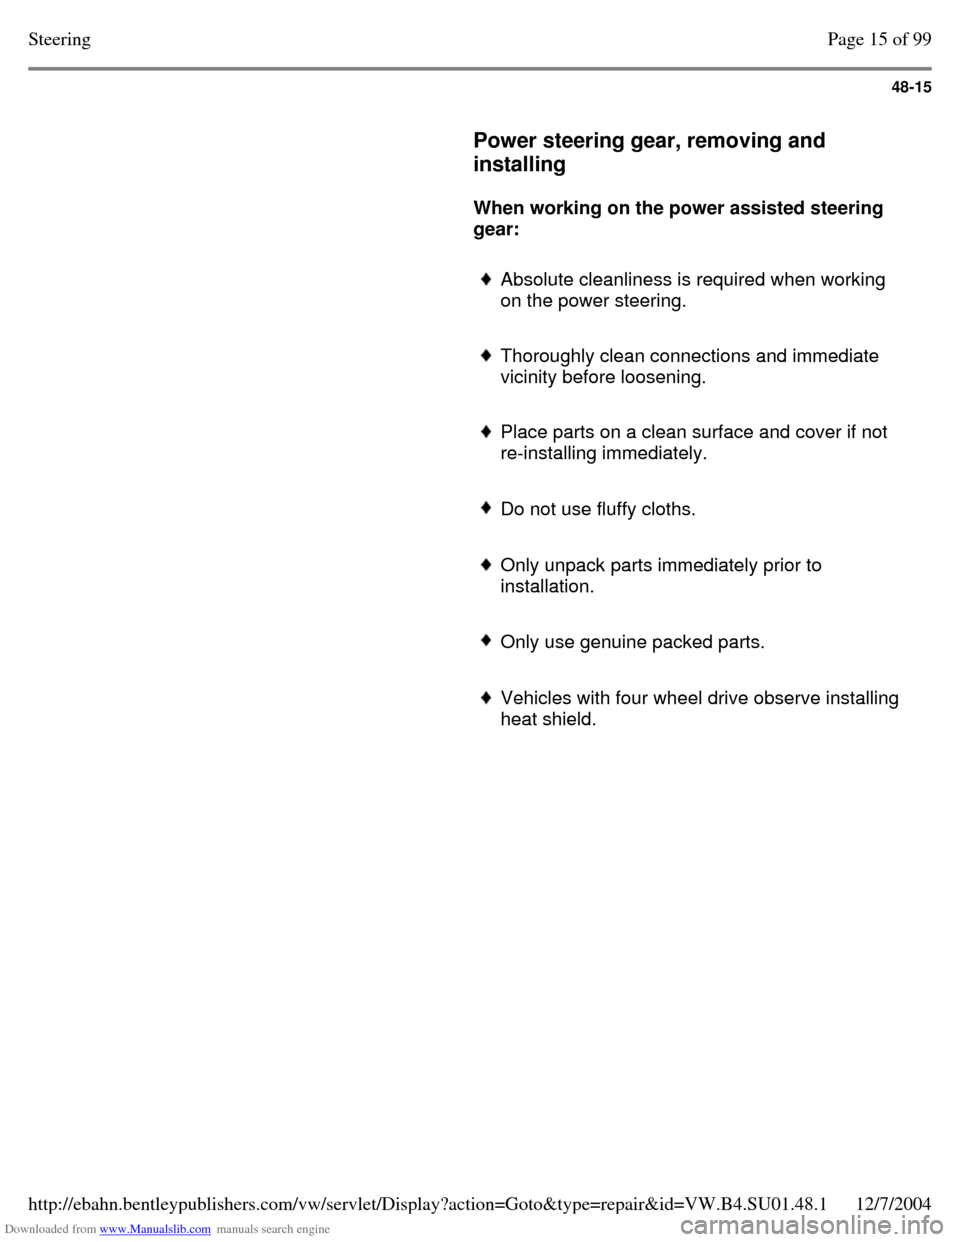
Power steering gear, removing and
installing
When working on the power assisted steering
gear:
Absolute cleanliness is required when working
on the power steering.
Thoroughly clean connections and immediate
vicinity before loosening.
Place parts on a clean surface and cover if not
re-installing immediately.
Do not use fluffy cloths. Only unpack parts immediately prior to
installation.
Only use genuine packed parts. Vehicles with four wheel drive observe installing heat shield. Page 15 of 99Steering12/7/2004http://ebahn.bentleypublishers.com/vw/servlet/Display?action=Goto&type=repair&id=VW.B4.SU01.48.1
Page 286 of 369
Downloaded from www.Manualslib.com manuals search engine 48-16
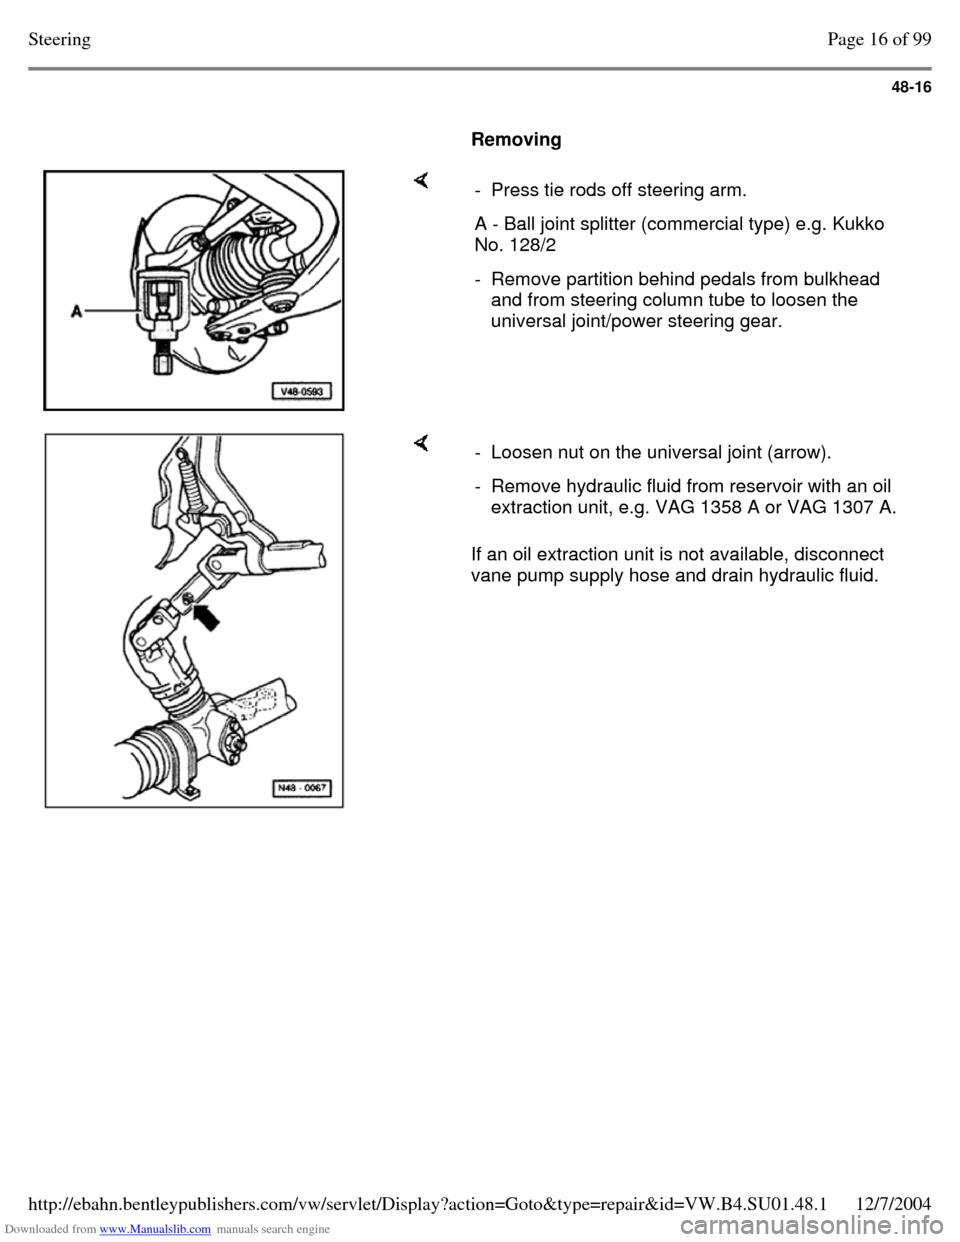
Removing - Press tie rods off steering arm. A - Ball joint splitter (commercial type) e.g. Kukko
No. 128/2
- Remove partition behind pedals from bulkhead
and from steering column tube to loosen the
universal joint/power steering gear. If an oil extraction unit is not available, disconnect
vane pump supply hose and drain hydraulic fluid. - Loosen nut on the universal joint (arrow). - Remove hydraulic fluid from reservoir with an oil
extraction unit, e.g. VAG 1358 A or VAG 1307 A. Page 16 of 99Steering12/7/2004http://ebahn.bentleypublishers.com/vw/servlet/Display?action=Goto&type=repair&id=VW.B4.SU01.48.1
Page 287 of 369
Downloaded from www.Manualslib.com manuals search engine 48-17
Instead of plastic sealing plugs a plug consisting of
Part No.113 301 229 A and banjo bolt, Part No. N
904 674 01 can be used. But when using these,
several 16 mm diameter sealing rings must be used
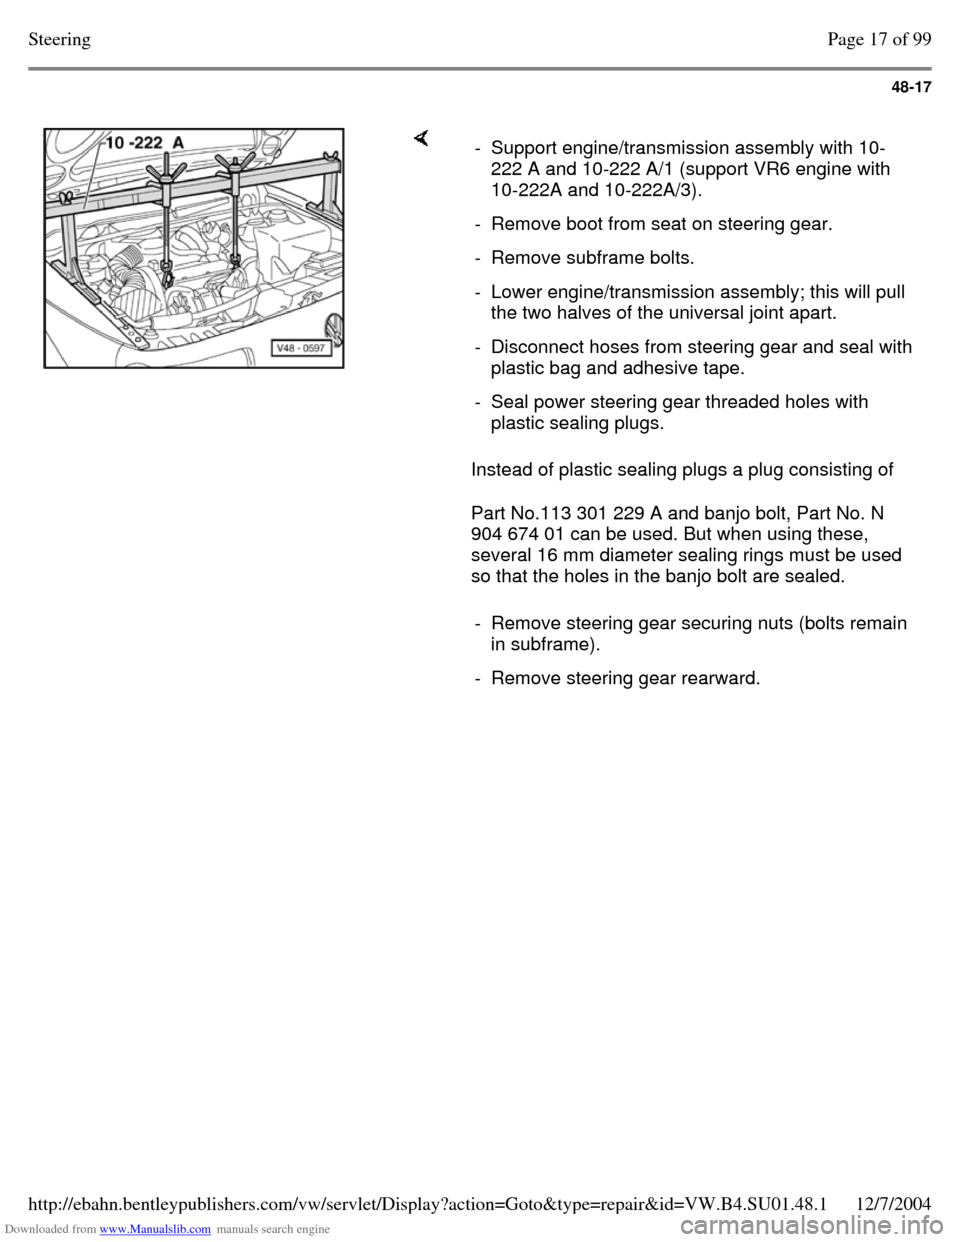
so that the holes in the banjo bolt are sealed. - Support engine/transmission assembly with 10-
222 A and 10-222 A/1 (support VR6 engine with
10-222A and 10-222A/3).
- Remove boot from seat on steering gear. - Remove subframe bolts. - Lower engine/transmission assembly; this will pull
the two halves of the universal joint apart.
- Disconnect hoses from steering gear and seal with plastic bag and adhesive tape.
- Seal power steering gear threaded holes with
plastic sealing plugs.
- Remove steering gear securing nuts (bolts remain
in subframe).
- Remove steering gear rearward. Page 17 of 99Steering12/7/2004http://ebahn.bentleypublishers.com/vw/servlet/Display?action=Goto&type=repair&id=VW.B4.SU01.48.1
Page 289 of 369
Downloaded from www.Manualslib.com manuals search engine 48-19
Assembly overview: power assisted
steering box (TRW)
Determine cause of any malfunctions using
pressure and leak testing, Page 48-13 .
Note:
Always replace self-locking nuts and bolts. Welding and straightening work on steering
components is not permitted.
To grease the rack only use steering gear
grease, Part No. AOF 063 000 04.
Type of oil: Hydraulic oil G 002 000 Oil system capacity: 0.7 - 0.9 ltr. (0.74 - 0.95
qt)
Supply and pressure line routing from Page 48-85 . Page 19 of 99Steering12/7/2004http://ebahn.bentleypublishers.com/vw/servlet/Display?action=Goto&type=repair&id=VW.B4.SU01.48.1
Page 290 of 369
Downloaded from www.Manualslib.com manuals search engine 48-20
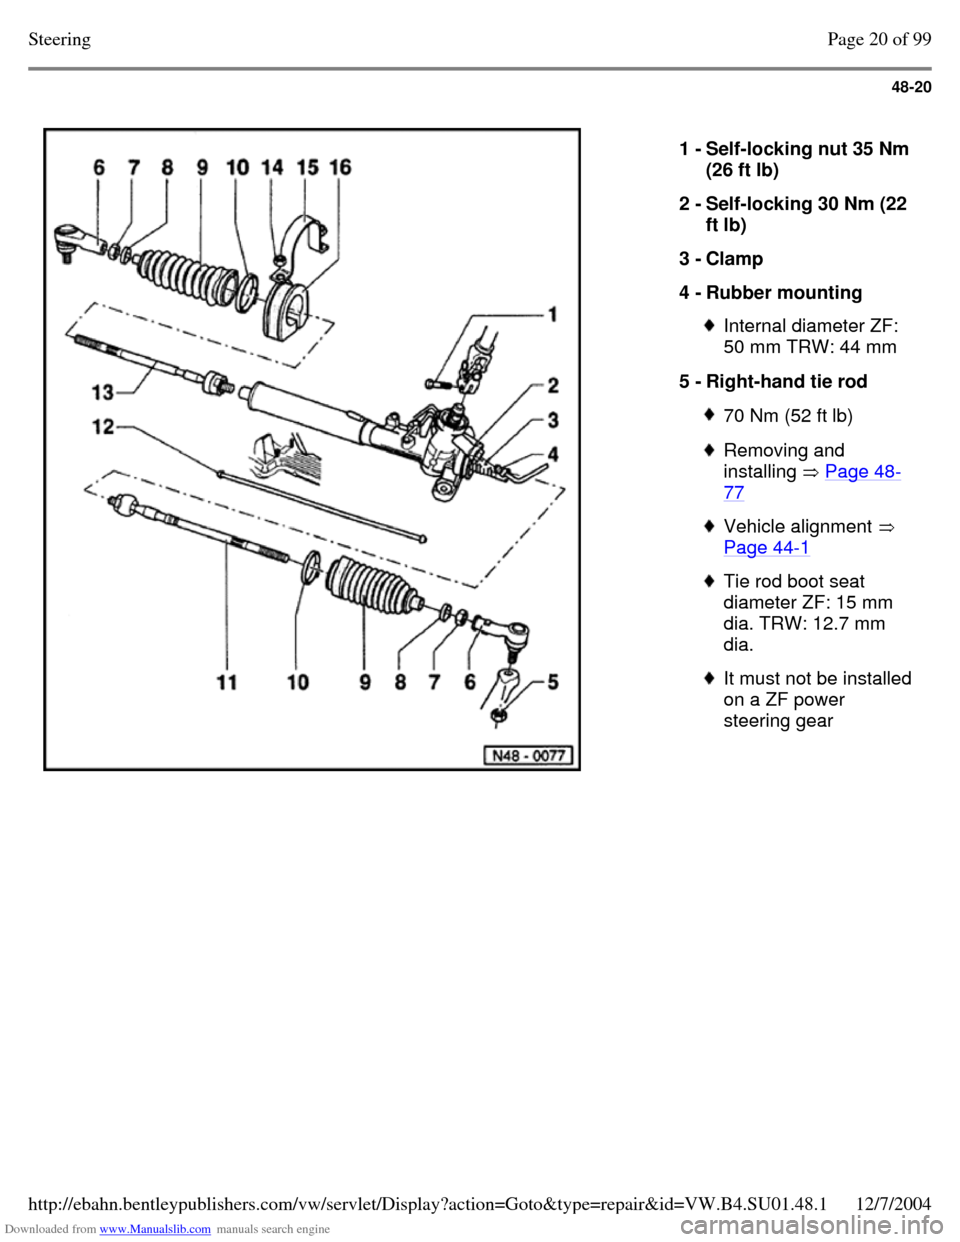
1 - Self-locking nut 35 Nm
(26 ft lb)
2 - Self-locking 30 Nm (22
ft lb)
3 - Clamp
4 - Rubber mounting Internal diameter ZF:
50 mm TRW: 44 mm
5 - Right-hand tie rod 70 Nm (52 ft lb) Removing and
installing Page 48-77 Vehicle alignment
Page 44-1 Tie rod boot seat
diameter ZF: 15 mm
dia. TRW: 12.7 mm
dia. It must not be installed
on a ZF power
steering gear Page 20 of 99Steering12/7/2004http://ebahn.bentleypublishers.com/vw/servlet/Display?action=Goto&type=repair&id=VW.B4.SU01.48.1
Page 291 of 369
Downloaded from www.Manualslib.com manuals search engine 48-21
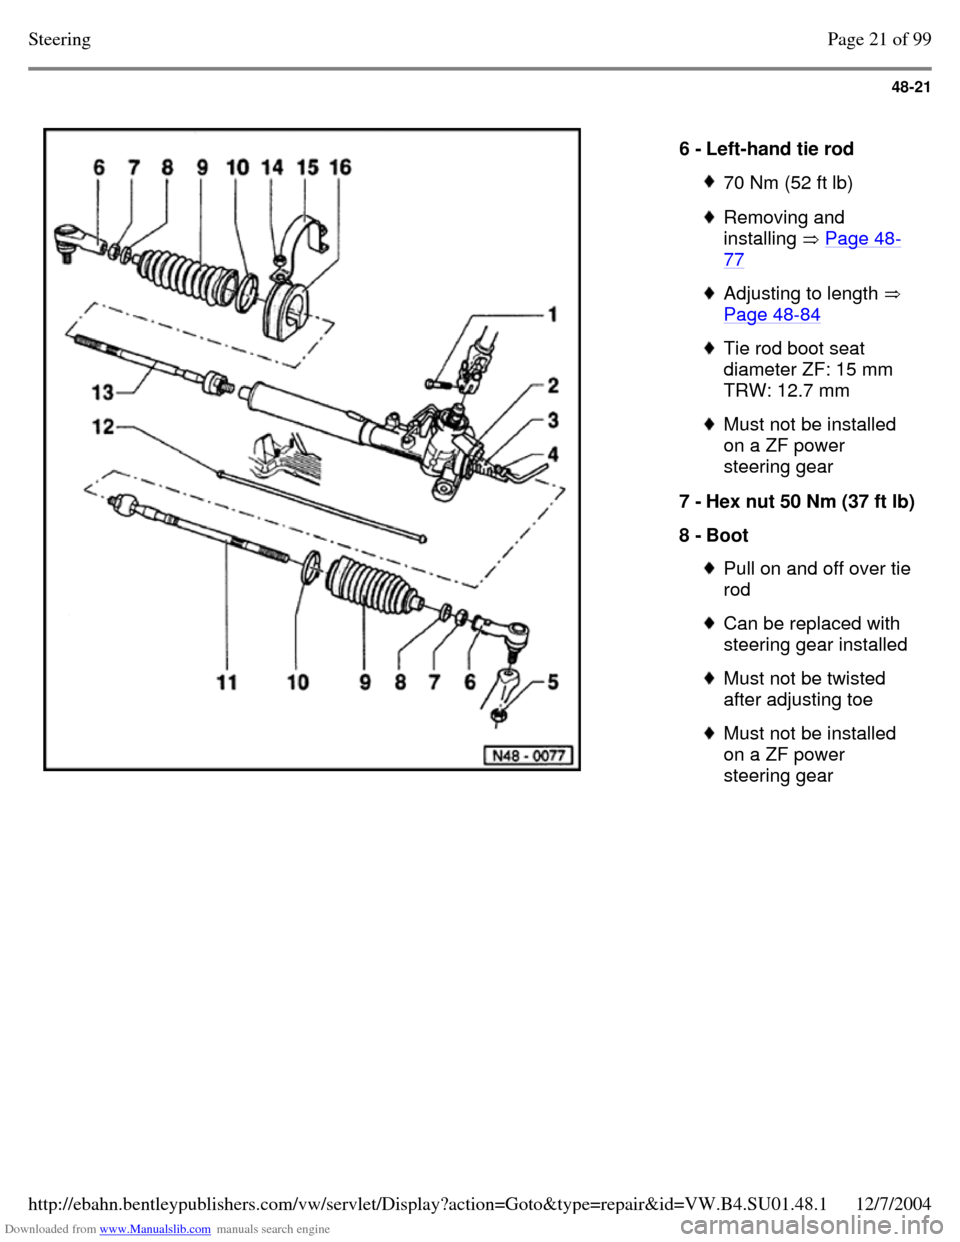
6 - Left-hand tie rod 70 Nm (52 ft lb) Removing and
installing Page 48-77 Adjusting to length
Page 48-84 Tie rod boot seat
diameter ZF: 15 mm
TRW: 12.7 mm Must not be installed
on a ZF power
steering gear
7 - Hex nut 50 Nm (37 ft lb) 8 - Boot Pull on and off over tie
rod Can be replaced with
steering gear installed Must not be twisted
after adjusting toe Must not be installed
on a ZF power
steering gear Page 21 of 99Steering12/7/2004http://ebahn.bentleypublishers.com/vw/servlet/Display?action=Goto&type=repair&id=VW.B4.SU01.48.1
Page 294 of 369
Downloaded from www.Manualslib.com manuals search engine 48-24
Power steering gear, adjusting (TRW)
Note:
Two Mechanics are required when adjusting.
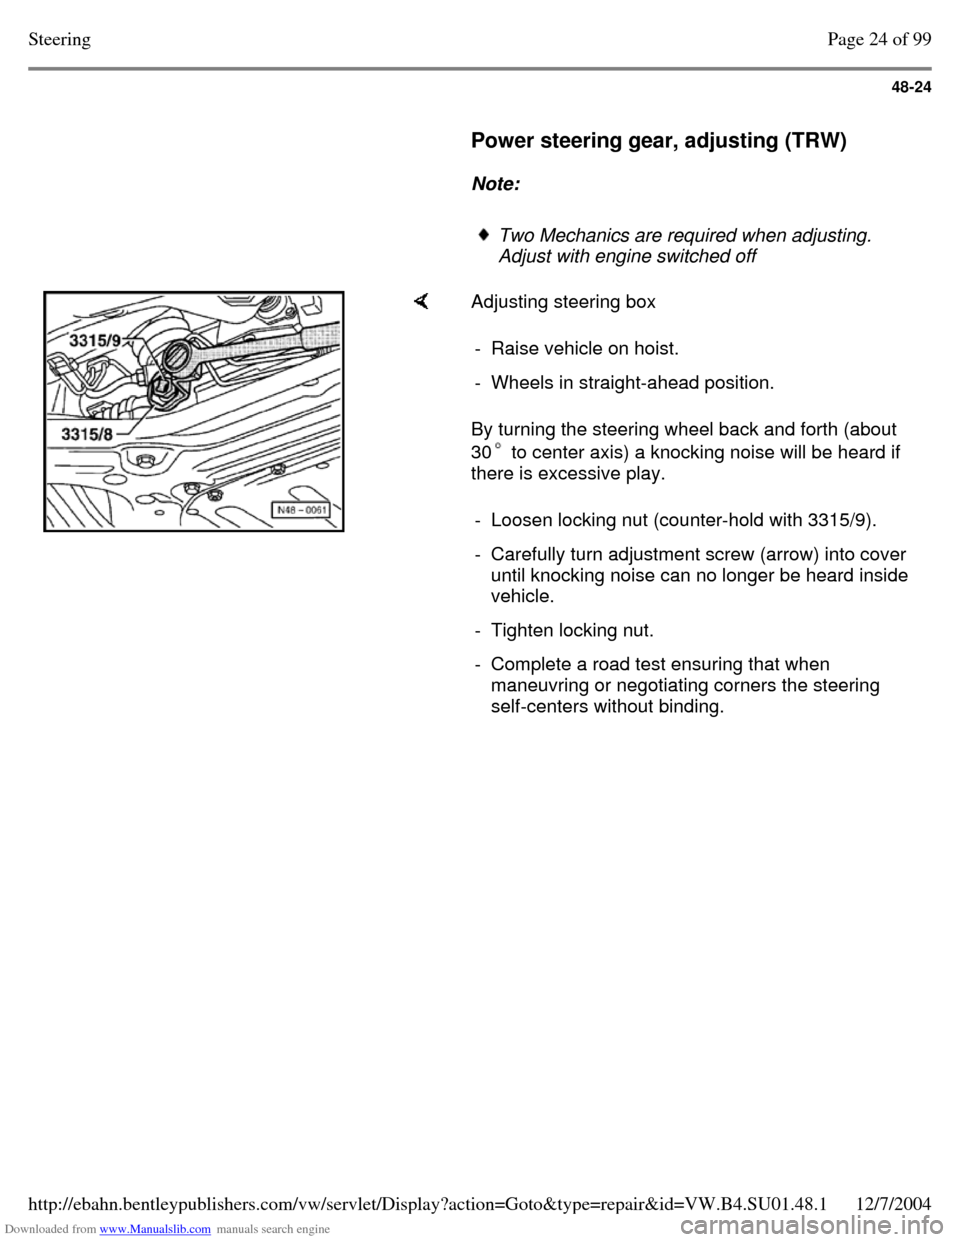
Adjust with engine switched off Adjusting steering box
By turning the steering wheel back and forth (about
30 to center axis) a knocking noise will be heard if
there is excessive play. - Raise vehicle on hoist. - Wheels in straight-ahead position. - Loosen locking nut (counter-hold with 3315/9). - Carefully turn adjustment screw (arrow) into cover
until knocking noise can no longer be heard inside
vehicle.
- Tighten locking nut. - Complete a road test ensuring that when
maneuvring or negotiating corners the steering
self-centers without binding. Page 24 of 99Steering12/7/2004http://ebahn.bentleypublishers.com/vw/servlet/Display?action=Goto&type=repair&id=VW.B4.SU01.48.1
Page 295 of 369
Downloaded from www.Manualslib.com manuals search engine 48-25
Power steering gear, disassembling and
reassembling (TRW)
This repair is limited to replacing the sealing
rings and, if necessary, the toothed rod. Steering
gears that are damaged by an accident must be
replaced.
For a satisfactory and successful repair, the
greatest care, safety and proper tools are
required. The special tool set 3315 that is
pictured is also a part of this.
Note:
Clean hose connections and their surroundings
thoroughly before opening.
Thoroughly clean work place (workbench, vise)
before starting work if necessary place paper
towels on the working surface.
Place parts that have been removed on a clean
surface. If the repair will not be carried out
immediately, cover parts.
Do not use cloths with lint. All the replacement parts that are needed are
contained in the repair kit.
Only take replacement parts out of the package
right before installing. Use only parts in original
packaging.
Always install all of the parts in the repair kit Page 25 of 99Steering12/7/2004http://ebahn.bentleypublishers.com/vw/servlet/Display?action=Goto&type=repair&id=VW.B4.SU01.48.1