VOLKSWAGEN PASSAT 1997 B3, B4 / 3.G Service Workshop Manual
PASSAT 1997 B3, B4 / 3.G
VOLKSWAGEN
VOLKSWAGEN
https://www.carmanualsonline.info/img/18/7419/w960_7419-0.png
VOLKSWAGEN PASSAT 1997 B3, B4 / 3.G Service Workshop Manual
Trending: display, transmission, fuel pressure, spare wheel, change time, clock, Gasket
Page 151 of 369
Downloaded from www.Manualslib.com manuals search engine 42-55
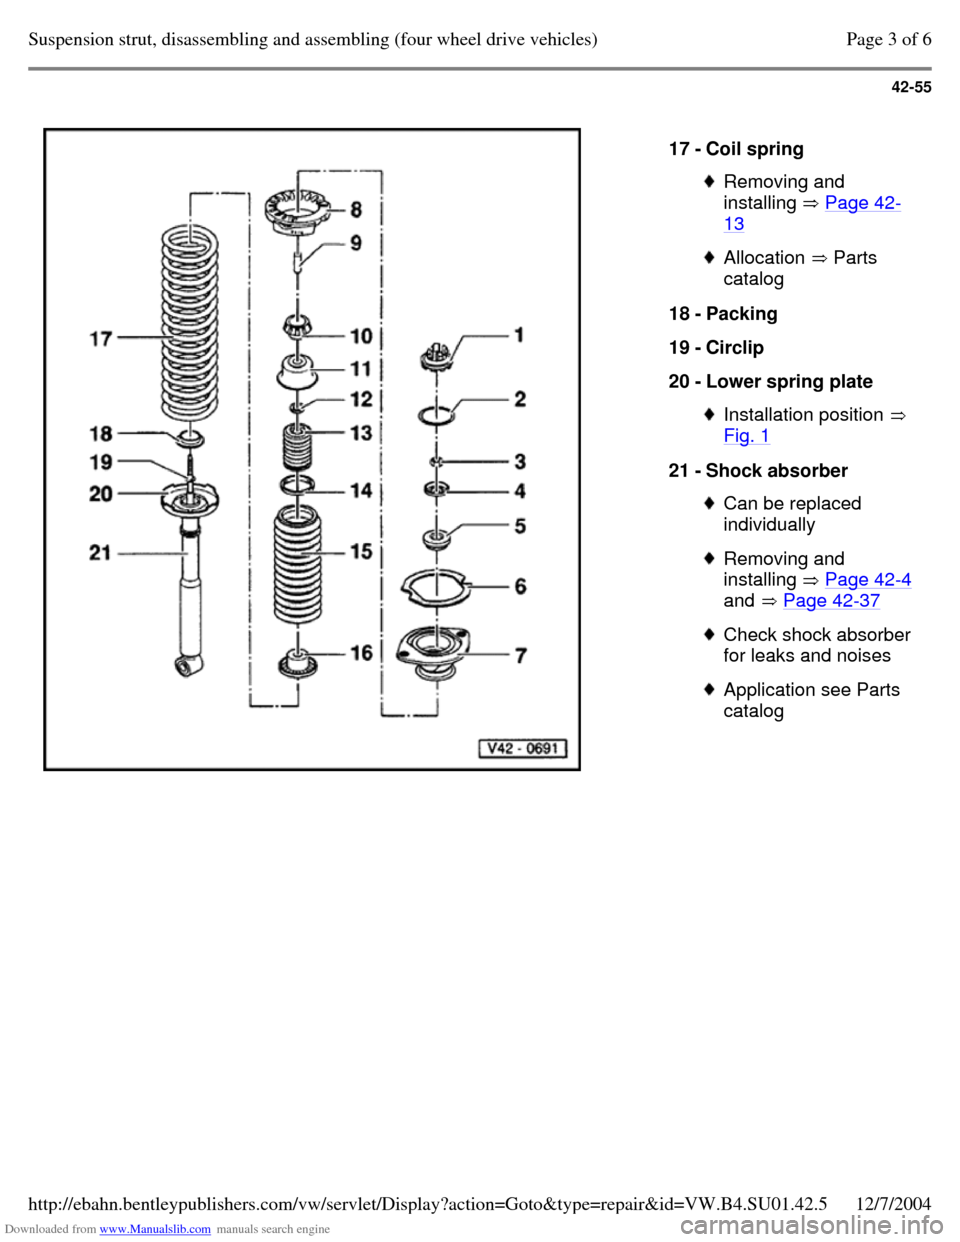
17 - Coil spring Removing and
installing Page 42-13 Allocation Parts
catalog 18 - Packing
19 - Circlip
20 - Lower spring plate Installation position
Fig. 1 21 - Shock absorber Can be replaced
individually Removing and
installing Page 42-4
and Page 42-37 Check shock absorber
for leaks and noises Application see Parts
catalog Page 3 of 6Suspension strut, disassembling and assembling (four wheel drive vehicles)12/7/2004http://ebahn.bentleypublishers.com/vw/servlet/Display?action=Goto&type=repair&id=VW.B4.SU01.42.5
Page 152 of 369
Downloaded from www.Manualslib.com manuals search engine 42-56
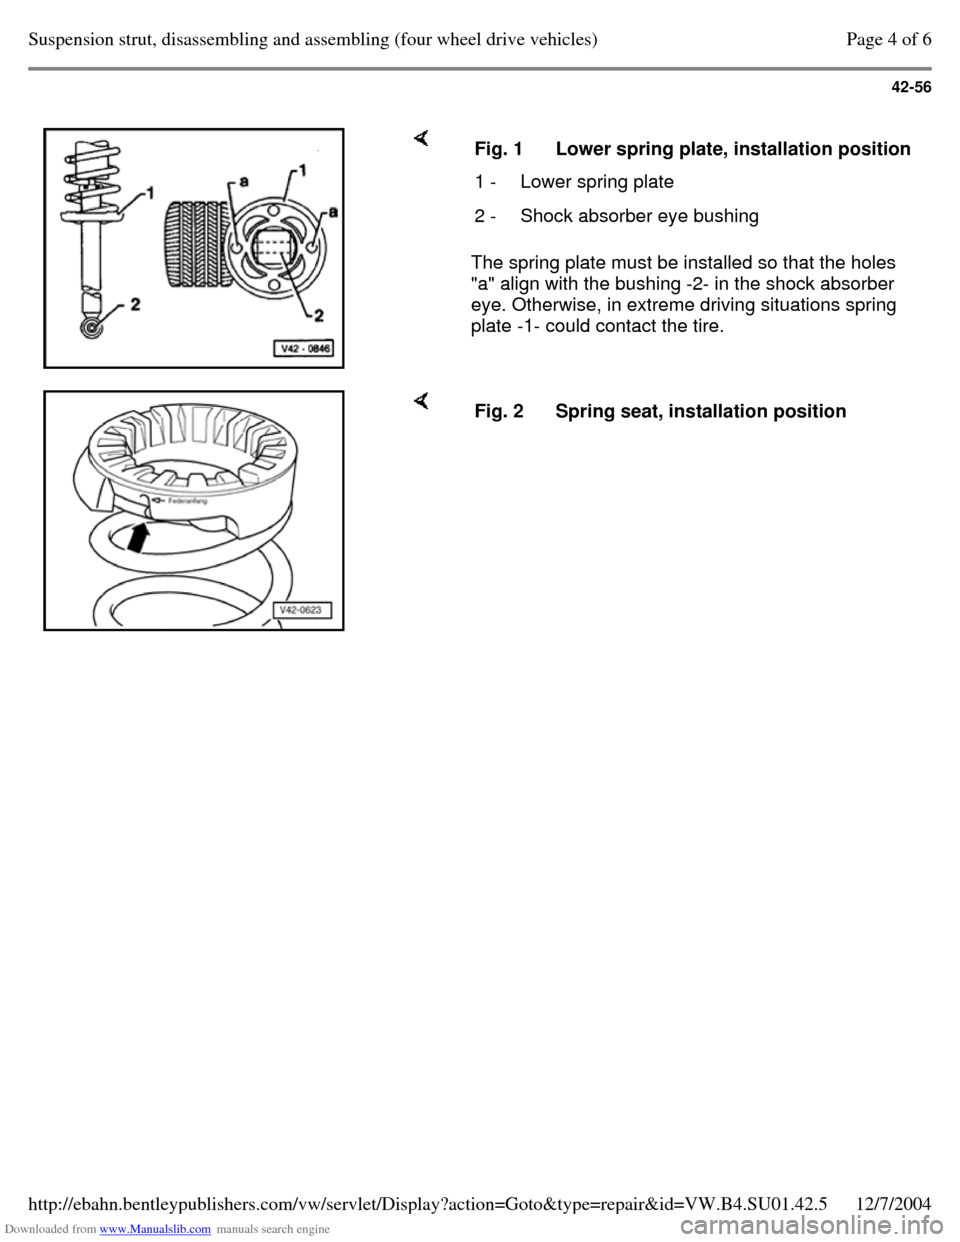
The spring plate must be installed so that the holes
"a" align with the bushing -2- in the shock absorber
eye. Otherwise, in extreme driving situations spring
plate -1- could contact the tire. Fig. 1 Lower spring plate, installation position 1 - Lower spring plate 2 - Shock absorber eye bushing Fig. 2 Spring seat, installation position Page 4 of 6Suspension strut, disassembling and assembling (four wheel drive vehicles)12/7/2004http://ebahn.bentleypublishers.com/vw/servlet/Display?action=Goto&type=repair&id=VW.B4.SU01.42.5
Page 153 of 369
Downloaded from www.Manualslib.com manuals search engine 42-57
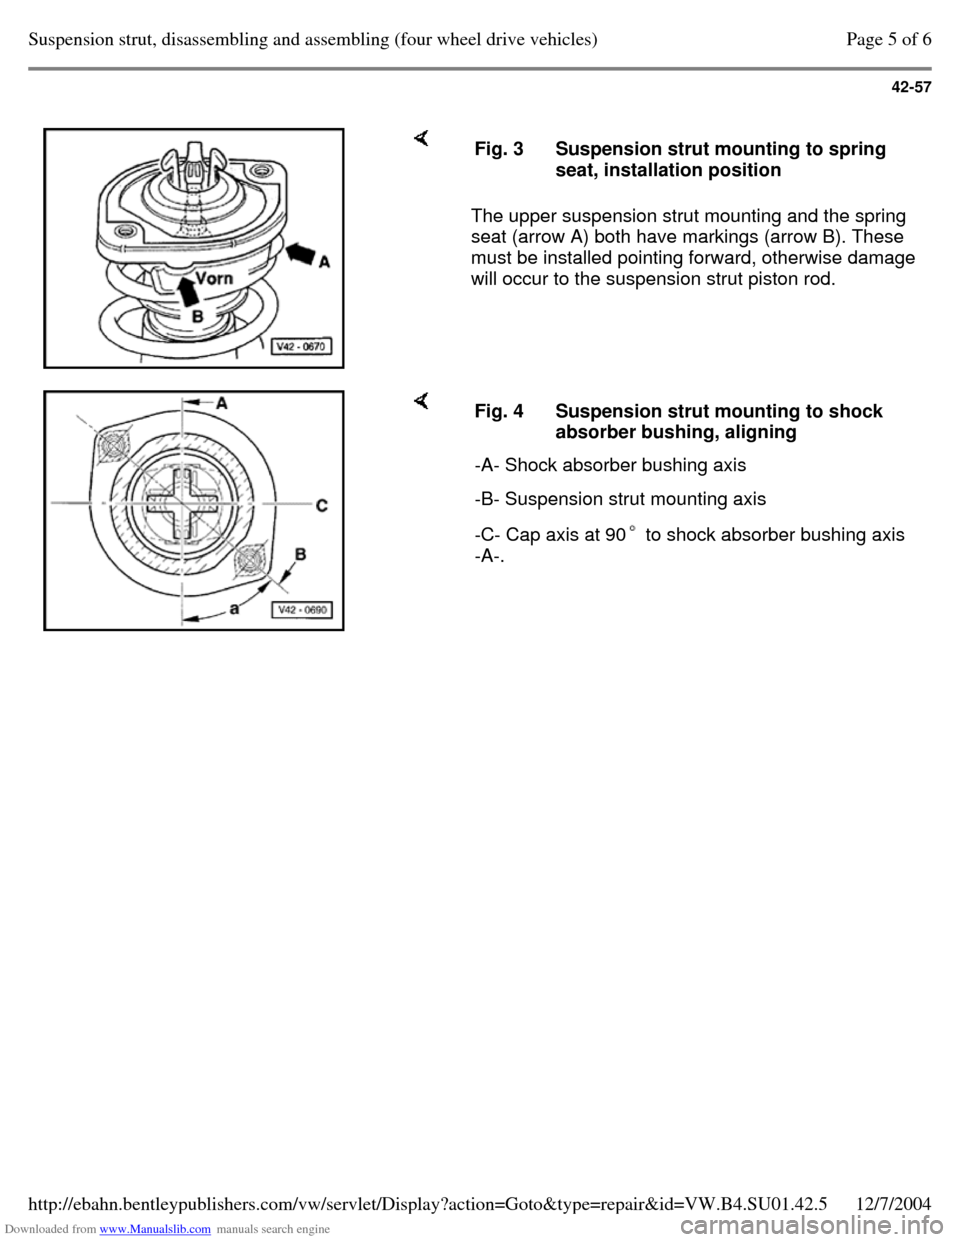
The upper suspension strut mounting and the spring
seat (arrow A) both have markings (arrow B). These
must be installed pointing forward, otherwise damage
will occur to the suspension strut piston rod. Fig. 3 Suspension strut mounting to spring
seat, installation position Fig. 4 Suspension strut mounting to shock
absorber bushing, aligning
-A- Shock absorber bushing axis -B- Suspension strut mounting axis -C- Cap axis at 90 to shock absorber bushing axis
-A-. Page 5 of 6Suspension strut, disassembling and assembling (four wheel drive vehicles)12/7/2004http://ebahn.bentleypublishers.com/vw/servlet/Display?action=Goto&type=repair&id=VW.B4.SU01.42.5
Page 154 of 369
Downloaded from www.Manualslib.com manuals search engine 42-58
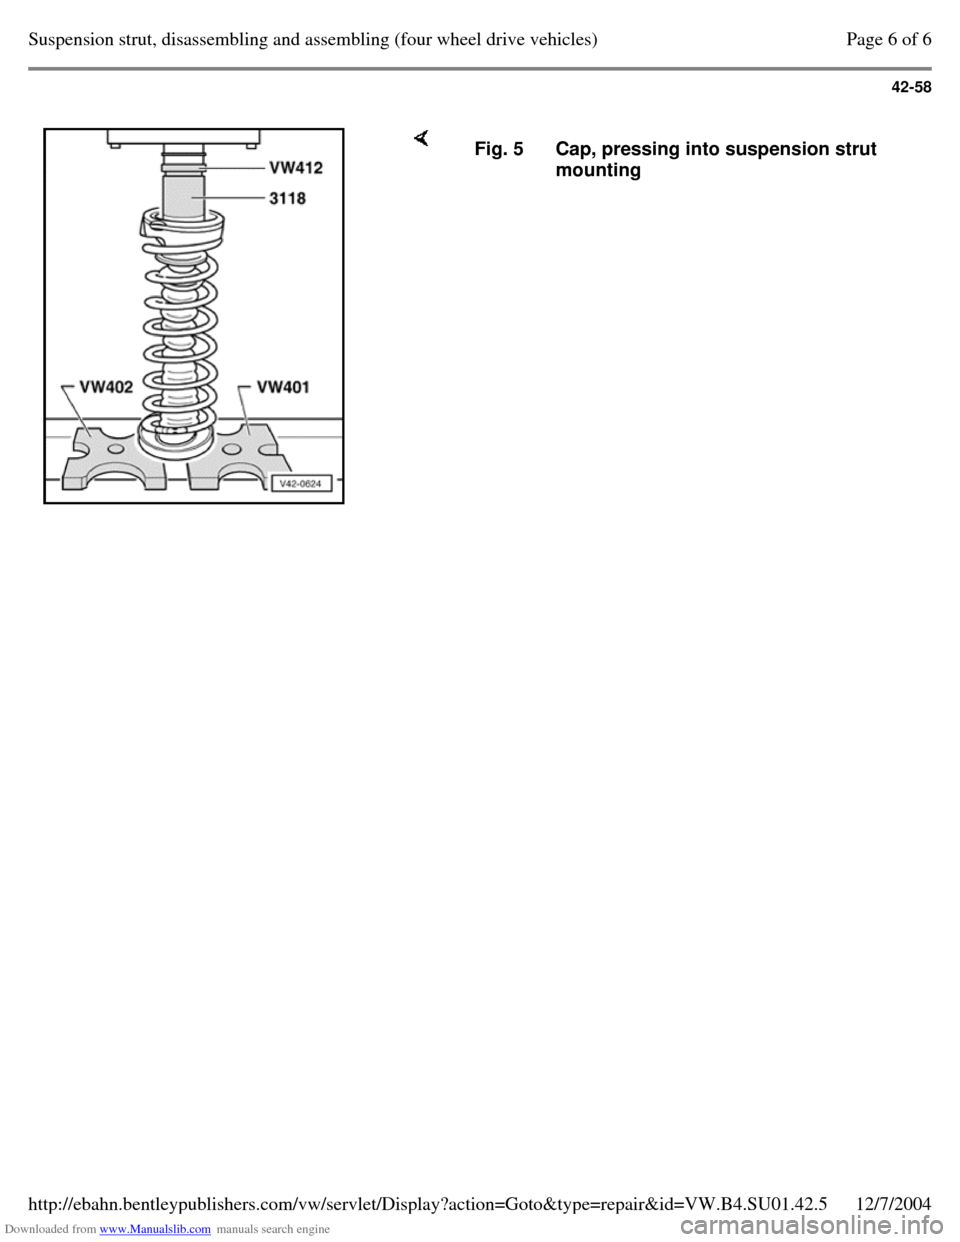
Fig. 5 Cap, pressing into suspension strut
mounting Page 6 of 6Suspension strut, disassembling and assembling (four wheel drive vehicles)12/7/2004http://ebahn.bentleypublishers.com/vw/servlet/Display?action=Goto&type=repair&id=VW.B4.SU01.42.5
Page 155 of 369
Downloaded from www.Manualslib.com manuals search engine 42-59
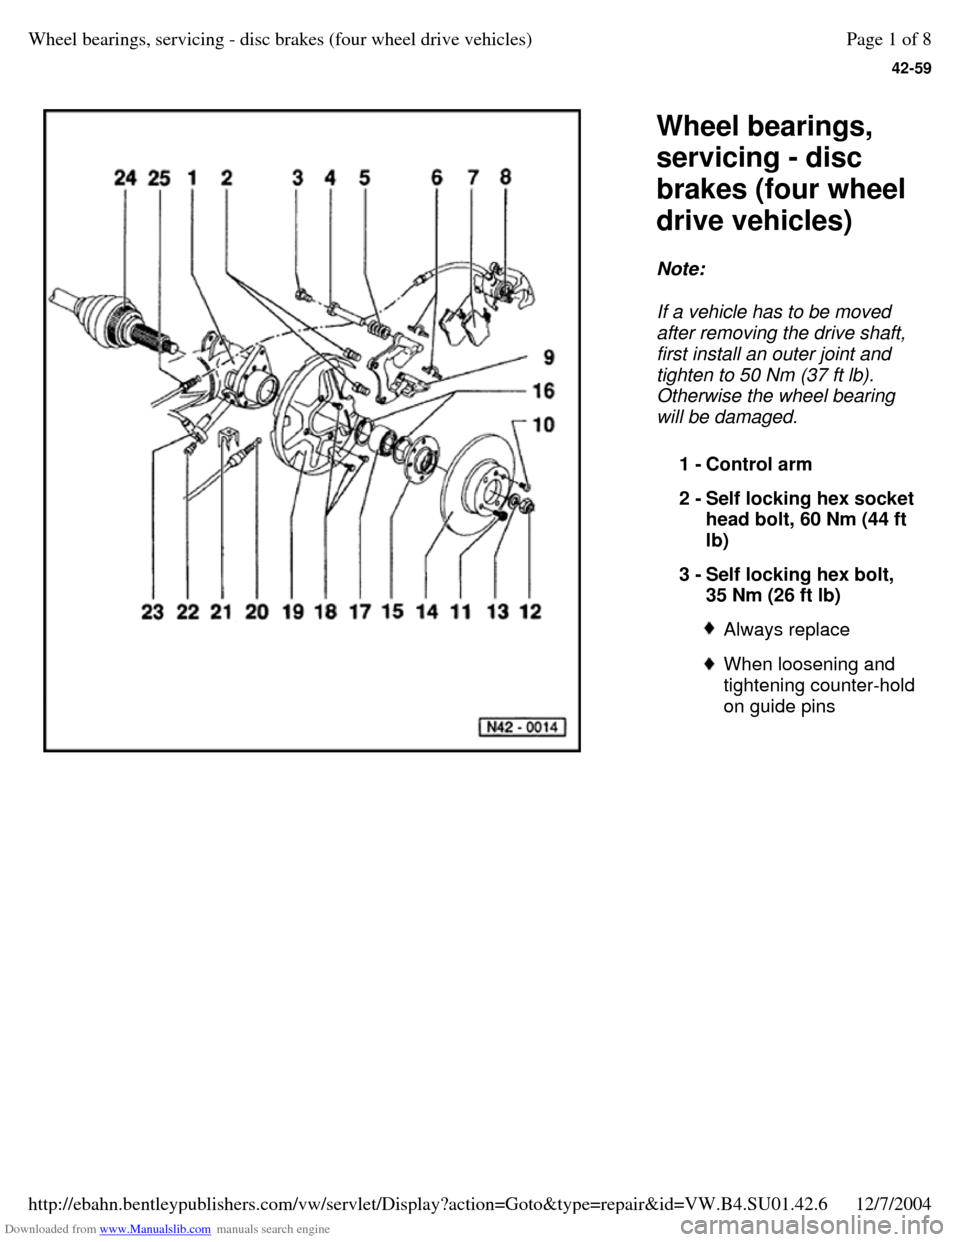
Wheel bearings,
servicing - disc
brakes (four wheel
drive vehicles)
Note:
If a vehicle has to be moved
after removing the drive shaft,
first install an outer joint and
tighten to 50 Nm (37 ft lb).
Otherwise the wheel bearing
will be damaged.
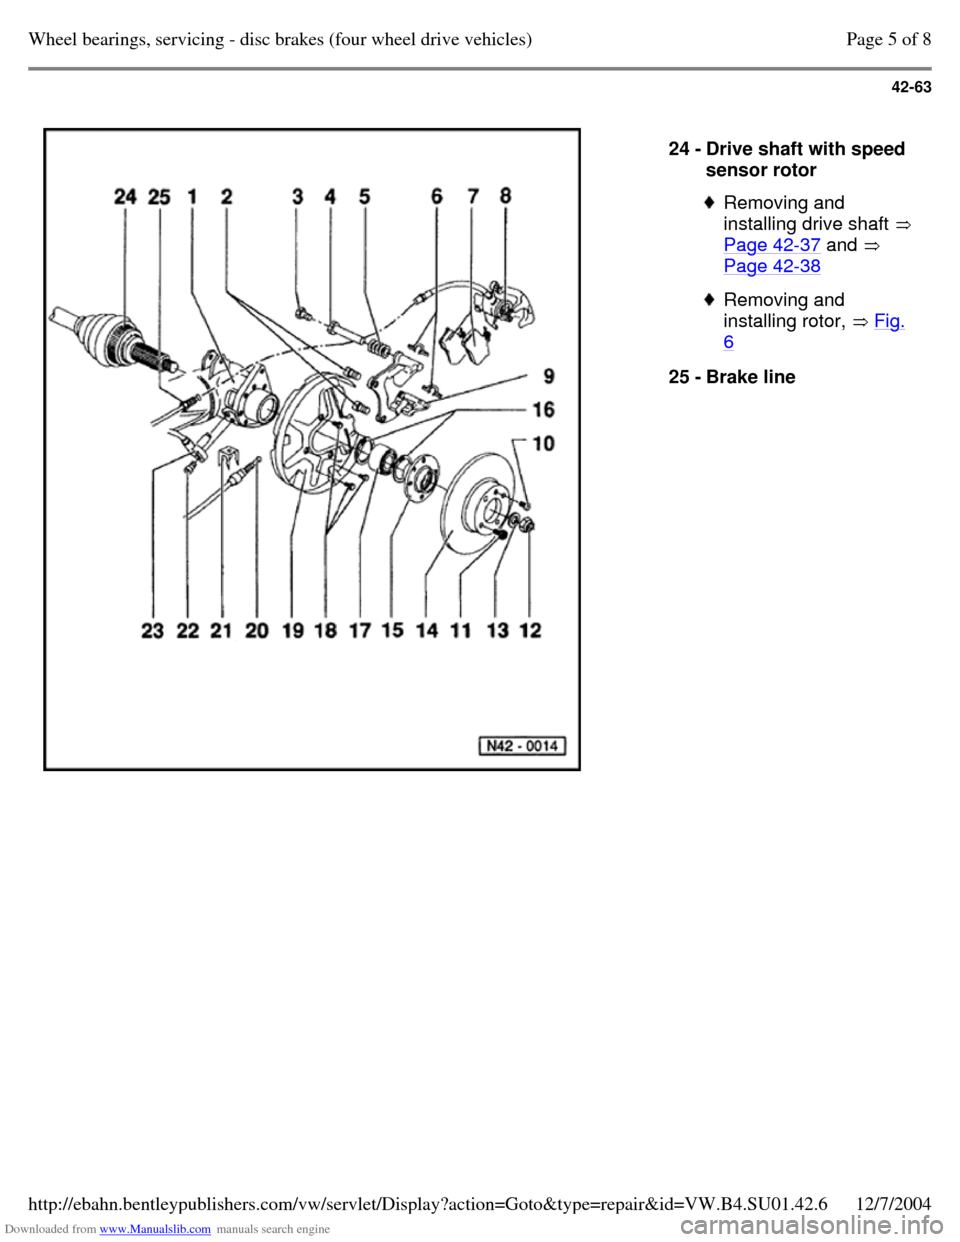
1 - Control arm
2 - Self locking hex socket head bolt, 60 Nm (44 ft
lb)
3 - Self locking hex bolt,
35 Nm (26 ft lb) Always replace When loosening and
tightening counter-hold on guide pins Page 1 of 8Wheel bearings, servicing - disc brakes (four wheel drive vehicles)12/7/2004http://ebahn.bentleypublishers.com/vw/servlet/Display?action=Goto&type=repair&id=VW.B4.SU01.42.6
Page 156 of 369
Downloaded from www.Manualslib.com manuals search engine 42-60
Repair Manual, Suspension, Wheels, Brakes, Steering, Repair Group 46
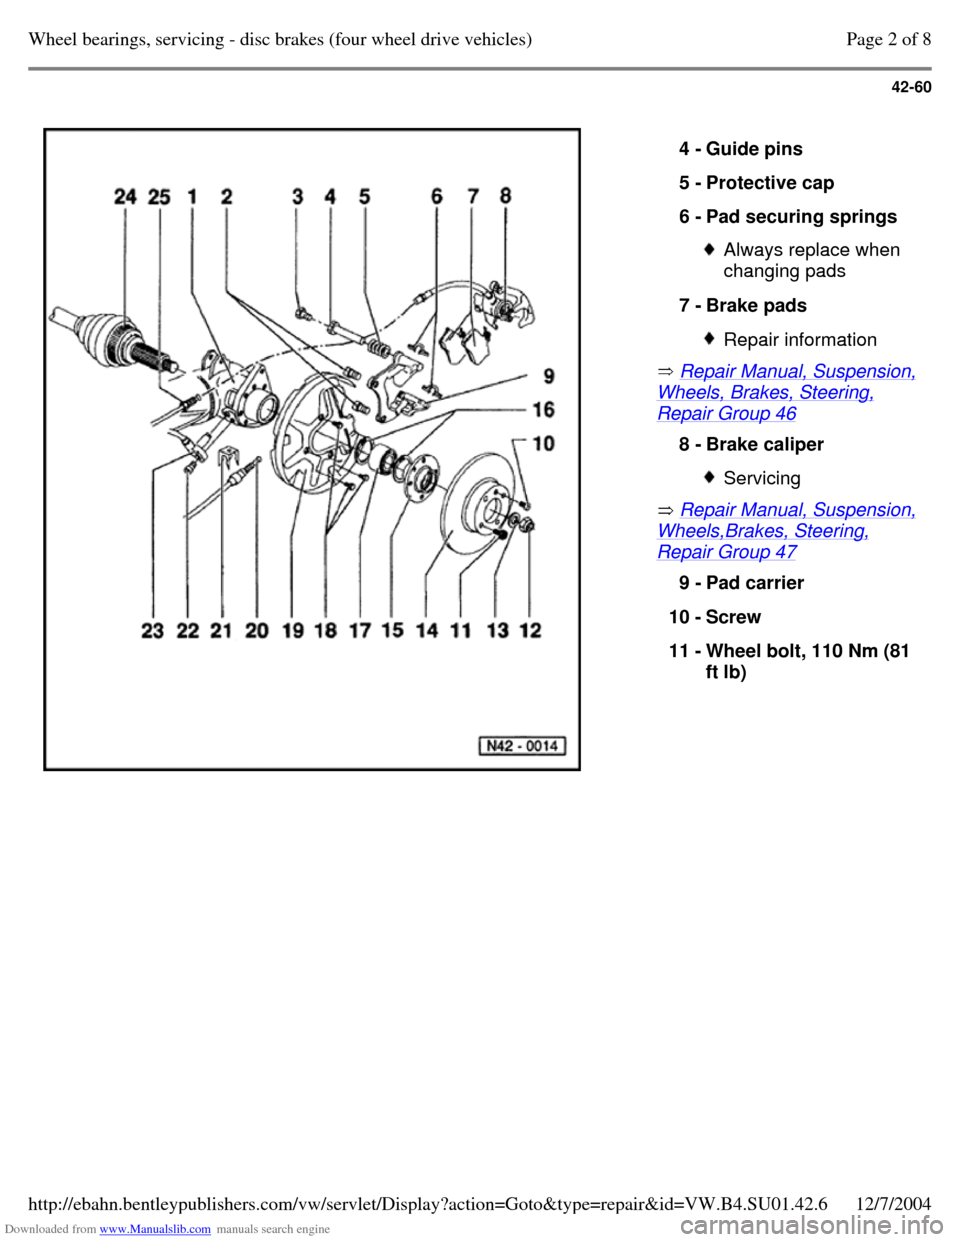
Repair Manual, Suspension, Wheels,Brakes, Steering, Repair Group 47 4 - Guide pins
5 - Protective cap
6 - Pad securing springs Always replace when
changing pads
7 - Brake pads Repair information 8 - Brake caliper Servicing 9 - Pad carrier
10 - Screw
11 - Wheel bolt, 110 Nm (81
ft lb) Page 2 of 8Wheel bearings, servicing - disc brakes (four wheel drive vehicles)12/7/2004http://ebahn.bentleypublishers.com/vw/servlet/Display?action=Goto&type=repair&id=VW.B4.SU01.42.6
Page 157 of 369
Downloaded from www.Manualslib.com manuals search engine 42-61
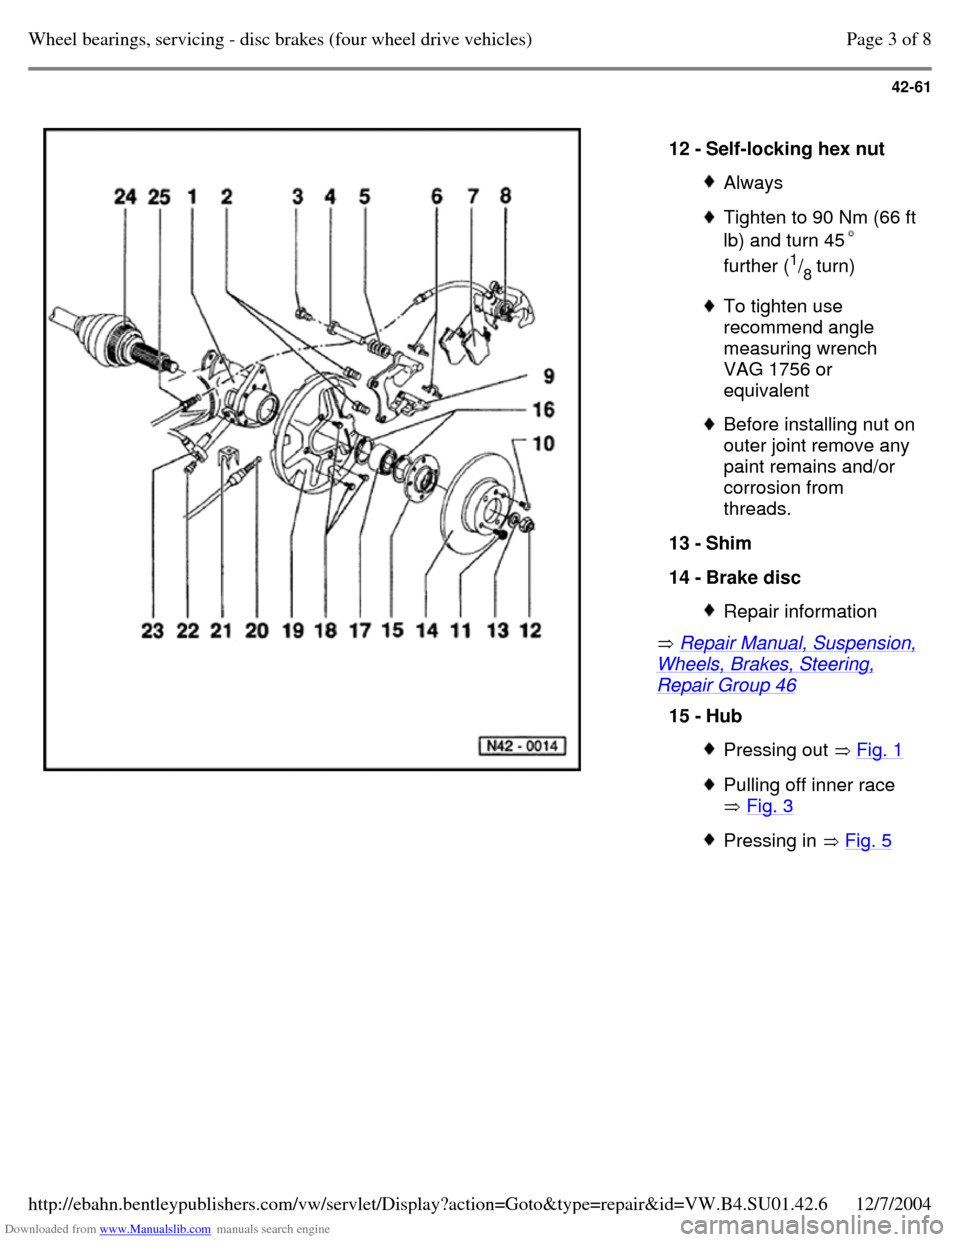
Repair Manual, Suspension, Wheels, Brakes, Steering, Repair Group 46 12 - Self-locking hex nut Always Tighten to 90 Nm (66 ft lb) and turn 45
further (1
/
8 turn) To tighten use
recommend angle
measuring wrench
VAG 1756 or
equivalent Before installing nut on outer joint remove any
paint remains and/or
corrosion from
threads.
13 - Shim
14 - Brake disc Repair information 15 - Hub Pressing out Fig. 1 Pulling off inner race
Fig. 3 Pressing in Fig. 5 Page 3 of 8Wheel bearings, servicing - disc brakes (four wheel drive vehicles)12/7/2004http://ebahn.bentleypublishers.com/vw/servlet/Display?action=Goto&type=repair&id=VW.B4.SU01.42.6
Page 158 of 369
Downloaded from www.Manualslib.com manuals search engine 42-62
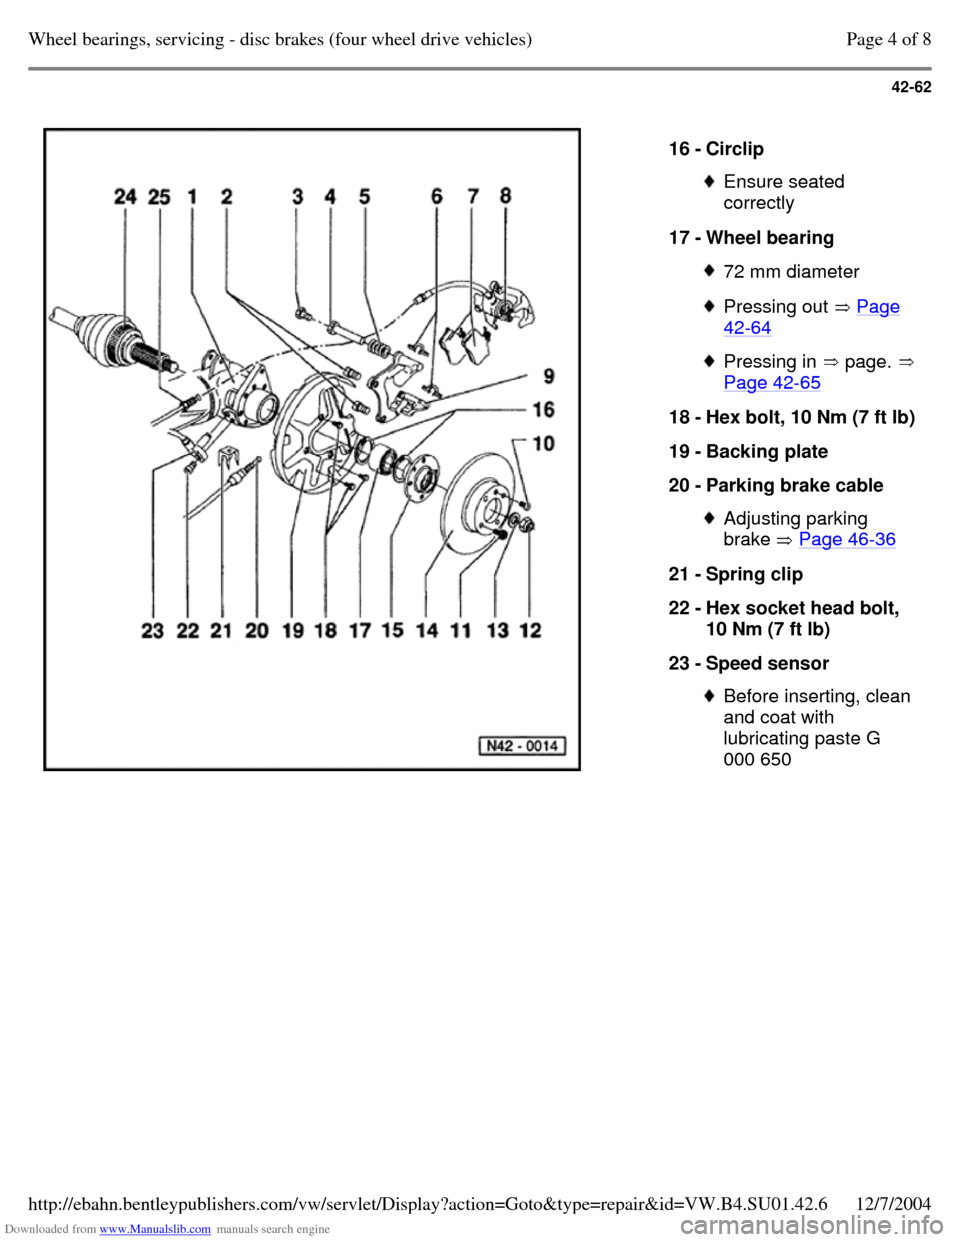
16 - Circlip Ensure seated
correctly
17 - Wheel bearing 72 mm diameter Pressing out Page 42-64 Pressing in page. Page 42-65 18 - Hex bolt, 10 Nm (7 ft lb) 19 - Backing plate
20 - Parking brake cable Adjusting parking
brake Page 46-36 21 - Spring clip
22 - Hex socket head bolt,
10 Nm (7 ft lb)
23 - Speed sensor Before inserting, clean
and coat with
lubricating paste G
000 650 Page 4 of 8Wheel bearings, servicing - disc brakes (four wheel drive vehicles)12/7/2004http://ebahn.bentleypublishers.com/vw/servlet/Display?action=Goto&type=repair&id=VW.B4.SU01.42.6
Page 159 of 369
Downloaded from www.Manualslib.com manuals search engine 42-63
24 - Drive shaft with speed
sensor rotor Removing and
installing drive shaft
Page 42-37 and
Page 42-38 Removing and
installing rotor, Fig. 6 25 - Brake line Page 5 of 8Wheel bearings, servicing - disc brakes (four wheel drive vehicles)12/7/2004http://ebahn.bentleypublishers.com/vw/servlet/Display?action=Goto&type=repair&id=VW.B4.SU01.42.6
Page 160 of 369
Downloaded from www.Manualslib.com manuals search engine 42-64
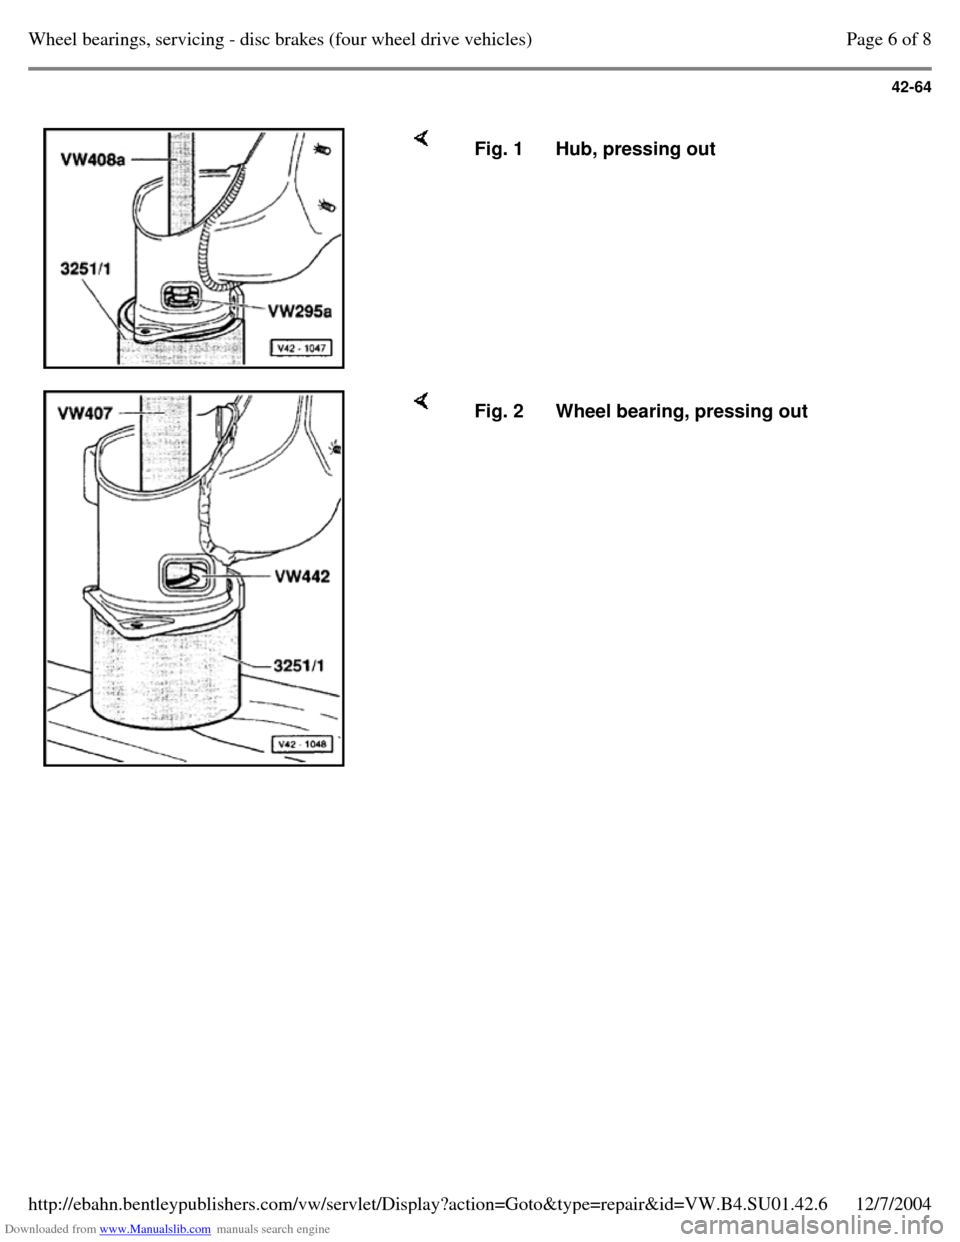
Fig. 1 Hub, pressing out Fig. 2 Wheel bearing, pressing out Page 6 of 8Wheel bearings, servicing - disc brakes (four wheel drive vehicles)12/7/2004http://ebahn.bentleypublishers.com/vw/servlet/Display?action=Goto&type=repair&id=VW.B4.SU01.42.6
Trending: steering, spare wheel, maintenance, center console, spare tire, brake pads replacement, Engine
