lock VOLKSWAGEN PASSAT 2010 Manual PDF
[x] Cancel search | Manufacturer: VOLKSWAGEN, Model Year: 2010, Model line: PASSAT, Model: VOLKSWAGEN PASSAT 2010Pages: 392, PDF Size: 4.1 MB
Page 376 of 392

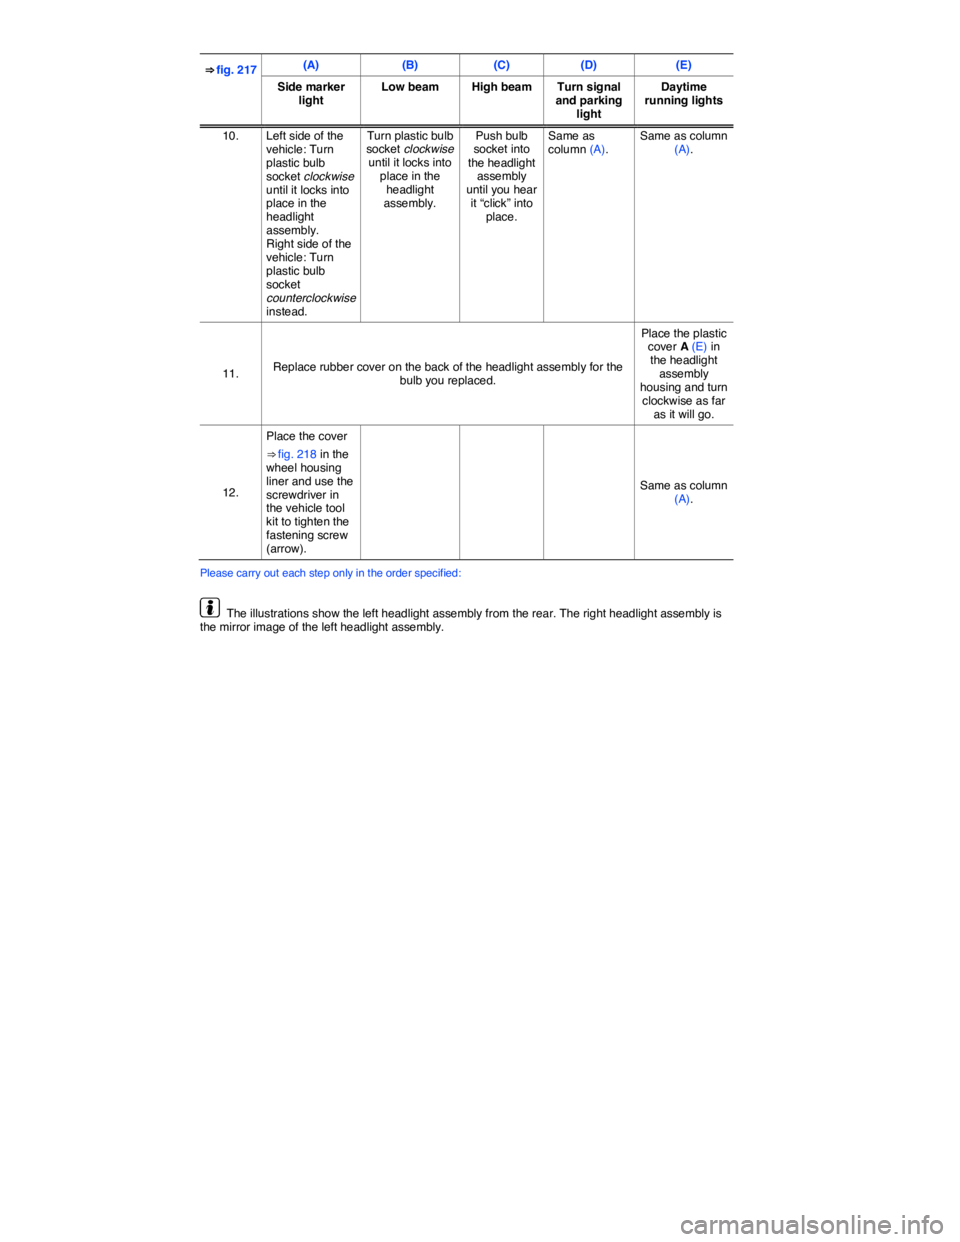
⇒ fig. 217 (A) (B) (C) (D) (E)
Side marker light Low beam High beam Turn signal and parking light
Daytime running lights
10. Left side of the vehicle: Turn plastic bulb socket clockwise until it locks into place in the headlight assembly. Right side of the vehicle: Turn plastic bulb socket counterclockwise instead.
Turn plastic bulb socket clockwise until it locks into place in the headlight assembly.
Push bulb socket into the headlight assembly until you hear it “click” into place.
Same as column (A). Same as column (A).
11. Replace rubber cover on the back of the headlight assembly for the bulb you replaced.
Place the plastic cover A (E) in the headlight assembly housing and turn clockwise as far as it will go.
12.
Place the cover
⇒ fig. 218 in the wheel housing liner and use the screwdriver in the vehicle tool kit to tighten the fastening screw (arrow).
Same as column (A).
Please carry out each step only in the order specified:
The illustrations show the left headlight assembly from the rear. The right headlight assembly is the mirror image of the left headlight assembly.
Page 379 of 392

381
Please carry out each step only in the order specified:
3. Using the flat blade of the screwdriver in the vehicle tool kit carefully pry the cover out of
the slot ⇒ fig. 221 A (1) (arrow).
4. Pull the red locking tab B (4) in the direction of the arrow to unlock connector plug B (2).
5. Push catch B (5) to release connector plug. Then pull out connector plug B (2).
6. Remove the cover from the side of the taillight, sliding it in the direction of the arrow B. Check the original mounting position of the taillight before removing it.
7. Unscrew the fastening screws B (3) with screwdriver and carefully remove the taillight assembly from the luggage compartment lid. Pull it to the side and away from the vehicle body and place it on a clean, smooth surface.
8. Unlock the bulb socket assembly by pressing the locking tabs in direction of the arrow
⇒ fig. 222 A and remove the bulb socket assembly from the taillight assembly.
9. Replace the burned out light bulb with a new bulb of the same type B.
10. Reinsert the bulb socket assembly in the taillight assembly. The locking tabs must latch with an audible “click.”
11.
Carefully reinsert the taillight assembly into the opening in the luggage compartment lid. Hold the rear light assembly with one hand in the installation position, and with the other
hand tighten the fastening screws ⇒ fig. 221 B (3).
12. Plug connector plug B (2) into the bulb socket and push red locking tab B (4) in the direction opposite to the arrow.
13. Check the taillight assembly for proper installation and secure fit.
14. Attach the cover. The cover must latch tightly and securely into place.
15. Close the luggage compartment lid ⇒ page 57.
Different models may have different taillights, and the light bulb may be in a different location than shown in the illustrations.
Page 381 of 392

383
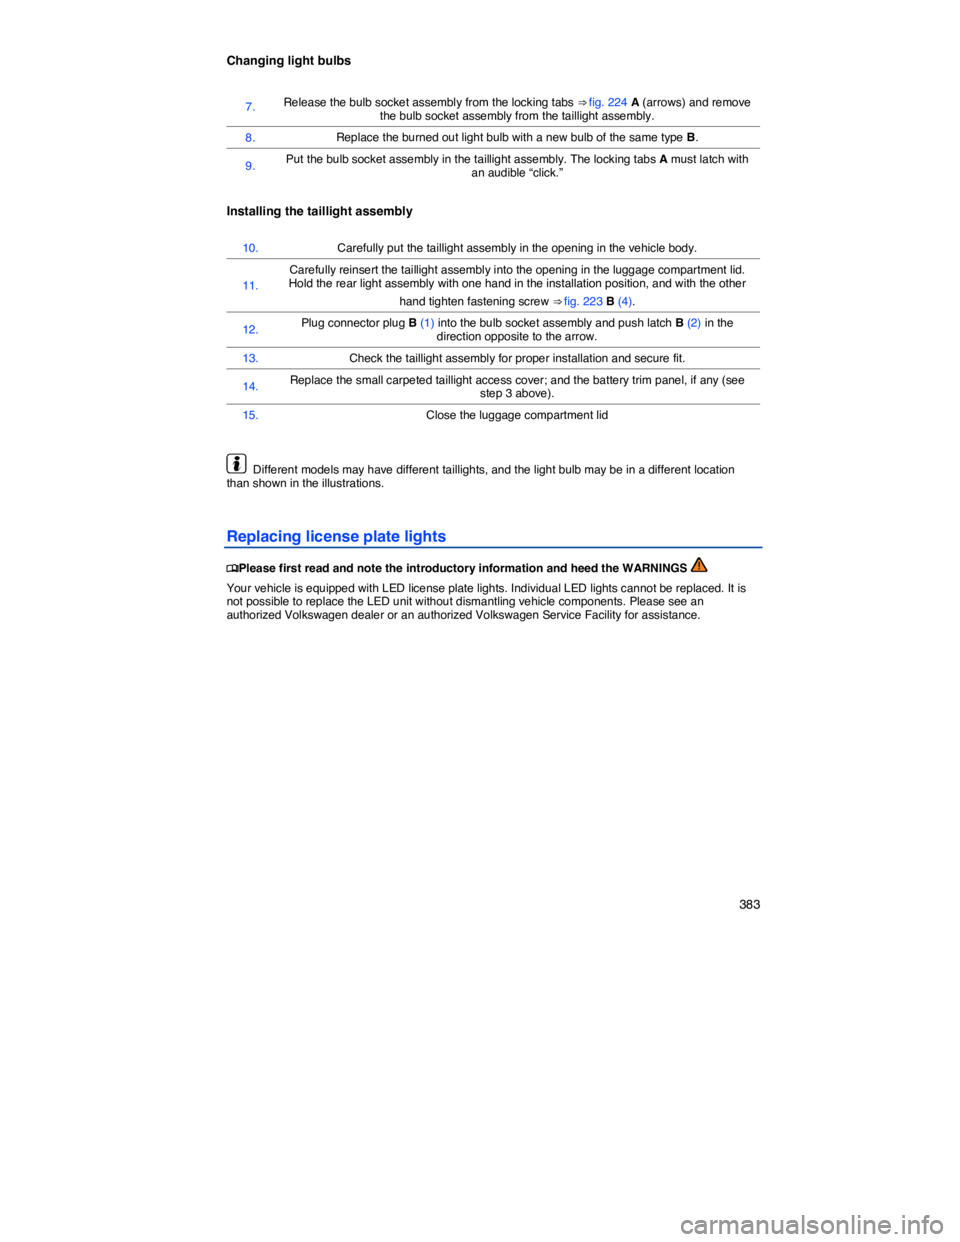
Changing light bulbs
7. Release the bulb socket assembly from the locking tabs ⇒ fig. 224 A (arrows) and remove the bulb socket assembly from the taillight assembly.
8. Replace the burned out light bulb with a new bulb of the same type B.
9. Put the bulb socket assembly in the taillight assembly. The locking tabs A must latch with an audible “click.”
Installing the taillight assembly
10. Carefully put the taillight assembly in the opening in the vehicle body.
11.
Carefully reinsert the taillight assembly into the opening in the luggage compartment lid. Hold the rear light assembly with one hand in the installation position, and with the other
hand tighten fastening screw ⇒ fig. 223 B (4).
12. Plug connector plug B (1) into the bulb socket assembly and push latch B (2) in the direction opposite to the arrow.
13. Check the taillight assembly for proper installation and secure fit.
14. Replace the small carpeted taillight access cover; and the battery trim panel, if any (see step 3 above).
15. Close the luggage compartment lid
Different models may have different taillights, and the light bulb may be in a different location than shown in the illustrations.
Replacing license plate lights
�
Page 390 of 392

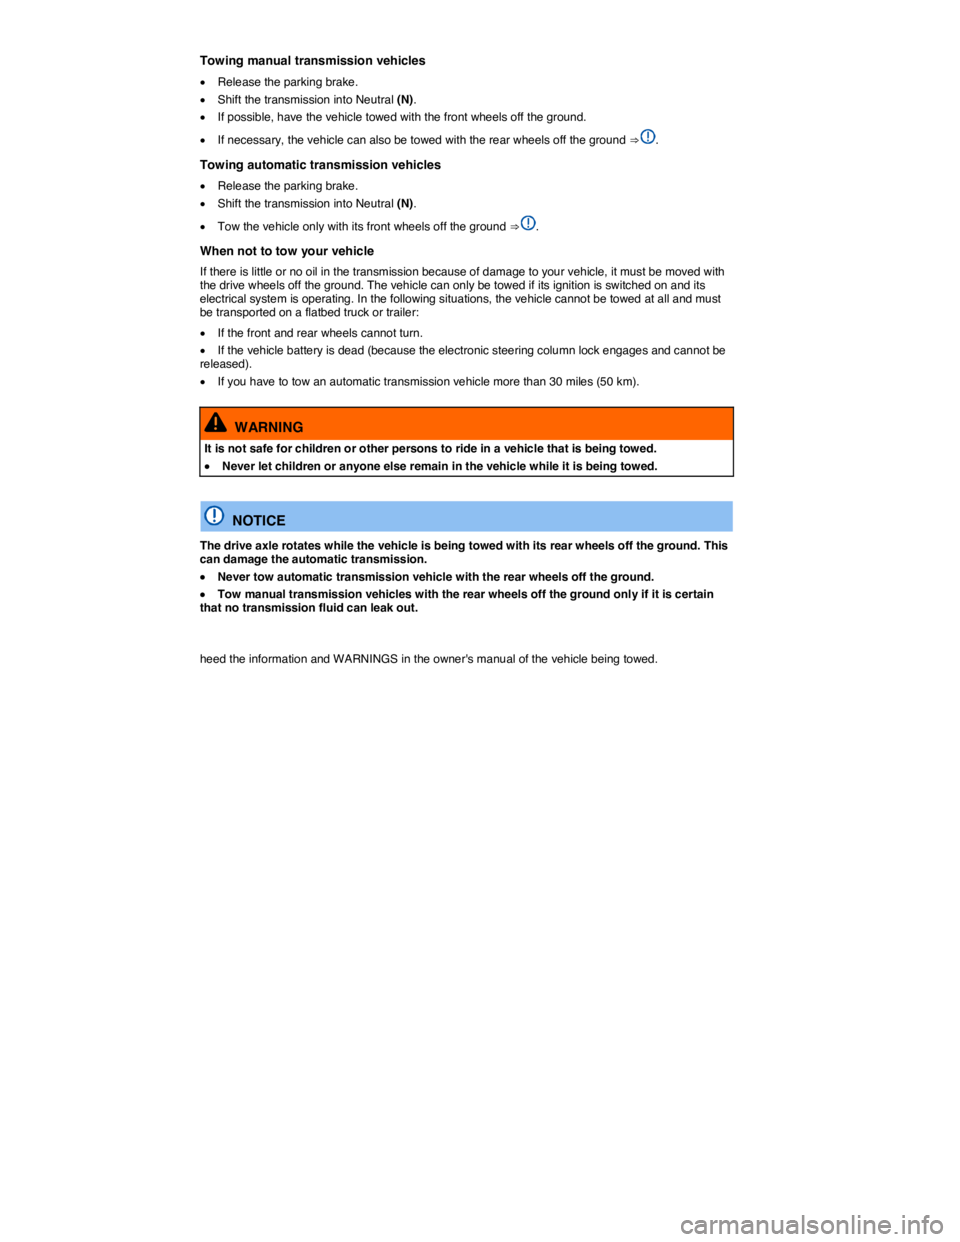
Towing manual transmission vehicles
�x Release the parking brake.
�x Shift the transmission into Neutral (N).
�x If possible, have the vehicle towed with the front wheels off the ground.
�x If necessary, the vehicle can also be towed with the rear wheels off the ground ⇒ .
Towing automatic transmission vehicles
�x Release the parking brake.
�x Shift the transmission into Neutral (N).
�x Tow the vehicle only with its front wheels off the ground ⇒ .
When not to tow your vehicle
If there is little or no oil in the transmission because of damage to your vehicle, it must be moved with the drive wheels off the ground. The vehicle can only be towed if its ignition is switched on and its electrical system is operating. In the following situations, the vehicle cannot be towed at all and must be transported on a flatbed truck or trailer:
�x If the front and rear wheels cannot turn.
�x If the vehicle battery is dead (because the electronic steering column lock engages and cannot be released).
�x If you have to tow an automatic transmission vehicle more than 30 miles (50 km).
WARNING
It is not safe for children or other persons to ride in a vehicle that is being towed.
�x Never let children or anyone else remain in the vehicle while it is being towed.
NOTICE
The drive axle rotates while the vehicle is being towed with its rear wheels off the ground. This can damage the automatic transmission.
�x Never tow automatic transmission vehicle with the rear wheels off the ground.
�x Tow manual transmission vehicles with the rear wheels off the ground only if it is certain that no transmission fluid can leak out.
heed the information and WARNINGS in the owner's manual of the vehicle being towed.
Page 391 of 392

Abbreviations
Abbreviation Meaning
5S manual 5-speed manual transmission
6S automatic 6-speed automatic transmission
6S manual 6-speed manual transmission
ABS Anti-lock Brake System
AFS Adaptive Front Lighting System
AKI Anti-Knock Index
ANSI American National Standards Institute
ASR Anti-Slip Regulation
ATA Anti-Theft Alarm system
BAS Brake Assist System
ccm Cubic centimeters - unit of measure for engine displacement
CCS Cruise Control System
CID Cubic inches - unit of measure for engine displacement
cm Centimeter - metric unit of measure for length
CO2 Carbon dioxide
DIN Deutsches Institut für Normung (German Institute for Standardization)
DPF Diesel Particulate Filter
DRL Daytime running lights
DSG® DSG® Direct Shift Gearbox automatic transmission
EDL Electronic Differential Lock
EN European Norm
EPC Engine control (Electronic Power Control)
ESC Electronic Stability Control
FSI Fuel Stratified Injection
g/km Generated carbon monoxide amount in grams per kilometer driven
GAWR Gross Axle Weight Rating
GVWR Gross Vehicle Weight Rating
HID High Intensity Discharge headlights (Xenon)
hp Horsepower - unit to measure engine power
kg Kilogram - metric unit for weight
kN Kilonewton - a measure of force
kp Kilopond - a measure of force
kPa Kilopascal - unit of measure for tire pressure
kW Kilowatt - engine rating
Page 392 of 392

LED Light Emitting Diode
m Meter, metric unit of measure for length
MFI Multi-Function Indicator
Nm Newton meter - engine torque unit
RON Research Octane Number, measurement of anti-knock resistance of gasoline
rpm Engine revolutions per minute (engine speed)
SAE Society of Automotive Engineers
SRE Manifold injection
TDI® Turbocharged Direct Injection (Turbocharged diesel engine with direct fuel injection)
XDL Extensions of the Electronic Differential Lock system.