wheel VOLKSWAGEN SCIROCCO 2012 User Guide
[x] Cancel search | Manufacturer: VOLKSWAGEN, Model Year: 2012, Model line: SCIROCCO, Model: VOLKSWAGEN SCIROCCO 2012Pages: 138, PDF Size: 48.59 MB
Page 53 of 138
Downloaded from www.Manualslib.com manuals search engine -
When removing or fitting head restraints, make
sure that they do not hit the roof or other parts
of the vehicle. The roof and other vehicle parts
could otherwise be damaged.
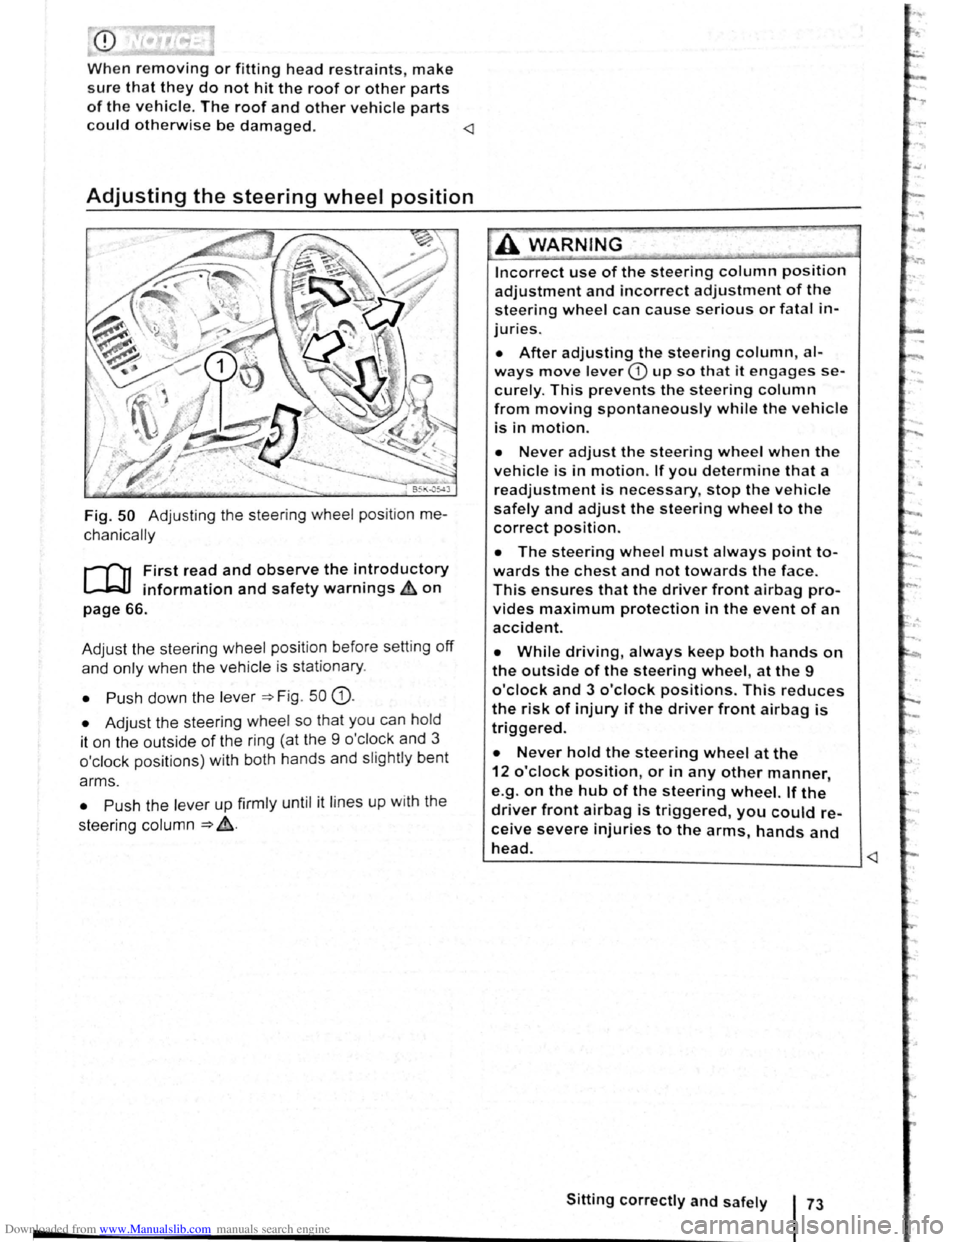
Fig. 50 Adjusting the steering wheel position me
chanically
r-f"'n First read and observe the i~troductory
~ information and safety warnmgs ~on
page 66.
Adjust the steering wheel position before setting
off
and only when the vehicle is sta tionary.
• Push down the lever =>Fig . 50 G).
• Adjust the steering wheel so that you can hold
it on the outside
of the ring (at the 9 o'cl ock and 3
o'clock positions) with both hands and slightly bent
arms.
• Push the lever up firmly until it lines up with the
steering column
=> ~-
Incorrect use of the steering column position
adjustment and incorrect adjustment of the
steering wheel can cause serious or fatal in
juries.
• After adjusting the steering column, al
ways move lever CD up so that it engages se
curely. This prevents the steering column
from moving spontaneously while the vehicle
is in motion.
• Never adjust the steering wheel when the
vehicle is in motion. If you determine that a
readjustment is necessary, stop the vehicle
safely and adjust the steering wheel to the
correct position.
• The steering wheel must always point to
wards the chest and not towards the face.
This ensures that the driver front airbag pro
vides maximum protection in the event of an
accident.
• While driving, always keep both hands on
the outside of the steering wheel, at the 9
o'clock and 3 o'clock positions. This reduces
the risk of injury if the driver front airbag is
triggered.
• Never hold the steering wheel at the
12 o'clock position, or in any other manner,
e.g .
on the hub of the steering wheel. If the
driver front airbag is triggered, you could re
ceive severe injuries to the arms, hands and
head. ~--------------------------____ _j
Page 59 of 138
Downloaded from www.Manualslib.com manuals search engine ..,
of turn signals, a failure to use
r f rg tting to switch off a turn
nfuse other road users. This can
nt and serious Injuries.
• lw. y activate the turn signal In good
tim wh n ch anging lanes and performing
'lt king or turning manoeuvres.
• Alw ys switch off the turn signal once the
le ne change or overtaking or turning ma-
n euvre has been completed.
A W~RNING
In correct use of the main beam headlights
ca n lead to accidents and serious injuries as
the main beam headlights can distract and
dazzle other road users.
Switching lights on and off
m The turn signal will only work when the igni
W tion is switched on. The hazard warning lights
a ls o work
when the ignition is switched off
=>page 336.
m If one turn signal fails, the indicator lamp will
W start flashing twice as fast.
m The main beam headlights can only be
W switched on if the dipped beam headlights
are already on.
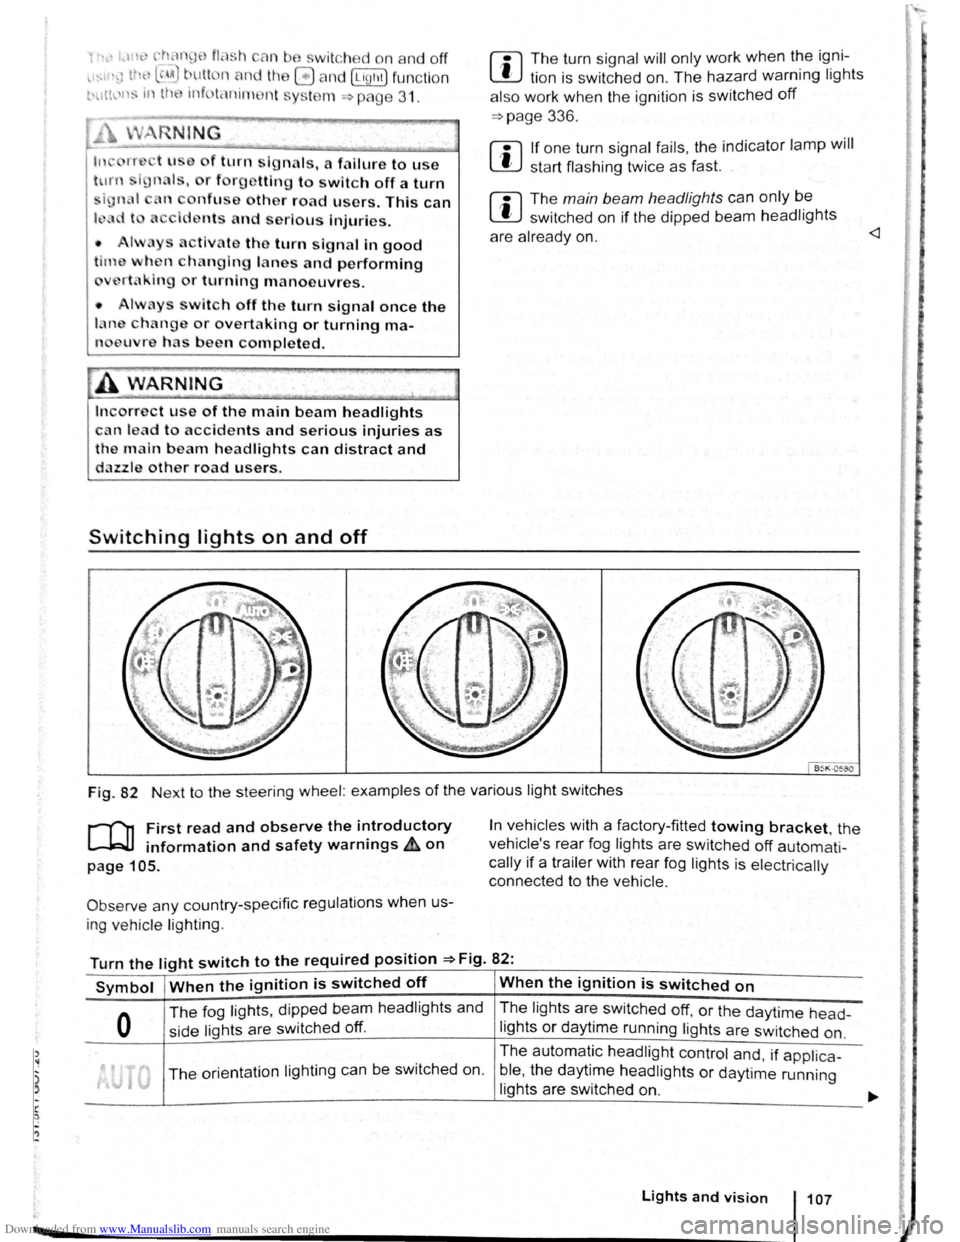
Fig. 82 Next to the steering wheel: examples of the various light switches
r-("n First read and observe the introductory
L-.W1 information and safety warnings ~on
page 105.
Observe any country-specific regulations when us
ing ve hic le lighting .
In vehicles with a factory-fitted towing bracket, the
vehicle's rear fog lights are switched
off automati
cally if a trailer with rear fog lights is electrically
connected to the vehicle .
Turn the light switch to the required position =>Fig. 82:
Symbol When the ignition is switched off When the ignition is switched on
0
The fog lights, dipped bea m headlights and
side lights are switched
off.
The lights are switched off, or the daytime head-
lights or daytime running lights are switched on.
The orientation lighting ca n be switched on. The
automatic
headlight control and, if applica -
ble ,
the daytime headlights or daytime running
lights are switched
on.
Lights and vision 107
Page 64 of 138
Downloaded from www.Manualslib.com manuals search engine "Coming Home"
Switching on
Switching off
"Leaving Home"
Switch ing on
Switc h ing off
I Action
------Swit c h off the ignit io n .
- Operate the headlight flashe r for approximately one second ~page 106.
The Coming Home lights are switched on when the driver door is opened . The
swi tc h-off de lay starts when the last vehicle door or the tailgate has been closed
-Occurs automatica lly once the set switch-off delay has elapsed .
-Occurs automatica lly if another ve h icle door or the tailgate is opened within ap-
proximately 30 seco nds of it being swit ched on.
- Turn the
ligh t switc h to positio n 0.
- Swit ch o n the ignition .
Action
-Unl ock the vehicle when the ligh t senso r is in position AUTO and the twilight sen
sor that it is d ar k.
- Occ urs autom atically once the switch-off delay has elapsed .
- Lo ck
the vehicle.
-Turn the light switc h to positi on 0.
-Switch on the ignition .
Surround lighting in the exterior mirrors m The length of the switch-off delay can be ad
L!:J justed , o r the function can be switched on
and off, u sing the
(ill) button and the~ and (Light)
functio n buttons in the infota inment system
=:.page 31.
Th e surround lighting in the exterior mirrors ligh ts
up the area directly around
the doors while you are
ente ring or ex iting the vehicle . lt is sw itc h ed on
when th e ve hi cle is unlo cked, when opening the
driver door or wh en
the Coming Home or Leav ing
Hom e lighting function is ac tiv e .
If the veh icle is
eq uipp ed with a ligh t sensor , the surround lighting
i n th e exterior mirrors
will only be switched on
wh en it is dark.
m When the Com ing Home function is switched .
L!:J on, no acoustic warning will sound when the t
driver d oor is opened to remind you that a light is
still switched on.
Headlight range control, instrument and switch lighting
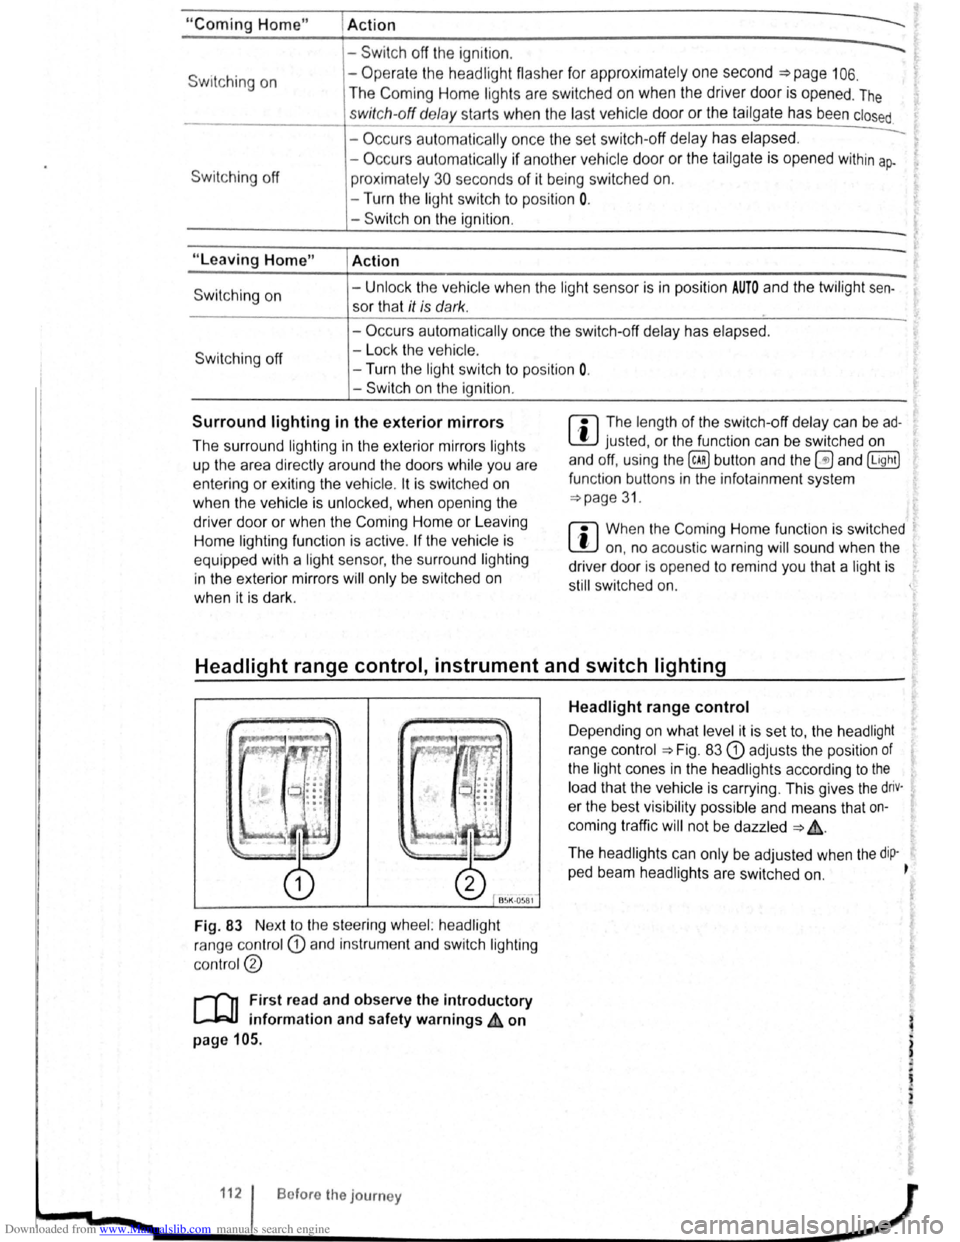
Fig. 83 Nex t to the stee ring wheel: head light
ra nge contr ol
CD and in strum ent and swit ch lighting
co ntr ol@
r-('n First read and observe the introductory
~ information and safety warnings ~ on
page 105.
112 Bofore the journey
Headlight range control
D epending on what level it is se t to, the head light
rang e co ntrol
:::.Fig . 83 CD adjusts the position of
the light cones in the head lights according to the
load that the vehi cle is carrying. This gives the driv·
er the best visibilit y possible and means that on
coming traffic
will not be dazzle d :::. &.
The hea dlights ca n on ly be adjust ed when the dip-
ped beam headlights are switched on. ~
t
Page 69 of 138
Downloaded from www.Manualslib.com manuals search engine -~
....,
m
.u \ 1n j w v ip r 1 switched on auto
.1t1 ',111 if the front -.. ind creen wipers are
<::' t ' ' r ~ rse gear i eng ged.
m The automatic switch-on function when in. re
W verse gear can be switched on and off us1ng
the@] button and the G and (Mirror and wipers ) func
tion buttons in the infotainment system ~page 31.
ro Fi tread and observe the introductory information and safety warnings & on page 117.
iper response in various situat ions:
\.._e t e e d~ sat na•y
Healed a her jet
Headlight
hen sw1tched on , the wipers will temporarily be switched to the
ext setting down.
T e C hmatromc w1ll sw1tch to air recirculation mode for approxits ru -n a e l 30 seconds to prevent the smell of the windscreen wash-
a s t
er utd from entering the vehicle interior.
T e
rper in tervals are adjusted depending on the vehicle
speed. The faster the vehicle is travelling, the shorter the inter
a!
nses on
ward s the steering wheel when the dipped beam
headlights or main beam are switched on. Clean
off stubborn dirt (msects, etc.) from the headl ights
at regular intervals, for instance when filling the
tank .
In winter, you should remove any snow from the
headligh t w as her nozzles in the
bumper to keep
the headligh t washer system in work ing order. Re
move any ice with a de-icer spray.
r:l The w1per will try to wipe away any obstacles
L!J that are on the wind screen . The w 1per will
sop moving 1f the obstacle blocks its path . Re-
mo e the obstacle and swttch the wiper back on
agam
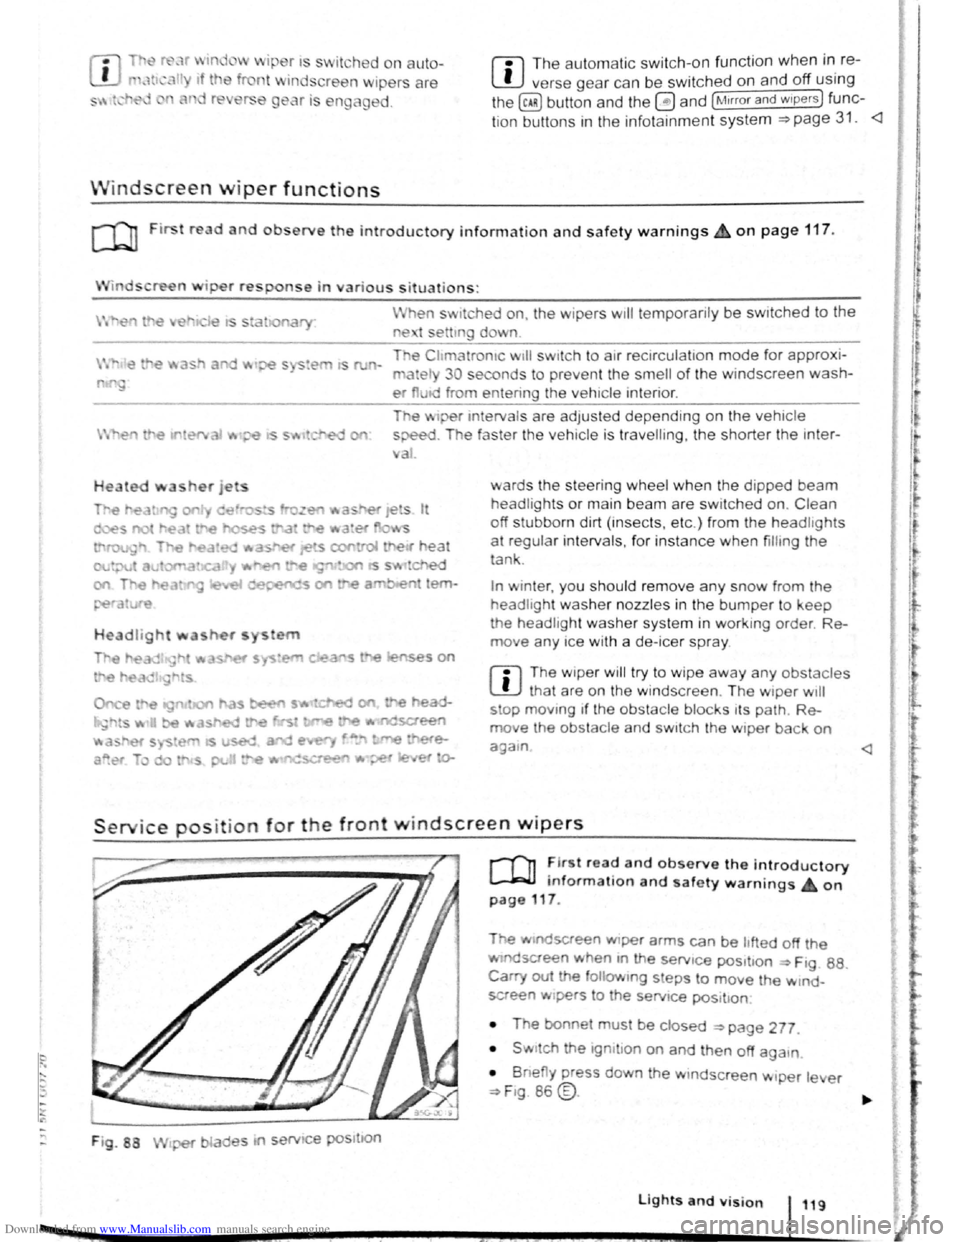
Service position for the front windscreen wipers
F ig . 88
2 -!.
r-T'n ~lr t rea~ and observe the introductory
L-Jr:J.J mformat1on and safety warnings on
page 117 .
Tt>e .vtndscreen Wlper arms can be h fted off the
ndsaeen when 10 the serv1ce pos1t1on ~ Ftg. 88.
Carry out e followtng s eps to move the w rnd
screen w1pers
t o the servtce pos1t1on
• The bonnet must be closed ~page 277.
• Swrtch the 1gntlton on and then off aga
1n
•
B ne y press down the wtndsc reen w1per le er
~F1g. 86 @.
Lights and vision 119
I 3£
Page 75 of 138
Downloaded from www.Manualslib.com manuals search engine CD
Please note the following to help avoid damag o
and premature wear:
• Do not rest your hand on the g ear le ve r
when
driving. The pressure from your hand is
passed onto the selector forks in the gearbox.
Automatic gearbox: selecting a gear
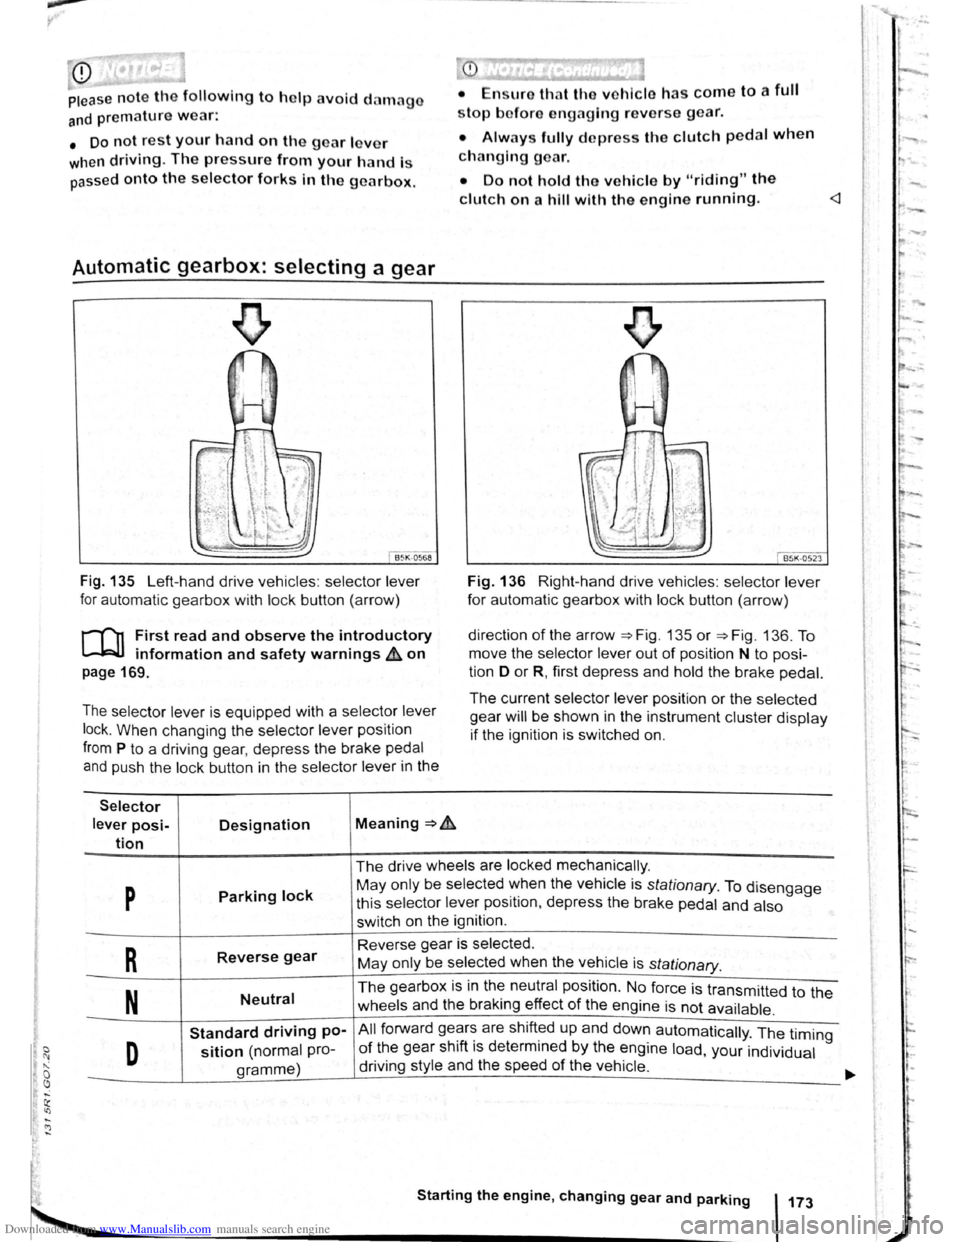
Fig . 135 Left-hand drive vehicles : selector lever
for automatic gearbox with lock button (arrow)
r-('n First read and observe the introductory
~ information and safety warnings & on
page 169.
The selector lever is equipped with a selector lever
lock .
When changing the selector lever position
from P to a driving gear, depress the brake pedal
and push the lock button in the selector lever in the
Selector
lever posi-Designation Meaning ~ .&.
tion
stop bofore engaging re verse gear.
• Always fully d epress the clutch pedal when
changing gear.
• Do not hold the vehicle by "riding" the
clutch on a hill with the engine running.
Fig. 136 Right-hand drive vehicles : selector lever
for automatic gearbox with lock button (arrow)
direction
of the arrow ~Fig. 135 or ~Fig. 136. To
move the selector
lever out of position N to posi
tion D
or R, first depress and hold the brake pedal.
The current selector lever position or the selected
gear
will be shown in the instrument cluster display
if the ignition is switched on.
The drive wheels are locked mechanically .
p Parking lock May only be selected ~hen the vehicle is stationary. To disengage
this selector lever pos1t1on, depress the brake pedal and also
switch on the ignition .
R Reverse gear Reverse gear is selected.
May only be selected when the vehicle is
stationary.
N Neutral The gearbox is in the neutral position . No force is transmitted to the
wheels and the braking effect
of the engine is not available .
Standard driving po-All forward ge~r~ are shift~d up and down automatically . The timing
D sition (normal pro-of the gear sh1ft 1s determmed by the engine load, your individual
gramme) driving
style and the speed
of the vehicle . -
Starting the engine, changing gear and parking 173
Page 77 of 138
Downloaded from www.Manualslib.com manuals search engine rfl If tho lo vo r Is move d accid entally to N when
L!J dr iving , take yo ur foot off the accele rato r.
WiJil fo r tile e ng in e ~~v s in t~e ne utral po sitio n be-
fo re solo ctin g a pos1!1o n agam.
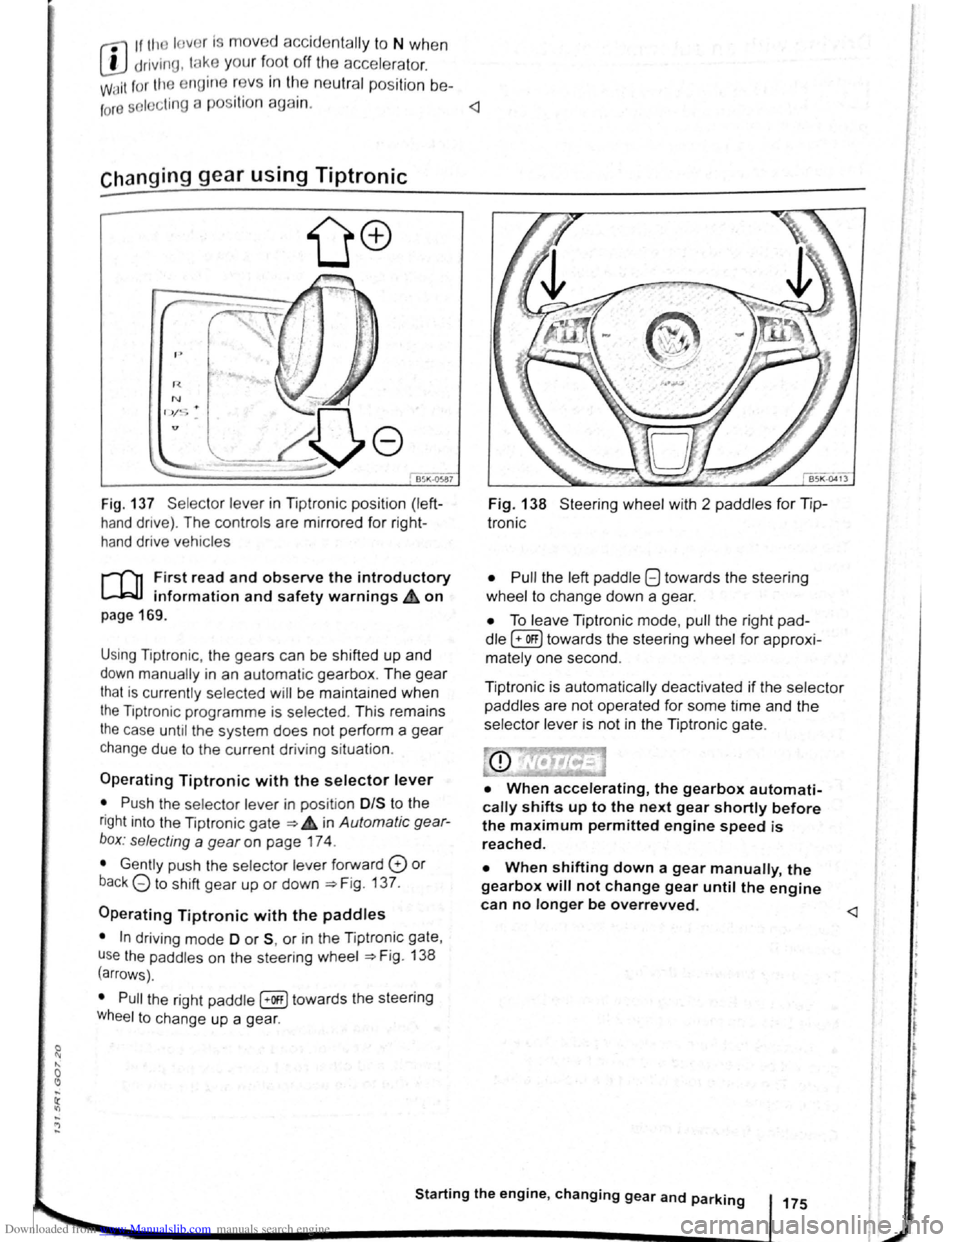
Fig. 137 Se lecto r leve r in Tiptronic position (left
hand drive) . The controls are mirrored for right
hand drive vehicles
rT'n F irst read and observe the introductory
L-.W.I information and safety warnings.& on
page 169 .
Using Tiptronic , the ge ars can be shifted up and
down manually in an automat ic gearbox . The gear
that is currently selected will be maintained when
the Tiptronic programme is selected . This remains
the case until the system does not perform a gear
change due to the current driv ing situation .
Operating Tiptronic with the selector lever
• Push the selector lever in pos it ion 0/S t o the
right into the Tiptronic gate ~ 4 in Automatic gear
b o x: selecting a
gear on page 174 .
• Gently push the selecto r lever forward 0 or
back G to shift gear up or down ~Fig. 137.
Operating Tiptronic with the paddles
• In driving mode 0 or S, or in the Tiptronic gate,
u se
the paddles o n the steering wheel ~Fig. 138
(arrows) .
• Pull the right paddle [+Off] towards the steering
Wheel to change up a gea r.
Fig. 138 Steer ing wheel with 2 padd les for Tip
Ironic
• Pull
the left paddle 8 towards the stee ring
whe el to cha nge down a gea r.
• To leave Tiptronic mode, pull the right pad
dle (+OFF) towa rds the steering whee l for approxi
mat ely one second .
Tiptronic is
automatically deactivated if the selector
paddles
are not operated for some time and the
selector lever is not in the Tiptronic gate.
• When accelerating, the gearbox automati
cally shifts up to the next gear shortly before
the maximum permitted engine speed is
reached.
• When shifting down a gear manually, the
gearbox will not change gear until the engine
can no longer be overrevved.
l t t
t
r
Page 78 of 138
Downloaded from www.Manualslib.com manuals search engine riving with an automatic gearbox
r-T'n First read and observe t h e introductory
L-..kJJ information and safety warnings~ on
page 169.
The gearbox changes th e forwa rd gears up and
down automat ic a lly .
Driving down hills
The steeper the gradi ent, the lower the gear you
will need . Lower gears increase the braking effect
of the engine . Never allow the vehicle to roll down
mountains or hills in the neutral position N.
• Reduce your speed.
• Push the selector lever from posit ion D t o the
r i
ght into the Tiptron ic gate ~page 175.
• Gently push the selector le ver to the rear to
change down gear.
• OR: shift down a gear using the padd les on the
s te
erin g wheel ~page 175 .
Stopping the vehicle and pulling away when
driving uphill
The steeper the incline, the lower the gear you will
need.
If you wish to stop the vehic le or pu ll away when
driv ing uphill you should use the Auto -Ho
ld func
tion
~page 196.
When you stop the vehicle on an incl ine and the
vehicle remains in gear , the vehicle must always
be prevented fro m rolling by depress ing the brake
pedal or
by applying the electron ic park ing brake .
The brake pedal or the electronic parking brake
should
not be released until you pull away ~CD.
Freewheel driving with dual clutch gearbox
DSG®
In
freewheel mode, the momentum of the vehicle is
used to save fuel with a foresighted driving style.
The engine is declutched and no longer brakes the
vehicle -the vehicle can
roll out over a longer dis
t a nce.
Switch-on condit io n: the selector lever must be in
positio n D.
Triggering freewheel driving
• Select the Eco driving mode from the Driving
Mode Selection menu ~page 248 .
• Remove foot from accelerator pedal. The en
gine
w ill be disengaged and run in freewheel
mode. The vehicle rolls without the braking effect
of the eng ine .
Cancelling freewheel mode
• Press the bra e pedal brieny or pull the 1 ft.
hand paddle G towards the stee ring wh 1.
Kick-down
The kickdown function enab~~s ma imum accelera.
tion in the selec tor lever pos1t1ons D and S, or in
th e Tiptron ic posi tio n.
If the acce lerator pedal is d epre ssed fully. the gear.
box will automat ically sh ift to a lower gear, depend
ing on the speed and engine revs. This will make
use of the full veh icle acceleration ~ Lt.
The gearbox does not shift up to the next gear until
the engine reaches the maximum engine s
peed for
the gear.
When the
Eco driving mode is sel ected in vehicles
with Driving Mode Selection ~page 248 and the
accelerator is depressed
fully beyond the pressure
point, the engine output is automatically regulated
to ensure maximum vehicl e acceleration .
Launch control programme
The launch control programme enables maximum
accelerat ion from a stand ing start .
• Switch off TCS ~page 179.
• Depress and hold the brake pedal with your left
foot.
• Move the selector lever to position S, or into the
Tiptronic position. Alte rnatively , select the Sport
driving mode in vehi cles with Driv ing Mode Selec
tion ~page 248 .
• With your right foot, depress the accelerator un
til the engines speed reaches approximately
3,200 rpm.
• Take your left foot off the brake ~ ~. The vehi
cle will start with maximum acceleration.
• Switch the TCS back on after accelerat ion.
A WARNING
Rapid acceleration can cause loss of traction
and skidding, particularly on slippery roads .
This can cause you to lose control of the ~e
hicle, which can lead to accidents and sen·
ous injuries.
• Always adjust your driving style in ac·
cordance with the flow of traffic.
• Only use kickdown or fast acceleration if
visibility, weather road and traffic conditions ' t permit, and other road users are not put a
risk due to the acceleration and the driving
style.
,
Page 79 of 138
Downloaded from www.Manualslib.com manuals search engine • Please note that the driven wheels can
\start to spin and the vehicle can skid If the
lCS i w1tched off, especially If the road Is
slippery.
•
Switch the TCS back on after acceleration.
attempt to stop it from rolling back by depress·
lng the accelerator while a position is still se
lected. The automatic gearbox could overheat
and be damage d .
• Never allow the vehicle to roll In posi tion N ,
particularly If the Ignition is s w itched off. The
automatic gearbox w ill not be lubricated and
could be damaged .
r-'('n F irst read and observe the introductory
L-Wl Information and safety warnings .&. on
page 169 .
Emergency programme
There is a fault in the system if all the displays on
the mstrument clu ste r for the se lector le ve r posi
tions have a light background. The automatic gear
box is running in an emergency programme. The
vehicle can still be driven in the eme rg ency pro
gramme, but only at reduced speed and not in all
gear s.
In vehicles with a dual clutch gearbox DSG®, y o u
may
no longer be able to select reverse gear.
In all cases the automatic gearbox should be
checke d
by a qualified workshop immediately.
Overheating of the dual clutch gearbox
DSG®
The dual clutch gearbox can overheat when th e
vehicle pulls off re
gularly, travels at a crawl for long
penods, or in s
top and go traffic . Gearbox over- .
heating
is i ndi cate d by the w arning lamp 0 and tn
some cases by a text m essage in the instrument
cluste r d1splay . An acoustic warni ng may also be
heard . Stop the ve hi cle and allow th e gea rbox to
cool down
~CD.
The vehicle will not move forwards or
backwards even though a gear has been
selected
If the veh1cle w11l not move in the requi red direc
tio n, the system may have selected the pos1tion m
correctly Depress the bra e pedal and reselect the
pOSitiOn
If th e vehicle st1ll does not move tn the requ1red di
re ction , th ere IS a system fault. Seek expert assis
tance and have the system checked
• If the display indicates that the gearbox is
overheating for the first time, the vehicle will
have to be parked safely or driven faster than
20 km/h (12 mph) .
• If the text message and acoustic warning
are repeated approximately every 10 seconds,
the vehicle must be parked safely immediately
and the engine switched off. Allow the gearbox
to cool down.
•
In order to prevent damage to the gearbox,
you should not drive on unti l the acousti c
warning stops. You should not pull away or
drive the vehicle at very low speeds while the
gearbox is overheated.
' 177
~
l
I
i
t
Page 81 of 138
Downloaded from www.Manualslib.com manuals search engine • o;;--"cc A WAR'I'G (Contmued)
tf the brake warning lamp 0 does not go
'Jt or if it lights up when driving, the brake Ol , . • fluid level in the reservoir IS too low or there
is a fault in the brake system. Stop the vehi
c le immediately and seek expert assistance
=>page 188 , Brake fluid.
, tf the brake warning lamp ID lights up to
gether with the ABS indicator lamp 8, the
control function of the ABS may have failed.
This can cause the rear wheels to lock quick
ly when you brake. Locked rear wheels can
lead to a loss of control of the vehicle. If pos
s ible, reduce your speed and drive carefully
at low speed to the nearest qualified work
shop in order to have the brake system tes
ted . Avoid sudden braking and driving ma
noeuvres on the way.
• The ABS is not functioning correctly if the
ABS indicator lamp Et does not go out or
com es on while the vehicle is in motion. The
Electronic parking brake
BSIV)•~9
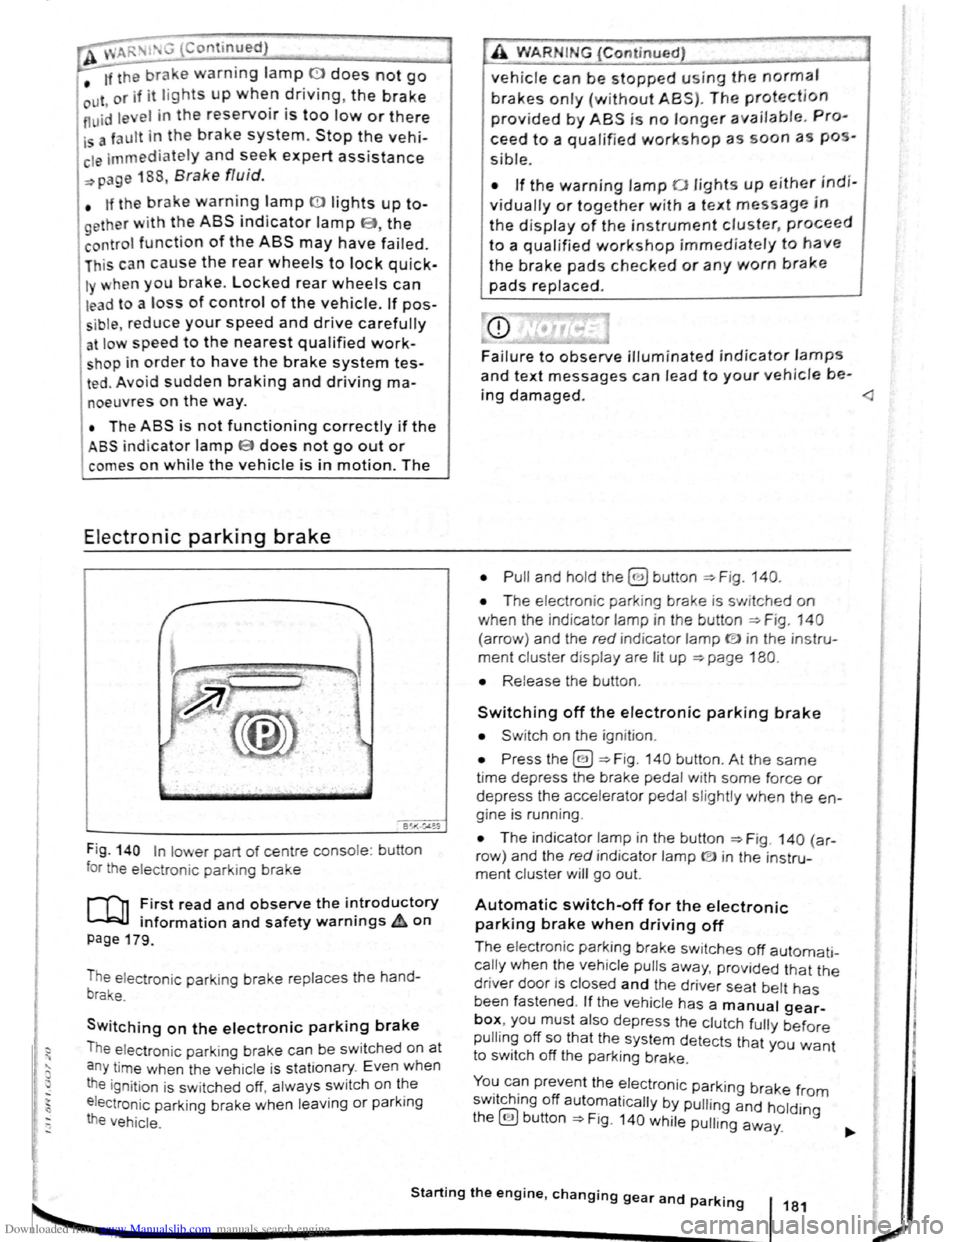
Fig . 140 In lower part of centre console : bu tton
for the electron ic parkin g brake
rf'n First read and observe the i~troductory
~ information and safety warnmgs A on
page 179.
The electronic parking brake replaces the hand
brake.
Switching on the electronic parking brake
The elec tron ic park ing brake can be swit ched on at
a n y time when the vehic le
is stationary . Even when
the ignition is sw itched off, always switch on the
e lectroni c parking brake when leaving
or parking
the vehicle .
_,
A WARN IN.G (Continued) .,~ ,1
vehicle can be stopped using the normal
brakes only {without ABS). The protection
provided by ABS is no longer available. Pro
ceed to a qualified workshop as soon a s pos
s ible.
• If the warning lamp 0 lights up either indi
vidually or together with a text message in
the d isplay of the instrument cluster, proceed
to a qualified workshop immediately to have
the brake pads checked or any worn brake
pads replaced.
Fa i
lure to observe illuminated indicator lamps
and text messages can lead to your vehicle be-
ing damaged.
• T he electron ic park ing brake is switched on
when the indicato r lamp in the button ::;;. Fig. 140
(a rro w) and the red indicator lamp ID in the instru
ment cluster displ ay are lit up ::;;. page 180.
• Release the button .
Switching off the electronic parking brake
• Swit ch on the ignition .
• Press the@) ::;;. Fig . 140 button . At the same
time depress the brake pedal with some force or
depress the accele rator pedal slightly when the en
gine is run ning .
• The indicator lamp in the button =:;.Fig . 140 (a r
row ) and the red indicator lamp ® in the instru
ment cluster will go out.
Automatic switch-off for the electronic
parking brake when driving off
The elec tronic parking brake switches off automati
cally when the vehi cle pulls away, prov ided that the
driver door is closed and the drive r sea t belt has
been fastened . If the vehicle has a manual gear
box, you must also depress the clutch fully before
pulling off so that the system detects that you want
to switch off the parking brake.
You can prevent the electronic parking brake f 0 . h. ff r m sw1tc 1ng o automat ically by pulling and hold.
the@) button::;;. Fig. 140 while pulling away. lng
Starting the engine, changing gear and parking 181
2
Page 82 of 138
Downloaded from www.Manualslib.com manuals search engine Aut mall wit h-o n of the electronic
p ar kin IJr ke If n o t activated properly whe n
th drlv r I av s the v ehicle
I h e .lec,lr uni park ing br ake s wit ch es itsel f on au
lortmlh ,RIIy In the fu llowlng Insta nces wh en the
JrivP-r I . avqs Ill v hlt,le :
• Wlr
t1 tile v hicl Is in gea r posi trons 0, S or R ,
ur If ll r lo t.! o r I v r Is I n t11e T ip tro nic posi tion
• Wl r c n tl re lgr rlll un is s wit ch d o n
• Wi 1 rt tire V l li c le Is s tatio na ry
• If ll re driv r uoor Is o pe n .
rn rge ncy braking function
1 11 n 1 rg on y br kin g fun ction sho uld only be
u s
d In those sit u atio ns wh ere the vehicle cannot
be slurped u ln g the foot br ake ~ &!
• Pull and hold the 8 butt on ~Fig. 14 0 to br ake
tir e ve hl
le sharply. An aco ustic sig na l ca n b e
hoa rd at the sa me lime.
•
T o sto p the br ak ing proced ure, re lease the§
b utt on or d epress th e acce le ra to r pedal.
The Incorrect use of the electronic parking
brake can cause accidents and serious inju
ries.
P arking
r-f11 First read and observe the introductory
l-J,.:JJ Information and safety warnings A on
page 179.
P lea e adhere to re leva nt legisla tion when stop
p in g
a nd pa rk in g your ve h icle .
S
topping the vehicle
Th e ta p s ho uld only be carr ied out in t he speci
flo d o rd or.
• Sto p the ve hi cle o n a sui tab le s urface ~ &,
• Depress a nd ho ld th e br ake ped al u ntil th e e n
gi ne ha
stoppe d .
• Swit ch o n the electr onic pa rking brake
. ~ pnye 18 1.
• With a n auto m atic gea rbox, move the selecto r
lo ve r to pos ition P .... #..
• Swit ch off th e engi ne a nd take your foo t off the
br ake pedal.
• Rem ove th a ve hi cle k e y from t he ignit ion lock .
• rurn the stee ring wheel s lig htly if necessa ry to
engage th e vtee ring lo ck mec h anism .
While driving
• The electronic parking brake should ne
be used to brake the vehicle, except in em '>'er
gencies. The braking distance is considerae.r .
bly longer as only the rear wheels are braked.
Always use the foot brake.
• Never activate the accelerator from the en.
gine compartment if a position or gear has
been selected and the engine is running. The
vehicle could move, even if the electronic
parking brake is applied.
m In veh rcles with a manual gea rbox: v. hen the
l..!J clu tch peda l is released a nd t he accelera
pedal depr essed at th e sa me time , th e e lectron
parkin g bra ke will be re leased autom aticall y
m If th e ve hicl e ba ttery is flat it w ill not be po~<:
L!J ble to re lease th e e lectro nic parking bra e.
U se
jump lead s =:>page 370 .
m Some norses ma y be hea rd wh en the elec·
W Iron ic p ark in g b ra ke is sw itch ed on or ff.
r::l If th e e le ctron ic park in g b ra ke has not been
W used fo r a long period , th e s ys te m will carry
out occa siona l automa tic a nd acou stic check s
when the ve hicl e is pa rk ed .
• With a m anu al gearbox , se lect 1st gea r for f.at
groun d and u phill incl in es , or re ve rse ge ar ()(
downh ill incl ines , a nd then r elease e dutch.
• Ple a se ensur e t hat all o ccup an s. i n pa
ch ildren , lea ve th e ve h icl e.
laf
• Take a ll ve hicl e ke ys with yo u w en you tea 'e
th e ve h icl e.
• lock the ve h icle .
Additional points for ascending and
descending inclines
Be fore SVIitchin g off th e e ng in e , turn e s eeriP:1
wheel so that th e fron t wheels w ill roll aga i st me
kerb if the parked ve icle start s to mo e.
• Whe n fa cing downhill , turn tl e ~s SO tf'\3!
they fa ce e ke rb.
•
Whe n fa cing up ill , turn e omeels so IP8t tt
<
1821
---------------------- ------~~