VOLKSWAGEN T-ROC 2019 Owners Manual
Manufacturer: VOLKSWAGEN, Model Year: 2019, Model line: T-ROC, Model: VOLKSWAGEN T-ROC 2019Pages: 502, PDF Size: 8.58 MB
Page 111 of 502

The buttons are located in the doors Vehicle overviews
Opening the windows: press the button. Closing the windows: pull the button.Press to disable
the electric window buttons in the rear doors.
The windows can still be opened or closed using the buttons for a short time after the ignition has
been switched off, provided the driver door and the front passenger door are not opened.
One-touch opening and closing
The one-touch opening and closing function can be used to fully open and close the windows. The
individual buttons do not have to be held to do this.
One-touch closing: pull the button for the appropriate window up briefly into the second position.
One-touch opening: press the button for the appropriate window down briefly into the second
position.
Stopping the one-touch function: press or pull the button for the appropriate window again.
Convenience opening and closing
The windows can be opened and closed from outside the vehicle using the vehicle key when the
ignition is switched off:
Press and hold the locking or unlocking button on the vehicle key.
In vehicles with keyless locking and starting system Keyless Access: place your finger on the locking
sensor in the door handle for a few seconds until the windows are closed Unlocking or locking the
vehicle with Keyless Access operating range.
To interrupt this function, release the locking or unlocking button OR remove your finger from the
sensor.
A valid vehicle key must be located within the operating range. All turn signals will flash once as
confirmation that all the windows and the glass roof have been closed.
Set the convenience opening settings in the Vehicle settings menu in the Infotainment system
Infotainment system controls and displays
WARNING
Careless or unsupervised use of the electric windows can cause serious injuries.
The electric windows should only be opened or closed when you are sure that nobody is in their
operating area.
Never leave children or people requiring assistance alone in the vehicle when the vehicle is locked.
The windows can no longer be opened in an emergency.
Page 112 of 502

opened or closed using the buttons for a short time after the ignition has been switched off,
provided the driver door and the front passenger door are not opened.
When transporting children on the rear bench seat, the rear electric windows should always be
deactivated using the safety button so that they cannot be opened or closed.
NOTICE
If windows are open when it starts to rain, water can soak the interior equipment of the vehicle and
cause damage to the vehicle.
One-touch opening and closing and the roll-back function will not work if there is a malfunction in
the electric windows. Go to a qualified workshop.
Convenience opening and closing only works when one-touch opening and closing is activated for all
electric windows.
Some settings can be saved in the user accounts for personalisation and therefore change
automatically when the user account is changed Personalisation
Electric window roll-back function
The roll-back function for the electric windows can reduce the risk of injuries when the windows are
closing.
If the window is not able to close because it is stiff or because of an obstruction, the window will
immediately open again
Check to see why the window has not closed.
Try to close the window again.
If the window closing process is interrupted again, the roll-back function will be disabled for a few
seconds.
If the window still cannot close, it will come to a stop at this point. To close the window without the
roll-back function, press the button again within a few seconds
WARNING
Closing the electric windows without the roll-back function can lead to serious injuries.
Always close the window carefully.
Page 113 of 502
nobody obstructs the path of the window, especially if a window is being closed when
the roll-back function is not active.
The roll-back function does not prevent fingers or other body parts from being pressed against the
window frame and being injured.
The roll-back function is also activated if the windows are closed using the vehicle key for
convenience closing.
Troubleshooting
One-touch opening and closing does not work
One-touch opening and closing is deactivated if the 12-volt vehicle battery has been disconnected or
discharged while the windows were not fully closed. The function must then be reset:
Switch on the ignition.
Close all windows and doors.
Pull up the button for the respective window and hold it in this position for several seconds.
Release the button, then pull it up again and hold it in this position. The one-touch function is now
ready for operation again.
The one-touch function can be restored for individual windows or for several windows at the same
time.
Closing windows without roll-back function
Attempt to close the window again within a few seconds by holding the button. The roll-back
function will be deactivated for a small part of the path of the closing window.
If the closing procedure takes longer than several seconds, the roll-back function will be reactivated.
If it is still stiff or obstructed, the window will stop and open again automatically.
Please go to a qualified workshop if the window still cannot be closed.
Glass roof
Opening and closing the glass roof
Page 114 of 502

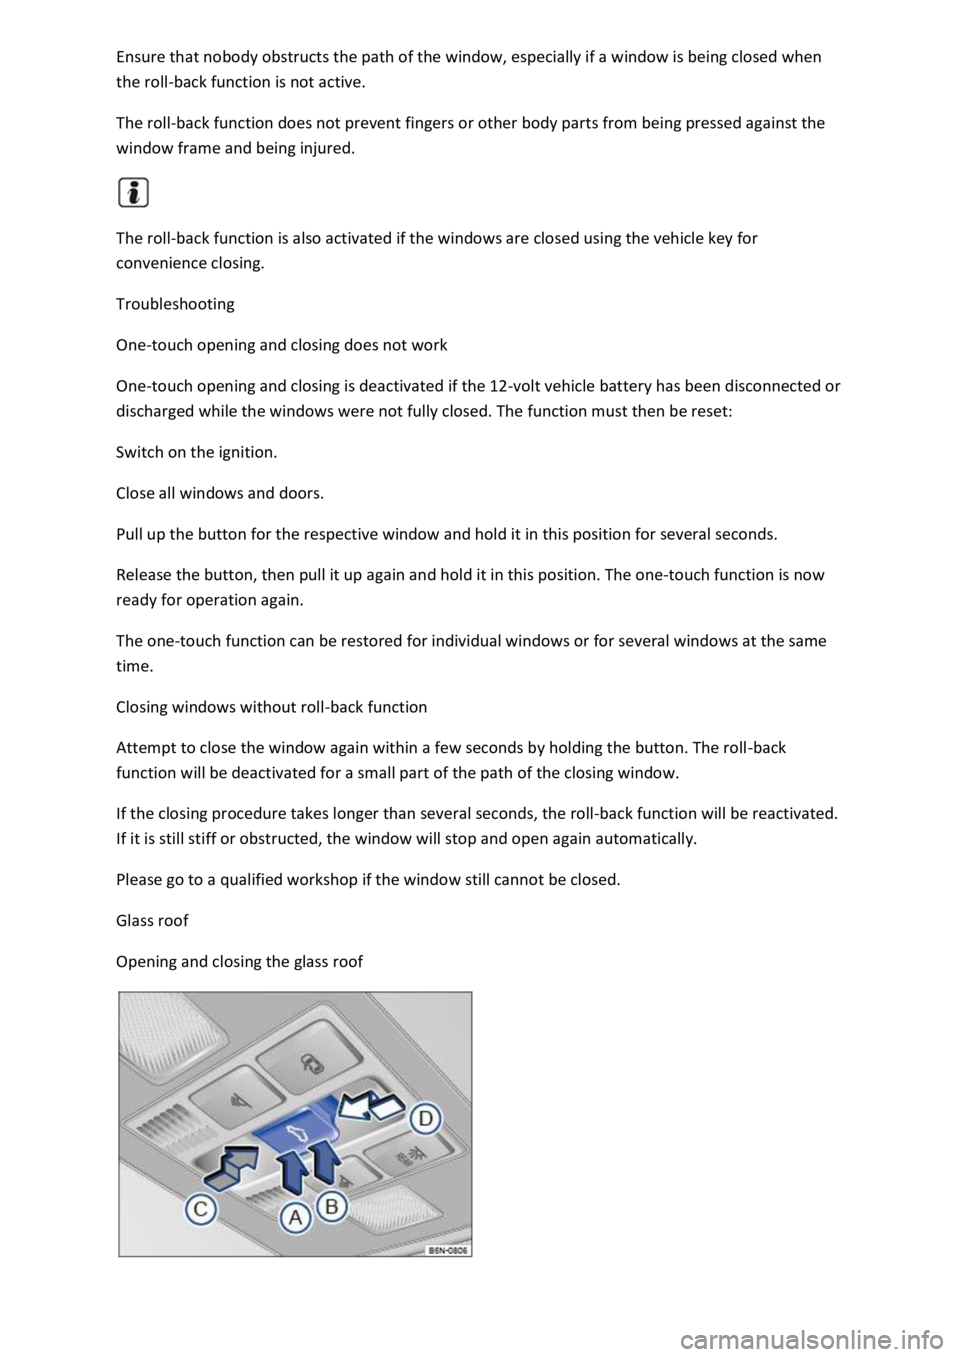
66 In the roof: button for the glass roof.
The term glass roof is used as a standard term for the panorama sliding/tilting roof.
The glass roof is a roof opening system featuring two glass elements. The rear glass element is fixed
and cannot be opened.
The button has two positions. First stage: fully or partially tilt, open or close the roof. Second
stage: automatically move the roof to the respective limit position. Press the button again to stop
the one-touch function.
Tilting the glass roof: push the button Fig. 66to the first position. One-touch function: push
button to the second position.
Closing the tilted glass roof: push the button to the first position. One-touch function: push
button to the second position.
Opening the glass roof: push the button to the first position. One-touch function up to
convenience position: push button to the second position.
Closing the glass roof: push the button to the first position. One-touch function: push button
to the second position.
Stopping one-stop function of the opening or closing procedure: push button or again.
WARNING
Careless or unsupervised use of the glass roof can cause serious injuries.
Open and close the glass roof only when you are sure that nobody is obstructing the path of the
roof.
Always take all vehicle keys with you every time you leave the vehicle.
Never leave children or people requiring assistance alone in the car, particularly if they have access
to the vehicle key. Unsupervised use of the vehicle key can lock the vehicle, start the engine, switch
on the ignition and operate the glass roof.
The glass roof can still be opened or closed for a short time after the ignition has been switched off,
provided that the driver door or front passenger door are not opened.
NOTICE
To avoid damage during cold weather, clear any ice and snow off the vehicle roof before opening or
tilting the glass roof.
Always close the glass roof when you leave the vehicle or if it starts to rain. Any rain entering the
vehicle when the glass roof is open or tilted could cause significant damage to the electrical system.
This can result in further damage to the vehicle.
Page 115 of 502

Remove leaves and other loose items from the glass roof guide rails at regular intervals using a
vacuum cleaner, or by hand.
The roll-back function will not work properly if there is a malfunction in the glass roof. Go to a
qualified workshop.
Convenience opening or closing of the glass roof
Convenience opening and closing
The glass roof can be opened and closed from outside the vehicle using the vehicle key:
Press and hold the locking or unlocking button on the vehicle key. The glass roof is tilted or closed.
In vehicles with the Keyless Access locking and starting system: place your finger on the locking
sensor in the door handle for a few seconds until the glass roof is closed Unlocking or locking the
vehicle with Keyless Access
Release the locking or unlocking button to interrupt this function.
The convenience closing function closes all the windows in the doors and the glass roof. All turn
signals will flash once as confirmation that all the windows and the glass roof have been closed.
Make settings for operation of the glass roof in the Vehicle settings menu in the Infotainment
system Infotainment system controls and displays
Some settings can be saved in the user accounts for personalisation and therefore change
automatically when the user account is changed Personalisation
Glass roof roll-back function
The roll-back function reduces the risk of crush injuries f the glass roof is obstructed during
the closing process, it will open again immediately.
Check to see why the glass roof has not closed.
Try to close the glass roof again.
If the glass roof still cannot be closed, close it without the roll-back function.
Closing the glass roof without the roll-back function
Press the button to the second position until the glass roof has fully closed.
The glass roof will now close without the roll-back function.
Please go to a qualified workshop if the glass roof still cannot be closed.
If you release the switch during the closing procedure, the glass roof will open automatically.
Page 116 of 502
WARNING
Closing the glass roof without the roll-back function can cause serious injuries.
Always close the glass roof carefully.
Ensure that nobody obstructs the path of the glass roof, especially if the roll-back function is not
active when it is closed.
The roll-back function does not prevent fingers or other body parts from being pressed against the
roof frame and being injured.
The roll-back function is also activated if you use the convenience closing function on the vehicle key
to close the windows and the glass roof.
Troubleshooting
Glass roof does not close
The glass roof works only when the ignition is switched on. The glass roof can still be opened or
closed for a short time after the ignition has been switched off, provided that the driver door or
front passenger door are not opened.
Steering wheel
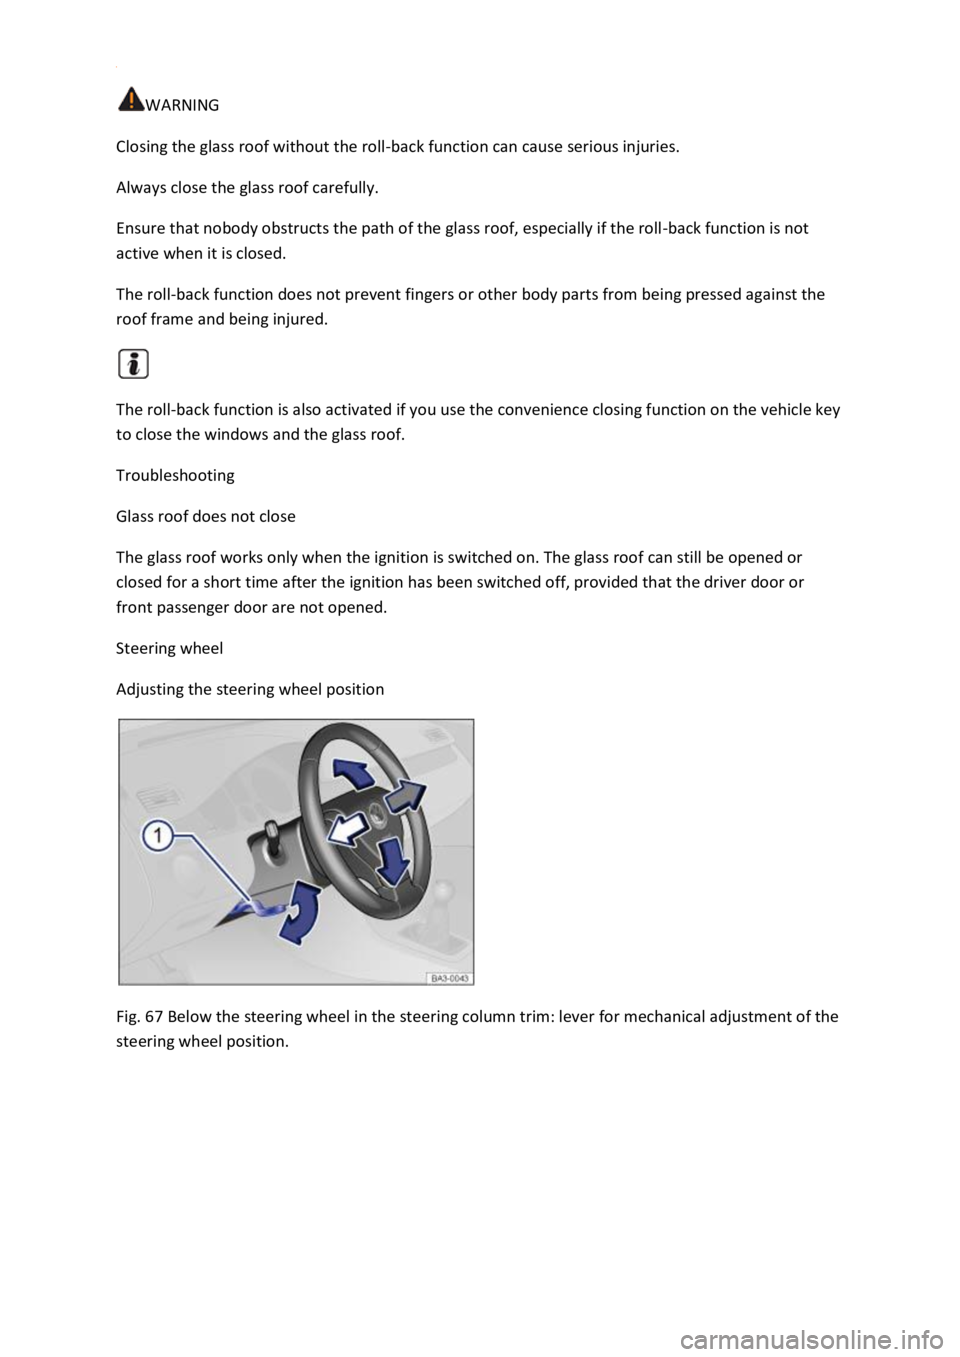
Adjusting the steering wheel position
Fig. 67 Below the steering wheel in the steering column trim: lever for mechanical adjustment of the
steering wheel position.
Page 117 of 502
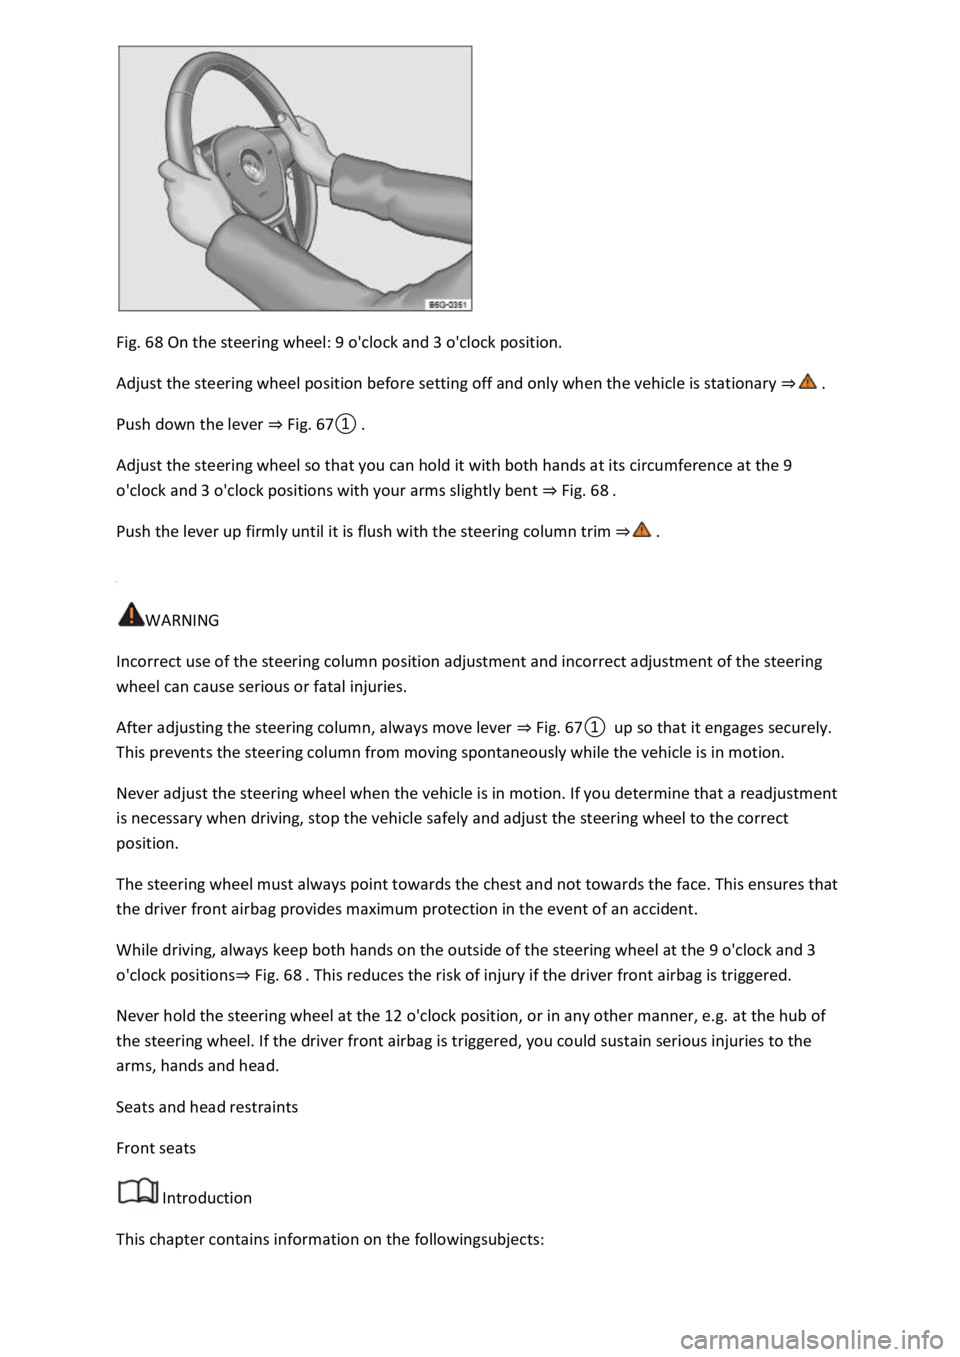
Fig. 68 On the steering wheel: 9 o'clock and 3 o'clock position.
Adjust the steering wheel position before setting off and only when the vehicle is stationary
Push down the lever Fig.
0
Adjust the steering wheel so that you can hold it with both hands at its circumference at the 9
o'clock and 3 o'clock positions with your arms slightly bent Fig. 68
Push the lever up firmly until it is flush with the steering column trim
WARNING
Incorrect use of the steering column position adjustment and incorrect adjustment of the steering
wheel can cause serious or fatal injuries.
After adjusting the steering column, always move lever Fig.
0up so that it engages securely.
This prevents the steering column from moving spontaneously while the vehicle is in motion.
Never adjust the steering wheel when the vehicle is in motion. If you determine that a readjustment
is necessary when driving, stop the vehicle safely and adjust the steering wheel to the correct
position.
The steering wheel must always point towards the chest and not towards the face. This ensures that
the driver front airbag provides maximum protection in the event of an accident.
While driving, always keep both hands on the outside of the steering wheel at the 9 o'clock and 3
o'clock positionsFig. 68
Never hold the steering wheel at the 12 o'clock position, or in any other manner, e.g. at the hub of
the steering wheel. If the driver front airbag is triggered, you could sustain serious injuries to the
arms, hands and head.
Seats and head restraints
Front seats
Introduction
This chapter contains information on the followingsubjects:
Page 118 of 502

Mechanically adjusting the front seat
Folding the front passenger seat backrest forwards
The following section describes the options for adjusting the front seats. Always ensure that you
adjust the correct sitting position Sitting position
WARNING
Always adjust the front seats to their correct position before any journey and ensure that all
passengers have fastened their seat belts.
Push the front passenger seat as far back as possible.
Adjust the driver seat so that there is at least 25 cm between your breastbone and the hub of the
steering wheel. Adjust the driver seat by moving it forwards or backwards so that you are able to
press the pedals to the floor with your knees still slightly angled and the distance to the dash panel
in the knee area is at least 10 cm. If your build makes it impossible to fulfil this requirement, you
must contact a qualified workshop so they can make any necessary modifications.
Never travel with the backrest tilted far back. The further back the backrest is tilted, the greater the
risk of injury caused by incorrect seat belt routing or an incorrect sitting position.
Never travel with the backrest tilted far forwards. When a front airbag is triggered, it could force the
seat backrest backwards and injure vehicle occupants on the rear seats.
Adopt and maintain the greatest possible distance from the steering wheel and dash panel.
You should always sit upright with your back against the seat backrest with the front seats properly
adjusted. Do not position any body part too close to where the airbags are fitted.
The risk of serious injury is increased for passengers on the rear seat if they are not sitting upright
because the seat belts are incorrectly positioned.
WARNING
Incorrect adjustment of the seats can cause accidents and serious injuries.
The seats must be adjusted only when the vehicle is stationary, or else the seat could change
position unexpectedly while the vehicle is in motion, leading to a loss of control of the vehicle.
Furthermore, an incorrect seating position is adopted while adjusting the seat.
Adjust the height and tilt of the seat or move it forwards and backwards only when the area around
the seat is clear.
The adjustment range of the seats must not be restricted by any items.
Adjust the tilt angle of the rear seats or move them forwards and backwards only when the area
around the seats is clear.
The adjustment and locking areas of the seats must not be soiled.
Page 119 of 502
WARNING
Cigarette lighters left in the vehicle can become damaged or may ignite unnoticed. This can cause
serious burns and vehicle damage.
Before adjusting the seats, always make sure that there is no lighter on or near the moveable parts
of the seat.
Before closing stowage areas or compartments, always make sure that there is no lighter in the way.
Never stow lighters in stowage areas, compartments or on other surfaces in the vehicle. Cigarette
lighters may self-ignite as a result of high surface temperatures, particularly in summer.
NOTICE
Sharp edges can damage the seats.
Do not touch the seats with sharp-edged objects. Sharp-edged objects such as zips, rivets on clothing
or belts can damage surfaces. Open Velcro fasteners can also cause damage.
Mechanically adjusting the front seat
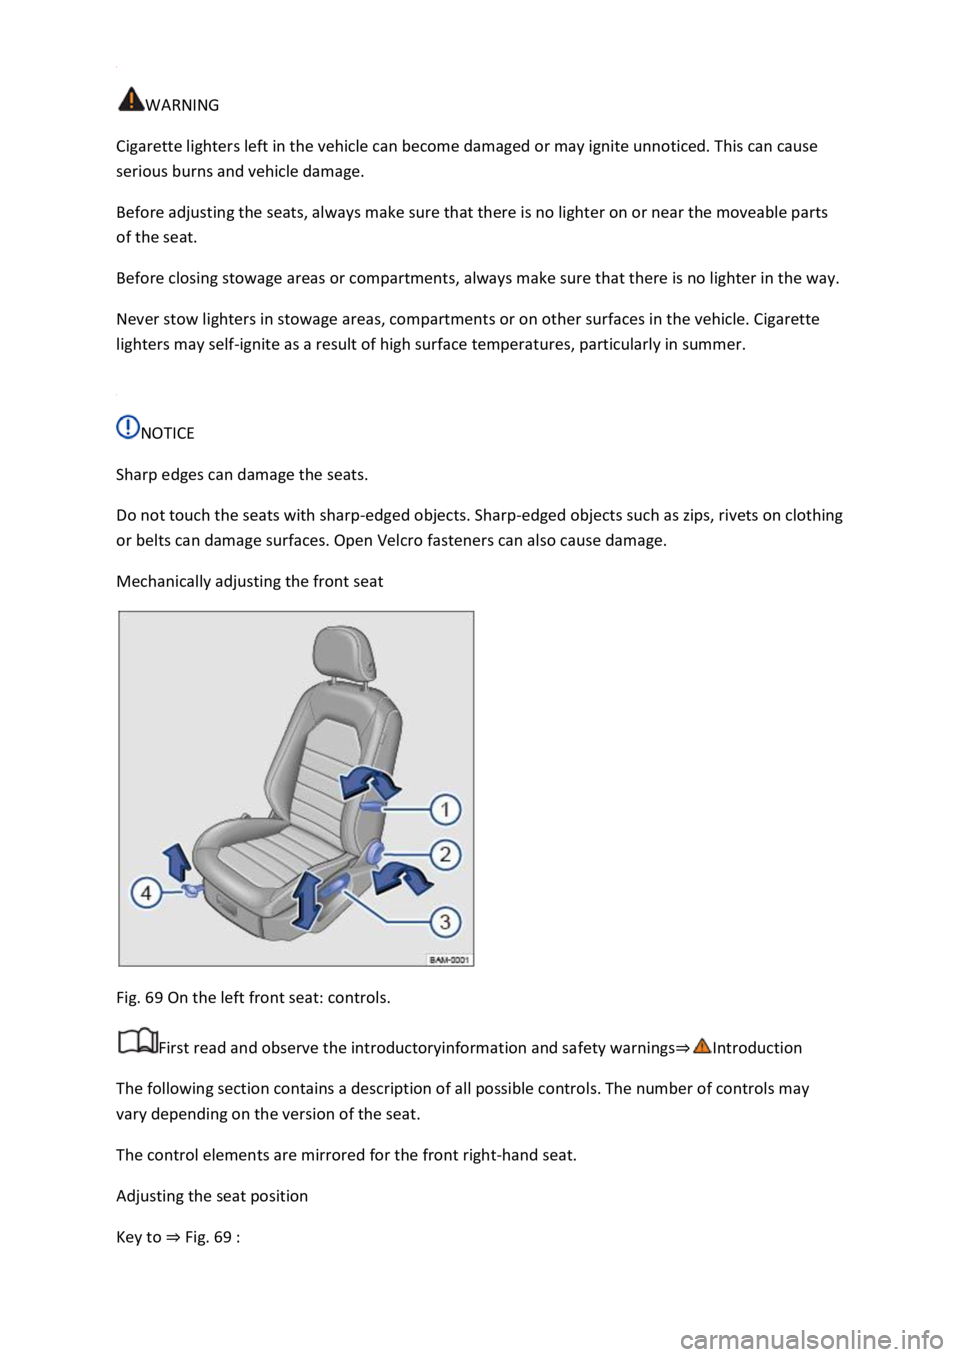
Fig. 69 On the left front seat: controls.
First read and observe the introductoryinformation and safety warnings
The following section contains a description of all possible controls. The number of controls may
vary depending on the version of the seat.
The control elements are mirrored for the front right-hand seat.
Adjusting the seat position
Key to Fig.
Page 120 of 502
Operate the lever to adjust the lumbar support.
Take your weight off the backrest and turn the handwheel to adjust the backrest position.
Front passenger seat: take your weight off the backrest and operate the lever to adjust the backrest
position (depending on equipment).
Move the lever up or down, several times if necessary, to adjust the seat height.
Pull the lever to push the front seat forwards or backwards. The front seat must engage after the
lever has been released.
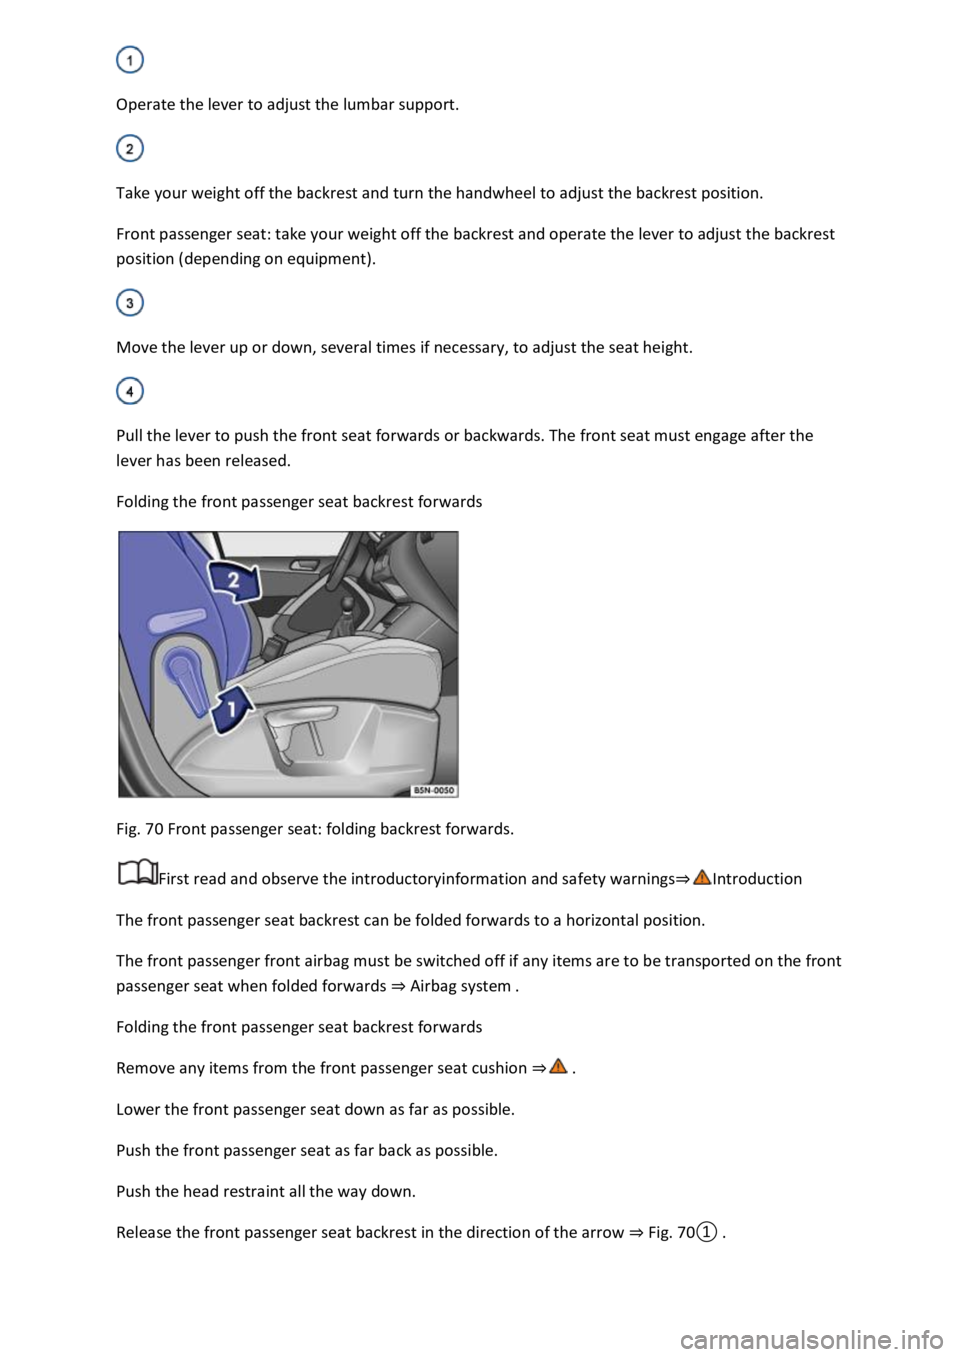
Folding the front passenger seat backrest forwards
Fig. 70 Front passenger seat: folding backrest forwards.
First read and observe the introductoryinformation and safety warnings
The front passenger seat backrest can be folded forwards to a horizontal position.
The front passenger front airbag must be switched off if any items are to be transported on the front
passenger seat when folded forwards Airbag system
Folding the front passenger seat backrest forwards
Remove any items from the front passenger seat cushion
Lower the front passenger seat down as far as possible.
Push the front passenger seat as far back as possible.
Push the head restraint all the way down.
Release the front passenger seat backrest in the direction of the arrow Fig.
0