turn signal VOLKSWAGEN T-ROC 2019 User Guide
[x] Cancel search | Manufacturer: VOLKSWAGEN, Model Year: 2019, Model line: T-ROC, Model: VOLKSWAGEN T-ROC 2019Pages: 502, PDF Size: 8.58 MB
Page 130 of 502
WARNING
Incorrect use of turn signals, a failure to use turn signals, or forgetting to switch off a turn signal can
confuse other road users. This could lead to accidents and serious injuries.
Always activate the turn signal in good time when changing lanes and performing overtaking or
turning manoeuvres.
Always switch off the turn signal once the lane change or overtaking or turning manoeuvre has been
completed.
The hazard warning lights also work when the ignition is switched off In an emergency
Some settings can be stored in the user accounts of the personalisation function and therefore
change when the user account changes Personalisation
Vehicle lighting
Switching lights on and off
Fig. 79 Next to the steering wheel: light switch (one variant).
Switching lights on
Switch on the ignition.
Turn the light switch to the appropriate position:
Automatic headlights: dipped beam is switched on or off depending on the brightness level
and the weather Automatic headlights The side lights and daytime running
lights are switched on. The symbol in the light switch lights up green.The dipped beam headlights
are switched on.
Switching lights off
Switch off the ignition.
Page 132 of 502
both sides of the vehicle switches on to
provide better illumination of the surrounding area when manoeuvring.
Switching the fog lights on and off
Switching on the front fog lights : pull the light switch Fig. 79out to the first position. The
indicator lamp in the light switch lights up green.
Switching on the rear fog light : pull the light switch all the way out. The indicator lamp in the
instrument cluster lights up yellow.
To switch the fog lights off, press in the light switch or turn it to position .
When the automatic headlights are switched on and the front or rear fog lights are switched
on, the dipped beam headlights will also be switched on irrespective of the current light conditions
outside.
In vehicles with a factory-fitted towing bracket: the vehicle's rear fog light is not switched on if a
trailer with rear fog light is electrically connected to the vehicle Trailer towing
Light functions
Side lights
If the side lights are switched on, both headlights light up with the side lights, parts of the tail
light clusters, the number plate lighting and the buttons in the centre console and the dash panel.
The daytime running lights also switch on when the ignition is switched on.
If the vehicle is not locked from outside when the ignition is switched off, the continuous parking
light on both sides of the vehicle switches on automatically after around 10 minutes to reduce 12-
volt vehicle battery discharge Switching the parking lights on and off
Automatic headlights
If the automatic headlights are switched on, the vehicle lighting and the instrument and
switch lighting will switch on and off according to the light conditions. When the lights are switched
on, the indicator lamp lights up yellow.
The automatic headlights are merely an aid and will not always be able to detect all driving
situations.
In vehicles with a corresponding equipment level, the switch-on time of the automatic headlights
can be adjusted in the Infotainment system in the Vehicle settings menu Infotainment system
controls an
Cornering light
A cornering light is switched on when turning slowly or travelling around very tight bends.
Signal tones if lights are not switched off
Page 133 of 502

and the driver door opened, acoustic
warnings sound under the following conditions:
If the parking light is switched on.
If the side lights are switched on or the rear fog light is switched on .
When the Coming Home function is switched on, no signal tone will be given as a reminder that a
light is still switched on when leaving the vehicle.
Some settings can be stored in the user accounts of the personalisation function and therefore
change when the user account changes Personalisation
Troubleshooting
Turn signal indicator lamp
If a turn signal on the vehicle has failed, the indicator lamp will start flashing twice as fast.
The indicator lamp flashes green.
Check the lighting and change the appropriate bulb as required Changing bulbs
If the problem persists, go to a qualified workshop.
Does not apply in China and Japan: trailer turn signals indicator lamp
The indicator lamp goes out if a trailer turn signal or all trailer lights stop working.
The indicator lamp flashes green.
Check the lighting and change the appropriate bulb as required Changing bulbs
If the problem persists, go to a qualified workshop.
Vehicle lighting not working
Vehicle lighting has failed either completely or partially.
The indicator lamp lights up yellow.
Check the lighting and change the appropriate bulb as required Changing bulbs
If the problem persists, go to a qualified workshop.
Fault in rain/light sensor
In the light switch position , the vehicle lighting is not switched on or off automatically.
The indicator lamp lights up yellow.
Switch the ignition off and on.
If the problem persists, go to a qualified workshop.
Page 134 of 502
Switching main beam on and off
Fig. 80 On the left of the steering column: turn signal and main beam lever.
Switch on the ignition and dipped beam.
Move the turn signal and main beam lever from the centre position to the following position:
Main beam switched on.
Operate the headlight flasher or switch off the main beam. The headlight flasher comes on for as
long as the lever is pulled.
When the main beam or headlight flasher are switched on, the blue indicator lamp lights up in
the instrument cluster.
Main-beam control
Depending on the vehicle equipment level, advanced main-beam control may also be available
Main-beam control
WARNING
Incorrect use of the main beam headlights can lead to accidents and serious injuries as the main
beam headlights could distract and dazzle other road users.
Main-beam control
The main-beam control automatically dips the headlights when oncoming vehicles and/or vehicles
driving in front are detected. Main-beam control also recognises illuminated areas such as towns
and deactivates the main beam while driving through them.
Within the limits of the system, main-beam control automatically switches main beam on at speeds
of over approximately 60 km/h (37 mph), depending on ambient and traffic conditions, and switches
it off again at speeds under approximately 30 km/h (18 mph)
With some equipment levels, the main-beam control can be activated and deactivated in the
Infotainment system in the Vehicle settings menu Infotainment system controls and displays
Switching on main-beam control
Page 135 of 502

matic headlights .
Tap the turn signal and main beam lever forwards from the basic position.
When main-beam control is switched on, the indicator lamp lights up in the instrument cluster
display.
Switching off main-beam control
Pull back the turn signal and main beam lever.
OR: switch off the automatic headlights .
OR: switch off the ignition.
OR: push the turn signal and main beam lever forwards to switch on the manual main beam.
System limits
The main beam must be manually switched off under the following conditions, as it is not switched
off by the main-beam control in time or at all:
In poorly lit streets where there are highly-reflective signs.
Other road users with insufficient lighting facilities, such as pedestrians, cyclists.
In tight bends, with half-hidden oncoming traffic, on steep crests or in dips.
With oncoming traffic on roads with a central barrier where the driver can see clearly over the
central barrier e.g. truck drivers.
In fog, snow or heavy rain.
In conditions with swirled-up dust and sand.
If the windscreen is damaged in the camera's field of vision.
If the camera's field of vision is covered by condensation, dirt, a sticker, or by snow or ice.
If the camera is faulty or the power supply is interrupted.
WARNING
Do not let the extra convenience afforded by main-beam control tempt you into taking any risks
when driving. The system is not a substitute for the full concentration of the driver.
Always check the vehicle lights yourself and adapt them to the prevailing conditions for light,
visibility and road traffic.
The main-beam control may not be able to recognise all driving situations correctly and may not
work properly in certain situations.
If the camera's field of view is dirty, covered or damaged, the function of the main-beam control
may be impaired. This also applies if changes are made to the vehicle's lighting system, for example
if additional headlights are fitted.
Page 136 of 502
NOTICE
Please observe the following points in order to avoid impairing the proper function of the system:
Regularly clean the camera's field of view, and keep it free from snow and ice.
Do not cover the camera's field of view.
Regularly check the area of the windscreen that is in the camera's field of view for damage.
Light-emitting objects in the camera's field of operation, e.g. mobile navigation devices, can impair
the functions of the main-beam control system.
Parking light
Switching the parking lights on and off
Fig. 81 On the left of the steering column: turn signal and main beam lever.
Switching on parking light on one side of the vehicle
When the parking lights are switched on, the headlight with side light and parts of the tail light
cluster on the corresponding side of the vehicle light up:
Switch off the ignition.
Move the turn signal and main beam lever from the centre position to the following position:
The right-hand parking light is switched on.
The left-hand parking light is switched on.
Continuous parking light on both sides of the vehicle
Both headlights light up with side lights as well as parts of the tail light clusters if the continuous
parking light on both sides of the vehicle is switched on:
With the ignition on, turn the light switch to position .
Page 208 of 502

the vehicle speed, steering wheel torque and steering wheel angle. The electromechanical steering
functions only when the engine is running.
You will need considerably more strength than normal to steer the vehicle if the power steering is
reduced or has failed completely.
Counter steering assistance
Counter steering assistance provides the driver with steering assistance in critical driving situations.
Additional steering forces assist the driver when counter steering
Progressive steering
Depending on the vehicle equipment level, progressive steering can adjust the steering response in a
driving situation. Progressive steering functions only when the engine is running.
In urban traffic, less steering input is required when parking, manoeuvring, or turning sharply.
When driving on country roads or on the motorway, the progressive steering provides a more
sporty, direct steering response, and a dynamic feel.
WARNING
If the power steering is not working, the steering wheel is difficult to turn, which makes it difficult to
steer the vehicle.
Depending on the vehicle equipment level, the power steering functions only when the engine is
running.
Never allow the vehicle to roll if the engine is switched off.
Never remove the vehicle key from the ignition if the vehicle is in motion. The steering column lock
may be activated and it will no longer be possible to steer the vehicle.
WARNING
In conjunction with the ESC, counter steering assistance provides the driver with assistance when
steering in critical driving situations. The driver must steer the vehicle at all times. Counter steering
assistance does not steer the vehicle.
NOTICE
When the vehicle is towed, the ignition must be switched on to prevent the steering wheel from
locking, and so that the turn signals, horn, wipers and window washer system can be used.
Troubleshooting
Steering requires increased force
Page 230 of 502

to free the vehicle.
When you cannot move forwards
Carefully dig out all the wheels and check that no other parts of the vehicle are stuck in the sand.
Select reverse gear.
Reverse in your own tracks with gentle use of the accelerator.
If this does not help, place brushwood, foot mats or sacking directly in front of the wheels to
increase grip
Rocking the vehicle free
Never allow the wheels to spin for long periods as this will cause the vehicle to sink deeper
Switch off TCS Brake support systems
Position the steering wheel so that it is facing straight ahead.
Reverse until the point where the wheels just start to spin.
Immediately select first gear and drive forwards until the wheels start to spin again.
Repeat driving back and forth until you have enough momentum to free yourself.
Switch the TCS on after the rocking free procedure is completed Brake support systems
Use the Offroad driving profile.
WARNING
No one must stand either in front or behind the vehicle, particularly if you are attempting to free a
stuck vehicle.
Spinning wheels can propel stones, brushwood, pieces of wood or other objects that are in front or
behind the wheels at enormous speed and cause potentially fatal injury.
People standing in front of or behind the vehicle could be run over if the stuck vehicle starts to move
suddenly.
After offroad driving
First read and observe the introductoryinformation and safety warnings
Checklist
Clean the turn signals, lighting system, the number plate and all windows.
Page 256 of 502

When switched on, the Blind Spot Monitor is active from a speed of approx. 15 km/h (9 mph).
In the following driving situations, the yellow indicator lamp will light up in the corresponding
exterior mirror: Fig. 124
If your vehicle is being overtaken.
When overtaking another vehicle with a speed difference of up to approximately 10 km/h (6 mph).
No display will be shown if the takeover manoeuvre is much faster.
If a vehicle is detected in the blind spot and the turn signal is additionally activated in the direction
of the detected vehicle
In vehicles with the lane keeping system, the yellow indicator lamp will flash even if you do not
activate the turn signal when leaving your lane, provided that the lane keeping system is switched on
(Blind Spot Monitor Plus). The driver is warned by a corrective steering intervention when changing
lanes during a possible critical situation (information level, warning level). This also occurs when the
turn signal is activated for the corresponding direction. If the steering intervention is overridden by
the driver, the steering wheel vibrates to give an additional warning.
The quicker another vehicle approaches, the earlier there is a corresponding display in the exterior
mirror.
Automatic deactivation
The radar sensors for the Blind Spot Monitor will switch off automatically if, for example, the system
detects that a radar sensor is continuously covered. This can be caused by a layer of ice or snow in
front of the radar sensor, for example.
A text message will be shown on the instrument cluster display.
If the Blind Spot Monitor has been automatically deactivated, the system cannot be activated until
the ignition has been switched off and back on again.
The Blind Spot Monitor is automatically deactivated and cannot be activated when the factory-fitted
towing bracket is electrically connected to a trailer or similar Trailer towing
electrically connected to the vehicle and the driver pulls away, a text message appears in the
instrument cluster display to inform the driver that the Blind Spot Monitor has been deactivated.
The Blind Spot Monitor will be automatically activated again when the trailer has been unhitched
from the vehicle. This applies if the function was previously activated. The Blind Spot Monitor must
be deactivated manually if you tow a trailer using a towing bracket that was not fitted at the factory.
Troubleshooting
First read and observe the introductoryinformation and safety warnings
Blind Spot Monitor is not working
The indicator lamp lights up yellow.
Go to a qualified workshop.
Page 272 of 502
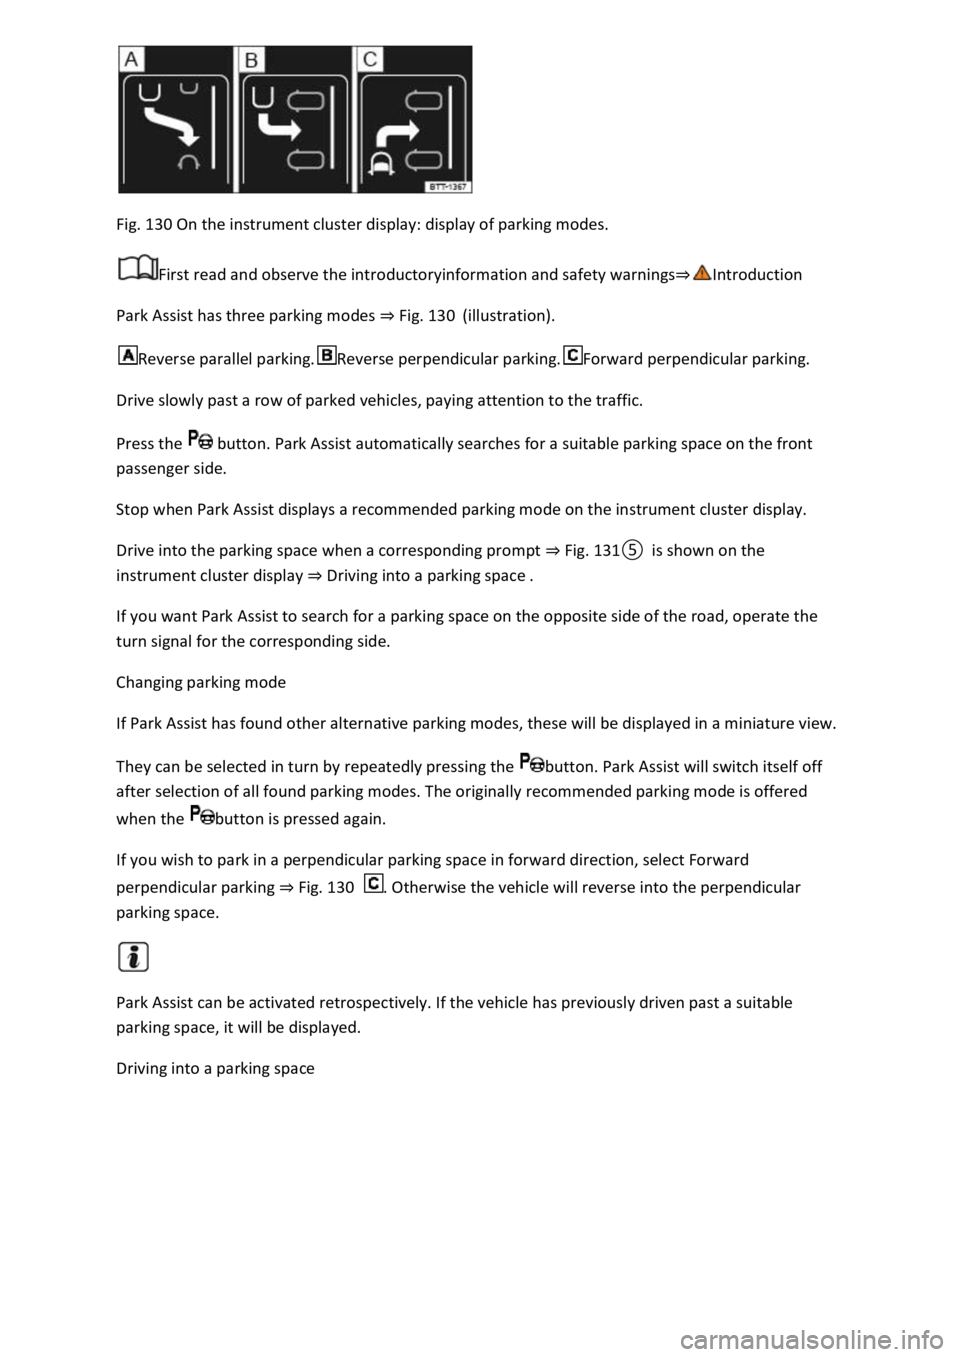
Fig. 130 On the instrument cluster display: display of parking modes.
First read and observe the introductoryinformation and safety warnings
Park Assist has three parking modes Fig. 130(illustration).
Reverse parallel parking.Reverse perpendicular parking.Forward perpendicular parking.
Drive slowly past a row of parked vehicles, paying attention to the traffic.
Press the button. Park Assist automatically searches for a suitable parking space on the front
passenger side.
Stop when Park Assist displays a recommended parking mode on the instrument cluster display.
Drive into the parking space when a corresponding prompt Fig.
Driving into a parking space
If you want Park Assist to search for a parking space on the opposite side of the road, operate the
turn signal for the corresponding side.
Changing parking mode
If Park Assist has found other alternative parking modes, these will be displayed in a miniature view.
They can be selected in turn by repeatedly pressing the button. Park Assist will switch itself off
after selection of all found parking modes. The originally recommended parking mode is offered
when the button is pressed again.
If you wish to park in a perpendicular parking space in forward direction, select Forward
perpendicular parking Fig. 130. Otherwise the vehicle will reverse into the perpendicular
parking space.
Park Assist can be activated retrospectively. If the vehicle has previously driven past a suitable
parking space, it will be displayed.
Driving into a parking space