lock VOLKSWAGEN T-ROC 2019 Owners Manual
[x] Cancel search | Manufacturer: VOLKSWAGEN, Model Year: 2019, Model line: T-ROC, Model: VOLKSWAGEN T-ROC 2019Pages: 502, PDF Size: 8.58 MB
Page 2 of 502

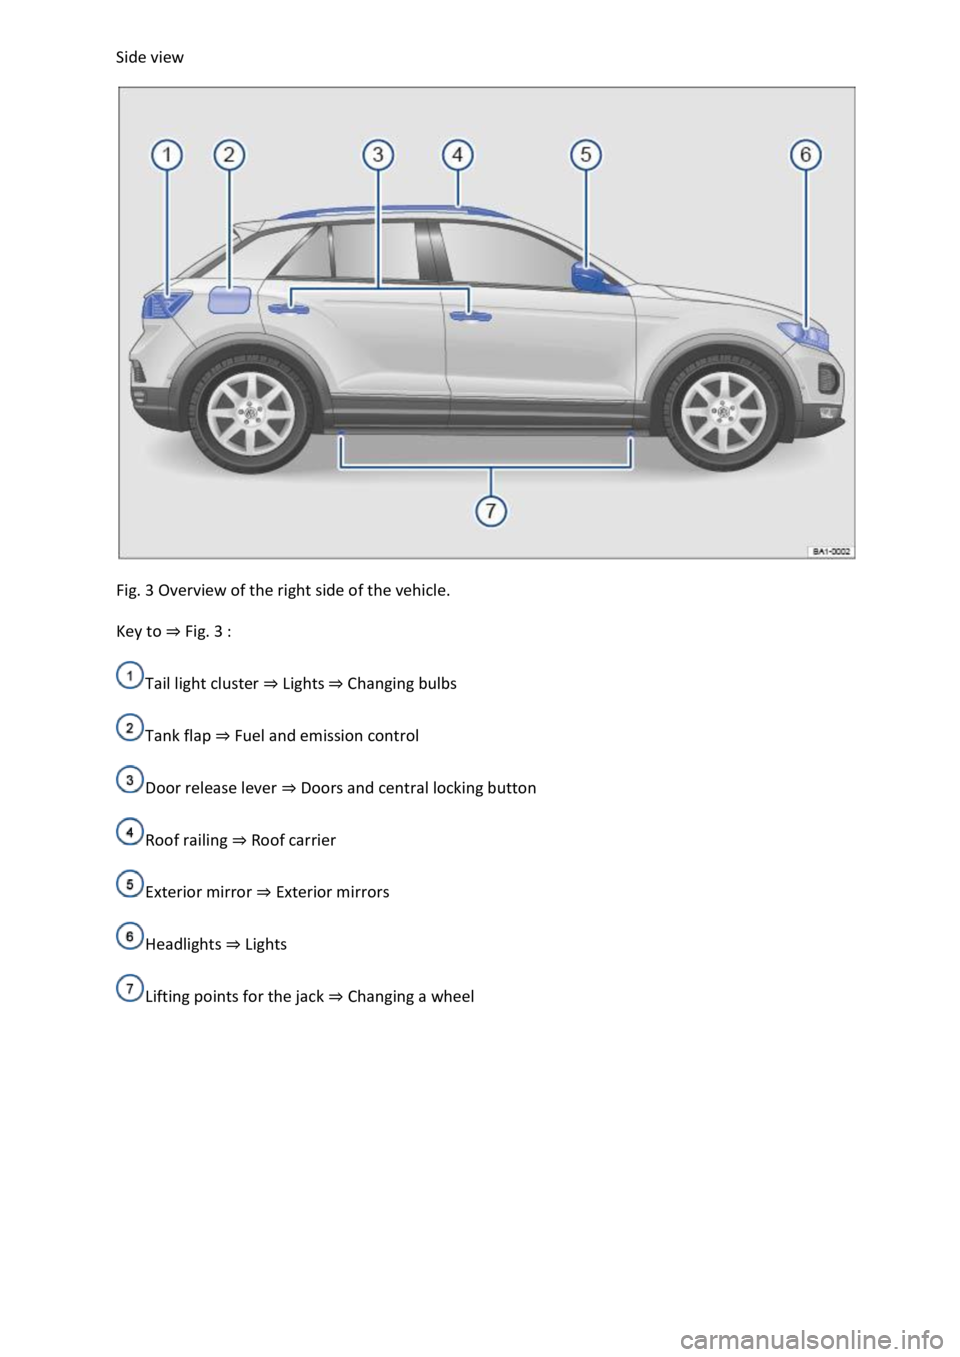
e view
Fig. 3 Overview of the right side of the vehicle.
Key to Fig. 3
Tail light cluster LightsChanging bulbs
Tank flap Fuel and emission control
Door release lever Doors and central locking button
Roof railing Roof carrier
Exterior mirror Exterior mirrors
Headlights Lights
Lifting points for the jack Changing a wheel
Page 4 of 502

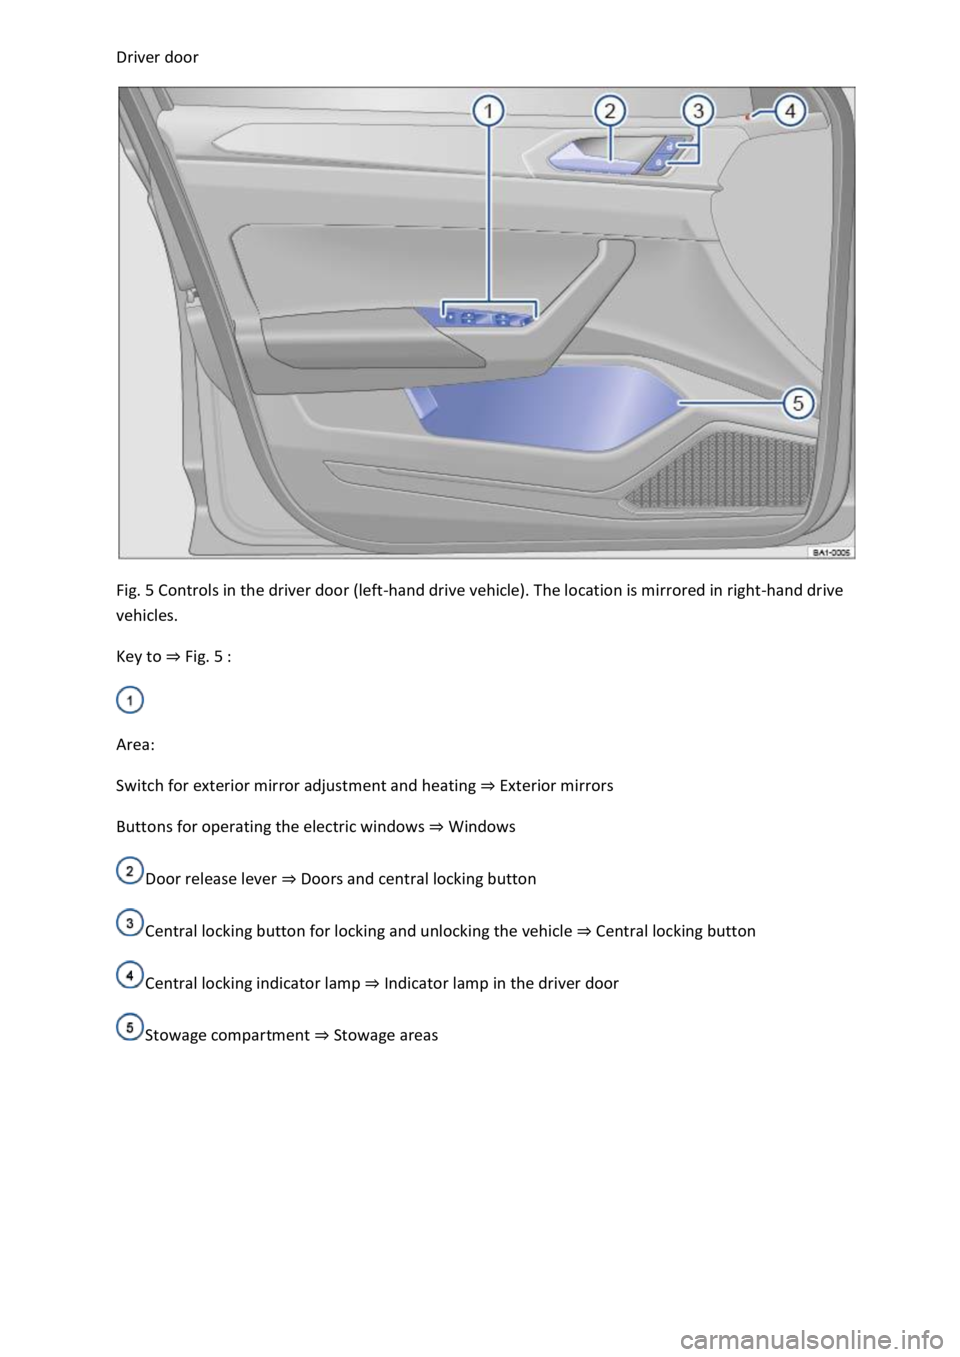
Fig. 5 Controls in the driver door (left-hand drive vehicle). The location is mirrored in right-hand drive
vehicles.
Key to Fig. 5
Area:
Switch for exterior mirror adjustment and heating Exterior mirrors
Buttons for operating the electric windows Windows
Door release lever Doors and central locking button
Central locking button for locking and unlocking the vehicle Central locking button
Central locking indicator lamp Indicator lamp in the driver door
Stowage compartment Stowage areas
Page 6 of 502

In the engine compartment
Fuse box cover Changing fuses
Lever for adjusting the steering column position Steering wheel
Light switch Vehicle lighting
Turn signal and main beam lever Vehicle lighting
With switches and buttons for the driver assist systems Button for driver assist systemsDriver
assist systems
Vents Heating and air conditioning system
Instrument cluster Instrument cluster
With warning and indicator lamps Symbols in instrument cluster
Lever for wipers and washers Wipers
With buttons for operating the menus Instrument cluster
Controls on the multifunction steering wheel:
Operating driver assist systems Operating using the multifunction steering wheelDriver assist
systems
Audio, navigation
Opening the telephone menu or accepting telephone calls
Volume adjustment
Activating voice control (no function in some models)
Horn
Location of the driver front airbag Airbag system
Ignition lock Starting and stopping the engine
Pedals Pedals
Page 10 of 502

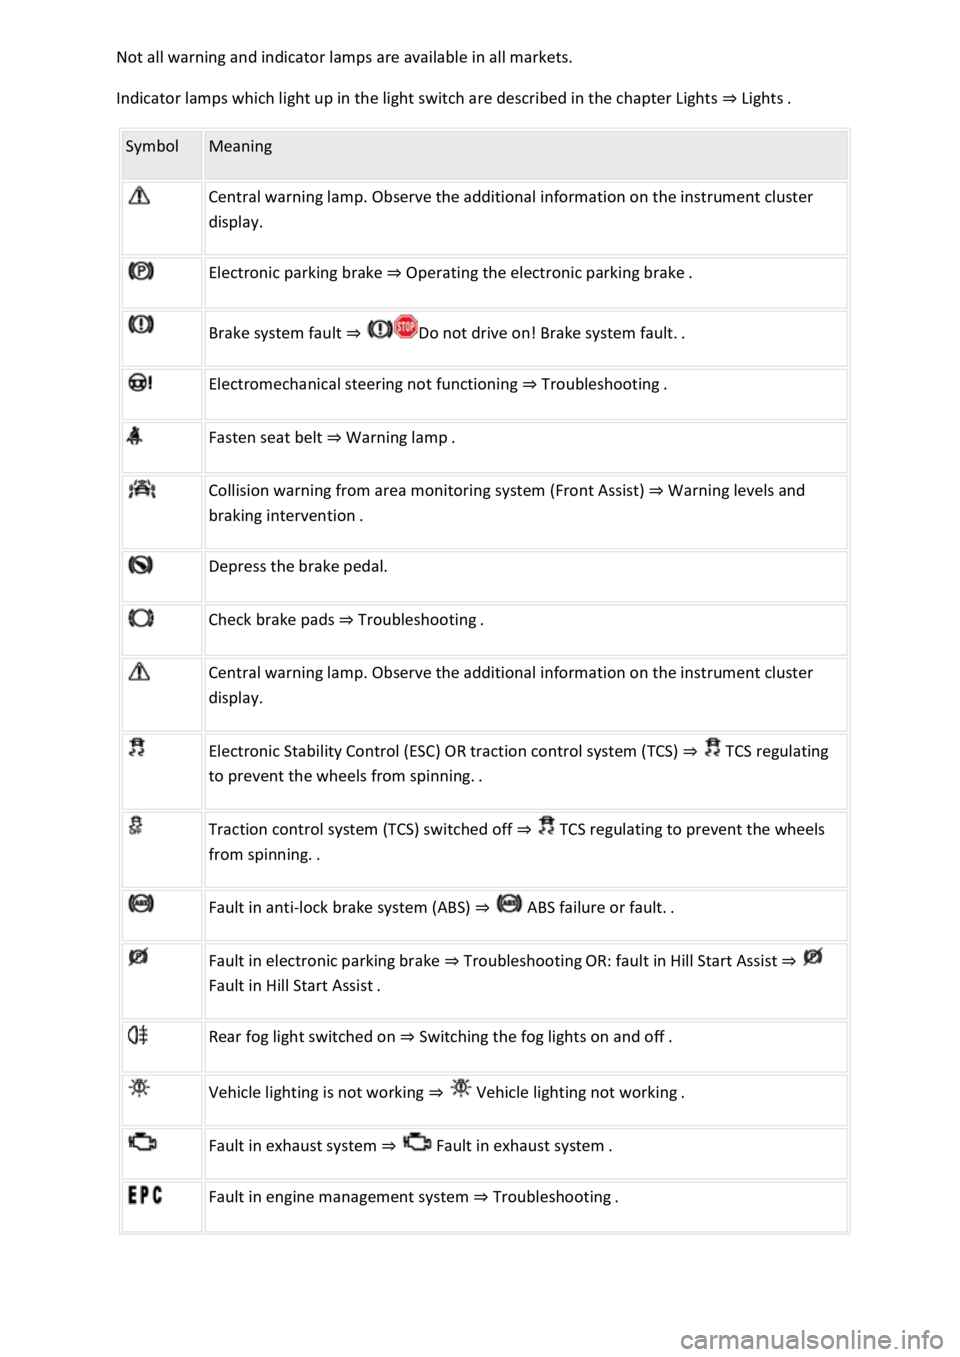
Indicator lamps which light up in the light switch are described in the chapter Lights Lig
Symbol Meaning
Central warning lamp. Observe the additional information on the instrument cluster
display.
Electronic parking brake Operating the electronic parking brake.
Brake system fault
Electromechanical steering not functioning Troubleshooting.
Fasten seat belt Warning lamp.
Collision warning from area monitoring system (Front Assist) Warning levels and
Depress the brake pedal.
Check brake pads Troubleshooting.
Central warning lamp. Observe the additional information on the instrument cluster
display.
Electronic Stability Control (ESC) OR traction control system (TCS) TCS regulating
to
Traction control system (TCS) switched off TCS regulating to prevent the wheels
Fault in anti-lock brake system (ABS)
Fault in electronic parking brake TroubleshootingOR: fault in Hill Start Assist
Rear fog light switched on Switching the fog lights on and off.
Vehicle lighting is not working
Fault in exhaust system Fault
Fault in engine management system Troubleshooting.
Page 19 of 502

Personalisation
Open doors, bonnet and boot lid
The instrument cluster display indicates if any doors, the engine compartment or boot lid are open
once the vehicle has been unlocked, and while the vehicle is in motion. In some cases, a signal tone
is also given. Different instrument cluster designs may have different displays.
Selector lever positions (DSG
Page 30 of 502

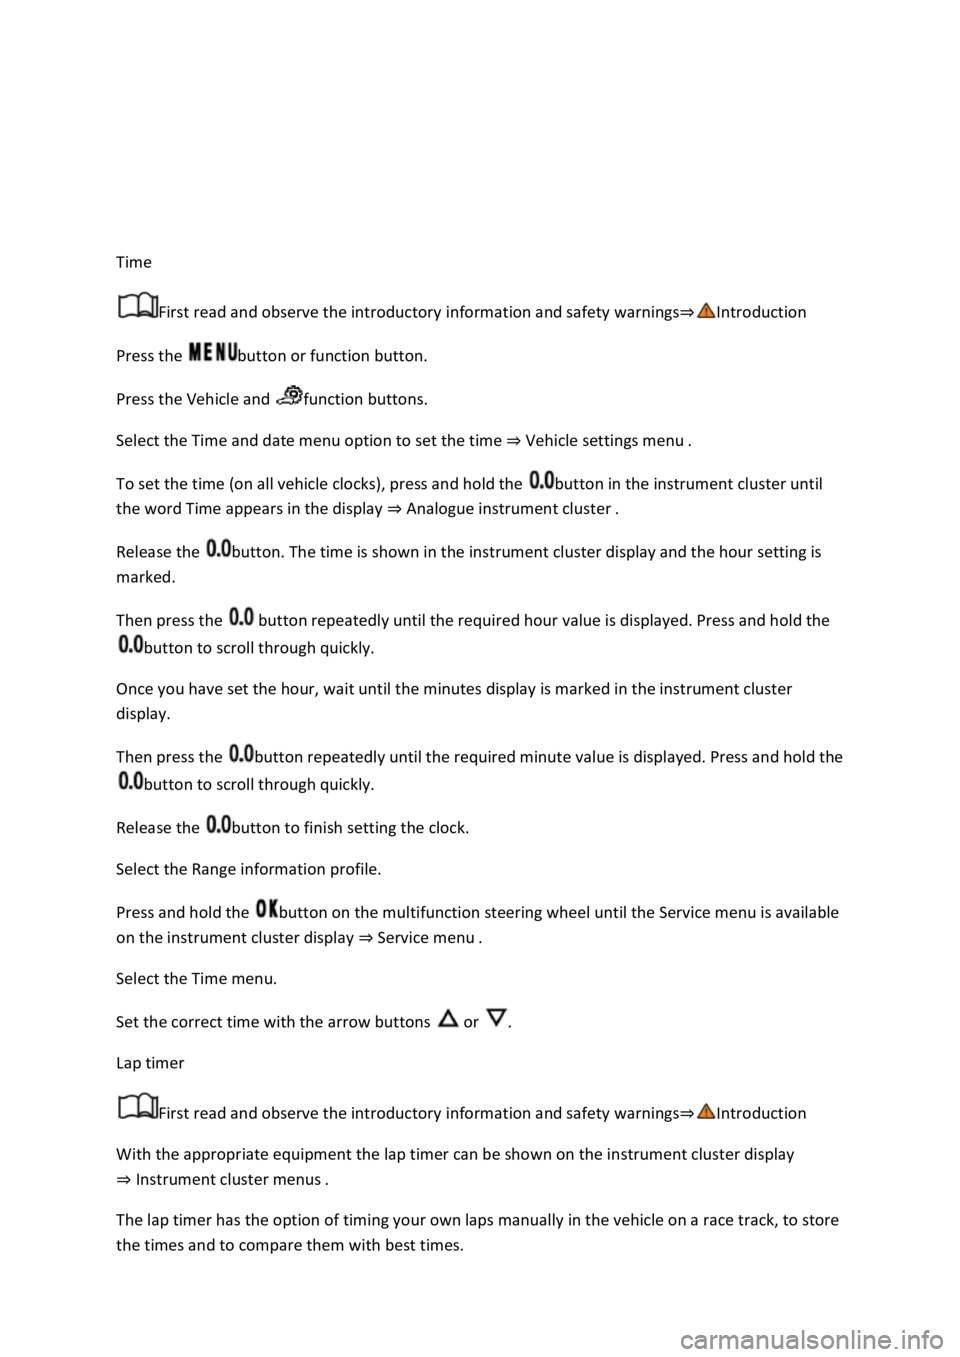
Time
First read and observe the introductory information and safety warnings
Press the button or function button.
Press the Vehicle and function buttons.
Select the Time and date menu option to set the time Vehicle settings menu
To set the time (on all vehicle clocks), press and hold the button in the instrument cluster until
the word Time appears in the display Analogue instrument cluster
Release the button. The time is shown in the instrument cluster display and the hour setting is
marked.
Then press the button repeatedly until the required hour value is displayed. Press and hold the
button to scroll through quickly.
Once you have set the hour, wait until the minutes display is marked in the instrument cluster
display.
Then press the button repeatedly until the required minute value is displayed. Press and hold the
button to scroll through quickly.
Release the button to finish setting the clock.
Select the Range information profile.
Press and hold the button on the multifunction steering wheel until the Service menu is available
on the instrument cluster display Service menu
Select the Time menu.
Set the correct time with the arrow buttons or .
Lap timer
First read and observe the introductory information and safety warnings
With the appropriate equipment the lap timer can be shown on the instrument cluster display
Instrument cluster menus
The lap timer has the option of timing your own laps manually in the vehicle on a race track, to store
the times and to compare them with best times.
Page 42 of 502

Fig. 23
Display areas.
Arrow buttons for changing to the lap timer.
Opening the performance monitor
Press the MENU button or function button on the Infotainment system.
Touch the Vehicle function button.
Touch the Selection function button.
Touch the Sport function button.
If you would like to switch between the performance monitor and the lap timer Lap timer
one of the arrow buttons on the left and right above the instruments Fig. 23
Selecting instruments and setting units
The display can show a maximum of three instruments at the same time. Each instrument can be
selected for each display area Fig. 23
To change between instruments, swipe vertically over the display. The currently selected instrument
will then disappear and a new instrument will appear.
The units can be adjusted for some instruments in the Infotainment system Vehicle settings
menu
The following instruments can be displayed:
Charge pressure display: the charge pressure display Fig. 23
ar). The further to the right the
needle on the scale, the higher the engine power output.
Accelerometer (G-meter): the accelerometer (G-meter) Fig. 23
-type area shows the
acceleration level and the direction of the acting force (in the opposite direction according to
physical laws). If you drive to the left, for example, the red marking will move in the right area of the
instrument (and vice versa). If you accelerate, the red marking will move down. If you brake, the red
marking will move up. The level of acceleration is indicated by the position of the red marking which
moves outwards. If the acceleration increases, the red marking will move away from the centre area.
Power display: the power display Fig. 23
Coolant temperature display: the needle may move further in a clockwise direction under high
engine loads and with high outside temperatures. This is no cause for concern unless the
indicator lamp in the instrument cluster display is lit up or flashing Coolant temperature display
Oil temperature display: the needle is in the middle area under normal driving conditions. If the
needle is in the bottom left area, this means that the engine has not yet reached its operating
temperature. Avoid excessively high speeds and acceleration when the engine has not yet reached
Page 43 of 502

needle may move further in a clockwise direction under high engine
loads and at high outside temperatures. This is no cause for concern unless the indicator lamp
in the instrument cluster display is lit up or flashing Engine oil
Adapting the display areas to the driving situation
Choose the three possible instruments corresponding to your individual driving style and the driving
situation.
WARNING
Accidents and injuries can occur if the driver is distracted. Operating the Infotainment system can
distract you from the road.
Always drive carefully and responsibly.
NOTICE
When starting from cold, avoid high engine speeds, driving at full throttle and over-loading the
engine.
Due to the principle of performance determination used in the vehicle, the physical accuracy of the
displayed values is not guaranteed.
Lap timer
First read and observe the introductoryinformation and safety warnings
The lap timer provides you with the option of timing your own laps manually in the vehicle on a race
track, storing the times and comparing them with previously measured best times.
Fig. 24 On the Infotainment system display: lap timer with stopwatch, function button and lap times.
Page 45 of 502

Press the MENU button or function button, depending on the version of the Infotainment system.
Touch the Vehicle function button.
Touch the Selection function button.
Touch the Sport function button. The performance monitor is displayed.
Touch one of the arrow buttons Fig. 23
You can change between the lap timer and performance monitor at any time using the arrow
buttons Fig. 23Fig. 24
Measuring lap times
The stopwatch measures the lap time in two areas:
The red needle and the numerical value in the centre show the running time in seconds. The smaller
display in the inner area shows minutes and hours.
The display on the right side shows the current lap time with an accuracy of 1/100 seconds. There is
no difference between the stopwatch and lap times if there are not yet any laps with split times
stored in the lap timer.
WARNING
Avoid operating the lap timer when the vehicle is in motion if possible.
Make lap timer settings and access statistics only when the vehicle is stationary.
When the vehicle is in motion, use the lap timer only in driving situations which are easy to control.
Personalisation
First read and observe the introductoryinformation and safety warnings
The personalisation function allows personalised vehicle settings, such as air conditioning system,
instrument cluster or lighting settings, to be saved in a user account. Four user accounts are
available. Users are identified by the vehicle keys upon unlocking the vehicle. A user account is
assigned to each vehicle key.
Changes to the settings will be assigned to the active user account and saved upon locking the
vehicle or changing the user account.
Welcome and user account selection
When personalisation is activated, the name of the current user account appears on the instrument
cluster display for approximately ten seconds after you switch on the ignition.
During this time, you can select a user account using the buttons on the wiper lever or multifunction
steering wheel Infotainment system controls and displays
Page 46 of 502

User management and settings
When the ignition is switched on, you can use the Personalisation menu in the Infotainment system
for user management and to make settings. The menu can be accessed via the vehicle settings in the
Infotainment system.
Changing the user account
You can select the user account either via the Personalisation menu or via the Vehicle status menu.
Manually assigning vehicle keys to user accounts
You can assign a vehicle key to the currently active user account. For this purpose, select Manual key
assignment.
Automatically assigning vehicle keys to user accounts
If you have selected Automatic key assignment, the following vehicle key is assigned to the user
account upon changing the user account:
Vehicles without Keyless Access: vehicle key used to unlock the vehicle.
Vehicles with Keyless Access: vehicle key that is identified first by the personalisation function
when you open the driver door.
Personalised vehicle settings
Opening and closing (single door unlocking, window convenience opening etc.)
Light and vision (daytime running lights, cornering light, lane change flash etc.)
Settings for air conditioning system
Active driver assist systems
Driving profile selection
Multifunction display and instrument cluster (selection of displays)
Infotainment system (display brightness and station sorting)
A new vehicle key will be assigned to the current user account. To assign the vehicle key to a
different user account, select the required user account and manually assign it to the vehicle key.
Safety