open VOLKSWAGEN T-ROC 2020 Owners Manual
[x] Cancel search | Manufacturer: VOLKSWAGEN, Model Year: 2020, Model line: T-ROC, Model: VOLKSWAGEN T-ROC 2020Pages: 502, PDF Size: 8.58 MB
Page 388 of 502

12-volt vehicle battery, ensure that your hands, arms and face in particular are protected from acid
spillages.
-volt vehicle battery. Electrolyte may spill out of the battery vents and cause
chemical burns.
-volt vehicle battery.
Then consult a doctor immediately.
lyte is swallowed, consult a doctor immediately.
Charging, replacing, disconnecting and connecting the 12-volt vehicle battery
First read and observe the introductoryinformation and safety warnings
If you suspect that the 12-volt vehicle battery is damaged or faulty, go to a qualified workshop and
have the 12-volt vehicle battery checked.
Charging the 12-volt vehicle battery
The 12-volt vehicle battery should be charged by a qualified workshop, as the technology used in
factory-fitted 12-volt vehicle batteries requires voltage-limited charging
recommends using a Volkswagen dealership for this purpose.
Replacing the 12-volt vehicle battery
The 12-volt vehicle battery has been developed to suit the conditions of its installation location and
has special safety features. If a 12-volt vehicle battery has to be replaced, find out about the
electromagnetic compatibility, size and necessary maintenance, power and safety requirements for
the new 12-volt vehicle battery at a Volkswagen dealership before purchase. The ventilation opening
of the vehicle battery must always be on the negative terminal side: the ventilation opening on the
positive terminal side must always be sealed.
Only maintenance-free vehicle batteries compliant with the standards TL 825 06 and VW 7 50 73
should be used. These standards must be dated October 2014 or later.
Always have the 12-volt vehicle battery replaced by a qualified workshop, as the vehicle electronics
must be adapted as part of the replacement process. Only qualified workshops have the technology
required to carry out this adjustment correctly. Volkswagen recommends that the 12-volt vehicle
battery is replaced by a Volkswagen dealership.
Disconnecting the 12-volt vehicle battery
Please observe the following if the 12-volt vehicle battery has to be disconnected from the electrical
system in the vehicle:
-theft
alarm.
Page 410 of 502

xamples:
78425 kg81462 kg83487 kg85515 kg87545 kg88560 kg91615 kg92630 kg93650 kg95690 kg97730
kg99775 kg100800 kg101825 kg102850 kg103875 kg104900 kg
Speed index
The speed index indicates the maximum permitted speed that may be driven with the tyres.
Pmax. 150 km/h (93 mph)Qmax. 160 km/h (99 mph)Rmax. 170 km/h (106 mph)Smax. 180 km/h
(112 mph)Tmax. 190 km/h (118 mph)Umax. 200 km/h (125 mph)Hmax. 210 km/h
(130 mph)Vmax. 240 km/h (149 mph)Wmax. 270 km/h (168 mph)Ymax. 300 km/h
(186 mph)Zover 240 km/h (149 mph)
Some tyre manufacturers use the code ZR for tyres with a maximum permitted speed of over
240 km/h (149 mph).
a) The TIN is the tyre serial number.
Maximum load and speed range for tyres
First read and observe the introductoryinformation and safety warnings
Vehicles in the EU and the so-called EU user states are issued an EC Certificate of Conformity. This
details the size, diameter, load rating and speed range of all tyres approved by Volkswagen for the
relevant vehicle type.
The type plate shows whether there is an EC certificate of conformity for this particular vehicle. The
type plate can be seen on the lower part of the door pillar when the driver door is open Technical
data
that the vehicle has an EC certificate of
conformity.
certificate of conformity.
Winter tyres
First read and observe the introductoryinformation and safety warnings
Winter or all-year tyres improve the handling and braking response in winter conditions. Volkswagen
recommends that winter tyres be fitted to the vehicle at temperatures below +7
Page 422 of 502

Loosen the wheel bolts Wheel bolts.
Find the jacking point under the vehicle which is closest to the wheel that is being changed.
Insert the crank into the opening on the jack (depends on the vehicle equipment).
Crank up the jack until it just fits under the jacking point of the vehicle.
Ensure that the entire surface of the foot of the jack is resting securely on the floor, and that the
foot of the jack is positioned fully underneath the point of application and .
Position the jack and simultaneously continue to crank the claw up until it is in position around the
vertical rib underneath the vehicle .
Crank the jack further until the wheel is just clear of the ground.
WARNING
Incorrect use of the vehicle jack could cause the vehicle to slip off the jack. This could lead to severe
injuries. Observe the following points in order to reduce the risk of injuries:
jacks could slip out of position this includes vehicle jacks supplied with other Volkswagen models.
the vehicle to slip off the jack. If necessary, use a large, sturdy board or similar support for the
vehicle jack.
side member securely Fig. 206
lace any part of your body (e.g. an arm or leg) underneath the vehicle if the latter is
supported only by the vehicle jack.
Page 429 of 502

Take the breakdown set out of the luggage compartment.
Take the sticker
Do not remove foreign objects (e.g. screws or nails) from the tyre.
WARNING
Ignoring any of the items on this important safety checklist can lead to accidents and severe injuries.
Sealing and inflating tyres
First read and observe the introductoryinformation and safety warnings
Sealing a tyre
Fig.
0to unscrew the valve core from the tyre valve. Place
the core on a clean surface.
Fig.
0vigorously to and fro several times.
Fig.
0tightly onto the tyre filler bottle in a clockwise direction. The
plastic foil on the closure is pierced automatically.
Fig.
0and place the open end fully on the tyre valve.
Fig.
0to screw the valve core back into the tyre valve.
Inflating the tyre
Fig.
Fig.
0is closed.
-volt plug Fig.
0into one of the vehicle's 12-volt sockets Electrical sockets
Page 488 of 502

214 Vehicle identification number.
Vehicle data sticker
The vehicle data sticker Fig. 213 is located on the cover of the owner's manual and under the
rear luggage compartment trim on the luggage compartment wall. It contains the following data:
Vehicle identification number (chassis number)
Vehicle type, engine power, gearbox type
Engine and gearbox codes, paint number, interior equipment. In the example, the engine code
is CPTA Fig. 213
Additional equipment, PR numbers
Type plate
The type plate Fig. 213can be seen on the lower part of the door pillar when the driver door is
open. Vehicles for certain export countries do not have a type plate.
The type plate contains the following data:
Approval
Gross vehicle weight rating
Gross combination weight rating (vehicle plus trailer)
Gross front axle weight rating
Gross rear axle weight rating
Vehicle identification number (VIN)
The vehicle identification number can be read from outside the vehicle through a viewer in the
windscreen Fig. 214(arrow). The viewer is located in the lower corner of the windscreen. The
vehicle identification number is also stamped on the right-hand water drainage channel. The water
drainage channel is located between the suspension turret and wing. Open the bonnet to gain
access to the vehicle identification number In the engine compartment
The vehicle identification number can be displayed in the Infotainment system using the button
and the and Service function buttons Infotainment system controls and displays
Vehicle data
Page 489 of 502
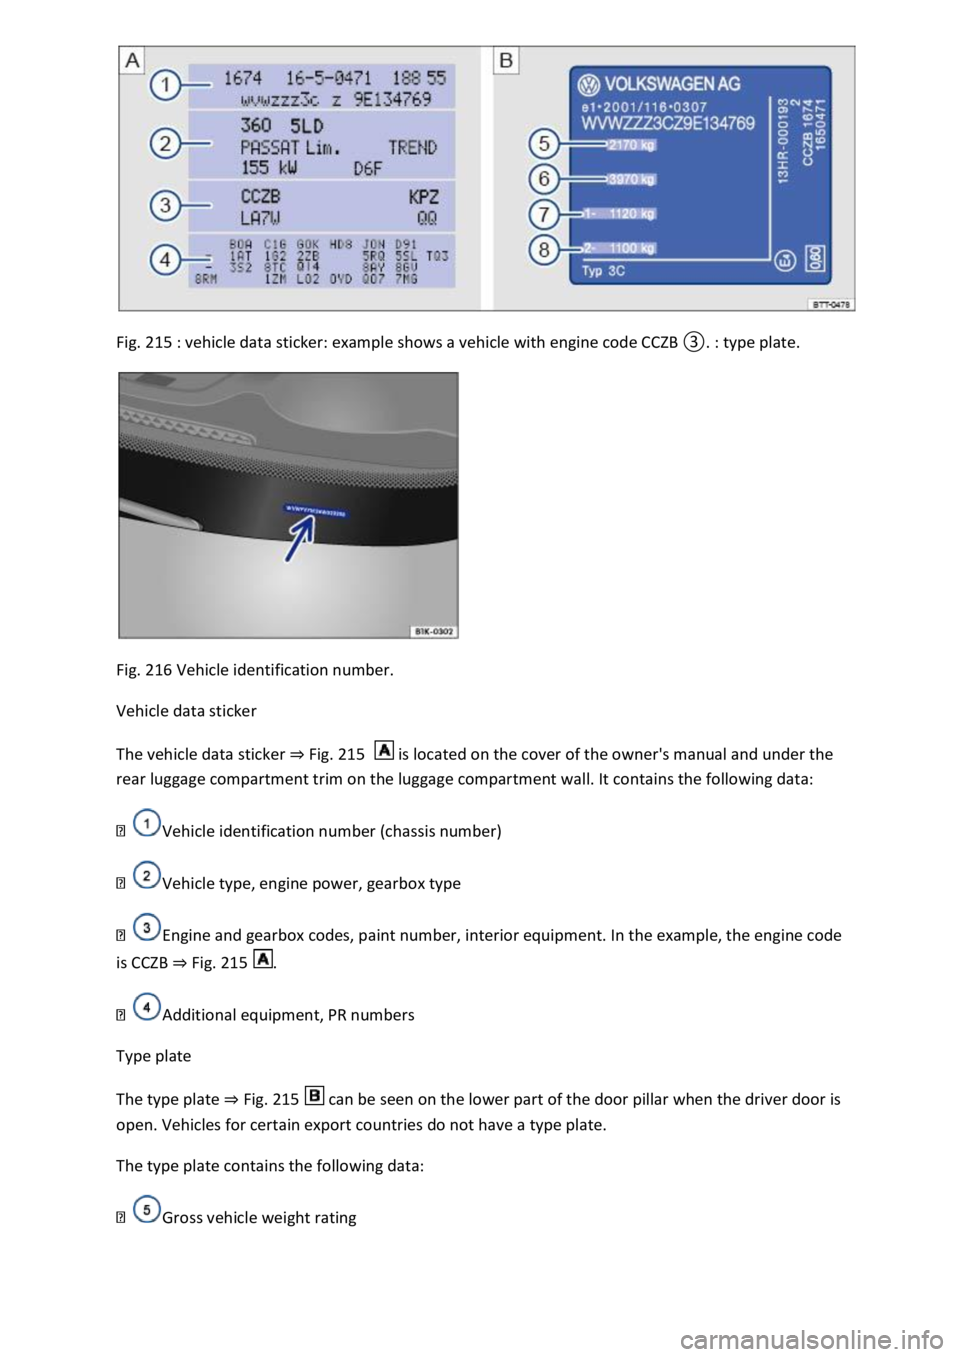
Fig. 215
Fig. 216 Vehicle identification number.
Vehicle data sticker
The vehicle data sticker Fig. 215 is located on the cover of the owner's manual and under the
rear luggage compartment trim on the luggage compartment wall. It contains the following data:
Vehicle identification number (chassis number)
Vehicle type, engine power, gearbox type
Engine and gearbox codes, paint number, interior equipment. In the example, the engine code
is CCZB Fig. 215
Additional equipment, PR numbers
Type plate
The type plate Fig. 215can be seen on the lower part of the door pillar when the driver door is
open. Vehicles for certain export countries do not have a type plate.
The type plate contains the following data:
Gross vehicle weight rating
Page 490 of 502
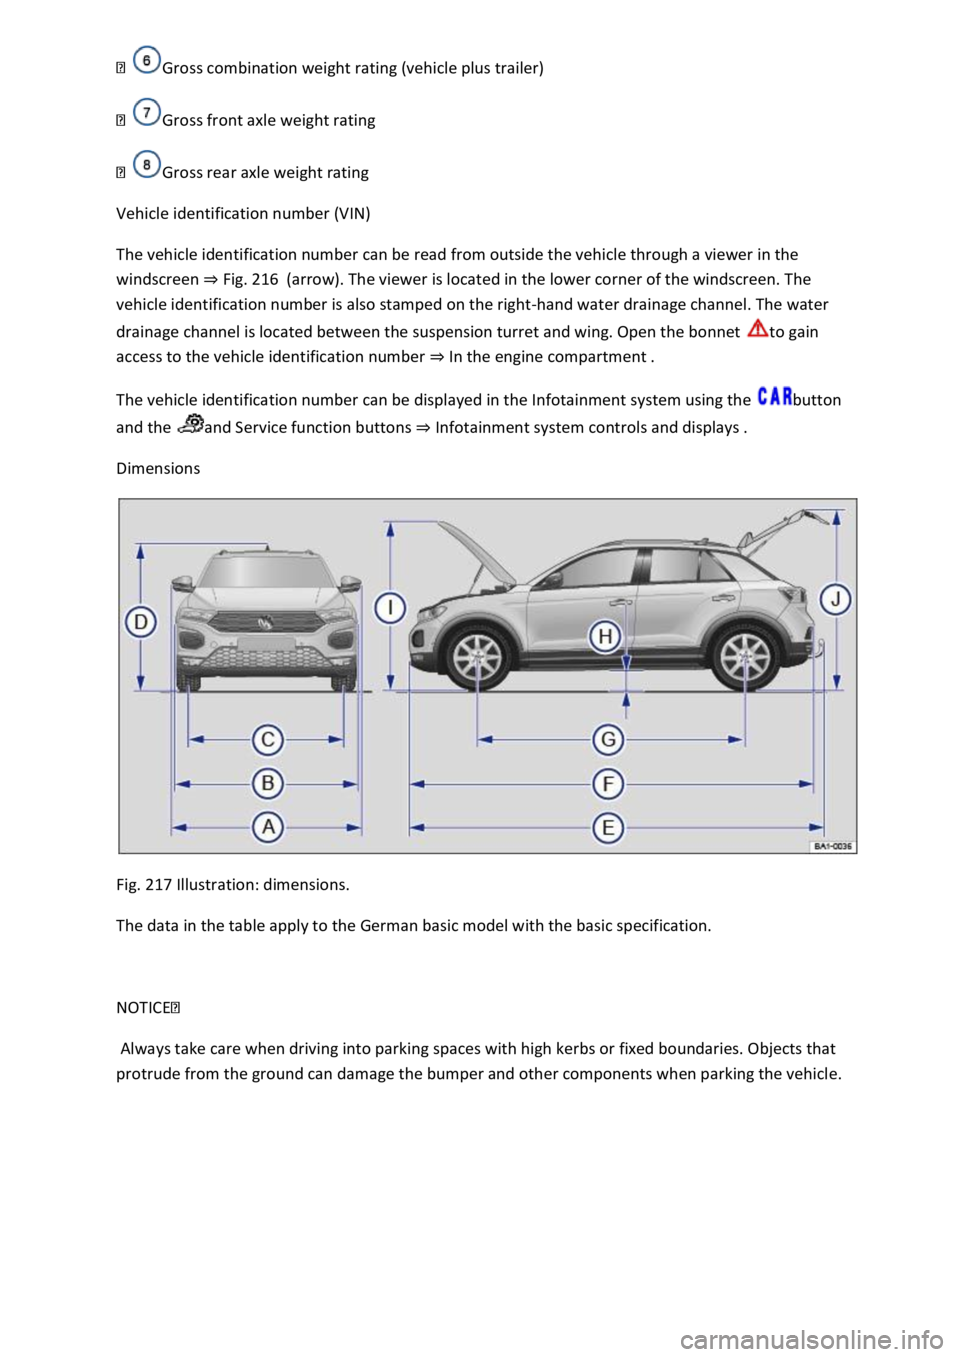
Gross front axle weight rating
Gross rear axle weight rating
Vehicle identification number (VIN)
The vehicle identification number can be read from outside the vehicle through a viewer in the
windscreen Fig. 216(arrow). The viewer is located in the lower corner of the windscreen. The
vehicle identification number is also stamped on the right-hand water drainage channel. The water
drainage channel is located between the suspension turret and wing. Open the bonnet to gain
access to the vehicle identification number In the engine compartment
The vehicle identification number can be displayed in the Infotainment system using the button
and the and Service function buttons Infotainment system controls and displays
Dimensions
Fig. 217 Illustration: dimensions.
The data in the table apply to the German basic model with the basic specification.
NOTICE
Always take care when driving into parking spaces with high kerbs or fixed boundaries. Objects that
protrude from the ground can damage the bumper and other components when parking the vehicle.