battery VOLKSWAGEN T-ROC 2020 Owners Manual
[x] Cancel search | Manufacturer: VOLKSWAGEN, Model Year: 2020, Model line: T-ROC, Model: VOLKSWAGEN T-ROC 2020Pages: 502, PDF Size: 8.58 MB
Page 14 of 502

Introduction
This chapter contains information on the followingsubjects:
Analogue instrument cluster
Rev counter
Digital instrument cluster (Active Info Display)
Displays
Instrument cluster menus
Service menu
Driving data display (multifunction display)
Warning and information messages
Driver Alert System (recommendation for rest breaks)
Dynamic Road Sign Display (Sign Assist)
Time
Lap timer
Fuel gauge
Coolant temperature display
Service interval display
The vehicle is equipped either with an analogue or a digital instrument cluster (Active Info Display).
When you start the engine after the 12-volt battery has been totally discharged or changed, you may
find that system settings (time, date, personal convenience settings and programming) have been
changed or deleted. Check and correct the settings as necessary once the 12-volt vehicle battery has
been sufficiently charged.
WARNING
Accidents and injuries can occur if the driver is distracted.
Never press the buttons on the instrument cluster while the vehicle is in motion.
Any settings for the instrument cluster display and displays in the Infotainment system should be
made only when the vehicle is stationary in order to reduce the risk of accidents and serious injuries.
Page 36 of 502

reset as follows:
Vehicles with analogue instrument cluster.
Switch off the ignition.
Press and hold the button in the instrument cluster Instrument cluster
Switch on the ignition again.
Release the button when one of the following messages appears on the instrument cluster
display: Reset oil service? or Reset inspection?.
Press the button on the instrument cluster Instrument clusterto confirm.
Vehicles with digital instrument cluster.
The service interval display can be reset only via the Service menu Service menu
Do not reset the service interval display between service intervals otherwise incorrect data will be
shown.
If the oil change service was manually reset, the service interval display then also changes to a fixed
service interval in vehicles with flexible oil change service.
The service message will disappear after a few seconds when the engine is running, or when the
button on the wiper lever or the button on the multifunction steering wheel is pressed
Operating the instrum
If the 12-volt vehicle battery was disconnected for long periods in vehicles with flexible service, the
system cannot calculate the time at which the next service is due. The information shown in the
service interval display may therefore be incorrect. In this case, please observe the maximum
permissible service intervals Service
Operating the instrument cluster
Introduction
This chapter contains information on the followingsubjects:
Operating using the wiper lever
Operating using the multifunction steering wheel
Button for driver assist systems
Some menu options can be accessed only when the vehicle is stationary.
Page 37 of 502

ng wheel
Operating using the wiper lever
WARNING
Accidents and injuries can occur if the driver is distracted.
Never operate the menus on the instrument cluster display while the vehicle is in motion.
Check the system settings after charging or replacing the 12-volt vehicle battery. System settings
may be changed or deleted if the power supply is interrupted.
Operating using the wiper lever
Fig. 20 On the right of the steering column: buttons on the wiper lever (illustration).
First read and observe the introductoryinformation and safety warnings
If any priority 1 Instrument clusterwarning messages are displayed, you will be unable to open
any menus. Some warnings can be confirmed and hidden using the button Fig. 20
Selecting a menu or information display
Switch on the ignition.
Personalisation: select user.
If a message or vehicle pictogram is displayed, press the Fig. 20
To display the menus Instrument cluster menusor to return from a menu or an information
display to the menu selection, hold down the rocker switch Fig. 20
To browse through the menus, press the rocker switch up or down.
To open the menu or information display, press button Fig. 20
a few seconds.
Changing settings in menus
Page 41 of 502

When you start the engine after the 12-volt vehicle battery has been totally discharged or changed,
you may find that system settings (time, date, personal convenience settings and programming) and
user accounts have been changed or deleted. Check and correct the settings as necessary once the
12-volt vehicle battery has been sufficiently charged.
Vehicle settings menu
First read and observe the introductoryinformation and safety warnings
You can switch individual functions and systems on and off and make settings in the vehicle settings
of the Infotainment system.
Opening the Vehicle settings menu
Switch on the ignition.
Switch on Infotainment system if necessary.
Press the button or function button.
Touch the Vehicle and function buttons to open the Vehicle settings menu.
Touch the corresponding function buttons to open additional menus in the Vehicle settings menu or
to make settings in the menu options.
If the checkbox in the function button is ticked , the respective function is switched on.
Touch the function button to return to the previous menu.
Performance monitor
First read and observe the introductoryinformation and safety warnings
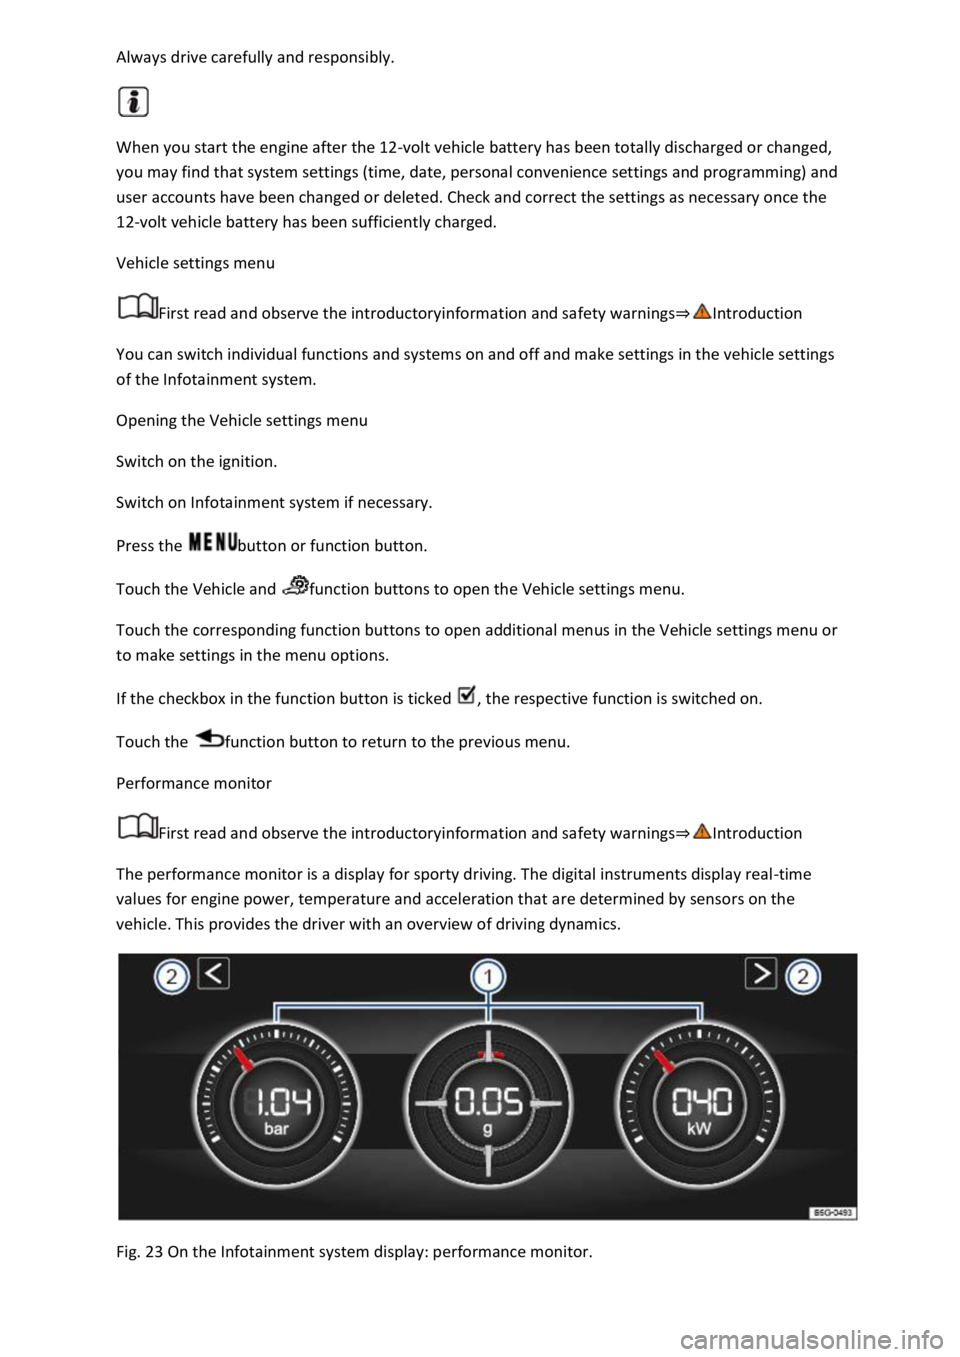
The performance monitor is a display for sporty driving. The digital instruments display real-time
values for engine power, temperature and acceleration that are determined by sensors on the
vehicle. This provides the driver with an overview of driving dynamics.
Fig. 23 On the Infotainment system display: performance monitor.
Page 86 of 502

When pushing the vehicle by hand, do not press on the tail light clusters, the rear spoiler or large
panels. This could damage the vehicle and the rear spoiler could become detached.
The 12-volt vehicle battery will discharge if the hazard warning lights are left on over a long period of
time even when the ignition is switched off.
Depending on the vehicle equipment, the brake lights flash rapidly if you brake sharply or initiate full
braking at a speed of more than 80 km/h (50 mph). This is a particularly effective way of attracting
the attention of vehicles behind you. If you then continue to brake, the hazard warning lights will be
switched on automatically at speeds under approximately 10 km/h (6 mph). Once you start to
accelerate, the hazard warning lights will switch off again automatically.
Equipment for an emergency
Fig. 48 In the boot lid: holder for the warning triangle.
First-aid kit
Depending on the equipment, the first-aid kit may be located in a stowage compartment or holder in
the luggage compartment, under the luggage compartment floor or in the vehicle interior.
The first-aid kit must comply with legal requirements. Please note the expiry date of the contents.
After use, replace any of the contents as necessary and then stow the first-aid kit away again safely.
Warning triangle
Depending on the equipment, the warning triangle may be located in the boot lid. When the boot lid
is open, turn the lock of the holder Fig. 48by 90
Page 90 of 502

in the vehicle in an emergency and may not be able to get themselves to safety. For example, locked
vehicles may be subjected to very high or very low temperatures depending on the season. This can
cause serious injuries and illness or fatalities, especially in the case of small children.
Never switch off the ignition while the vehicle is in motion. The steering column lock or steering lock
mechanism may be activated and you will no longer be able to steer the vehicle.
NOTICE
Every electric vehicle key contains electronic components. Protect the key from damage, moisture
and excessive vibration.
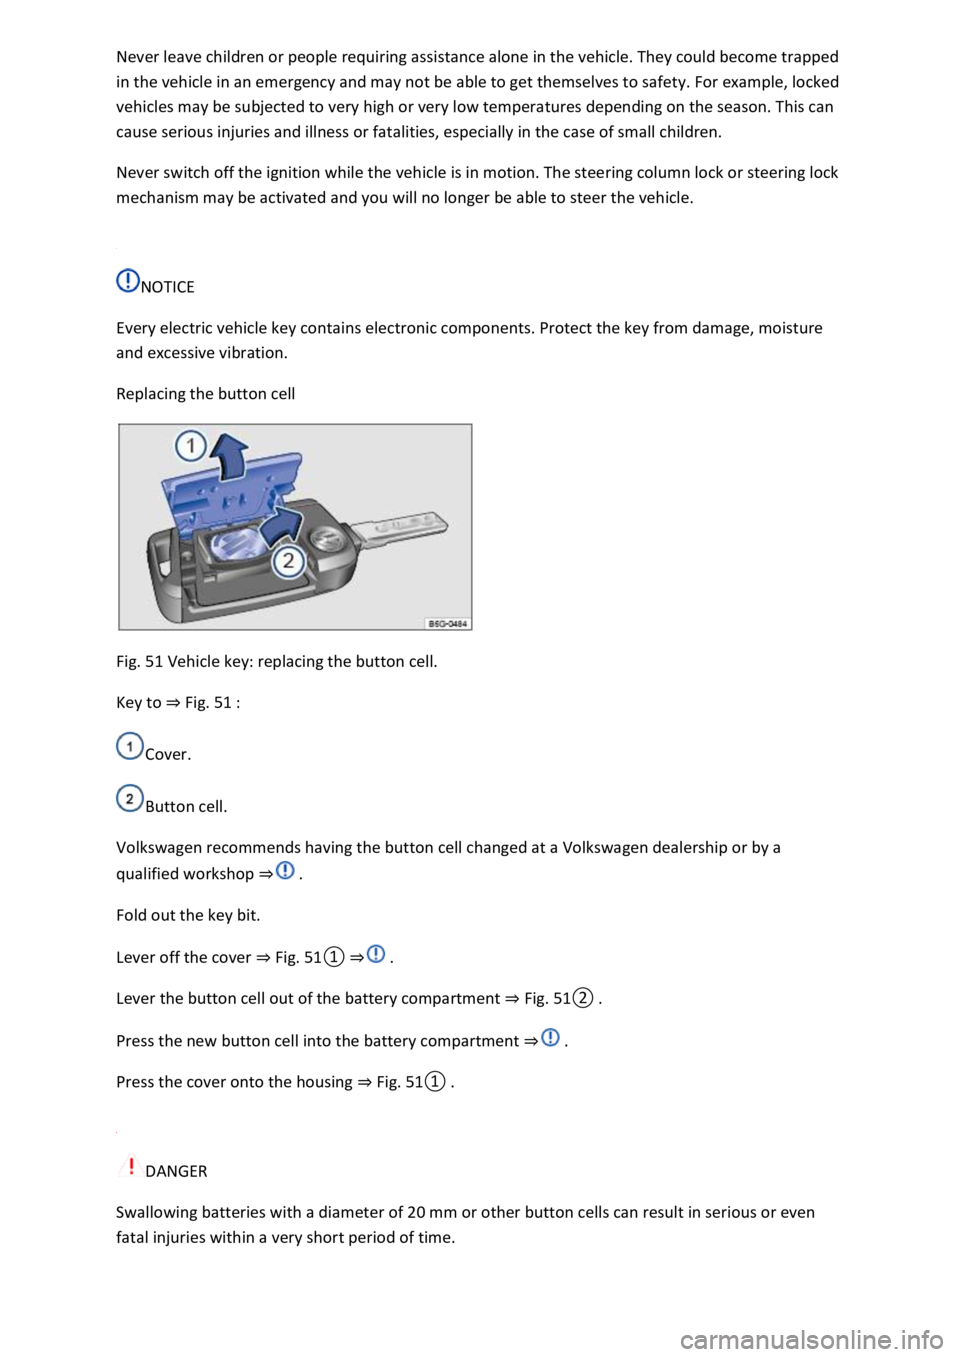
Replacing the button cell
Fig. 51 Vehicle key: replacing the button cell.
Key to Fig. 51
Cover.
Button cell.
Volkswagen recommends having the button cell changed at a Volkswagen dealership or by a
qualified workshop
Fold out the key bit.
Lever off the cover Fig.
0
Lever the button cell out of the battery compartment Fig.
0
Press the new button cell into the battery compartment
Press the cover onto the housing Fig.
0
DANGER
Swallowing batteries with a diameter of 20 mm or other button cells can result in serious or even
fatal injuries within a very short period of time.
Page 91 of 502

that are larger than 20 mm out of the reach of children.
Call for medical help immediately you suspect that someone has swallowed a battery.
NOTICE
The vehicle key can be damaged if the button cell is not changed properly.
Unsuitable batteries can damage the vehicle key. Replace discharged batteries only with new
batteries of the same voltage rating, size and specification.
Make sure the polarity is correct when inserting the battery.
Dispose of discharged batteries in accordance with environmental regulations.
Synchronising the vehicle key
If you cannot lock or unlock the vehicle with the vehicle key, synchronise the vehicle key or replace
the button cell Replacing the button cell
Fold out the key bit.
Remove the cap on the driver door handle Opening and closing the driver door manually
Stand beside the vehicle.
Press the button on the vehicle key.
Unlock the vehicle using the key bit.
Fit the cap Opening and closing the driver door manually
The synchronisation process is complete.
Troubleshooting
Vehicle cannot be locked or unlocked
The remote control is subject to interference caused by obstacles, adverse weather conditions or
other transmitters operating in the same frequency range in the vicinity of the vehicle, e.g. mobile
devices.
OR: the central locking switches off briefly to protect it from overloading.
Close the driver door.
OR: synchronise the vehicle key Synchronising the vehicle key
Indicator lamp does not flash
If the indicator lamp in the vehicle key does not flash when a button is pressed, the button cell in the
vehicle key must be changed Replacing the button cell
Page 103 of 502

steam if a valid vehicle key is simultaneously within the operating range. If at least one window is
open and sensor surfaces on the door handles are continuously activated, all windows will close. All
windows could open if the jet of water or steam is moved away from the door handle sensors briefly
and then moved back again
It may not be possible to lock or unlock the vehicle using the Keyless Access if the 12-volt vehicle
battery or button cell in the vehicle key is weak or discharged. The vehicle can be locked or unlocked
manually
If there is no valid vehicle key in the vehicle or if it is not detected, a corresponding message will be
shown on the instrument cluster display. This may occur if the vehicle key is exposed to interference
from another radio signal or is covered by another item, e.g. an aluminium case Starting and
stopping the engine
Anti-theft alarm
Depending on the vehicle equipment level, the vehicle may have an anti-theft alarm.
The anti-theft alarm is activated automatically when the vehicle is locked using the vehicle key.
The anti-theft alarm outputs acoustic and visual warning signals for up to five minutes.
When does the system trigger an alarm?
If a door is opened.
If the bonnet is opened.
If the boot lid is opened.
If the ignition is switched on with a valid vehicle key. (The alarm may sound briefly.)
If the 12-volt vehicle battery is disconnected.
If there is movement inside the vehicle (in vehicles with interior monitoring) Interior monitoring
system and anti-tow alarm
If the vehicle is lifted or towed (vehicles with anti-tow alarm) Interior monitoring system and anti-
tow alarm
If the vehicle is transported on a car ferry or by rail (vehicles with anti-tow alarm or interior
monitoring) Interior monitoring system and anti-tow alarm
If a trailer that is connected to the anti-theft alarm system is removed Trailer towing
Switching off the alarm
Unlock the vehicle using the unlocking button on the vehicle key.
Page 104 of 502

switch on the ignition using a valid vehicle key. A short alarm lasting around one second may
sound.
On vehicles with Keyless Access: grip the door handle Unlocking or locking the vehicle with
The anti-theft alarm will not function correctly if the 12-volt vehicle battery is weak or discharged.
Interior monitoring system and anti-tow alarm
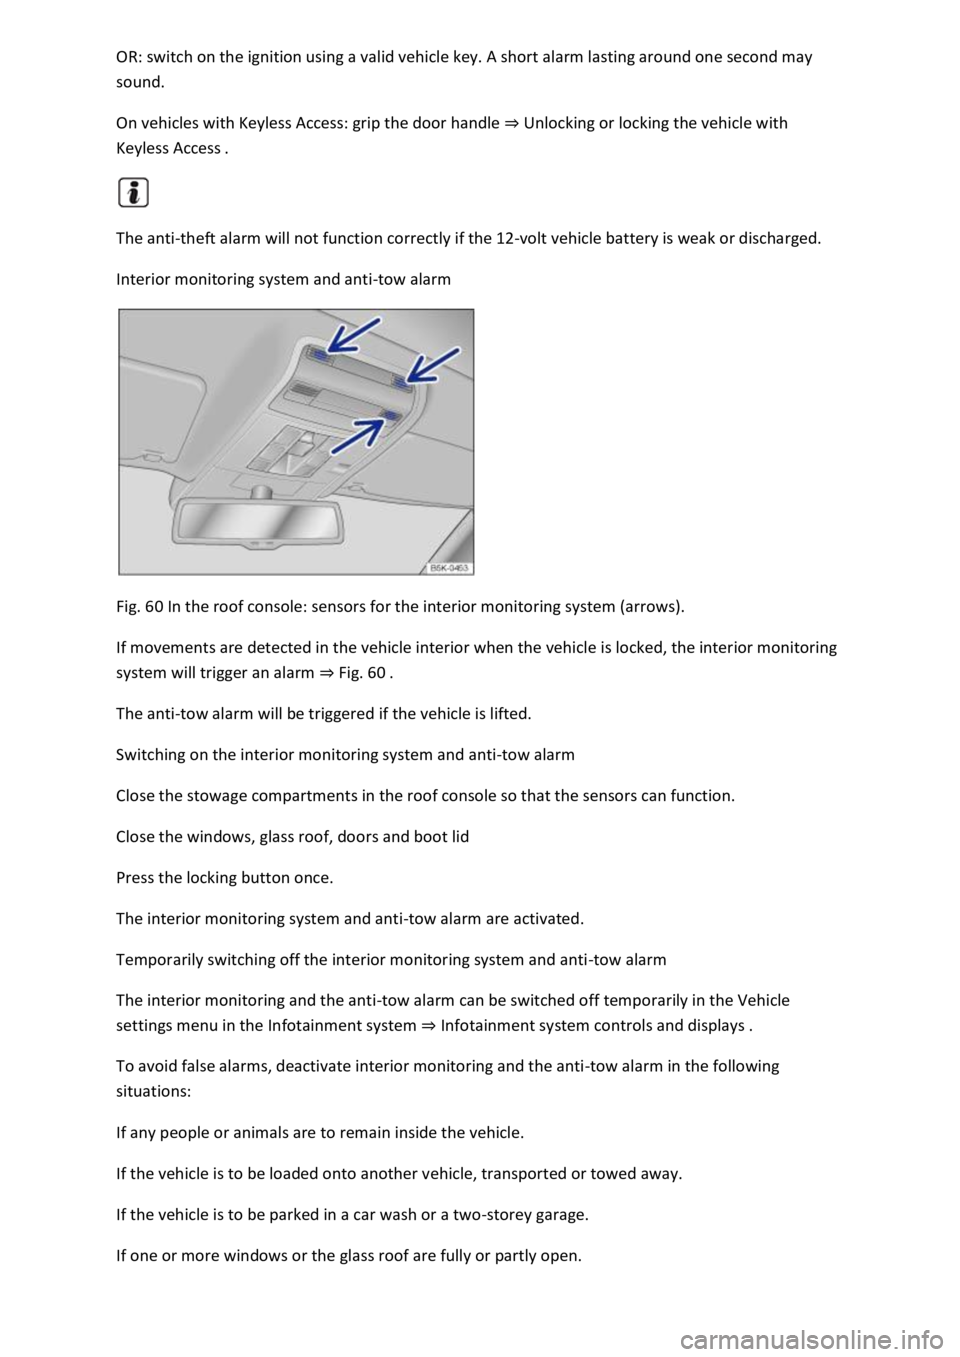
Fig. 60 In the roof console: sensors for the interior monitoring system (arrows).
If movements are detected in the vehicle interior when the vehicle is locked, the interior monitoring
system will trigger an alarm Fig.
The anti-tow alarm will be triggered if the vehicle is lifted.
Switching on the interior monitoring system and anti-tow alarm
Close the stowage compartments in the roof console so that the sensors can function.
Close the windows, glass roof, doors and boot lid
Press the locking button once.
The interior monitoring system and anti-tow alarm are activated.
Temporarily switching off the interior monitoring system and anti-tow alarm
The interior monitoring and the anti-tow alarm can be switched off temporarily in the Vehicle
settings menu in the Infotainment system Infotainment system controls and displays
To avoid false alarms, deactivate interior monitoring and the anti-tow alarm in the following
situations:
If any people or animals are to remain inside the vehicle.
If the vehicle is to be loaded onto another vehicle, transported or towed away.
If the vehicle is to be parked in a car wash or a two-storey garage.
If one or more windows or the glass roof are fully or partly open.
Page 113 of 502

nobody obstructs the path of the window, especially if a window is being closed when
the roll-back function is not active.
The roll-back function does not prevent fingers or other body parts from being pressed against the
window frame and being injured.
The roll-back function is also activated if the windows are closed using the vehicle key for
convenience closing.
Troubleshooting
One-touch opening and closing does not work
One-touch opening and closing is deactivated if the 12-volt vehicle battery has been disconnected or
discharged while the windows were not fully closed. The function must then be reset:
Switch on the ignition.
Close all windows and doors.
Pull up the button for the respective window and hold it in this position for several seconds.
Release the button, then pull it up again and hold it in this position. The one-touch function is now
ready for operation again.
The one-touch function can be restored for individual windows or for several windows at the same
time.
Closing windows without roll-back function
Attempt to close the window again within a few seconds by holding the button. The roll-back
function will be deactivated for a small part of the path of the closing window.
If the closing procedure takes longer than several seconds, the roll-back function will be reactivated.
If it is still stiff or obstructed, the window will stop and open again automatically.
Please go to a qualified workshop if the window still cannot be closed.
Glass roof
Opening and closing the glass roof