child lock VOLKSWAGEN T-ROC 2022 Owners Manual
[x] Cancel search | Manufacturer: VOLKSWAGEN, Model Year: 2022, Model line: T-ROC, Model: VOLKSWAGEN T-ROC 2022Pages: 502, PDF Size: 8.58 MB
Page 73 of 502

anywhere in the airbag deployment zone.
No other people, animals or objects may be carried between the occupants of the front seats and
the airbag deployment zone. Make sure that children and passengers also keep to this rule.
Do not attach any objects, e.g. mobile navigation devices, to the windscreen above the front airbag
on the front passenger side.
Do not cover or stick anything on the steering wheel hub or the soft plastic surface of the airbag unit
on the front passenger side, and do not obstruct or modify them in any way.
WARNING
The front airbags are deployed in front of the steering wheel Fig. 40and dash panelFig. 41
When driving, always hold the steering wheel with both hands on the outside of the rim at the 9
o'clock and 3 o'clock positions.
Adjust the driver seat so that there is at least 25 cm between your breastbone and the hub of the
steering wheel. Contact a qualified workshop if your physical build makes this impracticable.
Adjust the front passenger seat so that the distance between the front passenger and the dash panel
is as large as possible.
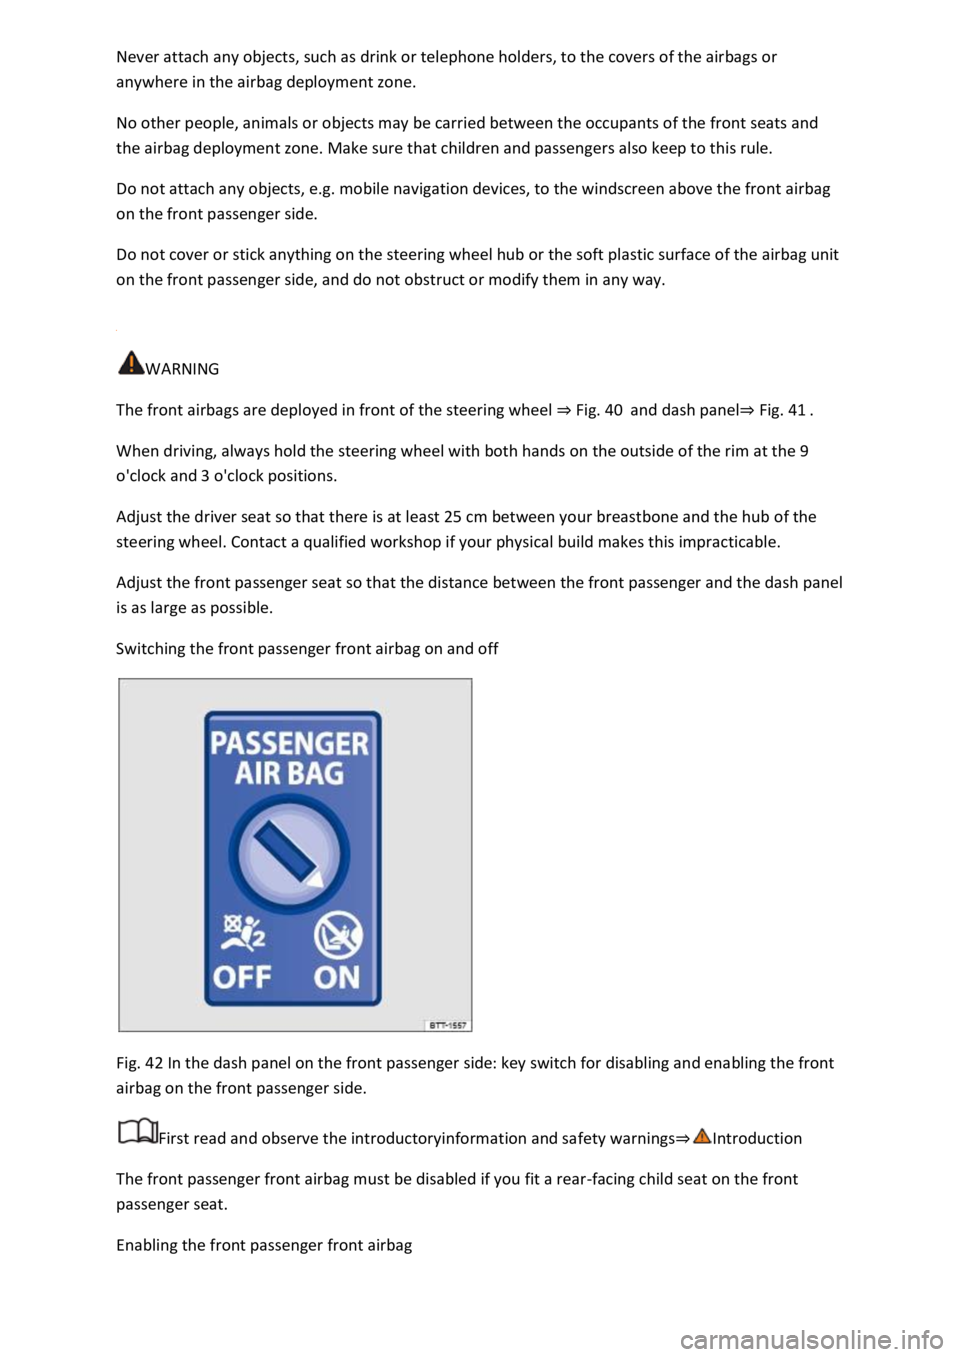
Switching the front passenger front airbag on and off
Fig. 42 In the dash panel on the front passenger side: key switch for disabling and enabling the front
airbag on the front passenger side.
First read and observe the introductoryinformation and safety warnings
The front passenger front airbag must be disabled if you fit a rear-facing child seat on the front
passenger seat.
Enabling the front passenger front airbag
Page 85 of 502

indicate a change in direction or lane change by operating the turn signal. The hazard warning lights
will be interrupted temporarily.
Switch on the hazard warning lights, e.g. in the following situations:
When traffic ahead suddenly starts moving more slowly or you reach the tail end of a traffic jam to
warn vehicles behind you.
There is an emergency situation.
The vehicle has broken down.
When tow-starting or towing.
Always follow local regulations on the use of the hazard warning lights.
If the hazard warning lights are not working, you must use an alternative method of drawing
attention to the broken-down vehicle. This method must comply with traffic legislation.
WARNING
Any broken-down vehicle poses a high accident risk for the vehicle occupants and for other road
users.
Stop the vehicle as soon as possible and when safe to do so.
Park the vehicle at a safe distance from moving traffic.
Switch on the hazard warning lights.
Never leave other persons alone in the vehicle, particularly children or people requiring assistance.
This applies in particular when the doors are locked. People locked in the vehicle may be subjected
to very high or very low temperatures.
WARNING
Ignoring any of the items on this important safety checklist can lead to accidents and severe injuries.
Always follow the instructions in the checklist and observe the general safety procedures.
WARNING
The components of the exhaust system become very hot. This can cause fires and serious injuries.
Park the vehicle so that no part of the exhaust system can come into contact with any inflammable
material underneath the vehicle, e.g. dry grass, fuel.
Page 89 of 502

-Net Mobile online services
Opening and closing
Vehicle key
Functions of the vehicle key
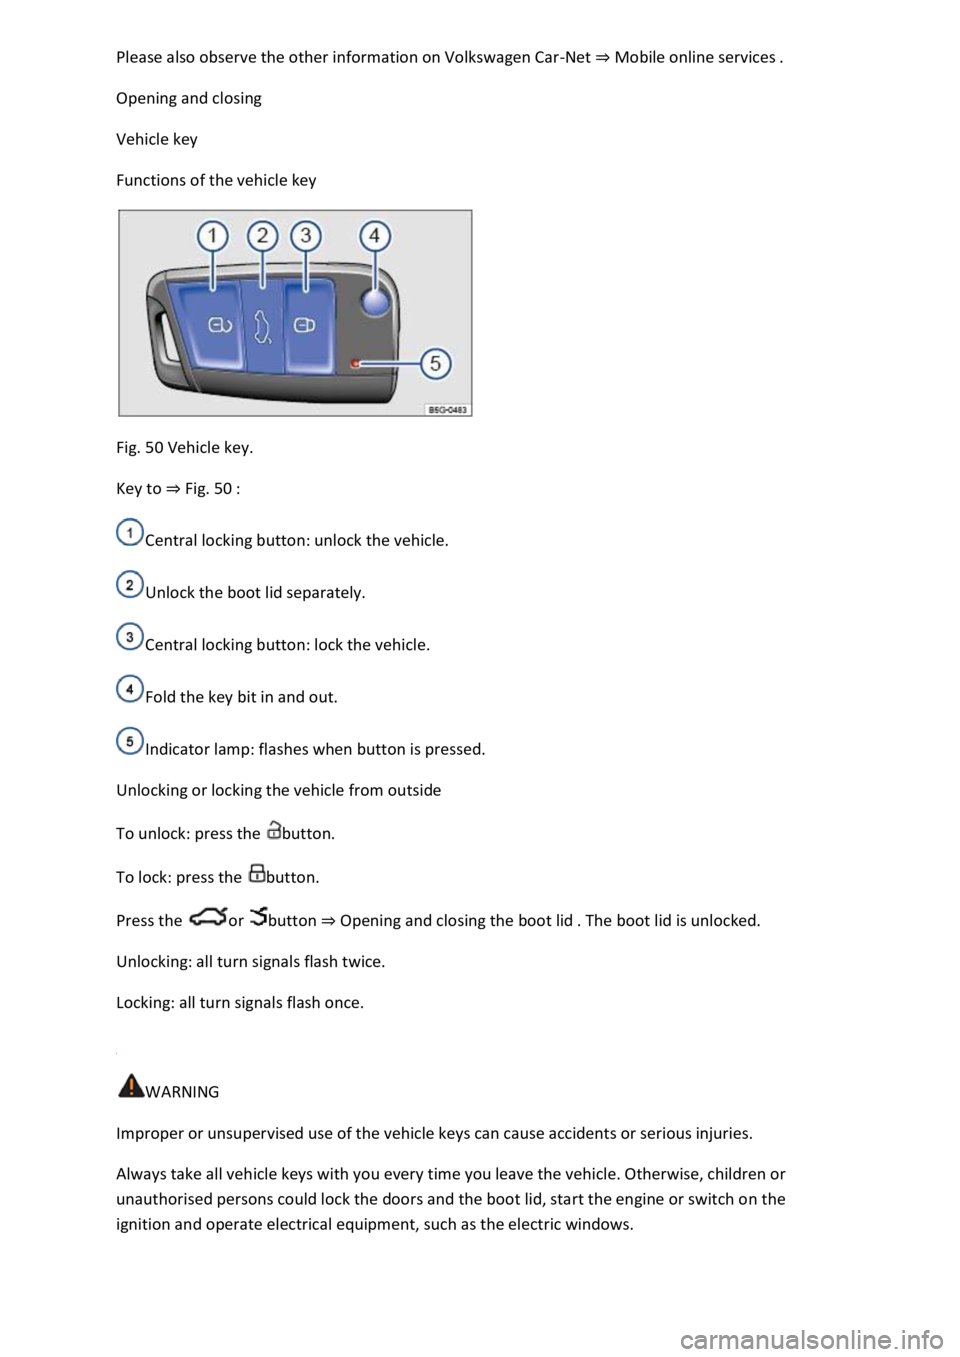
Fig. 50 Vehicle key.
Key to Fig. 50
Central locking button: unlock the vehicle.
Unlock the boot lid separately.
Central locking button: lock the vehicle.
Fold the key bit in and out.
Indicator lamp: flashes when button is pressed.
Unlocking or locking the vehicle from outside
To unlock: press the button.
To lock: press the button.
Press the or button Opening and closing the boot lid
Unlocking: all turn signals flash twice.
Locking: all turn signals flash once.
WARNING
Improper or unsupervised use of the vehicle keys can cause accidents or serious injuries.
Always take all vehicle keys with you every time you leave the vehicle. Otherwise, children or
unauthorised persons could lock the doors and the boot lid, start the engine or switch on the
ignition and operate electrical equipment, such as the electric windows.
Page 90 of 502

in the vehicle in an emergency and may not be able to get themselves to safety. For example, locked
vehicles may be subjected to very high or very low temperatures depending on the season. This can
cause serious injuries and illness or fatalities, especially in the case of small children.
Never switch off the ignition while the vehicle is in motion. The steering column lock or steering lock
mechanism may be activated and you will no longer be able to steer the vehicle.
NOTICE
Every electric vehicle key contains electronic components. Protect the key from damage, moisture
and excessive vibration.
Replacing the button cell
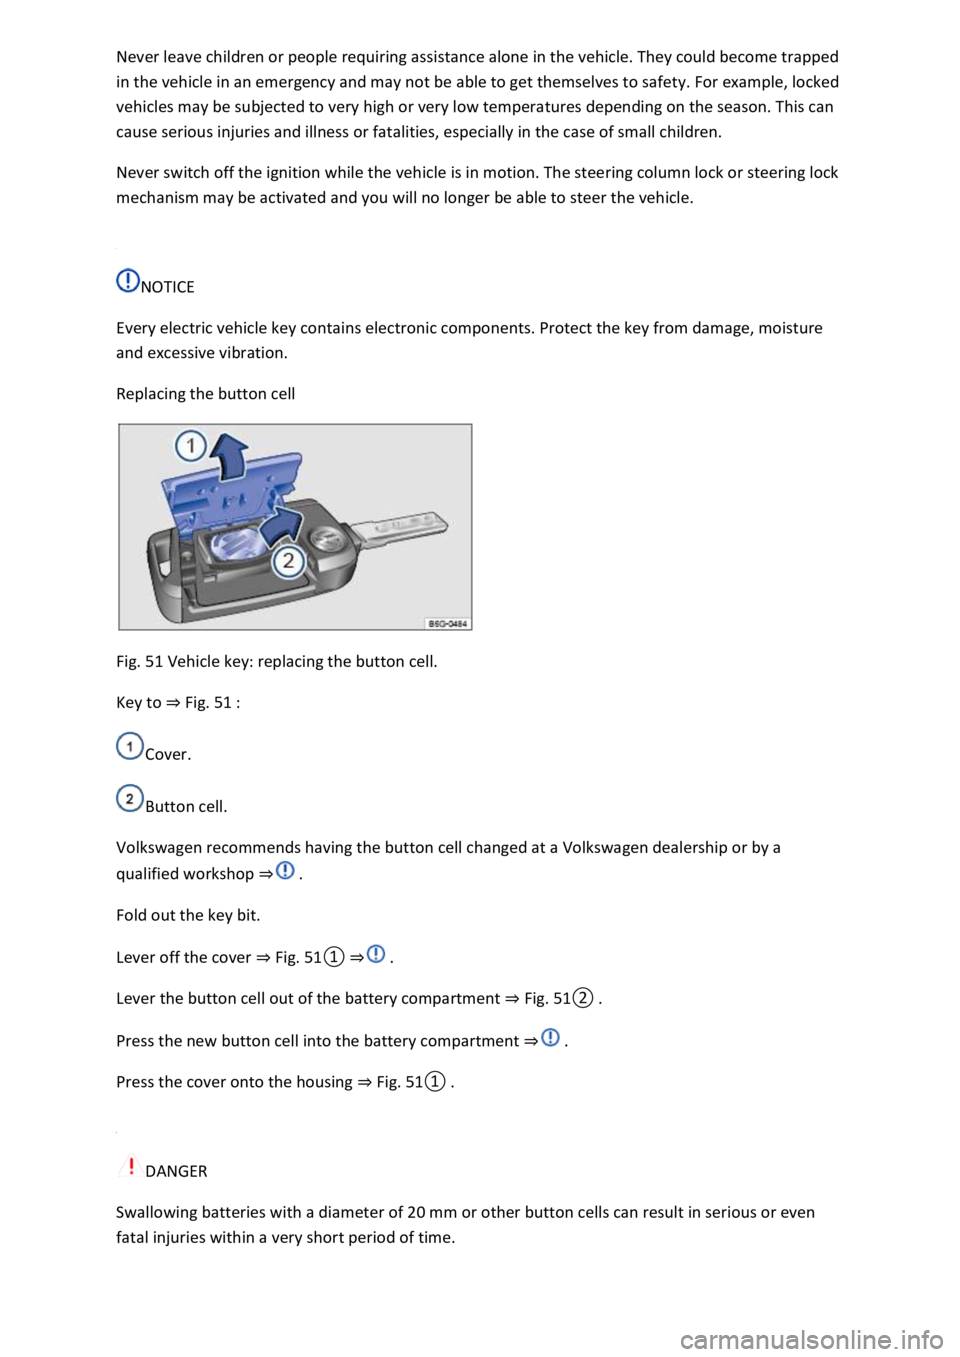
Fig. 51 Vehicle key: replacing the button cell.
Key to Fig. 51
Cover.
Button cell.
Volkswagen recommends having the button cell changed at a Volkswagen dealership or by a
qualified workshop
Fold out the key bit.
Lever off the cover Fig.
0
Lever the button cell out of the battery compartment Fig.
0
Press the new button cell into the battery compartment
Press the cover onto the housing Fig.
0
DANGER
Swallowing batteries with a diameter of 20 mm or other button cells can result in serious or even
fatal injuries within a very short period of time.
Page 91 of 502

that are larger than 20 mm out of the reach of children.
Call for medical help immediately you suspect that someone has swallowed a battery.
NOTICE
The vehicle key can be damaged if the button cell is not changed properly.
Unsuitable batteries can damage the vehicle key. Replace discharged batteries only with new
batteries of the same voltage rating, size and specification.
Make sure the polarity is correct when inserting the battery.
Dispose of discharged batteries in accordance with environmental regulations.
Synchronising the vehicle key
If you cannot lock or unlock the vehicle with the vehicle key, synchronise the vehicle key or replace
the button cell Replacing the button cell
Fold out the key bit.
Remove the cap on the driver door handle Opening and closing the driver door manually
Stand beside the vehicle.
Press the button on the vehicle key.
Unlock the vehicle using the key bit.
Fit the cap Opening and closing the driver door manually
The synchronisation process is complete.
Troubleshooting
Vehicle cannot be locked or unlocked
The remote control is subject to interference caused by obstacles, adverse weather conditions or
other transmitters operating in the same frequency range in the vicinity of the vehicle, e.g. mobile
devices.
OR: the central locking switches off briefly to protect it from overloading.
Close the driver door.
OR: synchronise the vehicle key Synchronising the vehicle key
Indicator lamp does not flash
If the indicator lamp in the vehicle key does not flash when a button is pressed, the button cell in the
vehicle key must be changed Replacing the button cell
Page 96 of 502

the inside using the central locking button. This may mean that people lock themselves in the
vehicle. People locked in the vehicle may be subjected to very high or very low temperatures.
Temperatures inside a locked vehicle may become extremely hot or cold, depending on the season.
This can cause serious injuries and illness or fatalities, especially in the case of small children.
Never leave anyone inside a locked vehicle. People in the vehicle could become trapped in an
emergency and will not be able to get themselves to safety.
NOTICE
When carrying out manual opening or closing, remove parts carefully and install them again
correctly in order to avoid damage to the vehicle.
Indicator lamp in the driver door
First read and observe the introductoryinformation and safety warnings
The central locking indicator lamp is located in the driver door Vehicle overviews
Vehicle is locked: a red LED flashes for approximately two seconds, firstly at short intervals and then
more slowly. The indicator lamp does not flash if the vehicle was locked with the central locking
button in the driver door Central locking button
Automatic locking and unlocking
First read and observe the introductoryinformation and safety warnings
Settings for central locking can be made in the Vehicle settings menu in the Infotainment system
Infotainment system controls and displays
Automatic locking (Auto Lock)
The vehicle can lock itself automatically at speeds above approximately 15 km/h (9 mph). The
indicator lamp in the central locking button will light up yellow when the vehicle is locked.
Automatic unlocking (Auto Unlock)
If one of the following conditions applies, all doors and the boot lid will be automatically unlocked:
The vehicle is at a standstill and the vehicle key has been removed.
In vehicles with DSG
Page 100 of 502

The doors can be unlocked and opened from inside by pulling the door release handle.
Childproof lock
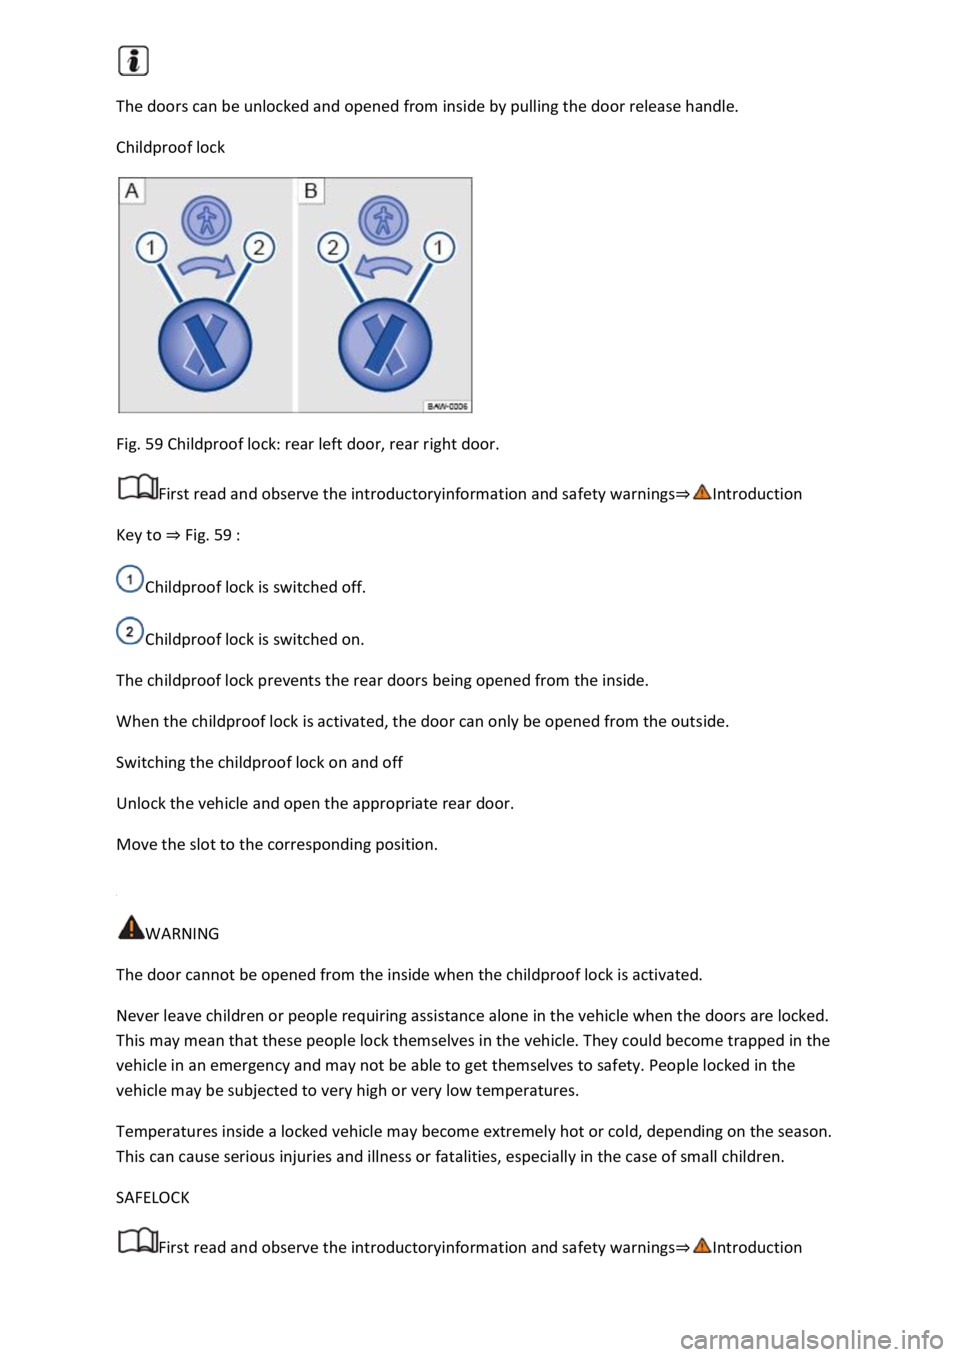
Fig. 59 Childproof lock: rear left door, rear right door.
First read and observe the introductoryinformation and safety warnings
Key to Fig. 59
Childproof lock is switched off.
Childproof lock is switched on.
The childproof lock prevents the rear doors being opened from the inside.
When the childproof lock is activated, the door can only be opened from the outside.
Switching the childproof lock on and off
Unlock the vehicle and open the appropriate rear door.
Move the slot to the corresponding position.
WARNING
The door cannot be opened from the inside when the childproof lock is activated.
Never leave children or people requiring assistance alone in the vehicle when the doors are locked.
This may mean that these people lock themselves in the vehicle. They could become trapped in the
vehicle in an emergency and may not be able to get themselves to safety. People locked in the
vehicle may be subjected to very high or very low temperatures.
Temperatures inside a locked vehicle may become extremely hot or cold, depending on the season.
This can cause serious injuries and illness or fatalities, especially in the case of small children.
SAFELOCK
First read and observe the introductoryinformation and safety warnings
Page 106 of 502

ot in use. Ensure that no one
remains in the vehicle.
Never leave children playing unattended in or around the vehicle, especially when the boot lid is
open. Children could climb into the luggage compartment and shut the boot lid, thereby trapping
themselves inside. Temperatures inside a locked vehicle may become extremely hot or cold,
depending on the season. This can cause serious injuries and illness or fatalities, especially in the
case of small children.
WARNING
Serious injuries could occur if the boot lid is unlocked or opened incorrectly or without due care and
attention.
The boot lid may not always be detected as being unlocked if there is a carrier and items attached to
it. The boot lid may open suddenly while the vehicle is in motion if it is unlocked.
WARNING
If heavy snow or heavy items are located on the boot lid, the additional weight could cause the boot
lid to close on its own and cause severe injuries.
Never open the boot lid if it is covered by a large amount of snow or a load is attached to it, e.g. on a
luggage carrier.
Remove the snow or load before opening the boot lid.
WARNING
Do not push down the boot lid with your hand on the rear window. The rear window could shatter
and cause injuries.
NOTICE
Never use the opening mechanism to fix or hold a load. This could lead to damage that makes it
impossible to close the boot lid.
NOTICE
Never use the rear window wiper or the rear spoiler to fix or hold a load. This could cause damage
which results in the rear window wiper or rear spoiler being torn off.
Opening and closing the boot lid
Page 111 of 502

The buttons are located in the doors Vehicle overviews
Opening the windows: press the button. Closing the windows: pull the button.Press to disable
the electric window buttons in the rear doors.
The windows can still be opened or closed using the buttons for a short time after the ignition has
been switched off, provided the driver door and the front passenger door are not opened.
One-touch opening and closing
The one-touch opening and closing function can be used to fully open and close the windows. The
individual buttons do not have to be held to do this.
One-touch closing: pull the button for the appropriate window up briefly into the second position.
One-touch opening: press the button for the appropriate window down briefly into the second
position.
Stopping the one-touch function: press or pull the button for the appropriate window again.
Convenience opening and closing
The windows can be opened and closed from outside the vehicle using the vehicle key when the
ignition is switched off:
Press and hold the locking or unlocking button on the vehicle key.
In vehicles with keyless locking and starting system Keyless Access: place your finger on the locking
sensor in the door handle for a few seconds until the windows are closed Unlocking or locking the
vehicle with Keyless Access operating range.
To interrupt this function, release the locking or unlocking button OR remove your finger from the
sensor.
A valid vehicle key must be located within the operating range. All turn signals will flash once as
confirmation that all the windows and the glass roof have been closed.
Set the convenience opening settings in the Vehicle settings menu in the Infotainment system
Infotainment system controls and displays
WARNING
Careless or unsupervised use of the electric windows can cause serious injuries.
The electric windows should only be opened or closed when you are sure that nobody is in their
operating area.
Never leave children or people requiring assistance alone in the vehicle when the vehicle is locked.
The windows can no longer be opened in an emergency.
Page 114 of 502

66 In the roof: button for the glass roof.
The term glass roof is used as a standard term for the panorama sliding/tilting roof.
The glass roof is a roof opening system featuring two glass elements. The rear glass element is fixed
and cannot be opened.
The button has two positions. First stage: fully or partially tilt, open or close the roof. Second
stage: automatically move the roof to the respective limit position. Press the button again to stop
the one-touch function.
Tilting the glass roof: push the button Fig. 66to the first position. One-touch function: push
button to the second position.
Closing the tilted glass roof: push the button to the first position. One-touch function: push
button to the second position.
Opening the glass roof: push the button to the first position. One-touch function up to
convenience position: push button to the second position.
Closing the glass roof: push the button to the first position. One-touch function: push button
to the second position.
Stopping one-stop function of the opening or closing procedure: push button or again.
WARNING
Careless or unsupervised use of the glass roof can cause serious injuries.
Open and close the glass roof only when you are sure that nobody is obstructing the path of the
roof.
Always take all vehicle keys with you every time you leave the vehicle.
Never leave children or people requiring assistance alone in the car, particularly if they have access
to the vehicle key. Unsupervised use of the vehicle key can lock the vehicle, start the engine, switch
on the ignition and operate the glass roof.
The glass roof can still be opened or closed for a short time after the ignition has been switched off,
provided that the driver door or front passenger door are not opened.
NOTICE
To avoid damage during cold weather, clear any ice and snow off the vehicle roof before opening or
tilting the glass roof.
Always close the glass roof when you leave the vehicle or if it starts to rain. Any rain entering the
vehicle when the glass roof is open or tilted could cause significant damage to the electrical system.
This can result in further damage to the vehicle.