light assist VOLKSWAGEN T-ROC 2022 Owners Manual
[x] Cancel search | Manufacturer: VOLKSWAGEN, Model Year: 2022, Model line: T-ROC, Model: VOLKSWAGEN T-ROC 2022Pages: 502, PDF Size: 8.58 MB
Page 1 of 502
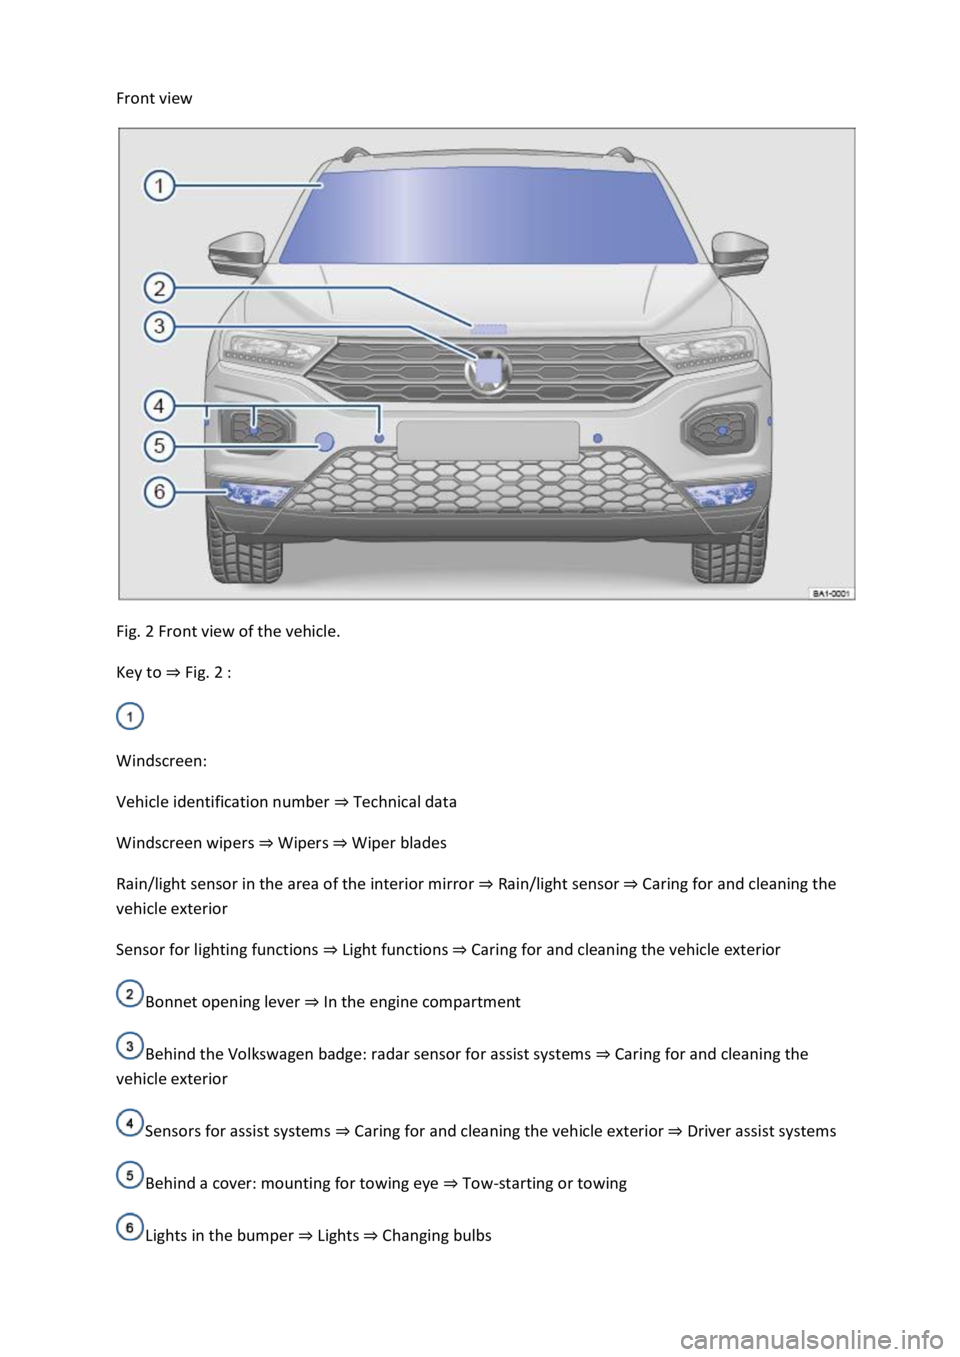
Front view
Fig. 2 Front view of the vehicle.
Key to Fig. 2
Windscreen:
Vehicle identification number Technical data
Windscreen wipers WipersWiper blades
Rain/light sensor in the area of the interior mirror Rain/light sensorCaring for and cleaning the
vehicle exterior
Sensor for lighting functions Caring for and cleaning the vehicle exterior
Bonnet opening lever In the engine compartment
Behind the Volkswagen badge: radar sensor for assist systems Caring for and cleaning the
vehicle exterior
Sensors for assist systems Caring for and cleaning the vehicle exteriorDriver assist systems
Behind a cover: mounting for towing eye Tow-starting or towing
Lights in the bumper LightsChanging bulbs
Page 3 of 502
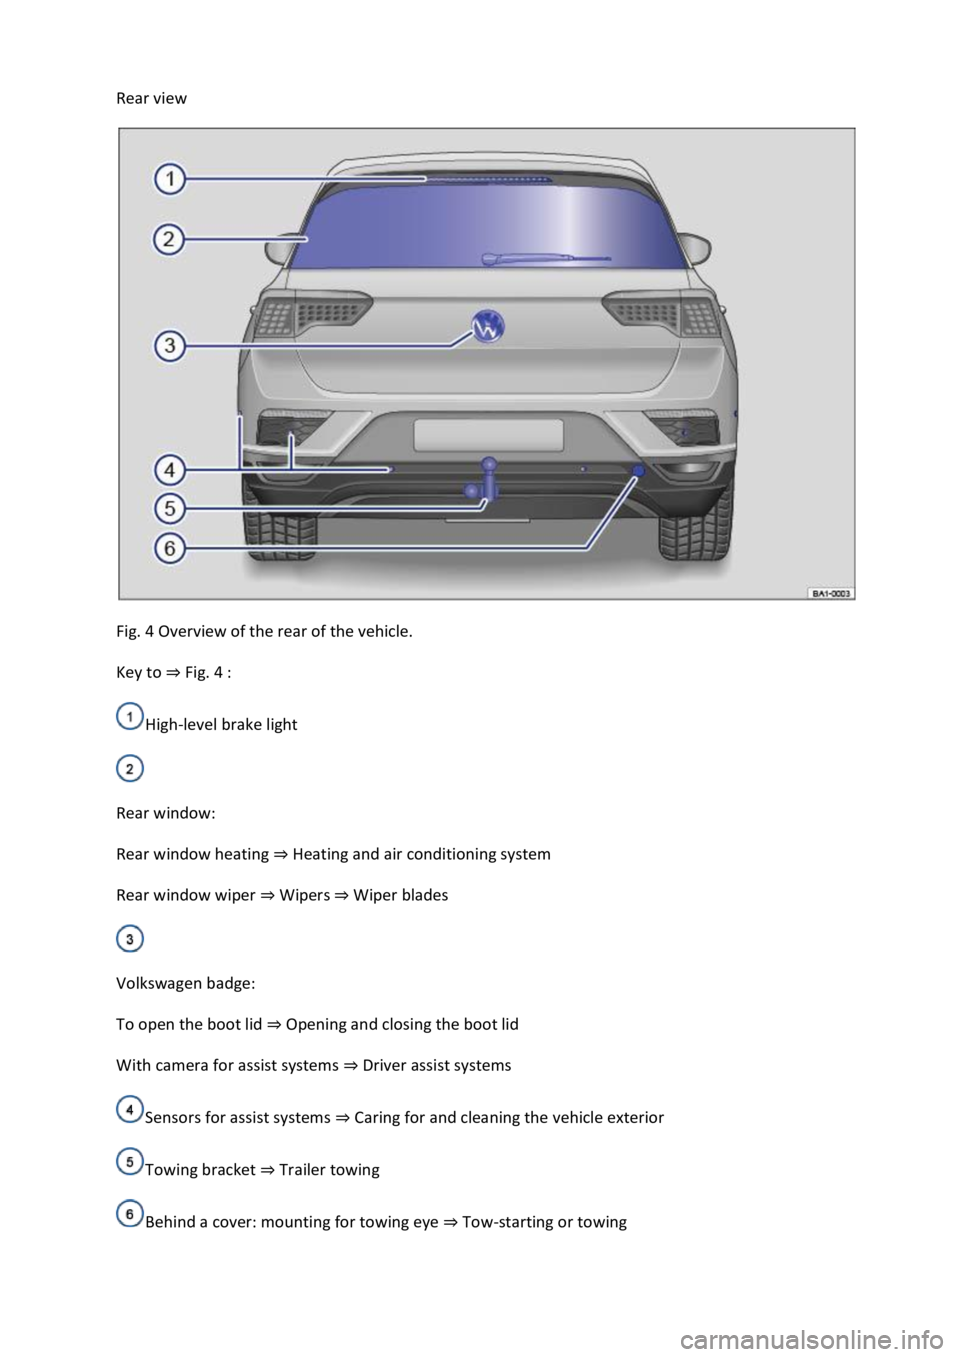
Rear view
Fig. 4 Overview of the rear of the vehicle.
Key to Fig. 4
High-level brake light
Rear window:
Rear window heating Heating and air conditioning system
Rear window wiper WipersWiper blades
Volkswagen badge:
To open the boot lid Opening and closing the boot lid
With camera for assist systems Driver assist systems
Sensors for assist systems Caring for and cleaning the vehicle exterior
Towing bracket Trailer towing
Behind a cover: mounting for towing eye Tow-starting or towing
Page 6 of 502
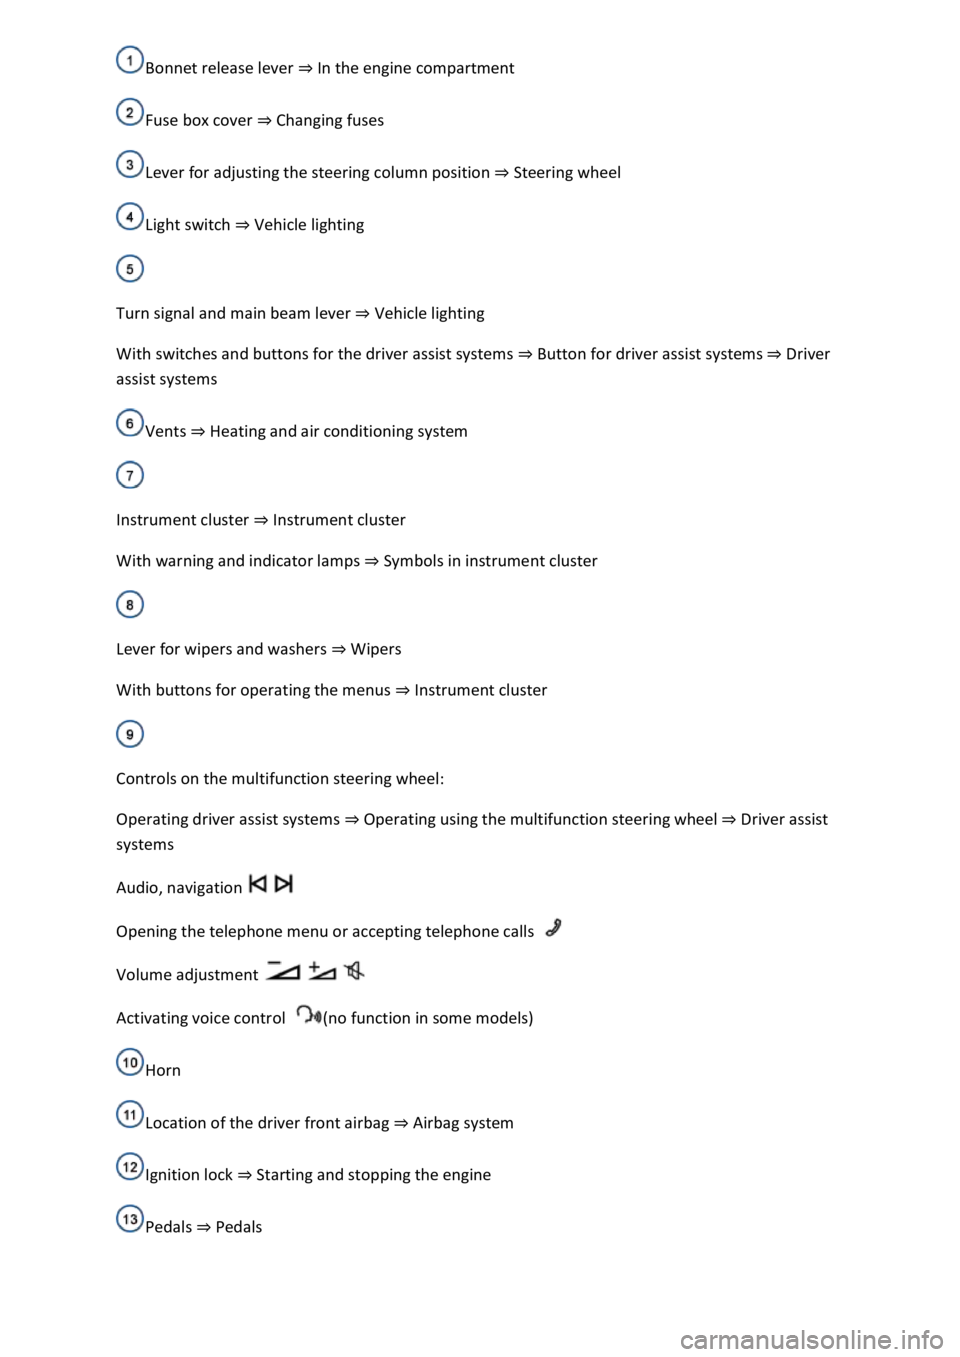
In the engine compartment
Fuse box cover Changing fuses
Lever for adjusting the steering column position Steering wheel
Light switch Vehicle lighting
Turn signal and main beam lever Vehicle lighting
With switches and buttons for the driver assist systems Button for driver assist systemsDriver
assist systems
Vents Heating and air conditioning system
Instrument cluster Instrument cluster
With warning and indicator lamps Symbols in instrument cluster
Lever for wipers and washers Wipers
With buttons for operating the menus Instrument cluster
Controls on the multifunction steering wheel:
Operating driver assist systems Operating using the multifunction steering wheelDriver assist
systems
Audio, navigation
Opening the telephone menu or accepting telephone calls
Volume adjustment
Activating voice control (no function in some models)
Horn
Location of the driver front airbag Airbag system
Ignition lock Starting and stopping the engine
Pedals Pedals
Page 10 of 502
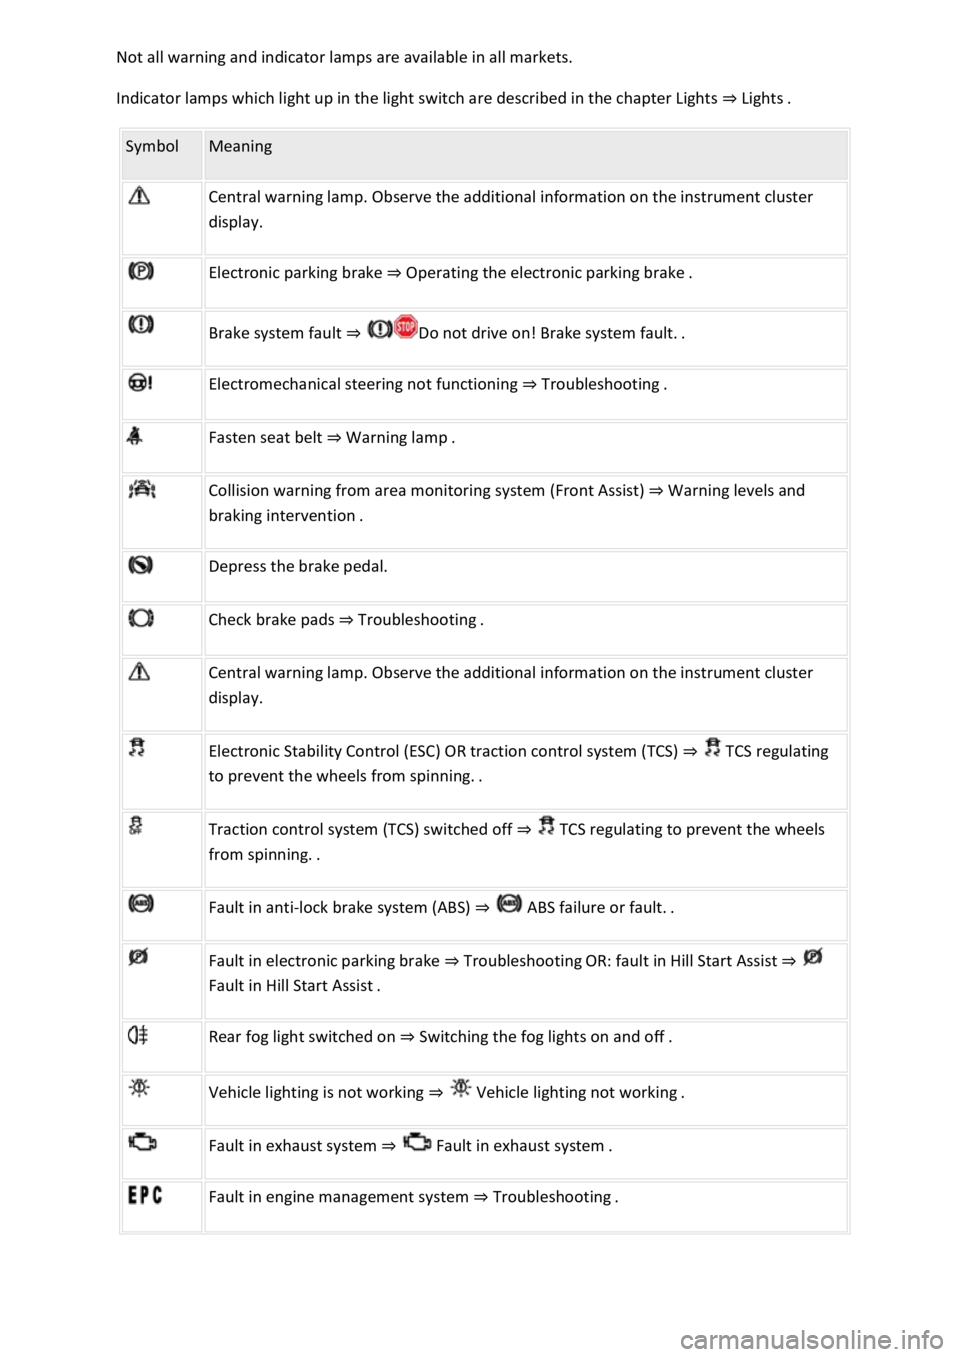
Indicator lamps which light up in the light switch are described in the chapter Lights Lig
Symbol Meaning
Central warning lamp. Observe the additional information on the instrument cluster
display.
Electronic parking brake Operating the electronic parking brake.
Brake system fault
Electromechanical steering not functioning Troubleshooting.
Fasten seat belt Warning lamp.
Collision warning from area monitoring system (Front Assist) Warning levels and
Depress the brake pedal.
Check brake pads Troubleshooting.
Central warning lamp. Observe the additional information on the instrument cluster
display.
Electronic Stability Control (ESC) OR traction control system (TCS) TCS regulating
to
Traction control system (TCS) switched off TCS regulating to prevent the wheels
Fault in anti-lock brake system (ABS)
Fault in electronic parking brake TroubleshootingOR: fault in Hill Start Assist
Rear fog light switched on Switching the fog lights on and off.
Vehicle lighting is not working
Fault in exhaust system Fault
Fault in engine management system Troubleshooting.
Page 24 of 502
rocker switch on the wiper lever or the
or buttons on the multifunction steering wheel. Then press the or button or
wait a few seconds. The speed is now saved and the warning is activated.
To deactivate, press the or button again. The stored speed will be deleted.
The speed warning can be adjusted within a range of 30 km/h (18 mph) to 250 km/h (155 mph).
Some settings can be saved in the user accounts for personalisation and therefore change
automatically when the user account is changed Personalis
1) Varies depending on the instrument cluster version.
2) Not available in all countries.
Warning and information messages
First read and observe the introductoryinformation and safety warnings
The system runs a check on certain components and functions in the vehicle when the ignition is
switched on or while the vehicle is in motion. Malfunctions are indicated by red and yellow warning
symbols with information messages on the instrument cluster display Symbols in instrument
cluster
messages and symbols can vary depending on the version of the instrument cluster.
In addition, a list of current malfunctions can be opened manually. To open the list, select the
Vehicle status or Vehicle menu Instrument cluster menus
Priority 1 warning (red)The symbol flashes or lights up (sometimes together with a signal tone).
Do not drive on! Danger. Check the fault and correct the cause. Seek expert assistance if
necessary.Priority 2 warning (yellow)The symbol flashes or lights up (sometimes together with a
signal tone). Malfunctions and insufficient service fluids can damage the vehicle and cause it to
break down. Check the fault as soon as possible. Seek expert assistance if necessary.Information
messageInformation about various vehicle procedures and conditions.
With some equipment levels, some settings and displays may also appear in the Infotainment
system.
If several warnings are present, the symbols will appear for several seconds, one after another. The
symbols will continue to appear until the faults are rectified.
If warning messages about malfunctions are displayed when the ignition is switched on, it may not
be possible to adjust some settings as described, or the information display may appear differently.
If this is the case, take the vehicle to a qualified workshop to have the malfunctions rectified.
Page 32 of 502
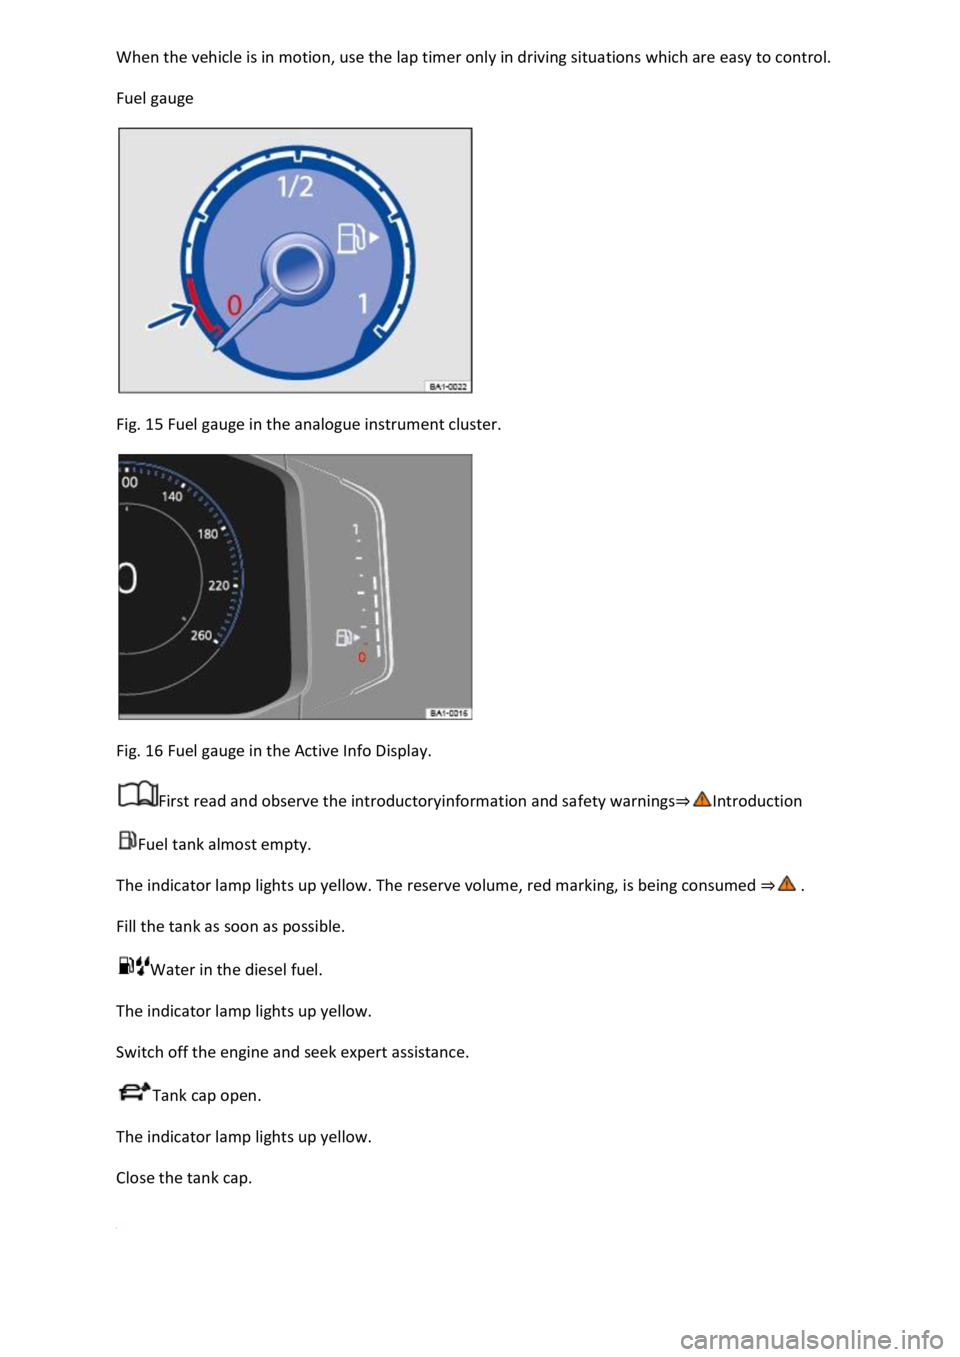
Fuel gauge
Fig. 15 Fuel gauge in the analogue instrument cluster.
Fig. 16 Fuel gauge in the Active Info Display.
First read and observe the introductoryinformation and safety warnings
Fuel tank almost empty.
The indicator lamp lights up yellow. The reserve volume, red marking, is being consumed
Fill the tank as soon as possible.
Water in the diesel fuel.
The indicator lamp lights up yellow.
Switch off the engine and seek expert assistance.
Tank cap open.
The indicator lamp lights up yellow.
Close the tank cap.
Page 34 of 502
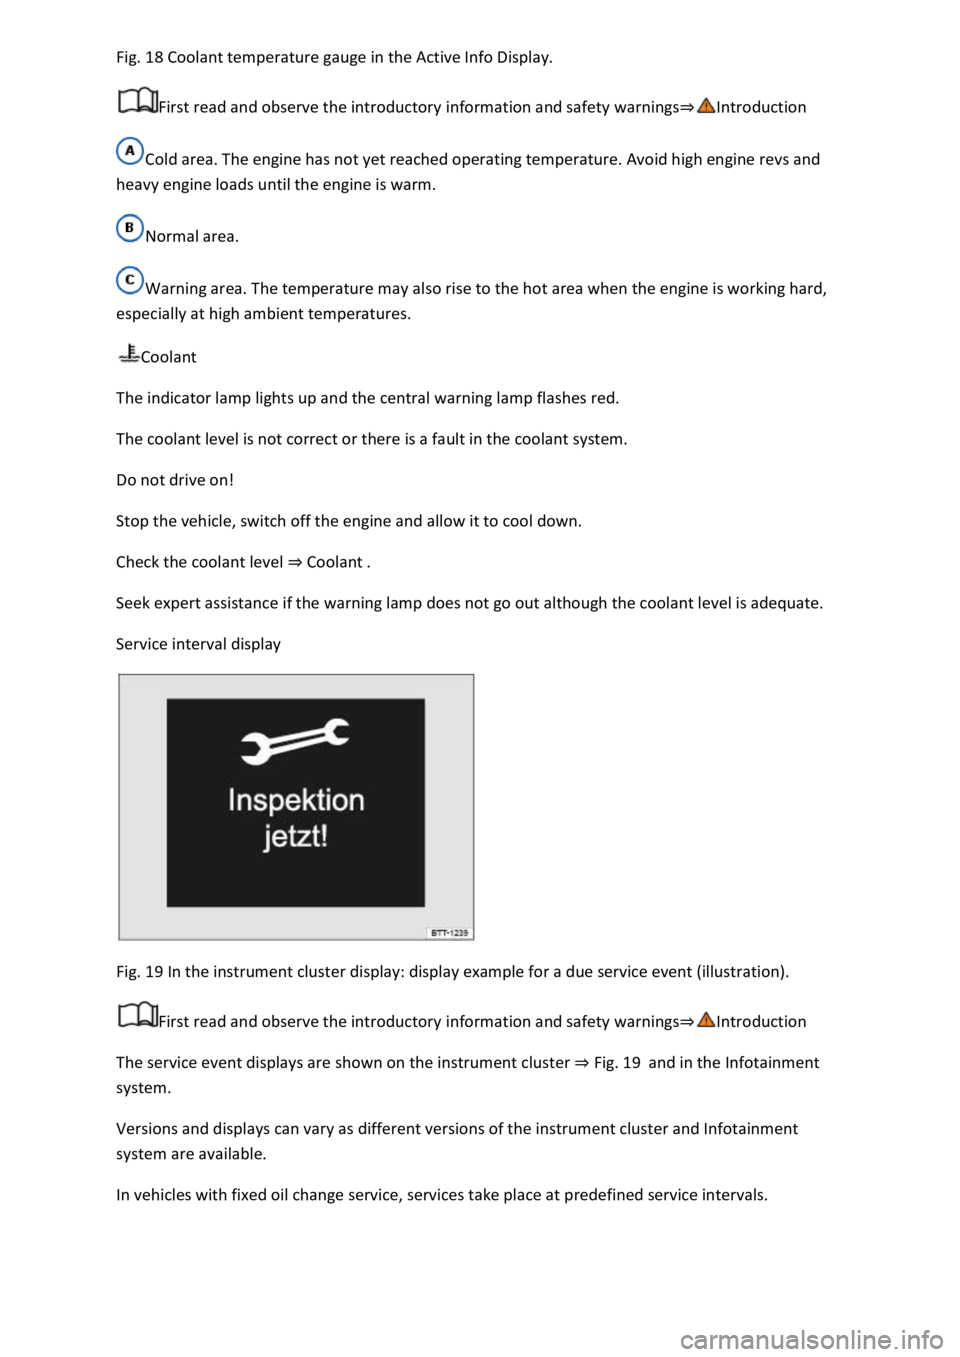
18 Coolant temperature gauge in the Active Info Display.
First read and observe the introductory information and safety warnings
Cold area. The engine has not yet reached operating temperature. Avoid high engine revs and
heavy engine loads until the engine is warm.
Normal area.
Warning area. The temperature may also rise to the hot area when the engine is working hard,
especially at high ambient temperatures.
Coolant
The indicator lamp lights up and the central warning lamp flashes red.
The coolant level is not correct or there is a fault in the coolant system.
Do not drive on!
Stop the vehicle, switch off the engine and allow it to cool down.
Check the coolant level Coolant
Seek expert assistance if the warning lamp does not go out although the coolant level is adequate.
Service interval display
Fig. 19 In the instrument cluster display: display example for a due service event (illustration).
First read and observe the introductory information and safety warnings
The service event displays are shown on the instrument cluster Fig. 19and in the Infotainment
system.
Versions and displays can vary as different versions of the instrument cluster and Infotainment
system are available.
In vehicles with fixed oil change service, services take place at predefined service intervals.
Page 46 of 502

User management and settings
When the ignition is switched on, you can use the Personalisation menu in the Infotainment system
for user management and to make settings. The menu can be accessed via the vehicle settings in the
Infotainment system.
Changing the user account
You can select the user account either via the Personalisation menu or via the Vehicle status menu.
Manually assigning vehicle keys to user accounts
You can assign a vehicle key to the currently active user account. For this purpose, select Manual key
assignment.
Automatically assigning vehicle keys to user accounts
If you have selected Automatic key assignment, the following vehicle key is assigned to the user
account upon changing the user account:
Vehicles without Keyless Access: vehicle key used to unlock the vehicle.
Vehicles with Keyless Access: vehicle key that is identified first by the personalisation function
when you open the driver door.
Personalised vehicle settings
Opening and closing (single door unlocking, window convenience opening etc.)
Light and vision (daytime running lights, cornering light, lane change flash etc.)
Settings for air conditioning system
Active driver assist systems
Driving profile selection
Multifunction display and instrument cluster (selection of displays)
Infotainment system (display brightness and station sorting)
A new vehicle key will be assigned to the current user account. To assign the vehicle key to a
different user account, select the required user account and manually assign it to the vehicle key.
Safety
Page 85 of 502

indicate a change in direction or lane change by operating the turn signal. The hazard warning lights
will be interrupted temporarily.
Switch on the hazard warning lights, e.g. in the following situations:
When traffic ahead suddenly starts moving more slowly or you reach the tail end of a traffic jam to
warn vehicles behind you.
There is an emergency situation.
The vehicle has broken down.
When tow-starting or towing.
Always follow local regulations on the use of the hazard warning lights.
If the hazard warning lights are not working, you must use an alternative method of drawing
attention to the broken-down vehicle. This method must comply with traffic legislation.
WARNING
Any broken-down vehicle poses a high accident risk for the vehicle occupants and for other road
users.
Stop the vehicle as soon as possible and when safe to do so.
Park the vehicle at a safe distance from moving traffic.
Switch on the hazard warning lights.
Never leave other persons alone in the vehicle, particularly children or people requiring assistance.
This applies in particular when the doors are locked. People locked in the vehicle may be subjected
to very high or very low temperatures.
WARNING
Ignoring any of the items on this important safety checklist can lead to accidents and severe injuries.
Always follow the instructions in the checklist and observe the general safety procedures.
WARNING
The components of the exhaust system become very hot. This can cause fires and serious injuries.
Park the vehicle so that no part of the exhaust system can come into contact with any inflammable
material underneath the vehicle, e.g. dry grass, fuel.
Page 131 of 502
tion:
The lights are switched off.Leaving Home function (orientation lighting) can be switched on
Coming Home and Leaving Home function (orientation lighting)Side lights or continuous
parking light on both sides of the vehicle switched on Switching the parking lights on and off
symbol in the light switch lights up green.Dipped beam is switched off the side lights will stay
on as long as the vehicle key is in the ignition lock or, in vehicles with Keyless Access, the driver door
is closed.
Daytime running lights
The daytime running lights (dependent on equipment level) can increase the visibility of your vehicle
in traffic during the day.
The daytime running lights are switched on every time the ignition is switched on when the light
switch is in position , or (when brightness is detected).
The daytime running lights cannot be switched on or off manually.
WARNING
Accidents and serious injuries can occur if the road is not sufficiently illuminated and other road
users have difficulty seeing the vehicle, or cannot see it at all.
The light assist systems are designed only to provide support; the driver is responsible for the
correct vehicle lights being switched on.
Always switch on the dipped beam headlights if it is dark, raining or visibility is poor.
WARNING
The side lights or daytime running lights are not bright enough to illuminate the road ahead and to
ensure that other road users are able to see you.
Always switch on the dipped beam headlights if it is dark, raining or visibility is poor.
The tail light clusters are not switched on with the daytime running lights. If the tail light clusters are
not switched on, the vehicle may not be visible to other road users if it is dark, raining, or if visibility
is poor.
WARNING
The automatic headlights ( ) switch dipped beam on and off only when there is a change in
the level of brightness.
Switch on dipped beam manually if required by the weather conditions, e.g. in fog.