oil VOLKSWAGEN T-ROC 2022 Owners Manual
[x] Cancel search | Manufacturer: VOLKSWAGEN, Model Year: 2022, Model line: T-ROC, Model: VOLKSWAGEN T-ROC 2022Pages: 502, PDF Size: 8.58 MB
Page 22 of 502

Settings can be made in the Service menu1) depending on the vehicle equipment.
Opening the Service menu
To open the Service menu, select the Range information profile and press and hold the OK button on
the multifunction steering wheel for around four seconds. You can now navigate in the menu in the
usual way using the buttons on the multifunction steering wheel.
Resetting the service interval display
Select the Service menu and follow the instructions on the instrument cluster display.
Resetting oil change service
Select the Reset oil service menu and follow the instructions on the instrument cluster display.
Resetting driving data
Select the Reset trip menu and follow the instructions on the instrument cluster display to reset the
desired value.
Engine code
Select the Engine code menu. The engine codes are now shown on the instrument cluster display.
Setting the time
Select the Time menu and set the correct time with the arrow buttons or .
1) Only in vehicles with an Active Info Display.
Driving data display (multifunction display)
First read and observe the introductoryinformation and safety warnings
The driving data display (multifunction display) shows a variety of travel and fuel consumption data.
Switching between displays
Vehicles without multifunction steering wheel:
Press the rocker switch on the wiper lever Operating using the wiper lever
Vehicles with multifunction steering wheel:
Press the or button Operating using the multifunction steering wheel
Switching between memories
Press the button on the wiper lever, or press the button on the multifunction
steering wheel.
Since start memory
Page 34 of 502

18 Coolant temperature gauge in the Active Info Display.
First read and observe the introductory information and safety warnings
Cold area. The engine has not yet reached operating temperature. Avoid high engine revs and
heavy engine loads until the engine is warm.
Normal area.
Warning area. The temperature may also rise to the hot area when the engine is working hard,
especially at high ambient temperatures.
Coolant
The indicator lamp lights up and the central warning lamp flashes red.
The coolant level is not correct or there is a fault in the coolant system.
Do not drive on!
Stop the vehicle, switch off the engine and allow it to cool down.
Check the coolant level Coolant
Seek expert assistance if the warning lamp does not go out although the coolant level is adequate.
Service interval display
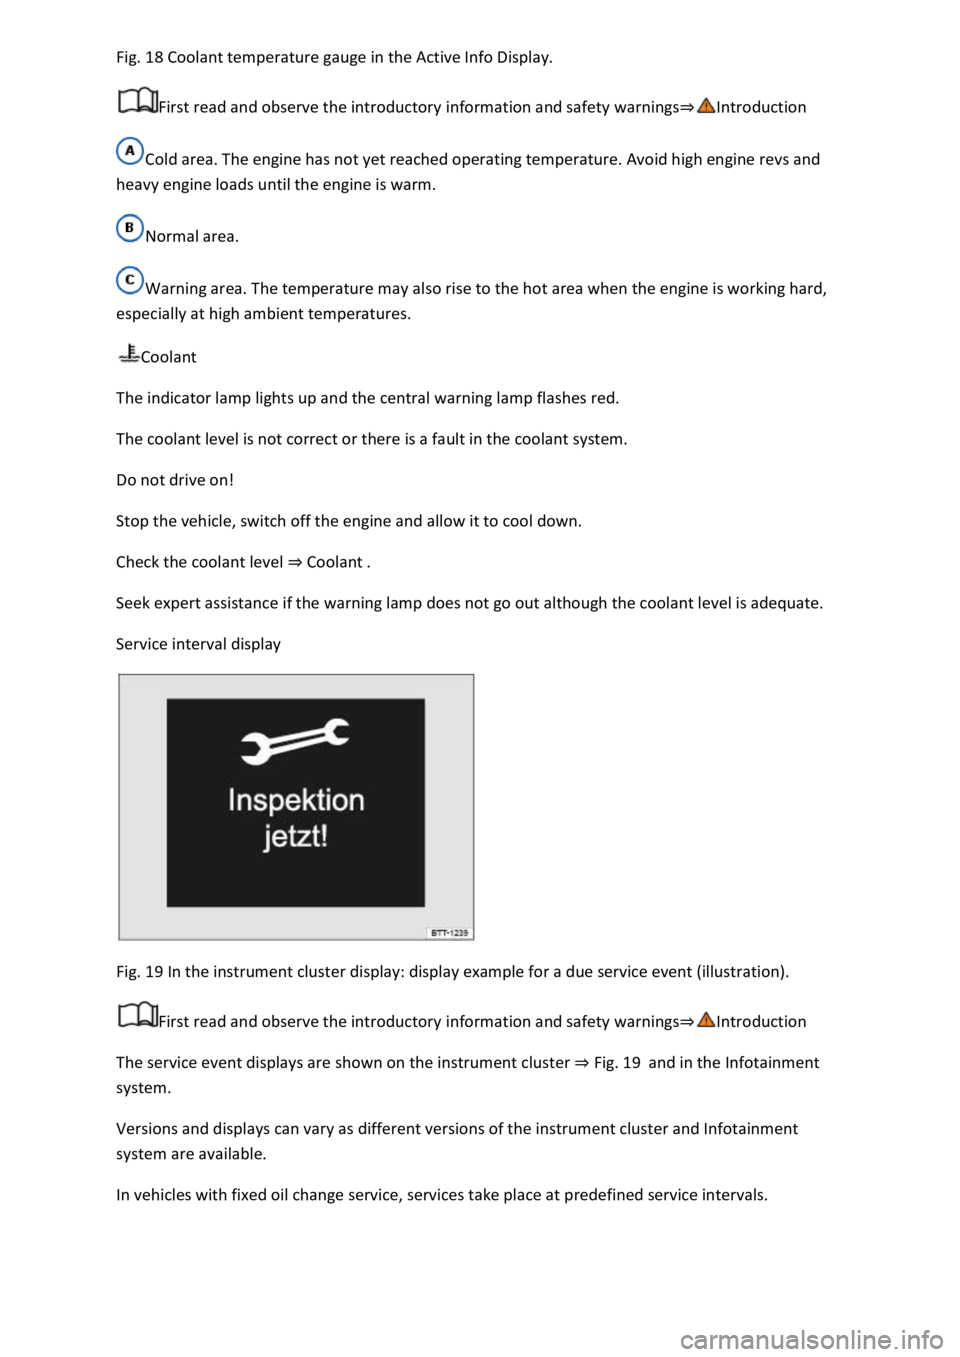
Fig. 19 In the instrument cluster display: display example for a due service event (illustration).
First read and observe the introductory information and safety warnings
The service event displays are shown on the instrument cluster Fig. 19and in the Infotainment
system.
Versions and displays can vary as different versions of the instrument cluster and Infotainment
system are available.
In vehicles with fixed oil change service, services take place at predefined service intervals.
Page 35 of 502

Technical progress has made it possible to considerably reduce servicing requirements. An oil change
service must only be carried out when required by the vehicle. The individual conditions in which the
vehicle is used and the driver's personal driving style are taken into account. The service reminder is
displayed 30 days before the service is due. The distance is rounded to the nearest 100 km and the
remaining time is rounded to full days.
Service alert
If a service or inspection is due soon, a service alert will appear the next time the ignition is switched
on.
The number of kilometres or amount of time shown correspond to the maximum number of
kilometres or maximum time that can still be driven before the next service.
Service event
In the event of a due service or a due inspection, a signal tone will be given when the ignition is
switched on and the spanner symbol will be displayed for several seconds on the instrument
cluster display. One of the following displays will also appear Fig. 19
Inspection now!
Oil service now!
Oil service and inspection now!
Checking service schedules
You can access the current scheduled service information when the ignition is switched on, the
engine is not running, and the vehicle is stationary:
Accessing the service schedule in the Infotainment system.
Press the button or function button.
Press the Vehicle and function buttons Infotainment system controls and displays
Select the Service menu option to display the service information.
Vehicles with analogue instrument cluster.
Press and hold the button in the instrument cluster Instrument clusteruntil the text Service
appears in the display.
Release the button. The current scheduled service will be shown in the display.
Vehicles with digital instrument cluster.
Information on the scheduled service can be accessed only via the Service menu Service menu
Resetting the service interval display
Page 36 of 502

reset as follows:
Vehicles with analogue instrument cluster.
Switch off the ignition.
Press and hold the button in the instrument cluster Instrument cluster
Switch on the ignition again.
Release the button when one of the following messages appears on the instrument cluster
display: Reset oil service? or Reset inspection?.
Press the button on the instrument cluster Instrument clusterto confirm.
Vehicles with digital instrument cluster.
The service interval display can be reset only via the Service menu Service menu
Do not reset the service interval display between service intervals otherwise incorrect data will be
shown.
If the oil change service was manually reset, the service interval display then also changes to a fixed
service interval in vehicles with flexible oil change service.
The service message will disappear after a few seconds when the engine is running, or when the
button on the wiper lever or the button on the multifunction steering wheel is pressed
Operating the instrum
If the 12-volt vehicle battery was disconnected for long periods in vehicles with flexible service, the
system cannot calculate the time at which the next service is due. The information shown in the
service interval display may therefore be incorrect. In this case, please observe the maximum
permissible service intervals Service
Operating the instrument cluster
Introduction
This chapter contains information on the followingsubjects:
Operating using the wiper lever
Operating using the multifunction steering wheel
Button for driver assist systems
Some menu options can be accessed only when the vehicle is stationary.
Page 42 of 502

Fig. 23
Display areas.
Arrow buttons for changing to the lap timer.
Opening the performance monitor
Press the MENU button or function button on the Infotainment system.
Touch the Vehicle function button.
Touch the Selection function button.
Touch the Sport function button.
If you would like to switch between the performance monitor and the lap timer Lap timer
one of the arrow buttons on the left and right above the instruments Fig. 23
Selecting instruments and setting units
The display can show a maximum of three instruments at the same time. Each instrument can be
selected for each display area Fig. 23
To change between instruments, swipe vertically over the display. The currently selected instrument
will then disappear and a new instrument will appear.
The units can be adjusted for some instruments in the Infotainment system Vehicle settings
menu
The following instruments can be displayed:
Charge pressure display: the charge pressure display Fig. 23
ar). The further to the right the
needle on the scale, the higher the engine power output.
Accelerometer (G-meter): the accelerometer (G-meter) Fig. 23
-type area shows the
acceleration level and the direction of the acting force (in the opposite direction according to
physical laws). If you drive to the left, for example, the red marking will move in the right area of the
instrument (and vice versa). If you accelerate, the red marking will move down. If you brake, the red
marking will move up. The level of acceleration is indicated by the position of the red marking which
moves outwards. If the acceleration increases, the red marking will move away from the centre area.
Power display: the power display Fig. 23
Coolant temperature display: the needle may move further in a clockwise direction under high
engine loads and with high outside temperatures. This is no cause for concern unless the
indicator lamp in the instrument cluster display is lit up or flashing Coolant temperature display
Oil temperature display: the needle is in the middle area under normal driving conditions. If the
needle is in the bottom left area, this means that the engine has not yet reached its operating
temperature. Avoid excessively high speeds and acceleration when the engine has not yet reached
Page 43 of 502

needle may move further in a clockwise direction under high engine
loads and at high outside temperatures. This is no cause for concern unless the indicator lamp
in the instrument cluster display is lit up or flashing Engine oil
Adapting the display areas to the driving situation
Choose the three possible instruments corresponding to your individual driving style and the driving
situation.
WARNING
Accidents and injuries can occur if the driver is distracted. Operating the Infotainment system can
distract you from the road.
Always drive carefully and responsibly.
NOTICE
When starting from cold, avoid high engine speeds, driving at full throttle and over-loading the
engine.
Due to the principle of performance determination used in the vehicle, the physical accuracy of the
displayed values is not guaranteed.
Lap timer
First read and observe the introductoryinformation and safety warnings
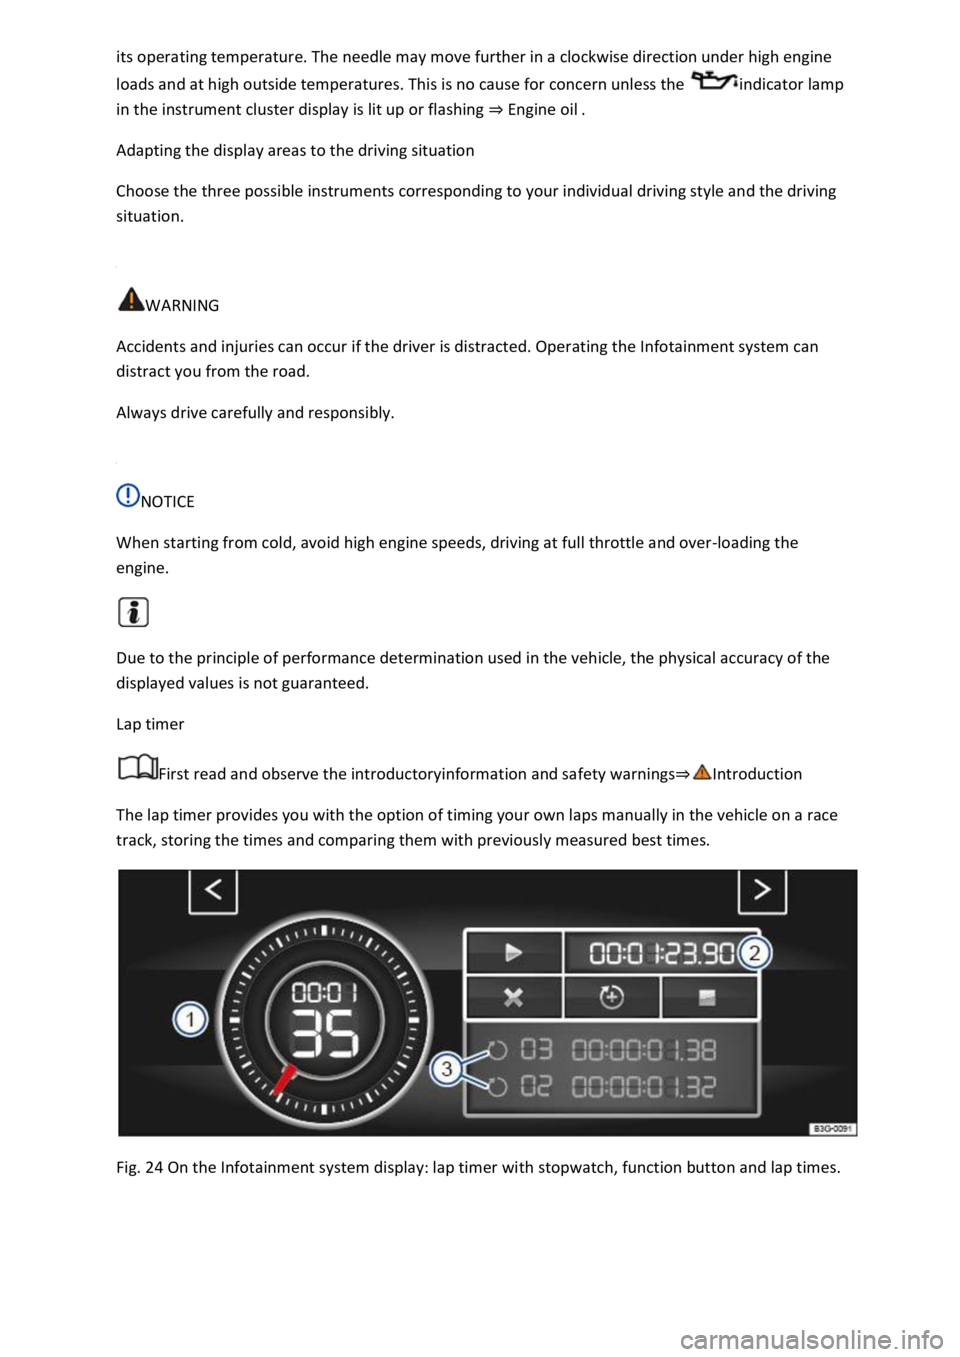
The lap timer provides you with the option of timing your own laps manually in the vehicle on a race
track, storing the times and comparing them with previously measured best times.
Fig. 24 On the Infotainment system display: lap timer with stopwatch, function button and lap times.
Page 49 of 502

Is fuel in the adequate quality available Fuel and emission control?
Are the correct service fluids that comply with Volkswagen specifications available in the destination
country Service fluids and consumables?
Will the navigation function in the factory-fitted Infotainment system work with the available
navigation data in the destination country?
Are special tyres necessary for travelling in the destination country?
Is a fire extinguisher a requirement in your destination country?
Which requirements must be observed regarding high-visibility waistcoats?
Checklist
Do not work on the engine and in the engine compartment unless you are familiar with the task, are
aware of the general safety procedures and have the correct equipment, service fluids and suitable
tools In the engine compartment
are uncertain. Make sure you check the following on a regular basis:
Washer fluid level Washer fluid
Engine oil level Engine oil
Coolant level Coolant
Brake fluid level Brake fluid
Tyre pressure Wheels and tyres
Page 86 of 502

When pushing the vehicle by hand, do not press on the tail light clusters, the rear spoiler or large
panels. This could damage the vehicle and the rear spoiler could become detached.
The 12-volt vehicle battery will discharge if the hazard warning lights are left on over a long period of
time even when the ignition is switched off.
Depending on the vehicle equipment, the brake lights flash rapidly if you brake sharply or initiate full
braking at a speed of more than 80 km/h (50 mph). This is a particularly effective way of attracting
the attention of vehicles behind you. If you then continue to brake, the hazard warning lights will be
switched on automatically at speeds under approximately 10 km/h (6 mph). Once you start to
accelerate, the hazard warning lights will switch off again automatically.
Equipment for an emergency
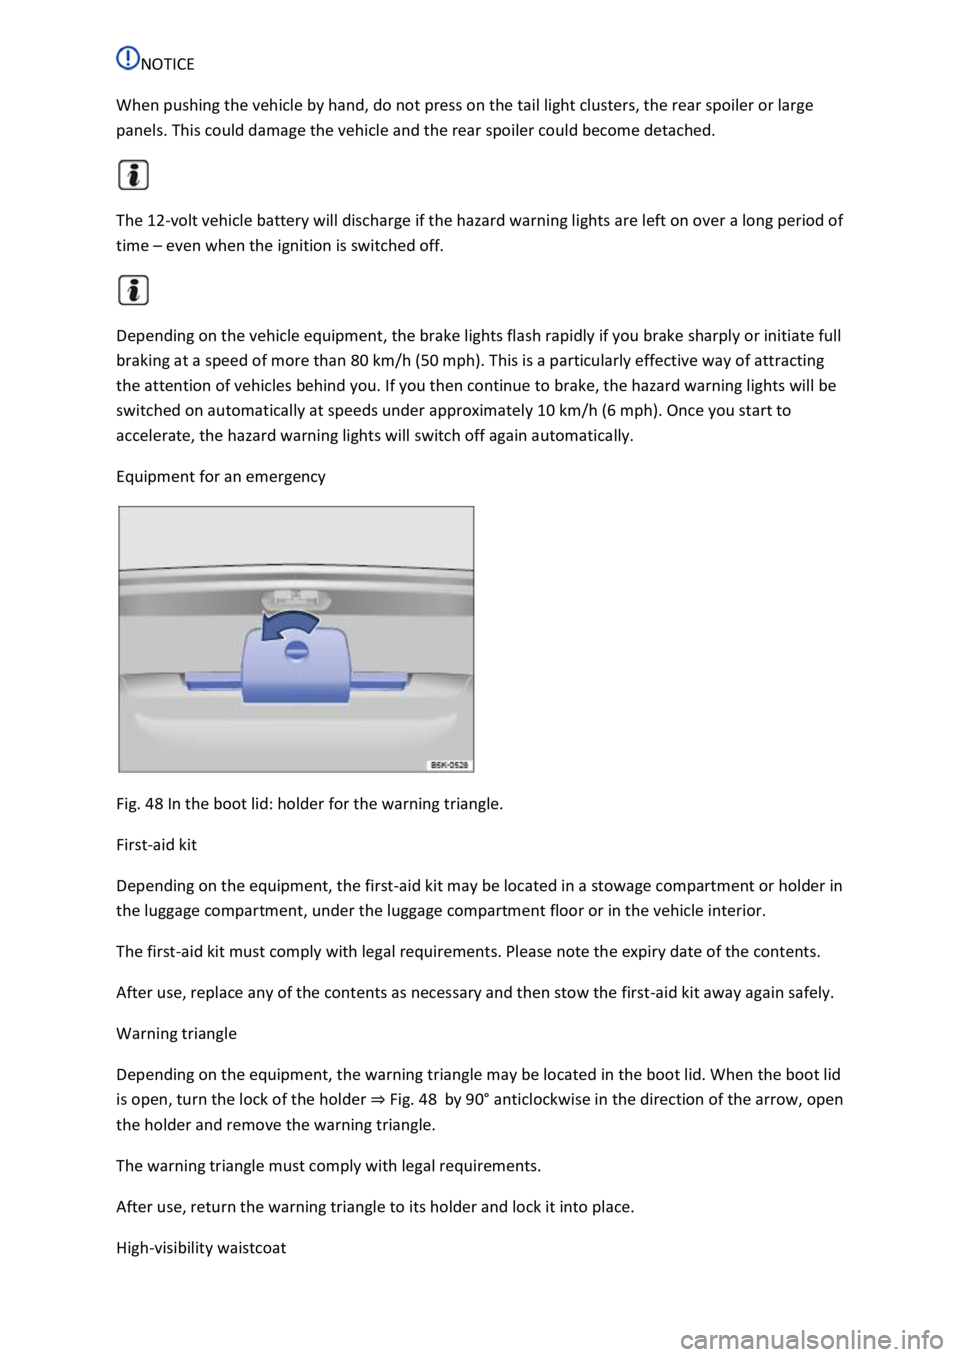
Fig. 48 In the boot lid: holder for the warning triangle.
First-aid kit
Depending on the equipment, the first-aid kit may be located in a stowage compartment or holder in
the luggage compartment, under the luggage compartment floor or in the vehicle interior.
The first-aid kit must comply with legal requirements. Please note the expiry date of the contents.
After use, replace any of the contents as necessary and then stow the first-aid kit away again safely.
Warning triangle
Depending on the equipment, the warning triangle may be located in the boot lid. When the boot lid
is open, turn the lock of the holder Fig. 48by 90
Page 106 of 502

ot in use. Ensure that no one
remains in the vehicle.
Never leave children playing unattended in or around the vehicle, especially when the boot lid is
open. Children could climb into the luggage compartment and shut the boot lid, thereby trapping
themselves inside. Temperatures inside a locked vehicle may become extremely hot or cold,
depending on the season. This can cause serious injuries and illness or fatalities, especially in the
case of small children.
WARNING
Serious injuries could occur if the boot lid is unlocked or opened incorrectly or without due care and
attention.
The boot lid may not always be detected as being unlocked if there is a carrier and items attached to
it. The boot lid may open suddenly while the vehicle is in motion if it is unlocked.
WARNING
If heavy snow or heavy items are located on the boot lid, the additional weight could cause the boot
lid to close on its own and cause severe injuries.
Never open the boot lid if it is covered by a large amount of snow or a load is attached to it, e.g. on a
luggage carrier.
Remove the snow or load before opening the boot lid.
WARNING
Do not push down the boot lid with your hand on the rear window. The rear window could shatter
and cause injuries.
NOTICE
Never use the opening mechanism to fix or hold a load. This could lead to damage that makes it
impossible to close the boot lid.
NOTICE
Never use the rear window wiper or the rear spoiler to fix or hold a load. This could cause damage
which results in the rear window wiper or rear spoiler being torn off.
Opening and closing the boot lid
Page 118 of 502

Mechanically adjusting the front seat
Folding the front passenger seat backrest forwards
The following section describes the options for adjusting the front seats. Always ensure that you
adjust the correct sitting position Sitting position
WARNING
Always adjust the front seats to their correct position before any journey and ensure that all
passengers have fastened their seat belts.
Push the front passenger seat as far back as possible.
Adjust the driver seat so that there is at least 25 cm between your breastbone and the hub of the
steering wheel. Adjust the driver seat by moving it forwards or backwards so that you are able to
press the pedals to the floor with your knees still slightly angled and the distance to the dash panel
in the knee area is at least 10 cm. If your build makes it impossible to fulfil this requirement, you
must contact a qualified workshop so they can make any necessary modifications.
Never travel with the backrest tilted far back. The further back the backrest is tilted, the greater the
risk of injury caused by incorrect seat belt routing or an incorrect sitting position.
Never travel with the backrest tilted far forwards. When a front airbag is triggered, it could force the
seat backrest backwards and injure vehicle occupants on the rear seats.
Adopt and maintain the greatest possible distance from the steering wheel and dash panel.
You should always sit upright with your back against the seat backrest with the front seats properly
adjusted. Do not position any body part too close to where the airbags are fitted.
The risk of serious injury is increased for passengers on the rear seat if they are not sitting upright
because the seat belts are incorrectly positioned.
WARNING
Incorrect adjustment of the seats can cause accidents and serious injuries.
The seats must be adjusted only when the vehicle is stationary, or else the seat could change
position unexpectedly while the vehicle is in motion, leading to a loss of control of the vehicle.
Furthermore, an incorrect seating position is adopted while adjusting the seat.
Adjust the height and tilt of the seat or move it forwards and backwards only when the area around
the seat is clear.
The adjustment range of the seats must not be restricted by any items.
Adjust the tilt angle of the rear seats or move them forwards and backwards only when the area
around the seats is clear.
The adjustment and locking areas of the seats must not be soiled.