steering VOLKSWAGEN TIGUAN 2017 Owner´s Manual
[x] Cancel search | Manufacturer: VOLKSWAGEN, Model Year: 2017, Model line: TIGUAN, Model: VOLKSWAGEN TIGUAN 2017Pages: 341, PDF Size: 9.14 MB
Page 7 of 341
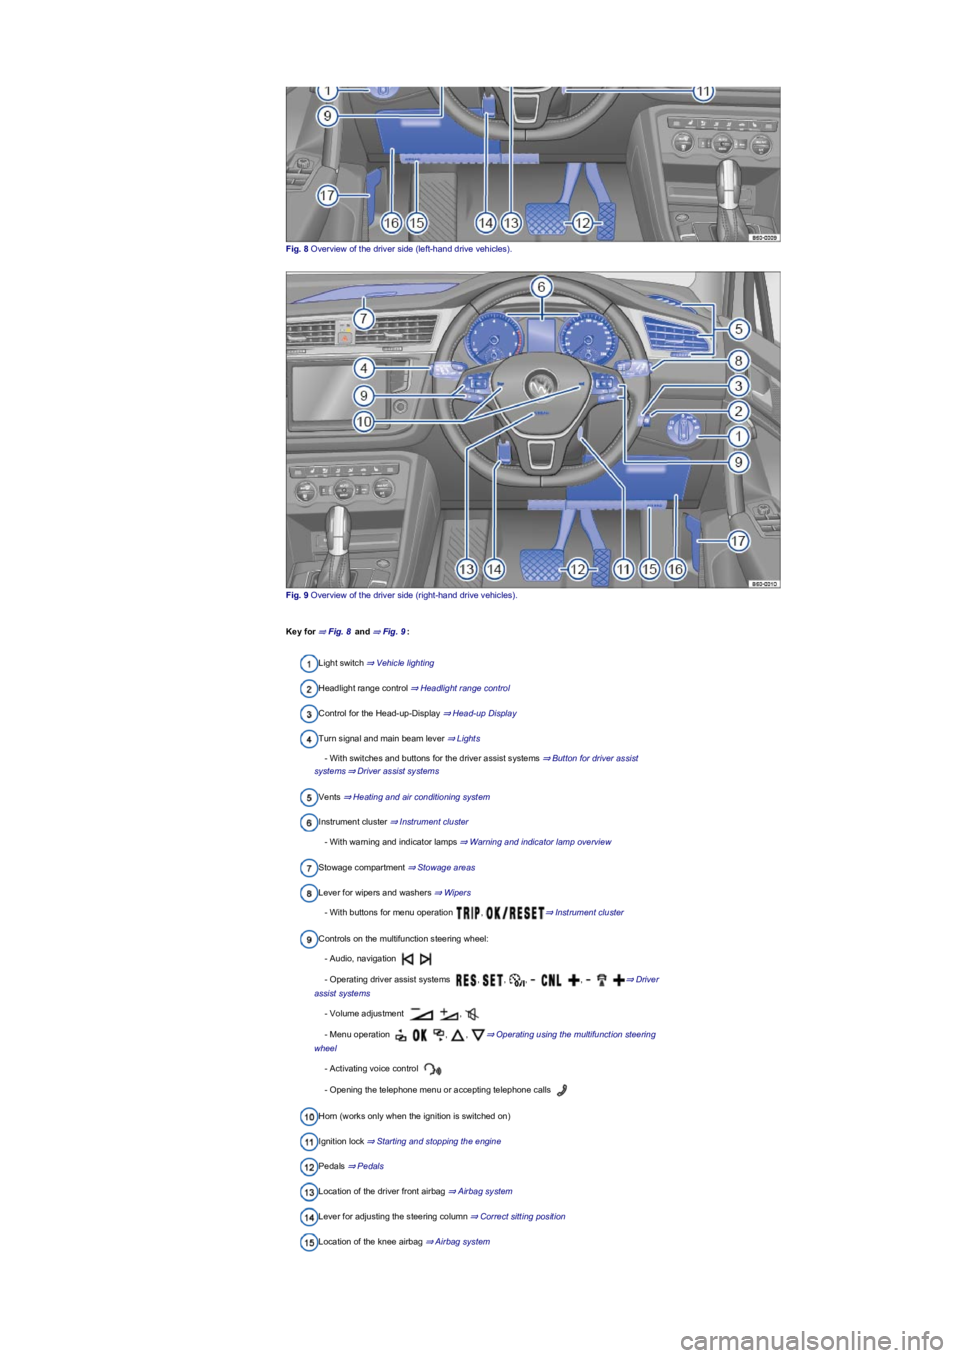
Fig. 8 Overview of the driver side (left-hand drive vehicles).
Fig. 9 Overview of the driver side (right-hand drive vehicles).
Key for ⇒ Fig. 8 and ⇒ Fig. 9:
Light switch ⇒ Vehicle lighting
Headlight range control ⇒ Headlight range control
Control for the Head-up-Display ⇒ Head-up Display
Turn signal and main beam lever ⇒ Lights
- With switches and buttons for the driver assist systems ⇒ Button for driver assist
systems⇒ Driver assist systems
Vents ⇒ Heating and air conditioning system
Instrument cluster ⇒ Instrument cluster
- With warning and indicator lamps ⇒ Warning and indicator lamp overview
Stowage compartment ⇒ Stowage areas
Lever for wipers and washers ⇒ Wipers
- With buttons for menu operation , ⇒ Instrument cluster
Controls on the multifunction steering wheel:
- Audio, navigation
- Operating driver assist systems , , , , ⇒ Driver
assist systems
- Volume adjustment ,
- Menu operation , , ⇒ Operating using the multifunction steering
wheel
- Activating voice control
- Opening the telephone menu or accepting telephone calls
Horn (works only when the ignition is switched on)
Ignition lock ⇒ Starting and stopping the engine
Pedals ⇒ Pedals
Location of the driver front airbag ⇒ Airbag system
Lever for adjusting the steering column ⇒ Correct sitting position
Location of the knee airbag ⇒ Airbag system
Page 10 of 341
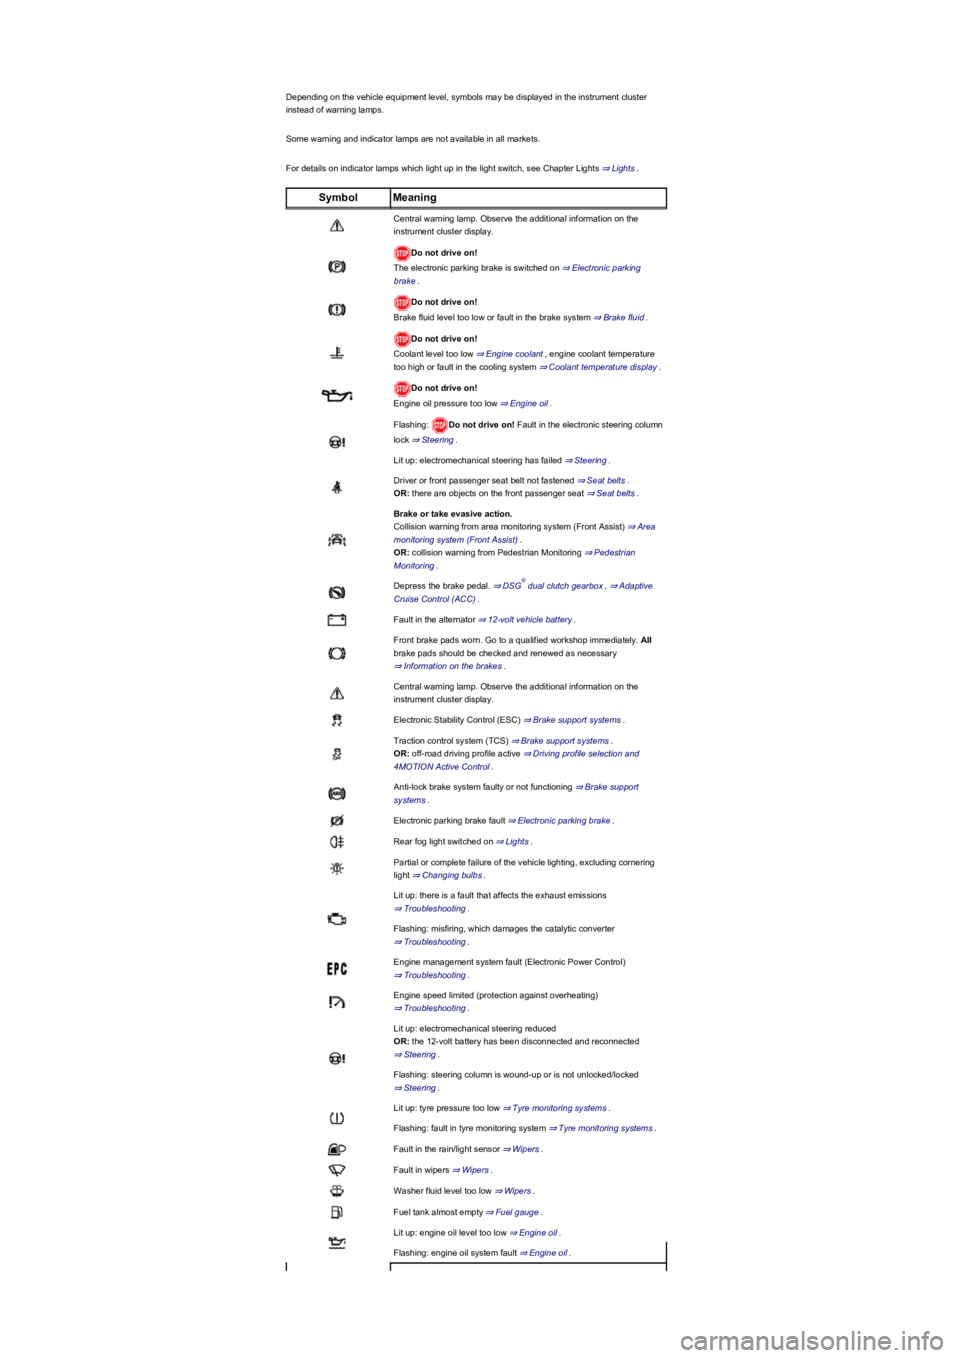
Depending on the vehicle equipment level, symbols may be displayed in the instrument cluster
instead of warning lamps.
Some warning and indicator lamps are not available in all markets.
For details on indicator lamps which light up in the light switch, see Chapter Lights ⇒ Lights.
SymbolMeaning
Central warning lamp. Observe the additional information on the
instrument cluster display.
Do not drive on!
The electronic parking brake is switched on ⇒ Electronic parking
brake.
Do not drive on!
Brake fluid level too low or fault in the brake system ⇒ Brake fluid.
Do not drive on!
Coolant level too low ⇒ Engine coolant, engine coolant temperature
too high or fault in the cooling system ⇒ Coolant temperature display.
Do not drive on!
Engine oil pressure too low ⇒ Engine oil.
Flashing: Do not drive on! Fault in the electronic steering column
lock ⇒ Steering.
Lit up: electromechanical steering has failed ⇒ Steering.
Driver or front passenger seat belt not fastened ⇒ Seat belts.
OR: there are objects on the front passenger seat ⇒ Seat belts.
Brake or take evasive action.
Collision warning from area monitoring system (Front Assist) ⇒ Area
monitoring system (Front Assist).
OR: collision warning from Pedestrian Monitoring ⇒ Pedestrian
Monitoring.
Depress the brake pedal. ⇒ DSG dual clutch gearbox, ⇒ Adaptive
Cruise Control (ACC).
Fault in the alternator ⇒ 12-volt vehicle battery.
Front brake pads worn. Go to a qualified workshop immediately. All
brake pads should be checked and renewed as necessary
⇒ Information on the brakes.
Central warning lamp. Observe the additional information on the
instrument cluster display.
Electronic Stability Control (ESC) ⇒ Brake support systems.
Traction control system (TCS) ⇒ Brake support systems.
OR: off-road driving profile active ⇒ Driving profile selection and
4MOTION Active Control.
Anti-lock brake system faulty or not functioning ⇒ Brake support
systems.
Electronic parking brake fault ⇒ Electronic parking brake.
Rear fog light switched on ⇒ Lights.
Partial or complete failure of the vehicle lighting, excluding cornering
light ⇒ Changing bulbs.
Lit up: there is a fault that affects the exhaust emissions
⇒ Troubleshooting.
Flashing: misfiring, which damages the catalytic converter
⇒ Troubleshooting.
Engine management system fault (Electronic Power Control)
⇒ Troubleshooting.
Engine speed limited (protection against overheating)
⇒ Troubleshooting.
Lit up: electromechanical steering reduced
OR: the 12-volt battery has been disconnected and reconnected
⇒ Steering.
Flashing: steering column is wound-up or is not unlocked/locked
⇒ Steering.
Lit up: tyre pressure too low ⇒ Tyre monitoring systems.
Flashing: fault in tyre monitoring system ⇒ Tyre monitoring systems.
Fault in the rain/light sensor ⇒ Wipers.
Fault in wipers ⇒ Wipers.
Washer fluid level too low ⇒ Wipers.
Fuel tank almost empty ⇒ Fuel gauge.
Lit up: engine oil level too low ⇒ Engine oil.
Flashing: engine oil system fault ⇒ Engine oil.
®
Page 14 of 341
Fuel gauge⇒ Fuel gauge.
Coolant temperature display ⇒ Coolant temperature display.
Current gear / selector lever position⇒ Manual gearbox: selecting a gear or ⇒ DSG
dual clutch gearbox.
Information profiles
To select a specific information profile, go to the Views menu option in the display of the instrument
cluster ⇒ Instrument cluster menus. The Active Info Display shows additional information in the
centre of the dials ⇒ Fig. 15② depending on the information profile you have selected. The
following information profiles are available:
•Classic. No additional information shown.
•Consumption and range. Current consumption is shown graphically and average consumption
is shown digitally in the rev counter. The remaining range is shown digitally in the speedometer.
•Efficiency. Average consumption is shown digitally and current consumption is shown
graphically in the rev counter. In the speedometer, the symbol is shown if the current
driving style is fuel-efficient, and a graphic display helps the driver save fuel.
•Navigation. If route guidance is active: the remaining distance to the set destination and an
estimated time of arrival are shown in the rev counter, and arrows to aid navigation are shown
in the speedometer. If route guidance is inactive: the current altitude is shown in the rev
counter, and a compass is shown in the speedometer.
•Driver assistance. Graphic representation of various driver assist systems, or digital display of
the driving time in the rev counter. The speedometer meanwhile shows arrow navigation or a
compass.
•Off-road. Digital display of the steering angle and compass display in the speedometer. With
active Hill Descent Control: graphic display of the Hill Descent Control with speed display in the
speedometer.
Navigation map in the Active Info Display
With some vehicle equipment levels, the Active Info Display is able to display a detailed map. To
display this map, select the Navigation menu item in the instrument cluster ⇒ Instrument cluster
menus.
The map can be shown in either of two sizes. If the larger version is selected, the Active Info
Display dials will be smaller. To select the preferred map size:
•Press the button on the multifunction steering wheel ⇒ Instrument cluster menus to
switch between map sizes as required.
•OR: press the or arrow button on the multifunction steering wheel to select the
required map size. A frame appears around the selected option.
•Confirm the selection by pressing the button on the multifunction steering wheel.
Depending on the equipment level, navigation is shown on two displays or only one. The navigation
map be displayed on the Active Info Display and Infotainment system or only on the Infotainment
system display. In the latter case, only navigation arrows are shown on the Active Info Display.
Changing up a gear early will help to save fuel and reduce engine noise.
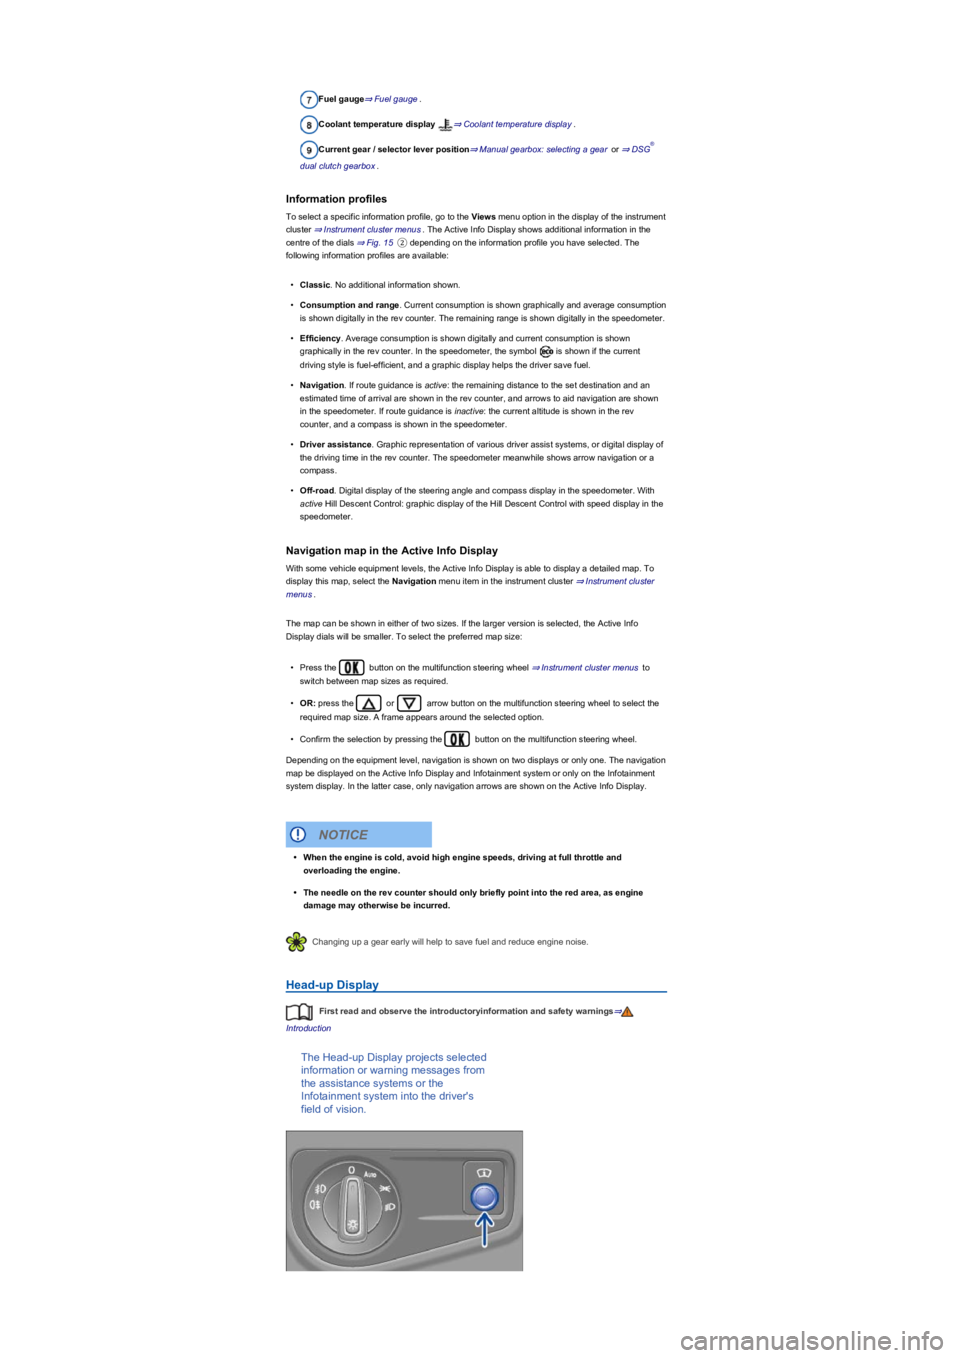
Head-up Display
First read and observe the introductoryinformation and safety warnings⇒
Introduction
The Head-up Display projects selected
information or warning messages from
the assistance systems or the
Infotainment system into the driver's
field of vision.
®
•When the engine is cold, avoid high engine speeds, driving at full throttle and
overloading the engine.
•The needle on the rev counter should only briefly point into the red area, as engine
damage may otherwise be incurred.
NOTICE
Page 15 of 341
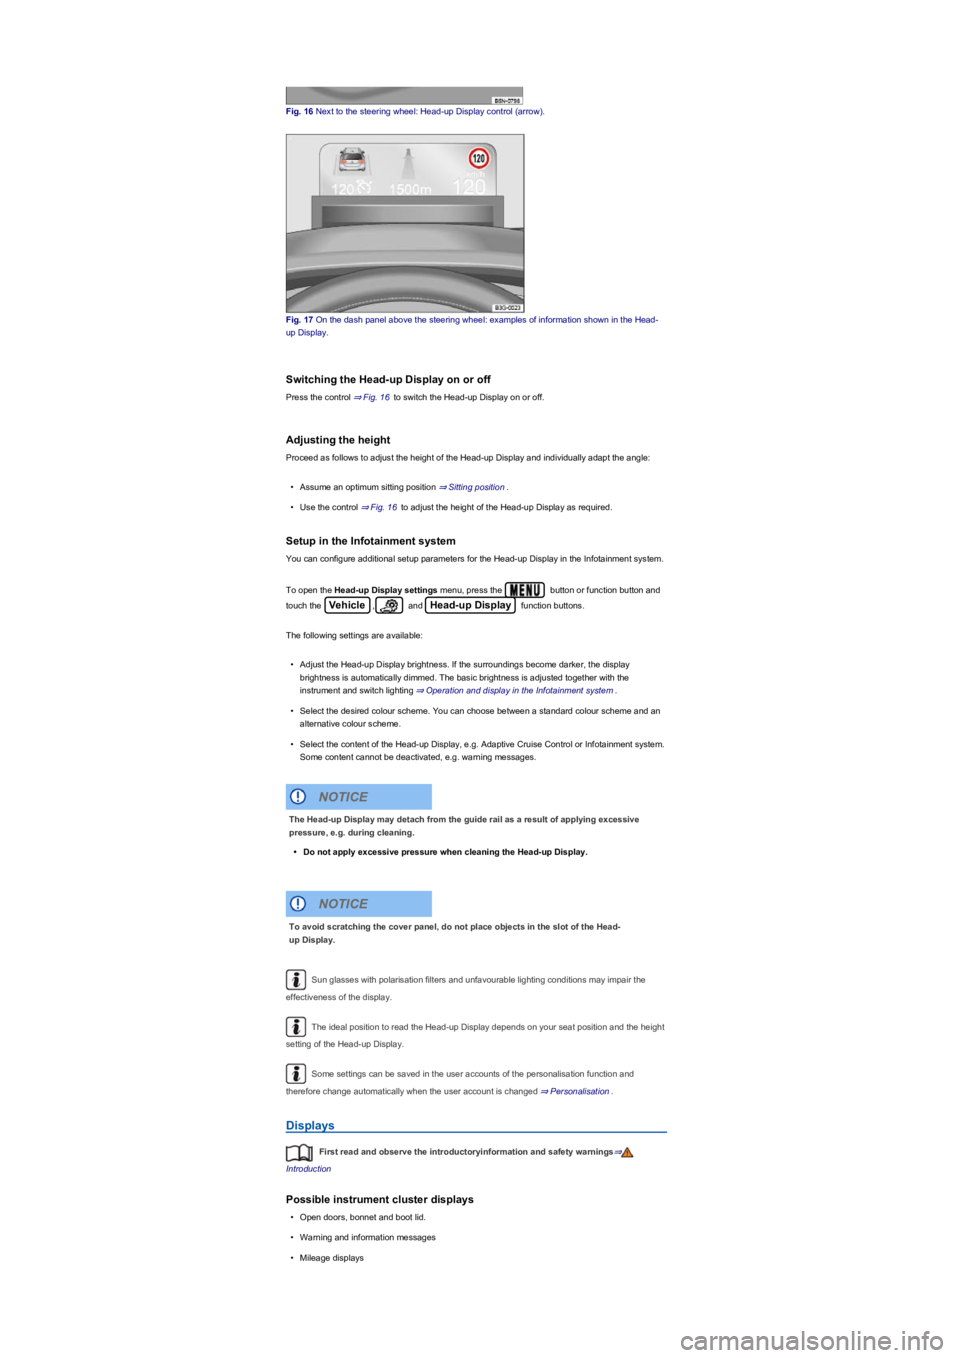
Fig. 16 Next to the steering wheel: Head-up Display control (arrow).
Fig. 17 On the dash panel above the steering wheel: examples of information shown in the Head-
up Display.
Switching the Head-up Display on or off
Press the control ⇒ Fig. 16 to switch the Head-up Display on or off.
Adjusting the height
Proceed as follows to adjust the height of the Head-up Display and individually adapt the angle:
•Assume an optimum sitting position ⇒ Sitting position.
•Use the control ⇒ Fig. 16 to adjust the height of the Head-up Display as required.
Setup in the Infotainment system
You can configure additional setup parameters for the Head-up Display in the Infotainment system.
To open the Head-up Display settings menu, press the button or function button and
touch the Vehicle, and Head-up Display function buttons.
The following settings are available:
•Adjust the Head-up Display brightness. If the surroundings become darker, the display
brightness is automatically dimmed. The basic brightness is adjusted together with the
instrument and switch lighting ⇒ Operation and display in the Infotainment system.
•Select the desired colour scheme. You can choose between a standard colour scheme and an
alternative colour scheme.
•Select the content of the Head-up Display, e.g. Adaptive Cruise Control or Infotainment system.
Some content cannot be deactivated, e.g. warning messages.
Sun glasses with polarisation filters and unfavourable lighting conditions may impair the
effectiveness of the display.
The ideal position to read the Head-up Display depends on your seat position and the height
setting of the Head-up Display.
Some settings can be saved in the user accounts of the personalisation function and
therefore change automatically when the user account is changed ⇒ Personalisation.
Displays
First read and observe the introductoryinformation and safety warnings⇒
Introduction
Possible instrument cluster displays
•Open doors, bonnet and boot lid.
•Warning and information messages
•Mileage displays
The Head-up Display may detach from the guide rail as a result of applying excessive
pressure, e.g. during cleaning.
•Do not apply excessive pressure when cleaning the Head-up Display.
NOTICE
To avoid scratching the cover panel, do not place objects in the slot of the Head-
up Display.
NOTICE
Page 18 of 341
Only in vehicles with an Active Info Display.
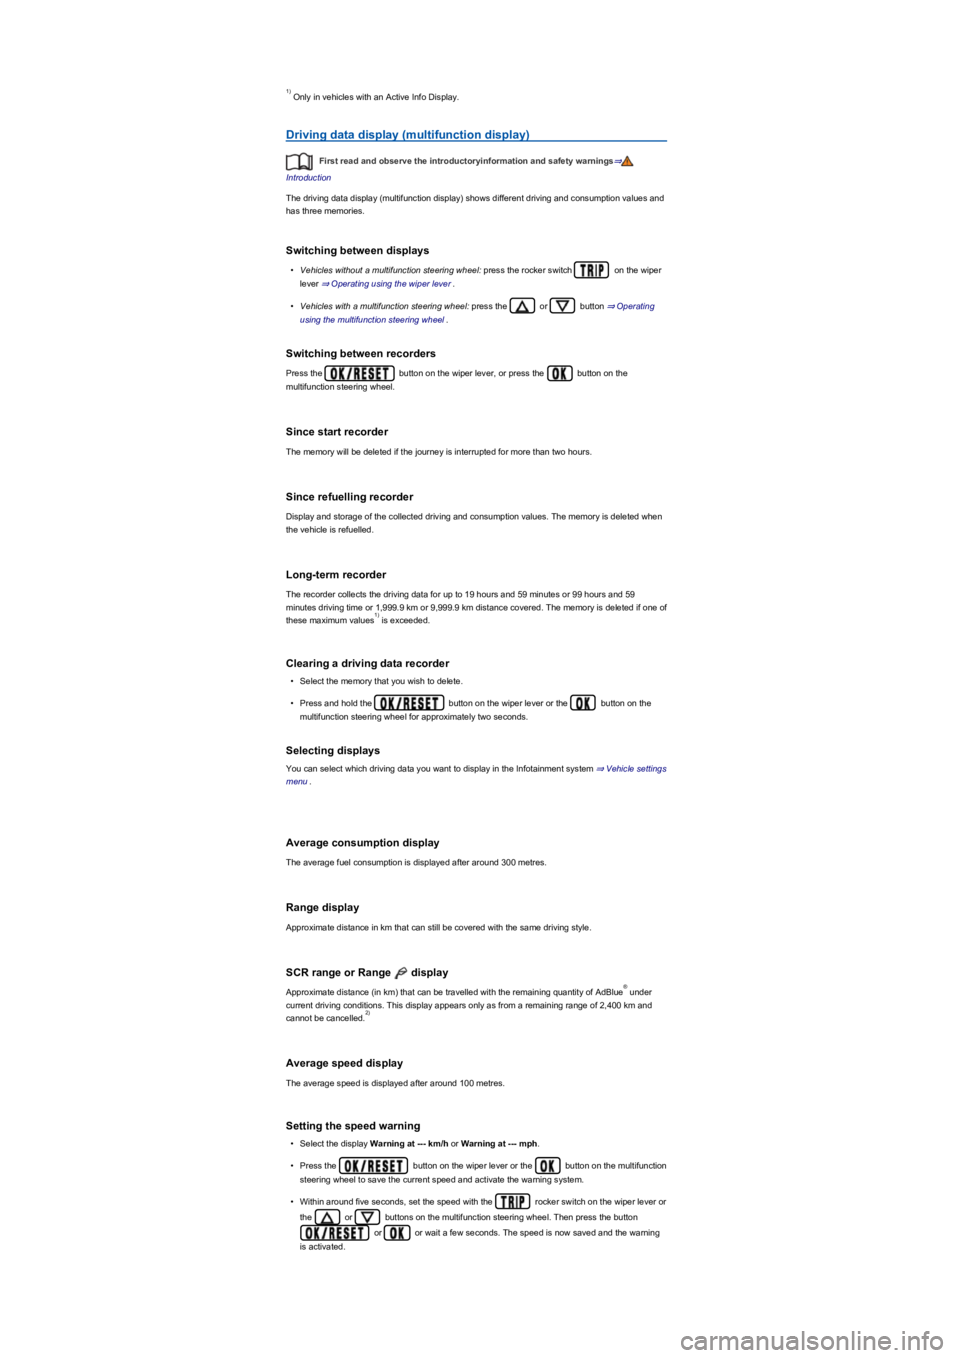
Driving data display (multifunction display)
First read and observe the introductoryinformation and safety warnings⇒
Introduction
The driving data display (multifunction display) shows different driving and consumption values and
has three memories.
Switching between displays
•Vehicles without a multifunction steering wheel: press the rocker switch on the wiper
lever ⇒ Operating using the wiper lever.
•Vehicles with a multifunction steering wheel: press the or button ⇒ Operating
using the multifunction steering wheel.
Switching between recorders
Press the button on the wiper lever, or press the button on the
multifunction steering wheel.
Since start recorder
The memory will be deleted if the journey is interrupted for more than two hours.
Since refuelling recorder
Display and storage of the collected driving and consumption values. The memory is deleted when
the vehicle is refuelled.
Long-term recorder
The recorder collects the driving data for up to 19 hours and 59 minutes or 99 hours and 59
minutes driving time or 1,999.9 km or 9,999.9 km distance covered. The memory is deleted if one of
these maximum values is exceeded.
Clearing a driving data recorder
•Select the memory that you wish to delete.
•Press and hold the button on the wiper lever or the button on the
multifunction steering wheel for approximately two seconds.
Selecting displays
You can select which driving data you want to display in the Infotainment system ⇒ Vehicle settings
menu.
Average consumption display
The average fuel consumption is displayed after around 300 metres.
Range display
Approximate distance in km that can still be covered with the same driving style.
SCR range or Range display
Approximate distance (in km) that can be travelled with the remaining quantity of AdBlue under
current driving conditions. This display appears only as from a remaining range of 2,400 km and
cannot be cancelled.
Average speed display
The average speed is displayed after around 100 metres.
Setting the speed warning
•Select the display Warning at --- km/h or Warning at --- mph.
•Press the button on the wiper lever or the button on the multifunction
steering wheel to save the current speed and activate the warning system.
•Within around five seconds, set the speed with the rocker switch on the wiper lever or
the or buttons on the multifunction steering wheel. Then press the button
or or wait a few seconds. The speed is now saved and the warning
is activated.
1)
1)
®
2)
Page 19 of 341
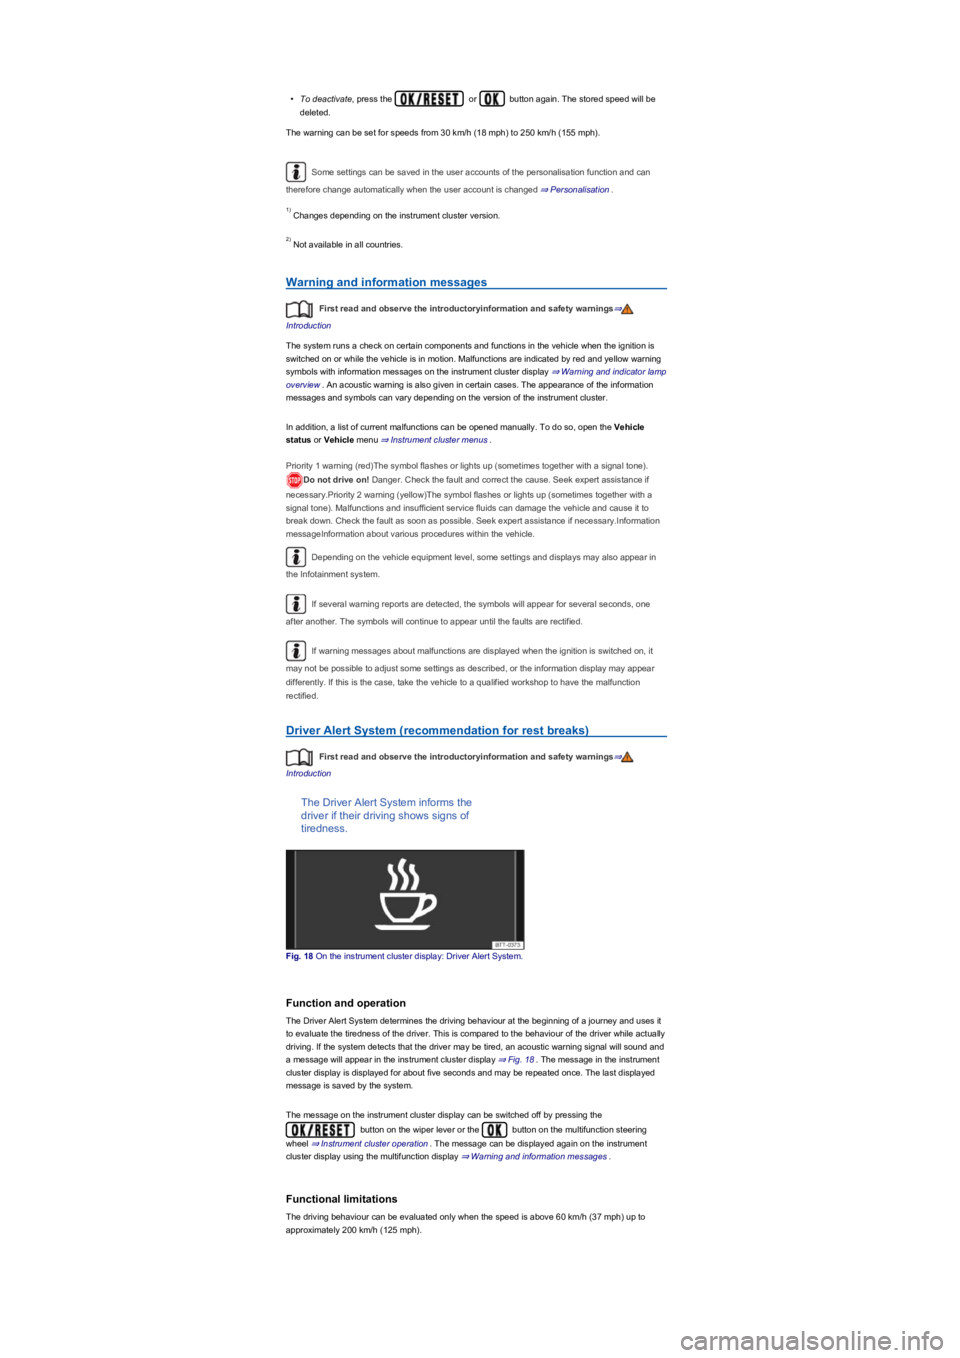
•To deactivate, press the or button again. The stored speed will be
deleted.
The warning can be set for speeds from 30 km/h (18 mph) to 250 km/h (155 mph).
Some settings can be saved in the user accounts of the personalisation function and can
therefore change automatically when the user account is changed ⇒ Personalisation.
Changes depending on the instrument cluster version.
Not available in all countries.
Warning and information messages
First read and observe the introductoryinformation and safety warnings⇒
Introduction
The system runs a check on certain components and functions in the vehicle when the ignition is
switched on or while the vehicle is in motion. Malfunctions are indicated by red and yellow warning
symbols with information messages on the instrument cluster display ⇒ Warning and indicator lamp
overview. An acoustic warning is also given in certain cases. The appearance of the information
messages and symbols can vary depending on the version of the instrument cluster.
In addition, a list of current malfunctions can be opened manually. To do so, open the Vehicle
status or Vehicle menu ⇒ Instrument cluster menus.
Priority 1 warning (red)The symbol flashes or lights up (sometimes together with a signal tone).
Do not drive on! Danger. Check the fault and correct the cause. Seek expert assistance if
necessary.Priority 2 warning (yellow)The symbol flashes or lights up (sometimes together with a
signal tone). Malfunctions and insufficient service fluids can damage the vehicle and cause it to
break down. Check the fault as soon as possible. Seek expert assistance if necessary.Information
messageInformation about various procedures within the vehicle.
Depending on the vehicle equipment level, some settings and displays may also appear in
the Infotainment system.
If several warning reports are detected, the symbols will appear for several seconds, one
after another. The symbols will continue to appear until the faults are rectified.
If warning messages about malfunctions are displayed when the ignition is switched on, it
may not be possible to adjust some settings as described, or the information display may appear
differently. If this is the case, take the vehicle to a qualified workshop to have the malfunction
rectified.
Driver Alert System (recommendation for rest breaks)
First read and observe the introductoryinformation and safety warnings⇒
Introduction
The Driver Alert System informs the
driver if their driving shows signs of
tiredness.
Fig. 18 On the instrument cluster display: Driver Alert System.
Function and operation
The Driver Alert System determines the driving behaviour at the beginning of a journey and uses it
to evaluate the tiredness of the driver. This is compared to the behaviour of the driver while actually
driving. If the system detects that the driver may be tired, an acoustic warning signal will sound and
a message will appear in the instrument cluster display ⇒ Fig. 18. The message in the instrument
cluster display is displayed for about five seconds and may be repeated once. The last displayed
message is saved by the system.
The message on the instrument cluster display can be switched off by pressing the
button on the wiper lever or the button on the multifunction steering
wheel ⇒ Instrument cluster operation. The message can be displayed again on the instrument
cluster display using the multifunction display ⇒ Warning and information messages.
Functional limitations
The driving behaviour can be evaluated only when the speed is above 60 km/h (37 mph) up to
approximately 200 km/h (125 mph).
1)
2)
Page 23 of 341
•Once you have set the hour, wait until the minutes display in the instrument cluster is marked.
•Then press the button repeatedly until the required minute is displayed. Press and hold
the button to scroll through quickly.
•Release the button to finish setting the clock.
The analogue clock adjusts itself a few seconds after ignition is switched on.
You can also use the Infotainment system to adjust the time ⇒ Vehicle settings menu.
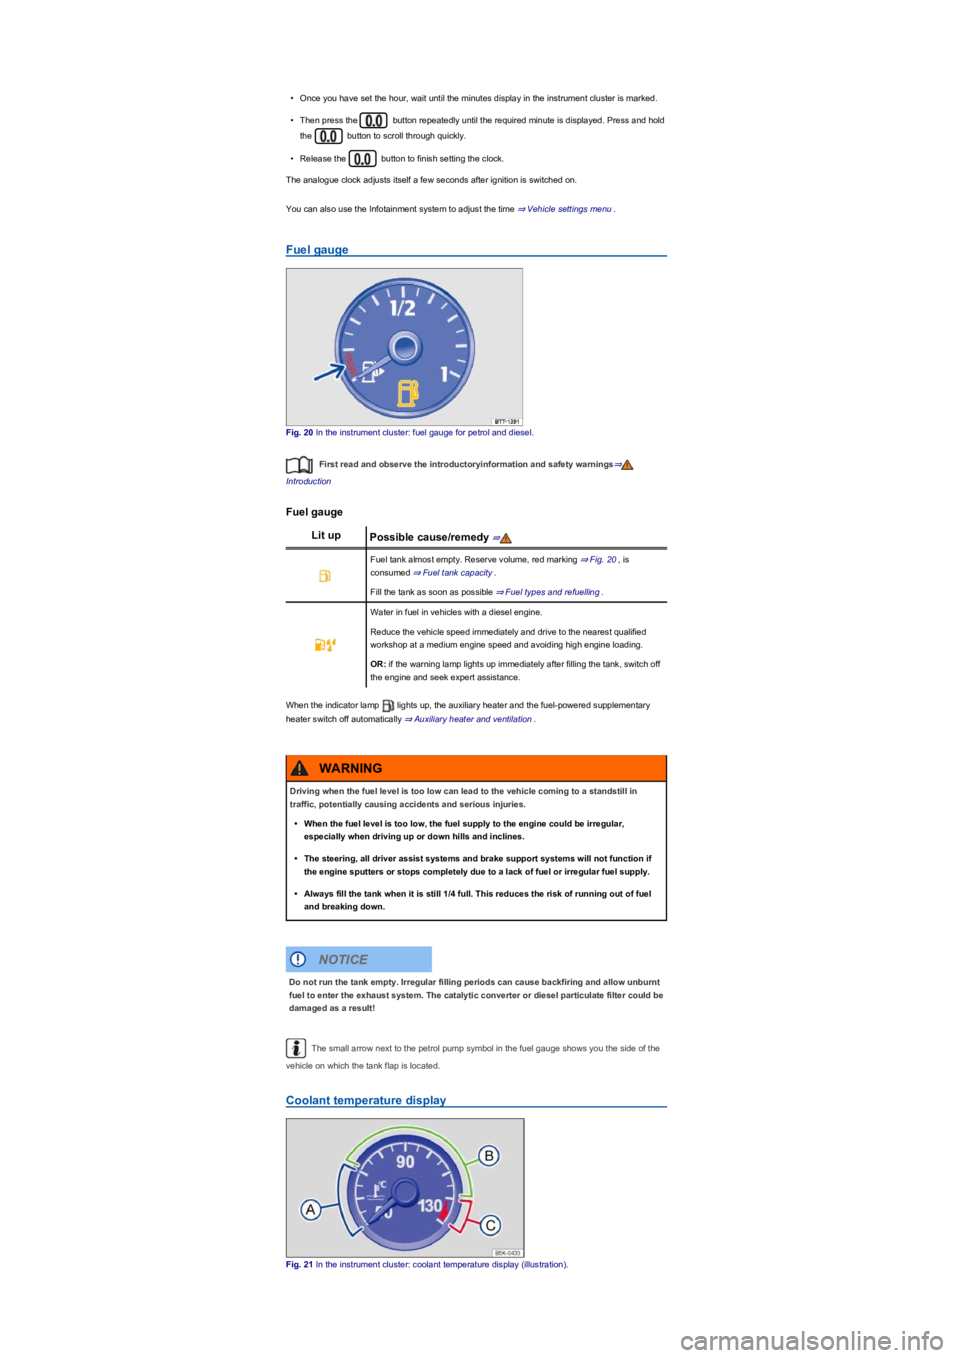
Fuel gauge
Fig. 20 In the instrument cluster: fuel gauge for petrol and diesel.
First read and observe the introductoryinformation and safety warnings⇒
Introduction
Fuel gauge
Lit upPossible cause/remedy ⇒
Fuel tank almost empty. Reserve volume, red marking ⇒ Fig. 20, is
consumed ⇒ Fuel tank capacity.
Fill the tank as soon as possible ⇒ Fuel types and refuelling.
Water in fuel in vehicles with a diesel engine.
Reduce the vehicle speed immediately and drive to the nearest qualified
workshop at a medium engine speed and avoiding high engine loading.
OR: if the warning lamp lights up immediately after filling the tank, switch off
the engine and seek expert assistance.
When the indicator lamp lights up, the auxiliary heater and the fuel-powered supplementary
heater switch off automatically ⇒ Auxiliary heater and ventilation.
The small arrow next to the petrol pump symbol in the fuel gauge shows you the side of the
vehicle on which the tank flap is located.
Coolant temperature display
Fig. 21 In the instrument cluster: coolant temperature display (illustration).
Driving when the fuel level is too low can lead to the vehicle coming to a standstill in
traffic, potentially causing accidents and serious injuries.
•When the fuel level is too low, the fuel supply to the engine could be irregular,
especially when driving up or down hills and inclines.
•The steering, all driver assist systems and brake support systems will not function if
the engine sputters or stops completely due to a lack of fuel or irregular fuel supply.
•Always fill the tank when it is still 1/4 full. This reduces the risk of running out of fuel
and breaking down.
WARNING
Do not run the tank empty. Irregular filling periods can cause backfiring and allow unburnt
fuel to enter the exhaust system. The catalytic converter or diesel particulate filter could be
damaged as a result!
NOTICE
Page 25 of 341
taken into account. The service reminder is displayed 30 days before the service is due. The
distance is rounded to the nearest 100 km; the remaining time is rounded to full days.
Service alert
If a service or inspection is due soon, a service alert will appear when the ignition is switched on.
The number of kilometres or amount of time shown correspond to the maximum number of
kilometres or maximum time that can still be driven before the next service.
Service event
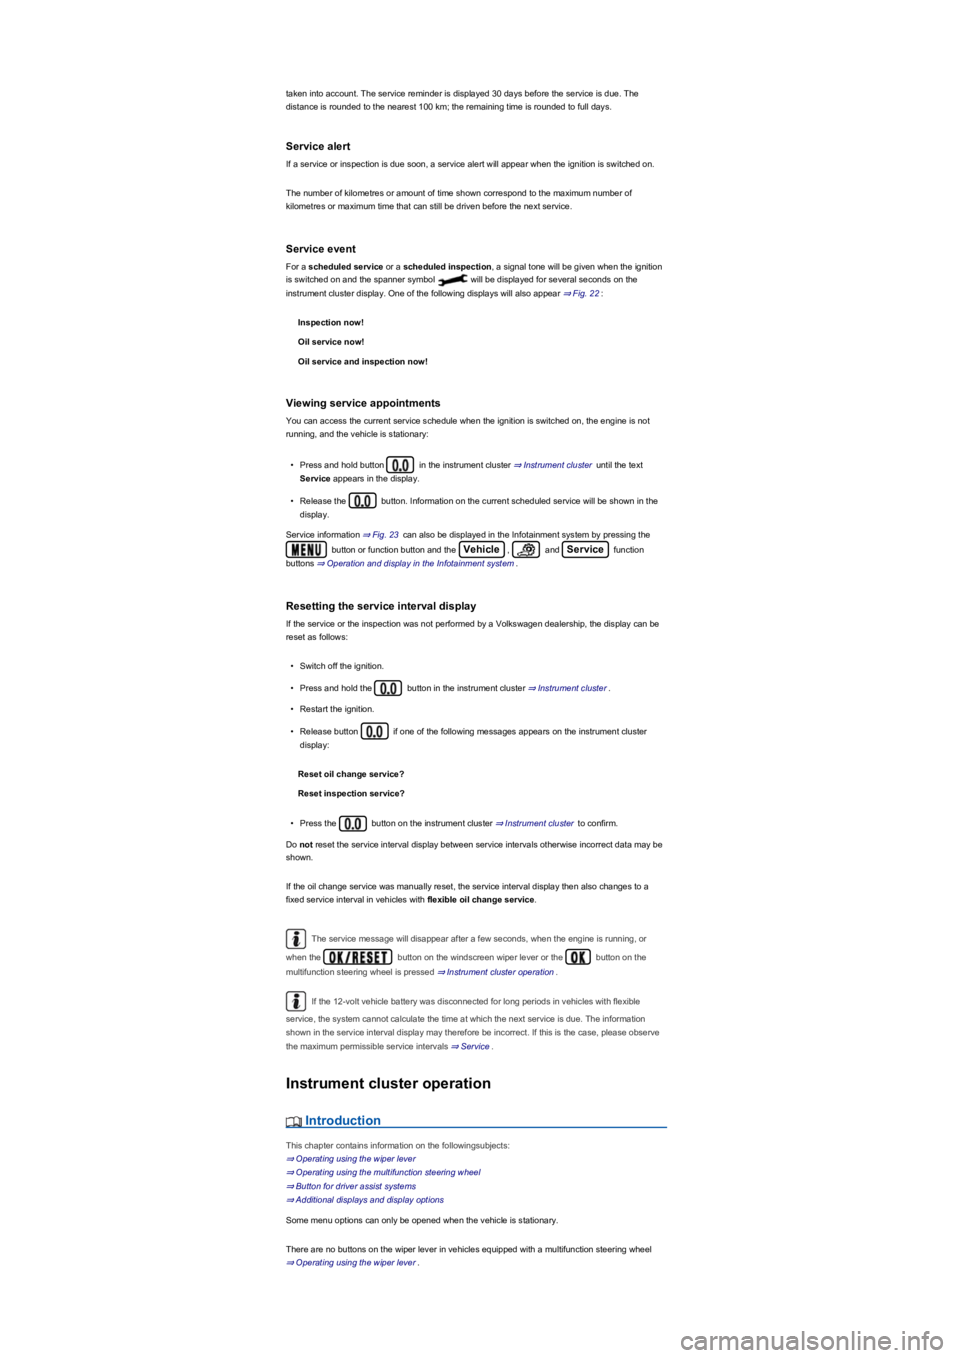
For a scheduled service or a scheduled inspection, a signal tone will be given when the ignition
is switched on and the spanner symbol will be displayed for several seconds on the
instrument cluster display. One of the following displays will also appear ⇒ Fig. 22:
Inspection now!
Oil service now!
Oil service and inspection now!
Viewing service appointments
You can access the current service schedule when the ignition is switched on, the engine is not
running, and the vehicle is stationary:
•Press and hold button in the instrument cluster ⇒ Instrument cluster until the text
Service appears in the display.
•Release the button. Information on the current scheduled service will be shown in the
display.
Service information ⇒ Fig. 23 can also be displayed in the Infotainment system by pressing the
button or function button and the Vehicle, and Service function
buttons ⇒ Operation and display in the Infotainment system.
Resetting the service interval display
If the service or the inspection was not performed by a Volkswagen dealership, the display can be
reset as follows:
•Switch off the ignition.
•Press and hold the button in the instrument cluster ⇒ Instrument cluster.
•Restart the ignition.
•Release button if one of the following messages appears on the instrument cluster
display:
Reset oil change service?
Reset inspection service?
•Press the button on the instrument cluster ⇒ Instrument cluster to confirm.
Do not reset the service interval display between service intervals otherwise incorrect data may be
shown.
If the oil change service was manually reset, the service interval display then also changes to a
fixed service interval in vehicles with flexible oil change service.
The service message will disappear after a few seconds, when the engine is running, or
when the button on the windscreen wiper lever or the button on the
multifunction steering wheel is pressed ⇒ Instrument cluster operation.
If the 12-volt vehicle battery was disconnected for long periods in vehicles with flexible
service, the system cannot calculate the time at which the next service is due. The information
shown in the service interval display may therefore be incorrect. If this is the case, please observe
the maximum permissible service intervals ⇒ Service.
Instrument cluster operation
Introduction
This chapter contains information on the followingsubjects:
⇒ Operating using the wiper lever
⇒ Operating using the multifunction steering wheel
⇒ Button for driver assist systems
⇒ Additional displays and display options
Some menu options can only be opened when the vehicle is stationary.
There are no buttons on the wiper lever in vehicles equipped with a multifunction steering wheel
⇒ Operating using the wiper lever.
Page 26 of 341
Check the system settings after charging or replacing the 12-volt vehicle battery. System
settings may be adjusted or deleted if the power supply is interrupted.
Operating using the wiper lever
Fig. 24 On the right of the steering column: buttons on the wiper lever (illustration).
First read and observe the introductoryinformation and safety warnings⇒
Introduction
If any priority 1 ⇒ Instrument cluster warnings are displayed, you will be unable to open any
menus. Some warnings can be confirmed and hidden with the ⇒ Fig. 24① button.
Selecting a menu or information display
•Switch on the ignition.
•Personalisation: select user.
•If a message or vehicle pictogram is displayed, press the ⇒ Fig. 24① button, several times if
necessary.
•To display the menus ⇒ Instrument cluster menus or to return from a menu or an information
display to the menu selection, hold down the rocker switch ⇒ Fig. 24②.
•To browse through the menus, press the rocker switch up or down.
•To open the displayed menu or information display, press the ⇒ Fig. 24① button or wait until
the menu or information display opens automatically after a few seconds.
Making settings in menus
•In the displayed menu, press the rocker switch ⇒ Fig. 24② up or down until the desired menu
option is marked. A frame appears around the selected option.
•Press button ⇒ Fig. 24① to make the necessary change. A tick indicates that the particular
system or function is active.
Returning to the selection menu
Select the menu option Back in each case to leave the current menu.
If warning messages about malfunctions are displayed when the ignition is switched on, it
may not be possible to adjust some settings as described, or the information display may appear
differently. If this is the case, take the vehicle to a qualified workshop to have the malfunction
rectified.
Operating using the multifunction steering wheel
Fig. 25 Right-hand side of the multifunction steering wheel: controls for using the menus and
information displays in the instrument cluster.
First read and observe the introductoryinformation and safety warnings⇒
Introduction
Accidents and injuries can occur if the driver is distracted.
•Never operate the menus on the instrument cluster display while the vehicle is in
motion.
WARNING
Page 27 of 341
If any priority 1 ⇒ Instrument cluster warning reports are being displayed, you will be unable to
open any menus. Some warnings can be confirmed and switched off with the button on the
multifunction steering wheel ⇒ Fig. 25.
Selecting a menu or information display
•Switch on the ignition.
•Personalisation: select user.
•If a message or the vehicle pictogram is displayed, press the button ⇒ Fig. 25, several
times if required.
•Press the or button to display a menu or browse through a menu ⇒ Fig. 25.
•To open the menu or information display, press ⇒ Fig. 25 or wait until the menu or
information display opens automatically after a few seconds.
Making settings in menus
•In the displayed menu, press the arrow keys or ⇒ Fig. 25 until the desired menu
option is marked. A frame appears around the selected option.
•Press button ⇒ Fig. 25 to make the necessary change. A tick indicates that the
particular system or function is active.
Returning to the selection menu
Press the or button ⇒ Fig. 25.
If warning messages about malfunctions are displayed when the ignition is switched on, it
may not be possible to adjust some settings as described, or the information display may appear
differently. If this is the case, take the vehicle to a qualified workshop to have the malfunction
rectified.
Button for driver assist systems
Fig. 26 On the turn signal and main beam lever on the left of the steering column: button for driver
assist systems.
First read and observe the introductoryinformation and safety warnings⇒
Introduction
You can switch the driver assist systems listed in the Assist systems menu ⇒ Instrument cluster
on and off using the button on the turn signal and main beam lever.
Switching individual driver assist systems on and off
•Press the button ⇒ Fig. 26 in the direction of the arrow to open the Assist systems menu.
•Select the driver assist system and switch it on or off ⇒ Instrument cluster operation. A tick
indicates that a driver assist system is switched on.
•Then confirm your selection by pressing the button on the wiper lever, or by
pressing the button on the multifunction steering wheel.
Driver assist systems can also be switched on and off in the Infotainment system by pressing the
button and the Vehicle, and Driver assistance function buttons
⇒ Operation and display in the Infotainment system.
Additional displays and display options
First read and observe the introductoryinformation and safety warnings⇒
Introduction
Assist systems menu:
MenuFunction
Lane AssistSwitching the lane keeping system (Lane Assist) on or off
⇒ Lane keeping system (Lane Assist).
Front AssistSwitching the area monitoring system (Front Assist) on and off
⇒ Area monitoring system (Front Assist).